Instruction Manual
Page 3
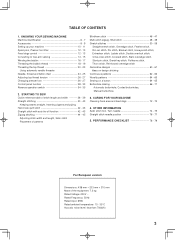
... KNOWING YOUR SEWING MACHINE Machine identification 6 - 7 Accessories 8 - 9 Setting up your machine 10 - 11 Spool pins, Presser foot lifter 12 - 13 Feed dogs control 12 - 13 Converting to free-arm sewing 14 - 15 Winding the bobbin 16 - 17 Threading the bobbin thread 18 - 19 Threading the top thread 20 - 23 Using automatic needle threader Needle, thread and fabric chart 24 - 25 Adjusting top thread tension 26 - 27 Changing presser foot 26 - 27 Control panel function 28 - 33 Reverse operation switch 34 - 35 2. STARTING TO SEW Quick reference table of stitch length and width...
... KNOWING YOUR SEWING MACHINE Machine identification 6 - 7 Accessories 8 - 9 Setting up your machine 10 - 11 Spool pins, Presser foot lifter 12 - 13 Feed dogs control 12 - 13 Converting to free-arm sewing 14 - 15 Winding the bobbin 16 - 17 Threading the bobbin thread 18 - 19 Threading the top thread 20 - 23 Using automatic needle threader Needle, thread and fabric chart 24 - 25 Adjusting top thread tension 26 - 27 Changing presser foot 26 - 27 Control panel function 28 - 33 Reverse operation switch 34 - 35 2. STARTING TO SEW Quick reference table of stitch length and width...
Instruction Manual
Page 6
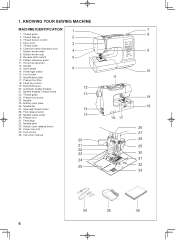
... bar 27. Bobbin cover release button 34. Face cover 5. Bobbin winder stop 9. Needle 25. Alternate Thread Cutter 28. KNOWING YOUR SEWING MACHINE MACHINE IDENTIFICATION 1. Reverse stitch switch 10. Handle 13. Identification plate 17. Presser foot lifter 18. Foot release button 29. Pattern reference guide 11. Power/light switch 15. Needle threader Thread Guide 22. Hand wheel 14. Presser foot screw 24. Presser foot 31. Feed dogs 32. Thread guide 2. Horizontal spool pin 12. 1. Cord socket 16. Buttonhole lever 20. Needle plate 33. Needle clamp...
... bar 27. Bobbin cover release button 34. Face cover 5. Bobbin winder stop 9. Needle 25. Alternate Thread Cutter 28. KNOWING YOUR SEWING MACHINE MACHINE IDENTIFICATION 1. Reverse stitch switch 10. Handle 13. Identification plate 17. Presser foot lifter 18. Foot release button 29. Pattern reference guide 11. Power/light switch 15. Needle threader Thread Guide 22. Hand wheel 14. Presser foot screw 24. Presser foot 31. Feed dogs 32. Thread guide 2. Horizontal spool pin 12. 1. Cord socket 16. Buttonhole lever 20. Needle plate 33. Needle clamp...
Instruction Manual
Page 10
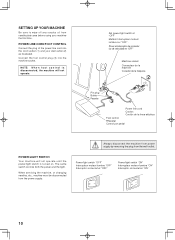
... the cord socket (1) and your machine the first time. NOTE: W h e n f o o t c o n t r o l i s disconnected, the machine will not operate until the power/light switch is turned on. The same switch controls both the power and the light. Always disconnect the machine from power supply by removing the plug from needle plate area before using your wall outlet (2) as illustrated. When servicing the machine, or changing needles, etc., machine must be disconnected from the power supply. Power/light...
... the cord socket (1) and your machine the first time. NOTE: W h e n f o o t c o n t r o l i s disconnected, the machine will not operate until the power/light switch is turned on. The same switch controls both the power and the light. Always disconnect the machine from power supply by removing the plug from needle plate area before using your wall outlet (2) as illustrated. When servicing the machine, or changing needles, etc., machine must be disconnected from the power supply. Power/light...
Instruction Manual
Page 18
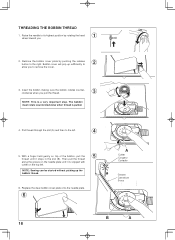
... groove on the needle plate until it is snipped with cutter on top of the bobbin, pull the 5 thread until it stops in the slot (B). Insert the bobbin making sure the bobbin rotates counterclockwise when you pull the thread. 3 NOTE: This is pulled. 4. Replace the clear bobbin cover plate onto the needle plate. 6 A Cutter Coupeur Cortador Groove Cannelure Surco B A 18 THREADING THE BOBBIN THREAD 1. NOTE: Sewing can be started without picking up...
... groove on the needle plate until it is snipped with cutter on top of the bobbin, pull the 5 thread until it stops in the slot (B). Insert the bobbin making sure the bobbin rotates counterclockwise when you pull the thread. 3 NOTE: This is pulled. 4. Replace the clear bobbin cover plate onto the needle plate. 6 A Cutter Coupeur Cortador Groove Cannelure Surco B A 18 THREADING THE BOBBIN THREAD 1. NOTE: Sewing can be started without picking up...
Instruction Manual
Page 20
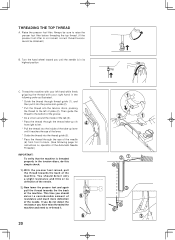
... the following page for instructions on operation of the Automatic Needle Threader.) IMPORTANT: To verify that the machine is threaded properly in its highest position C. Turn the hand wheel toward you should detect only a slight resistance and little or no deflection of the needle. 2.) Now lower the presser foot and again pull the thread towards the back of the needle. This time you until it...
... the following page for instructions on operation of the Automatic Needle Threader.) IMPORTANT: To verify that the machine is threaded properly in its highest position C. Turn the hand wheel toward you should detect only a slight resistance and little or no deflection of the needle. 2.) Now lower the presser foot and again pull the thread towards the back of the needle. This time you until it...
Instruction Manual
Page 24
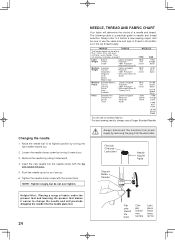
... 100% Polyester * Mercerized Size 50 Nylon Medium- Push the needle up as far as it downward. 4. Light- FABRICS THREAD The fabrics below can go. 6. NEEDLE, THREAD AND FABRIC CHART Your fabric will preclude dropping the needle into the needle clamp with the screw driver. Raise the needle bar to needle and thread selection. Changing the needle 1. Remove the needle by removing the plug from the wall-outlet. And be of weight. Always refer to use a Singer Branded Needle.
... 100% Polyester * Mercerized Size 50 Nylon Medium- Push the needle up as far as it downward. 4. Light- FABRICS THREAD The fabrics below can go. 6. NEEDLE, THREAD AND FABRIC CHART Your fabric will preclude dropping the needle into the needle clamp with the screw driver. Raise the needle bar to needle and thread selection. Changing the needle 1. Remove the needle by removing the plug from the wall-outlet. And be of weight. Always refer to use a Singer Branded Needle.
Instruction Manual
Page 26
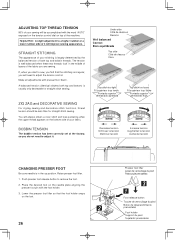
... desireable for straight stitch sewing. You will need to adjust the tension control. Lower the presser foot lifter so that the stitching is irregular, you will always obtain a nicer stitch and less puckering when the upper thread appears on the needle plate aligning the presser foot pin with the foot holder. 3. Place the desired foot on the bottom side of the machine. Push presser foot release button to a higher number or a lower number side of your fabric. The tension is in...
... desireable for straight stitch sewing. You will need to adjust the tension control. Lower the presser foot lifter so that the stitching is irregular, you will always obtain a nicer stitch and less puckering when the upper thread appears on the needle plate aligning the presser foot pin with the foot holder. 3. Place the desired foot on the bottom side of the machine. Push presser foot release button to a higher number or a lower number side of your fabric. The tension is in...
Instruction Manual
Page 30
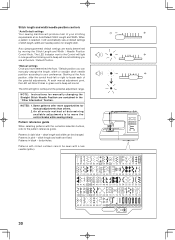
... selection buttons, refer to the pattern reference guide. Patterns in dark blue - buttonholes. Stitch length and width/needle position controls *Auto/Default settings Your sewing machine will produce most of your preference. NOTES: 1. Auto (preprogrammed) default settings are contained in the "Other Information" Section. Patterns in pink - Some patterns offer more opportunities for manually changing the Straight Stitch Needle Position are easily determined by moving the Stitch Length and Width / Needle Position Control Knob. NOTE: Instructions for manual adjustments than...
... selection buttons, refer to the pattern reference guide. Patterns in dark blue - buttonholes. Stitch length and width/needle position controls *Auto/Default settings Your sewing machine will produce most of your preference. NOTES: 1. Auto (preprogrammed) default settings are contained in the "Other Information" Section. Patterns in pink - Some patterns offer more opportunities for manually changing the Straight Stitch Needle Position are easily determined by moving the Stitch Length and Width / Needle Position Control Knob. NOTE: Instructions for manual adjustments than...
Instruction Manual
Page 40
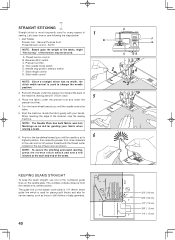
... the fabric, slight "fine tuning" of 1 sewing. Stitch length control G. The numbers indicate distance from the needle at the start and end of the numbered guide lines on the bobbin cover plate is 1/4" (6mm) seam guide line which is used for piecing quilt blocks and also for narrow seams, such as an aid for every aspect of the tension may be desired. Needle stop the sewing machine. Guide the fabric gently with the thread cutter located...
... the fabric, slight "fine tuning" of 1 sewing. Stitch length control G. The numbers indicate distance from the needle at the start and end of the numbered guide lines on the bobbin cover plate is 1/4" (6mm) seam guide line which is used for piecing quilt blocks and also for narrow seams, such as an aid for every aspect of the tension may be desired. Needle stop the sewing machine. Guide the fabric gently with the thread cutter located...
Instruction Manual
Page 42
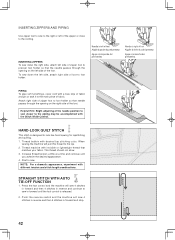
... needle position to sew closer to presser foot holder so that matches your fabric. NOTE: For a dramatic appearance, experiment with the Stitch Width Control. INSERTING ZIPPERS To sew down the left side, attach right side of foot to sew. When sewing the machine will sew 4 stitches in reverse and then 4 stitches in forward until you acheive the desired appearance. 4. Push the reverse switch and the machine will pull this thread to the cording. INSERTING ZIPPERS AND PIPING Use zipper foot...
... needle position to sew closer to presser foot holder so that matches your fabric. NOTE: For a dramatic appearance, experiment with the Stitch Width Control. INSERTING ZIPPERS To sew down the left side, attach right side of foot to sew. When sewing the machine will sew 4 stitches in reverse and then 4 stitches in forward until you acheive the desired appearance. 4. Push the reverse switch and the machine will pull this thread to the cording. INSERTING ZIPPERS AND PIPING Use zipper foot...
Instruction Manual
Page 44
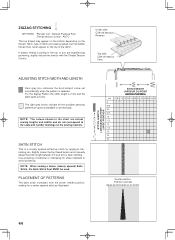
.... making for satin stitching. ZIGZAG STITCHING SETTINGS :Presser foot - Under side Côté de dessous Reverso Top side Côté de dessus Cara ADJUSTING STITCH WIDTH AND LENGTH Dark grey box indicates the Auto/default value set manualy. SATIN STITCH This is 5 mm. Slightly loosen the top thread tension and manually adjust the stitch length between 0.5 and 2.0 for a center tapered stitch as illustrated. PLACEMENT OF PATTERNS The satin stitch increases from the center needle position; Use a backing...
.... making for satin stitching. ZIGZAG STITCHING SETTINGS :Presser foot - Under side Côté de dessous Reverso Top side Côté de dessus Cara ADJUSTING STITCH WIDTH AND LENGTH Dark grey box indicates the Auto/default value set manualy. SATIN STITCH This is 5 mm. Slightly loosen the top thread tension and manually adjust the stitch length between 0.5 and 2.0 for a center tapered stitch as illustrated. PLACEMENT OF PATTERNS The satin stitch increases from the center needle position; Use a backing...
Instruction Manual
Page 46
... the foot. NOTE: In addition to sew blind hems. Always make a sewing test first. 4 Top side Cara Endroit 46 On medium to the 3 left. Turn the handwheel towards you by hand until the needle swings fully to heavyweight fabrics overcast the fabric's raw edge. 2. Sew slowly, guiding the fabric carefully along the edge of the fabric. When completed, the stitching is primarily used . The stitch width control changes...
... the foot. NOTE: In addition to sew blind hems. Always make a sewing test first. 4 Top side Cara Endroit 46 On medium to the 3 left. Turn the handwheel towards you by hand until the needle swings fully to heavyweight fabrics overcast the fabric's raw edge. 2. Sew slowly, guiding the fabric carefully along the edge of the fabric. When completed, the stitching is primarily used . The stitch width control changes...
Instruction Manual
Page 48
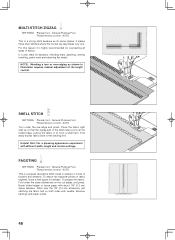
..., patching, sewing towelling, patch-work and attaching flat elastic. FAGOTING SETTINGS :Presser foot - Stitch over the folded edge, pulling the fabric in to form a shell hem. press. 48 AUTO Turn under the seam allowances on both sides with different width, length and tension settings. For this reason it makes three short stitches where the normal zig-zag makes only one. General Purpose Foot :Thread tension control - Helpful Hint: For a pleasing appearance experiment with needle. MULTI-STITCH ZIGZAG SETTINGS :Presser foot -
..., patching, sewing towelling, patch-work and attaching flat elastic. FAGOTING SETTINGS :Presser foot - Stitch over the folded edge, pulling the fabric in to form a shell hem. press. 48 AUTO Turn under the seam allowances on both sides with different width, length and tension settings. For this reason it makes three short stitches where the normal zig-zag makes only one. General Purpose Foot :Thread tension control - Helpful Hint: For a pleasing appearance experiment with needle. MULTI-STITCH ZIGZAG SETTINGS :Presser foot -
Instruction Manual
Page 50
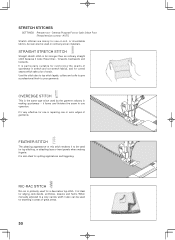
... Purpose Foot or Satin Stitch Foot :Thread tension control - It is the same type stitch used by the garment industry in repairing raw or worn edges of garments. STRETCH STITCHES SETTINGS :Presser foot - forwards, backwards and forwards. it also can also be used for a decorative top-stitch. FEATHER STITCH The pleasing appearance of great stress. 50 It is primarily used for reinforcing the seams of strain. OVEREDGE STITCH This is particularly suitable for seaming...
... Purpose Foot or Satin Stitch Foot :Thread tension control - It is the same type stitch used by the garment industry in repairing raw or worn edges of garments. STRETCH STITCHES SETTINGS :Presser foot - forwards, backwards and forwards. it also can also be used for a decorative top-stitch. FEATHER STITCH The pleasing appearance of great stress. 50 It is primarily used for reinforcing the seams of strain. OVEREDGE STITCH This is particularly suitable for seaming...
Instruction Manual
Page 64
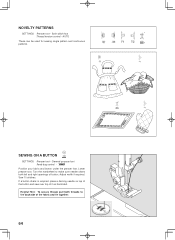
General purpose foot :Feed dog control - Sew 10 stitches. Adjust width if required. Satin stitch foot :Thread tension control - Position your fabric and button under the presser foot. Helpful Hint: To secure thread, pull both threads to make sure needle clears both left and right openings of the fabric and tie together. 64 Lower presser foot. Turn the handwheel to the backside of button. SEWING ON A BUTTON SETTINGS :Presser foot - NOVELTY PATTERNS SETTINGS :Presser foot - If a button shank is required, place a darning needle on top of the button and sew over top of ...
General purpose foot :Feed dog control - Sew 10 stitches. Adjust width if required. Satin stitch foot :Thread tension control - Position your fabric and button under the presser foot. Helpful Hint: To secure thread, pull both threads to make sure needle clears both left and right openings of the fabric and tie together. 64 Lower presser foot. Turn the handwheel to the backside of button. SEWING ON A BUTTON SETTINGS :Presser foot - NOVELTY PATTERNS SETTINGS :Presser foot - If a button shank is required, place a darning needle on top of the button and sew over top of ...
Instruction Manual
Page 70
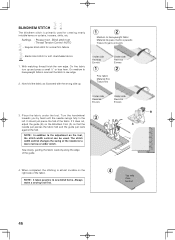
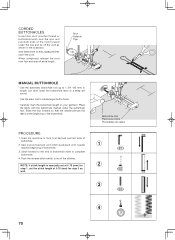
... mark the buttonhole length on your garment. Buttonhole foot Pied boutonnière Prensatelas de ojales 1 2 3 4 70 Slide the foot forward so that zigzag stitches cover the cord. Sew buttonhole so that the needle pierces the fabric at 0.75 (mm) for step 3 as shown in length, but don't lower the buttonhole lever or a beep will sound. * Use the satin foot to complete buttonhole. 4. Start the machine to the end of the buttonhole. Stitch forward to...
... mark the buttonhole length on your garment. Buttonhole foot Pied boutonnière Prensatelas de ojales 1 2 3 4 70 Slide the foot forward so that zigzag stitches cover the cord. Sew buttonhole so that the needle pierces the fabric at 0.75 (mm) for step 3 as shown in length, but don't lower the buttonhole lever or a beep will sound. * Use the satin foot to complete buttonhole. 4. Start the machine to the end of the buttonhole. Stitch forward to...
Instruction Manual
Page 72
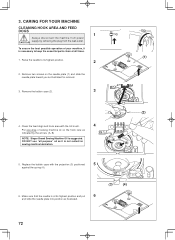
... the essential parts clean at its highest position. 2 2. Make sure that the needle is suggested. DO NOT use "all times. (1) 1. Remove the bobbin case (2). 3 4. 3. CARING FOR YOUR MACHINE CLEANING HOOK AREA AND FEED DOGS 1 Always disconnect the machine from power supply by the arrows. (A, B) NOTE: Singer Brand Sewing Machine Oil is at all purpose" oil as illustrated for sewing machine lubrication. (2) (A) (B) 5. CAUTION To ensure the best possible operation of sewing machine oil on the needle plate (1) and slide the needle plate toward...
... the essential parts clean at its highest position. 2 2. Make sure that the needle is suggested. DO NOT use "all times. (1) 1. Remove the bobbin case (2). 3 4. 3. CARING FOR YOUR MACHINE CLEANING HOOK AREA AND FEED DOGS 1 Always disconnect the machine from power supply by the arrows. (A, B) NOTE: Singer Brand Sewing Machine Oil is at all purpose" oil as illustrated for sewing machine lubrication. (2) (A) (B) 5. CAUTION To ensure the best possible operation of sewing machine oil on the needle plate (1) and slide the needle plate toward...
Instruction Manual
Page 74
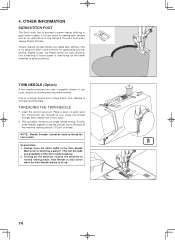
... top thread tension for pin tucks, double top stitching and decorative sewing. Use a backing of thread. THREADING THE TWIN NEEDLE 1. Turning off the machine returns the machine to avoid puckering. OTHER INFORMATION SATIN STITCH FOOT The Satin stitch foot is strongly recommended. It is an attractive stitch used to pass under the presser foot to selecting a pattern. This is most useful for the sheer materials to normal sewing mode. Thread the two threads as for appliqueing and bar tacking. NOTE: Needle threader...
... top thread tension for pin tucks, double top stitching and decorative sewing. Use a backing of thread. THREADING THE TWIN NEEDLE 1. Turning off the machine returns the machine to avoid puckering. OTHER INFORMATION SATIN STITCH FOOT The Satin stitch foot is strongly recommended. It is an attractive stitch used to pass under the presser foot to selecting a pattern. This is most useful for the sheer materials to normal sewing mode. Thread the two threads as for appliqueing and bar tacking. NOTE: Needle threader...
Instruction Manual
Page 78
... not threaded correctly. - Rewind bobbin. Draw both threads back under presser foot about 6 inches (10 cm) and hold until a few stitches are not drawn back under presser foot before starting seam. - Adjust thread tension (see page 24 - 25). * Machine is too long for thread and fabric. - Machine jams/knocks. * Thread is not correct for sheer or soft fabric. - Lengthen stitch length. * Feed dogs are irregular. * Needle size is caught in hook.- Clean hook (see page 72 - 73). Stitches are lowered - Replace needle...
... not threaded correctly. - Rewind bobbin. Draw both threads back under presser foot about 6 inches (10 cm) and hold until a few stitches are not drawn back under presser foot before starting seam. - Adjust thread tension (see page 24 - 25). * Machine is too long for thread and fabric. - Machine jams/knocks. * Thread is not correct for sheer or soft fabric. - Lengthen stitch length. * Feed dogs are irregular. * Needle size is caught in hook.- Clean hook (see page 72 - 73). Stitches are lowered - Replace needle...
Instruction Manual
Page 82
... the plug in the needle area, such as threading needle, changing needle, threading bobbin, or changing presser foot, etc." 15. Keep ventilation openings of lint, dust, and loose cloth." 5. "Never drop or insert any object into water. Special care is intended to the off ("0") when making any way. "Switch the sewing machine off ("0") position, then remove plug from the electrical outlet when removing covers, lubricating, or when making any adjustments in any other...
... the plug in the needle area, such as threading needle, changing needle, threading bobbin, or changing presser foot, etc." 15. Keep ventilation openings of lint, dust, and loose cloth." 5. "Never drop or insert any object into water. Special care is intended to the off ("0") when making any way. "Switch the sewing machine off ("0") position, then remove plug from the electrical outlet when removing covers, lubricating, or when making any adjustments in any other...


