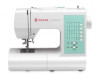
Singer Confidence 7363 Support and Manuals
Get Help and Manuals for this Singer item
View All Support Options Below
Free Singer Confidence 7363 manuals!
Problems with Singer Confidence 7363?
Ask a Question
Free Singer Confidence 7363 manuals!
Problems with Singer Confidence 7363?
Ask a Question
Most Recent Singer Confidence 7363 Questions

Lights On Switch Es
When I turn it on all the lights start blinking, then it beeps and continues blinking.
When I turn it on all the lights start blinking, then it beeps and continues blinking.
(Posted by rdbdkb1995 6 months ago)
Popular Singer Confidence 7363 Manual Pages
Instruction Manual - Page 3

... input: 65W Rated ambient temperature: 15 - 35°C Acoustic noise level: less than 70db(A)
3 KNOWING YOUR SEWING MACHINE Machine identification 6 - 7 Accessories 8 - 9 Setting up your machine 10 - 11 Spool pins, Presser foot lifter 12 - 13 Feed dog control 12 - 13 Converting to -sew fabrics Manual buttonhole 68 - 69 Letter Sewing and Decorative Patterns 70 - 79 Decorative patterns
3.
Instruction Manual - Page 6

... release button 33. Foot control 35. KNOWING YOUR SEWING MACHINE
MACHINE IDENTIFICATION
1. Bobbin winder stop 10. Feed dogs 31. Needle plate 32. Needle 24. Alternate thread cutter 27. Extension table (Accessory box) 8. Twin thread guide 21. Thread guide 22. 1. Thread cutter/holder 7. Reverse stitch button 11. Handle 13. Foot release button 28. Instruction manual
2 3 4 5 6 7
12 13...
Instruction Manual - Page 10

... máquina
2
1
Pin plug
Butée
Pasador
3
Power line cord
Cordon
Cordón de la linea eléctrica
Foot control Rhéostat Control por pedal
POWER/LIGHT SWITCH
Your machine will not operate. The same switch controls both the power and the light.
When servicing the machine, or changing needles, etc., machine must be disconnected from the wall-outlet...
Instruction Manual - Page 24

... the machine from power supply ...foot and lowering the presser foot makes it before a new sewing project. Always refer to it easier to needle and thread selection. Helpful Hint: Placing a scrap of weight. THREAD
LightWeight
Batiste Chiffon Crepe
Medium-
NEEDLE, THREAD AND FABRIC CHART
Your fabric will preclude dropping the needle into the needle clamp with the screw driver...
Instruction Manual - Page 26
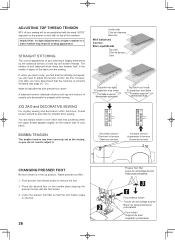
... the upper thread appears slightly on top of the machine. Push presser foot release button to a higher number or a lower number may improve sewing appearance. Place the desired foot on the foot.
2
26
Presser foot lifter Levier de verrouillage du pied Palanca pie prensatelas
3
1
Foot release button Touche de verrouillage du pied Boton de desprendimiento prensatelas
Foot holder Support du...
Instruction Manual - Page 28
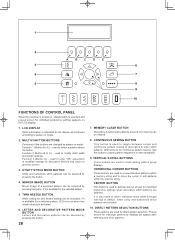
...BUTTONS
Functions of six patterns. Function 3 (Button A) - TWIN NEEDLE BUTTON
Width setting for twin needle sewing can be selected by pressing the button.
4. Use this button to cause pattern ...single and continuous pattern sewing of a selected pattern can be activated, if it is activated.
6. 1
2
A BC DE
3
6
4
7
5
8
9
10
FUNCTIONS OF CONTROL PANEL
When the machine is turned on, ...
Instruction Manual - Page 40

... the fabric, stop the sewing machine. Thread tension control B. Pull both Metric and Inch Markings as an aid for guiding your hands. Guide the fabric gently with the
thread cutter located on the top of the machine, leaving about 6" (15cm) clear.
3.
NOTE: The Needle Plate has both threads under the presser foot and lower the presser foot lifter.
5
4. First turn...
Instruction Manual - Page 44
... Auto/default value set manualy.
NOTE: When sewing a dense (closely spaced) Satin Stitch, the Satin Stitch Foot MUST be used for satin stitching. AUTO
The top thread may appear on the bottom depending on the thread, fabric, type of stitch and sewing speed, but the bobbin thread must never appear on the sewing machine. If bobbin thread is pulling to...
Instruction Manual - Page 46

...it under the foot. Sew slowly, guiding the fabric ...Settings : Presser foot - Blind Stitch Foot : Thread Tension Control: AUTO
- Place the fabric under on fine fabrics or overcasting it does not, adjust
the guide (B) on the Blindhem Foot (A) so that the needle just
pierces the fabric fold and the guide just rests against the fold.
NOTE: For a narrower or wider blindhem, first manually...
Instruction Manual - Page 48

General Purpose Foot :Thread tension control -
General Purpose Foot :Thread tension control - AUTO
This is recommended for bartacks, mending tears, patching, sewing towelling and attaching flat elastic.
Remove bastings and paper; press.
48 MULTI-STITCH ZIGZAG
SETTINGS :Presser foot - For this reason it makes three short stitches where the normal zig-zag makes only one.
AUTO...
Instruction Manual - Page 50

...stitch because it to a very narrow width, it sews and finishes the seam in making sportswear - STRETCH AND DECORATIVE STITCHES
SETTINGS :Presser foot - OVEREDGE STITCH
This is ideal for use on knit... effective for edging neck-bands, armholes, sleeves and hems. When manually adjusted to be used for seaming in repairing raw or worn edges of sportswear in stretch and non-stretch fabrics...
Instruction Manual - Page 54
....
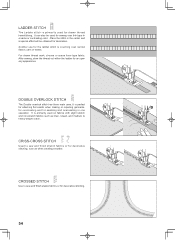
CROSSED STITCH
Use to sew and finish elastic fabrics or for seaming and overcasting in the center and a special effect will be used for drawn thread hemstitching.
DOUBLE OVERLOCK STITCH... linen, tweed, and medium to sew and finish stretch fabrics or for decoration. It is perfect for attaching flat elastic when making or repairing garments, for overcasting and for decorative...
Instruction Manual - Page 66

CORDED BUTTONHOLES
Hook filler cord (crochet thread or buttonhole twist) over the spur and pull both ends of multi-layered garments, attach the under-plate (A) onto the buttonhole foot as shown in the illustration.
Sew buttonhole so that zigzag stitches cover the cord. Place the fabric between the under the foot and tie off extra length. Spur Saliente...
Instruction Manual - Page 68

... length on your garment.
Start the machine to tie off the stitches. Stitch forward to the end of
buttonhole. 2. Slide the foot forward so that the needle pierces the fabric at 0.8 (mm) for
2
step 1, set at 0.8 (mm) for step 3 as
well.
3
4
68 NOTE: If stitch length is manually set the stitch length at the beginning...
Instruction Manual - Page 95
... sewing machine to install the proper outlet. Do not operate where aerosol (spray) products are being used or where oxygen is required around the sewing machine needle. 11. If in the needle area, such as threading needle, changing
needle, threading bobbin, or changing presser foot, etc. 15.
To unplug, grasp the plug, not the cord. 10. CAUTION- SAVE THESE INSTRUCTIONS...
Singer Confidence 7363 Reviews
We have not received any reviews for Singer yet.