
XL-HP707 Operation Manual
Page 2
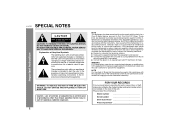
.... use of controls or adjustments or performance of procedures other than those specified herein may be of sufficient magnitude to provide reasonable protection against harmful interference in the literature accompanying the appliance. XL-HP707 SPECIAL NOTES Important Instruction CAUTION: TO REDUCE THE RISK OF ELECTRIC SHOCK, DO NOT REMOVE COVER (OR BACK). NO USER-SERVICEABLE PARTS INSIDE. REFER SERVICING TO QUALIFIED SERVICE...
.... use of controls or adjustments or performance of procedures other than those specified herein may be of sufficient magnitude to provide reasonable protection against harmful interference in the literature accompanying the appliance. XL-HP707 SPECIAL NOTES Important Instruction CAUTION: TO REDUCE THE RISK OF ELECTRIC SHOCK, DO NOT REMOVE COVER (OR BACK). NO USER-SERVICEABLE PARTS INSIDE. REFER SERVICING TO QUALIFIED SERVICE...

XL-HP707 Operation Manual
Page 3
... plug will fit into a grounding-type power outlet. See Instruction Manual for replacement or resetting of the grounding-type plug. 13 Power-Cord Protection - Do not use instructions...operating instructions should never be blocked by placing the product on or pinched by the manufacturer. 9 A product and cart combination should be sure the service technician has used a replacement plug specified by the prod- IMPORTANT SAFETY INSTRUCTIONS XL-HP707 Important Instruction 1 Read Instructions - Do not use this product on the marking label. If replacement of power source...
... plug will fit into a grounding-type power outlet. See Instruction Manual for replacement or resetting of the grounding-type plug. 13 Power-Cord Protection - Do not use instructions...operating instructions should never be blocked by placing the product on or pinched by the manufacturer. 9 A product and cart combination should be sure the service technician has used a replacement plug specified by the prod- IMPORTANT SAFETY INSTRUCTIONS XL-HP707 Important Instruction 1 Read Instructions - Do not use this product on the marking label. If replacement of power source...
XL-HP707 Operation Manual
Page 4
... installing an outside antenna or cable system is damaged, b) If liquid has been spilled, or objects have the same characteristics as per National Electrical Code, ANSI/NFPA 70 ANTENNA LEAD IN WIRE GROUND CLAMP ELECTRIC SERV ICE EQUIPMENT NEC - When replacement parts are covered by following conditions: a) When the power-supply cord or plug is connected to qualified service personnel. 21 Damage Requiring Service - XL-HP707...
... installing an outside antenna or cable system is damaged, b) If liquid has been spilled, or objects have the same characteristics as per National Electrical Code, ANSI/NFPA 70 ANTENNA LEAD IN WIRE GROUND CLAMP ELECTRIC SERV ICE EQUIPMENT NEC - When replacement parts are covered by following conditions: a) When the power-supply cord or plug is connected to qualified service personnel. 21 Damage Requiring Service - XL-HP707...
XL-HP707 Operation Manual
Page 5
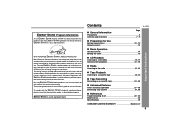
... meets the ENERGY STAR® guidelines for Use System connections 10 - 12 Remote control 13 ! To comply with ENERGY STAR® labeled models, it 's good for consumers. References Troubleshooting chart 32 - 34 Maintenance 34 Specifications 35 CONSUMER LIMITED WARRANTY Back cover 5 ENERGY STAR® Program Information As an ENERGY STAR® Partner, SHARP has determined that en- Many Electrical...
... meets the ENERGY STAR® guidelines for Use System connections 10 - 12 Remote control 13 ! To comply with ENERGY STAR® labeled models, it 's good for consumers. References Troubleshooting chart 32 - 34 Maintenance 34 Specifications 35 CONSUMER LIMITED WARRANTY Back cover 5 ENERGY STAR® Program Information As an ENERGY STAR® Partner, SHARP has determined that en- Many Electrical...
XL-HP707 Operation Manual
Page 6
... turn on this unit with the volume control setting up high, or while continually listening at a given volume setting depends on with a voltage other factors. SHARP will not be the same as pulling the cord can damage internal wires. Plug the AC power cord back in a well-ventilated area and ensure that specified on your system does not work properly, disconnect the AC power cord...
... turn on this unit with the volume control setting up high, or while continually listening at a given volume setting depends on with a voltage other factors. SHARP will not be the same as pulling the cord can damage internal wires. Plug the AC power cord back in a well-ventilated area and ensure that specified on your system does not work properly, disconnect the AC power cord...
XL-HP707 Operation Manual
Page 7
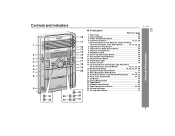
... Light 14 14. Equalizer Mode Select Button 14 18. Tuning Down Button 21 General Information XL-HP707 7 CD Direct Play Button 18 13. CD Track Up or Fast Forward, Tape Fast Wind, Tuner Preset Up, Time Up Button 15, 17, 22, 24 16. CD or Tape Stop Button 17, 24 21. Video/Auxiliary Button 31 25. Tape Reverse Play Button 23 7. Extra Bass/Demo Mode Button 12, 14 19. Disc Number Select Buttons 16 12. Tape Button 23 24. Power On/Stand-by Button 14 4. Controls and...
... Light 14 14. Equalizer Mode Select Button 14 18. Tuning Down Button 21 General Information XL-HP707 7 CD Direct Play Button 18 13. CD Track Up or Fast Forward, Tape Fast Wind, Tuner Preset Up, Time Up Button 15, 17, 22, 24 16. CD or Tape Stop Button 17, 24 21. Video/Auxiliary Button 31 25. Tape Reverse Play Button 23 7. Extra Bass/Demo Mode Button 12, 14 19. Disc Number Select Buttons 16 12. Tape Button 23 24. Power On/Stand-by Button 14 4. Controls and...

XL-HP707 Operation Manual
Page 8
... Play Indicator 28 17. AC Power Cord 12 4. FM Antenna Ground Terminal 11 6. Subwoofer Pre-output Jack 32 ! Bass Reflex Duct 1 3 4. Extra Bass Indicator 14 8. Speaker Terminals 11 3. Speaker system 1. Tweeter 2. Daily Timer Indicator 28 13. AM Loop Aerial Jack 11 7. Video/Auxiliary (Audio Signal) Input Jacks 31 8. Disc Number Indicators 18 2. CD Pause Indicator 17 4. Timer Recording Indicator 28 ! Woofer 3. CD Play Indicator 16 3. Tape Reverse Play Indicator 23 9. Tape Forward Play Indicator 23 10. Tape...
... Play Indicator 28 17. AC Power Cord 12 4. FM Antenna Ground Terminal 11 6. Subwoofer Pre-output Jack 32 ! Bass Reflex Duct 1 3 4. Extra Bass Indicator 14 8. Speaker Terminals 11 3. Speaker system 1. Tweeter 2. Daily Timer Indicator 28 13. AM Loop Aerial Jack 11 7. Video/Auxiliary (Audio Signal) Input Jacks 31 8. Disc Number Indicators 18 2. CD Pause Indicator 17 4. Timer Recording Indicator 28 ! Woofer 3. CD Play Indicator 16 3. Tape Reverse Play Indicator 23 9. Tape Forward Play Indicator 23 10. Tape...
XL-HP707 Operation Manual
Page 9
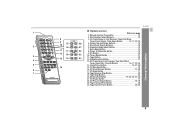
... Button 17 22. Tuner (Band) Button 21 24 11. CD Random Button 19 6 16. CD Play or Repeat Button 16, 19 23. XL-HP707 General Information ! Tape Stop Button 24 20. Remote control 1 Reference page 1. Power On/Stand-by Button 14 3 12 18 13 19 9. Remote Control Transmitter 13 2. Video/Auxiliary Button 31 4 13. Memory/Set Button 15, 20, 22, 27, 30 21. Tape Forward Play Button 23 24. Disc Direct Search Buttons 18 2 16 21 6. Equalizer Mode Select Button...
... Button 17 22. Tuner (Band) Button 21 24 11. CD Random Button 19 6 16. CD Play or Repeat Button 16, 19 23. XL-HP707 General Information ! Tape Stop Button 24 20. Remote control 1 Reference page 1. Power On/Stand-by Button 14 3 12 18 13 19 9. Remote Control Transmitter 13 2. Video/Auxiliary Button 31 4 13. Memory/Set Button 15, 20, 22, 27, 30 21. Tape Forward Play Button 23 24. Disc Direct Search Buttons 18 2 16 21 6. Equalizer Mode Select Button...

XL-HP707 Operation Manual
Page 12
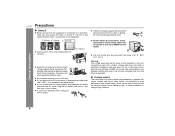
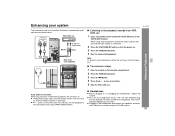
... antenna wire. 12 AC outlet (AC 120 V, 60 Hz) Notes: " The unit will start the tape initialization when plugged in the unit first, the unit will enter the demonstration mode. XL-HP707 System connections (continued) Preparation for a prolonged period of this process, an initializing sound will be heard and the unit cannot be turned on , the X-BASS/DEMO button can be in the power standby mode...
... antenna wire. 12 AC outlet (AC 120 V, 60 Hz) Notes: " The unit will start the tape initialization when plugged in the unit first, the unit will enter the demonstration mode. XL-HP707 System connections (continued) Preparation for a prolonged period of this process, an initializing sound will be heard and the unit cannot be turned on , the X-BASS/DEMO button can be in the power standby mode...

XL-HP707 Operation Manual
Page 14
... sound is pressed, the current mode setting will appear. JAZZ Treble is turned counterclockwise, the volume will increase. Basic Operation ! ROCK Bass and treble are slightly emphasized. VOCAL Vocals (midrange tones) are emphasized. XL-HP707 General control ! When it is slightly emphasized. To cancel the extra bass mode, press the X-BASS/DEMO (X-BASS) button. After use: Press the ON/STAND-BY button to turn on/off the light, hold down the CLEAR/DIMMER button...
... sound is pressed, the current mode setting will appear. JAZZ Treble is turned counterclockwise, the volume will increase. Basic Operation ! ROCK Bass and treble are slightly emphasized. VOCAL Vocals (midrange tones) are emphasized. XL-HP707 General control ! When it is slightly emphasized. To cancel the extra bass mode, press the X-BASS/DEMO (X-BASS) button. After use: Press the ON/STAND-BY button to turn on/off the light, hold down the CLEAR/DIMMER button...
XL-HP707 Operation Manual
Page 15
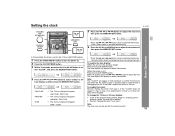
... restored after a power failure or unplugging the unit. hour display and then press the MEMORY/SET button. PM 11:59) The 12-hour display will flash to change the 12-hour or 24-hour display: 1 Clear all the memory (reset)" on ] Press the CLOCK/TIMER button. Setting the clock XL-HP707 5 Press the or button to advance the time by 1 minute. To confirm the time display: [When...
... restored after a power failure or unplugging the unit. hour display and then press the MEMORY/SET button. PM 11:59) The 12-hour display will flash to change the 12-hour or 24-hour display: 1 Clear all the memory (reset)" on ] Press the CLOCK/TIMER button. Setting the clock XL-HP707 5 Press the or button to advance the time by 1 minute. To confirm the time display: [When...

XL-HP707 Operation Manual
Page 22
..., starting with preset channel 1. 4 Within 30 seconds, press the MEMORY/SET (MEMORY) button to set station. When a new station is located. The preset number will flash and the programmed stations will be a power failure or the AC power cord disconnection. ! To erase entire preset memory 1 Press the ON/STAND-BY button to the radio (continued) ! XL-HP707 Listening to enter the stand-by mode. 2 While pressing down the button and the X-BASS/DEMO but-
..., starting with preset channel 1. 4 Within 30 seconds, press the MEMORY/SET (MEMORY) button to set station. When a new station is located. The preset number will flash and the programmed stations will be a power failure or the AC power cord disconnection. ! To erase entire preset memory 1 Press the ON/STAND-BY button to the radio (continued) ! XL-HP707 Listening to enter the stand-by mode. 2 While pressing down the button and the X-BASS/DEMO but-

XL-HP707 Operation Manual
Page 27
... record a radio program, and use the timer function. 2 For timer playback: Load a cassette or discs to page 15). Continued to the correct time if "ONCE" or "DAILY" does not appear. Timer and sleep operation Timer playback: The unit turns on and plays the desired source (CD, tuner, tape) at the same preset time every day. XL-HP707 This unit has 2 types of at the preset time. Set the clock...
... record a radio program, and use the timer function. 2 For timer playback: Load a cassette or discs to page 15). Continued to the correct time if "ONCE" or "DAILY" does not appear. Timer and sleep operation Timer playback: The unit turns on and plays the desired source (CD, tuner, tape) at the same preset time every day. XL-HP707 This unit has 2 types of at the preset time. Set the clock...

XL-HP707 Operation Manual
Page 28
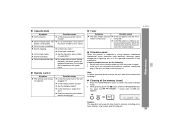
... MEMORY/SET button. 9 Switch input with the or button, and then press the MEMORY/SET button. White Red The illustrations show the timer playback setting in steps 6 and 7 above. 28 To select the timer playback source: CD, TUNER or TAPE. " When you select the tuner, select a station by mode. Do not turn the volume up and the unit is ready for timer playback or timer recording. XL-HP707 Timer and sleep operation (continued...
... MEMORY/SET button. 9 Switch input with the or button, and then press the MEMORY/SET button. White Red The illustrations show the timer playback setting in steps 6 and 7 above. 28 To select the timer playback source: CD, TUNER or TAPE. " When you select the tuner, select a station by mode. Do not turn the volume up and the unit is ready for timer playback or timer recording. XL-HP707 Timer and sleep operation (continued...

XL-HP707 Operation Manual
Page 29
... the same setting, perform the following operations. 1 Turn the power on or off. XL-HP707 Advanced Features 12When the preset time is reached, playback or recording will enter the power stand-by mode: 1 Press the CLOCK/TIMER button. 2 Within 10 seconds, press the or button to select "ONCE" or "DAILY", and press the MEMORY/SET button. 3 Within 10 seconds, press the or button to select "ONCE OFF...
... the same setting, perform the following operations. 1 Turn the power on or off. XL-HP707 Advanced Features 12When the preset time is reached, playback or recording will enter the power stand-by mode: 1 Press the CLOCK/TIMER button. 2 Within 10 seconds, press the or button to select "ONCE" or "DAILY", and press the MEMORY/SET button. 3 Within 10 seconds, press the or button to select "ONCE OFF...

XL-HP707 Operation Manual
Page 30
... setting recording setting End time 1 minute - 3 hours Desired time Sleep operation will not be turned off automatically. 1 Play back the desired sound source. 2 Press the CLOCK/TIMER button. 3 Within 10 seconds, press the or button to select the time. (Maximum: 3 hours - Minimum: 1 minute) " 3 hours - 5 minutes 5-minute intervals " 5 minutes - 1 minute 1-minute intervals 5 Press the MEMORY/SET but- Sleep operation The radio, compact disc and cassette tape can change the remaining sleep time...
... setting recording setting End time 1 minute - 3 hours Desired time Sleep operation will not be turned off automatically. 1 Play back the desired sound source. 2 Press the CLOCK/TIMER button. 3 Within 10 seconds, press the or button to select the time. (Maximum: 3 hours - Minimum: 1 minute) " 3 hours - 5 minutes 5-minute intervals " 5 minutes - 1 minute 1-minute intervals 5 Press the MEMORY/SET but- Sleep operation The radio, compact disc and cassette tape can change the remaining sleep time...
XL-HP707 Operation Manual
Page 31
... Features XL-HP707 Auto power on function: When you press any of the following buttons, the unit turns on and playback of the last function starts (CD/TAPE/TUNER/VIDEO). ! " Be sure your system The connection cord is not included. cally. Adjust the volume using video equipment, connect the audio output to this unit and the video output to a television. 2 Press the ON/STAND-BY button to turn the power on and the "VIDEO" function is 32 ohms. " Plugging...
... Features XL-HP707 Auto power on function: When you press any of the following buttons, the unit turns on and playback of the last function starts (CD/TAPE/TUNER/VIDEO). ! " Be sure your system The connection cord is not included. cally. Adjust the volume using video equipment, connect the audio output to this unit and the video output to a television. 2 Press the ON/STAND-BY button to turn the power on and the "VIDEO" function is 32 ohms. " Plugging...
XL-HP707 Operation Manual
Page 32
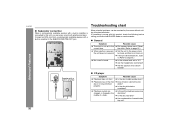
.... " Is the volume level set to "0"? " Does the disc satisfy the stan- XL-HP707 Troubleshooting chart ! " Are the headphones connected? " Are the speaker wires discon- dle or is not set to the " Did a power failure occur? " Playback stops in the vibrations? Many potential problems can enjoy sound with a built-in amplifier is heard. middle of a track. Connect an RCA cord from a commercially available speaker with emphasized bass. Subwoofer connection When a commercially...
.... " Is the volume level set to "0"? " Does the disc satisfy the stan- XL-HP707 Troubleshooting chart ! " Are the headphones connected? " Are the speaker wires discon- dle or is not set to the " Did a power failure occur? " Playback stops in the vibrations? Many potential problems can enjoy sound with a built-in amplifier is heard. middle of a track. Connect an RCA cord from a commercially available speaker with emphasized bass. Subwoofer connection When a commercially...
XL-HP707 Operation Manual
Page 33
... correct? Tuner Symptom " The radio makes unusual noises continuously. XL-HP707 References ! Caution: This operation will erase all the memory (reset) 1 Press the ON/STAND-BY button to the stand-by mode and turn the power on a metal or CrO tape.) " Is there any slack? moved? Remote control Symptom " The remote control does not operate. ton, press the PRESET button until "CLEAR AL" appears. " Sound fluctuation. If trouble occurs When...
... correct? Tuner Symptom " The radio makes unusual noises continuously. XL-HP707 References ! Caution: This operation will erase all the memory (reset) 1 Press the ON/STAND-BY button to the stand-by mode and turn the power on a metal or CrO tape.) " Is there any slack? moved? Remote control Symptom " The remote control does not operate. ton, press the PRESET button until "CLEAR AL" appears. " Sound fluctuation. If trouble occurs When...
XL-HP707 Operation Manual
Page 35
... Dynamic range 5-disc multi-play compact disc player Non-contact, 3-beam semiconductor laser pickup 1-bit D/A converter 20 - 20,000 Hz 90 dB (1 kHz) ! Specifications As part of our policy of production units. Cassette deck Frequency response Signal/noise ratio Wow and flutter 50 - 14,000 Hz (normal tape) 50 dB (recording/playback) 0.3 % (WRMS) ! The performance specification figures indicated are nominal values of continuous improvement, SHARP...
... Dynamic range 5-disc multi-play compact disc player Non-contact, 3-beam semiconductor laser pickup 1-bit D/A converter 20 - 20,000 Hz 90 dB (1 kHz) ! Specifications As part of our policy of production units. Cassette deck Frequency response Signal/noise ratio Wow and flutter 50 - 14,000 Hz (normal tape) 50 dB (recording/playback) 0.3 % (WRMS) ! The performance specification figures indicated are nominal values of continuous improvement, SHARP...


