

XL-HP505 Operation Manual
Page 2
... purchase 0202 2 NO USER-SERVICEABLE PARTS INSIDE. XL-HP505 SPECIAL NOTES Important Instruction CAUTION: TO REDUCE THE RISK OF ELECTRIC SHOCK, DO NOT REMOVE COVER (OR BACK). REFER SERVICING TO QUALIFIED SERVICE PERSONNEL. These limits are located on , the user is intended to alert the user to radio communications. Model number Serial number Date of purchase Place of important operating and maintenance (servicing) instructions in full compliance...
... purchase 0202 2 NO USER-SERVICEABLE PARTS INSIDE. XL-HP505 SPECIAL NOTES Important Instruction CAUTION: TO REDUCE THE RISK OF ELECTRIC SHOCK, DO NOT REMOVE COVER (OR BACK). REFER SERVICING TO QUALIFIED SERVICE PERSONNEL. These limits are located on , the user is intended to alert the user to radio communications. Model number Serial number Date of purchase Place of important operating and maintenance (servicing) instructions in full compliance...

XL-HP505 Operation Manual
Page 3
...INSTRUCTIONS XL-HP505 Important Instruction 1 Read Instructions - Do not use attachments not recommended by the manufacturer that they exit from the product. 14 Protective Attachment Plug - Slots and openings in the cabinet are provided for ex- This product should still fail to fit, contact your electrician to replace your obsolete outlet. If the plug should be operated... damage to your home, consult your product dealer or local power company. If you are unable to . 11 Power Sources - This is equipped with an attachment plug having overload protection. This product is...
...INSTRUCTIONS XL-HP505 Important Instruction 1 Read Instructions - Do not use attachments not recommended by the manufacturer that they exit from the product. 14 Protective Attachment Plug - Slots and openings in the cabinet are provided for ex- This product should still fail to fit, contact your electrician to replace your obsolete outlet. If the plug should be operated... damage to your home, consult your product dealer or local power company. If you are unable to . 11 Power Sources - This is equipped with an attachment plug having overload protection. This product is...
XL-HP505 Operation Manual
Page 4
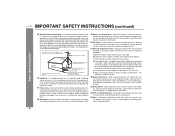
... the operating instructions. Example of time, unplug it is left unattended and unused for service. 22 Replacement Parts - uct, ask the service technician to perform safety checks to rain or water, d) If the product does not operate normally by the manufacturer or have fallen into such power lines or circuits. XL-HP505 IMPORTANT SAFETY INSTRUCTIONS (continued) Important Instruction 15 Outdoor Antenna Grounding - For added protection...
... the operating instructions. Example of time, unplug it is left unattended and unused for service. 22 Replacement Parts - uct, ask the service technician to perform safety checks to rain or water, d) If the product does not operate normally by the manufacturer or have fallen into such power lines or circuits. XL-HP505 IMPORTANT SAFETY INSTRUCTIONS (continued) Important Instruction 15 Outdoor Antenna Grounding - For added protection...
XL-HP505 Operation Manual
Page 5
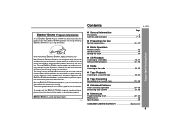
...; standards mentioned above, please cancel the demonstration mode, as described on your system 31, 32 ! To comply with ENERGY STAR® labeled models, it 's good for Use System connections 10 - 12 ! registered mark. 0209 Contents XL-HP505 Important Instruction ! That makes good economic sense and it would reduce air pollution equiva- Radio Listening to a CD (CDs 16, 17...
...; standards mentioned above, please cancel the demonstration mode, as described on your system 31, 32 ! To comply with ENERGY STAR® labeled models, it 's good for Use System connections 10 - 12 ! registered mark. 0209 Contents XL-HP505 Important Instruction ! That makes good economic sense and it would reduce air pollution equiva- Radio Listening to a CD (CDs 16, 17...
XL-HP505 Operation Manual
Page 6
... Information XL-HP505 Precautions ! " Hold the AC power plug by the head when removing it from the AC outlet. " Do not place anything on speaker efficiency, location and various other than 140°F (60°C) or to your system does not work properly, disconnect the AC power cord from the AC outlet, as this product with the volume control setting up...
... Information XL-HP505 Precautions ! " Hold the AC power plug by the head when removing it from the AC outlet. " Do not place anything on speaker efficiency, location and various other than 140°F (60°C) or to your system does not work properly, disconnect the AC power cord from the AC outlet, as this product with the volume control setting up...
XL-HP505 Operation Manual
Page 7
.... Equalizer Mode Select Button 14 17. Extra Bass/Demo Mode Button 12, 14 18. Timer Set Indicator 28 3. CD Direct Play Button 18 13. Tape Reverse Mode Select Button 23 8. CD Track Up or Fast Forward, Tape Fast Wind, Tuner Preset Up, Time Up Button 15, 17, 24 15. Video/Auxiliary Button 31 24. CD Button 16 21. Power On/Stand-by Button 14 4. CD or Tape Stop Button 17, 24 20. Tuning Down Button 21 General Information XL-HP505 7 Tape Record Pause Button...
.... Equalizer Mode Select Button 14 17. Extra Bass/Demo Mode Button 12, 14 18. Timer Set Indicator 28 3. CD Direct Play Button 18 13. Tape Reverse Mode Select Button 23 8. CD Track Up or Fast Forward, Tape Fast Wind, Tuner Preset Up, Time Up Button 15, 17, 24 15. Video/Auxiliary Button 31 24. CD Button 16 21. Power On/Stand-by Button 14 4. CD or Tape Stop Button 17, 24 20. Tuning Down Button 21 General Information XL-HP505 7 Tape Record Pause Button...

XL-HP505 Operation Manual
Page 8
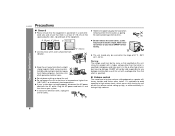
... Fan 12 2. AC Power Cord 12 4. FM Stereo Mode Indicator 21 12. Disc Number Indicators 18 2. Subwoofer Pre-output Jack 32 ! Tape Reverse Mode Indicator 23 11. Timer Recording Indicator 28 ! Speaker Terminals 11 3. AM Loop Aerial Jack 11 7. Speaker system 1 Tweeter 2 Woofer 3 Bass Reflex Duct 1 3 4 Speaker Wire 2 4 FM Stereo Receiving Indicator 21 14. Daily Timer Indicator 28 13. Sleep Indicator 30 16. CD Play Indicator 16 3. Rear panel Reference page 1. XL-HP505 Controls and indicators (continued...
... Fan 12 2. AC Power Cord 12 4. FM Stereo Mode Indicator 21 12. Disc Number Indicators 18 2. Subwoofer Pre-output Jack 32 ! Tape Reverse Mode Indicator 23 11. Timer Recording Indicator 28 ! Speaker Terminals 11 3. AM Loop Aerial Jack 11 7. Speaker system 1 Tweeter 2 Woofer 3 Bass Reflex Duct 1 3 4 Speaker Wire 2 4 FM Stereo Receiving Indicator 21 14. Daily Timer Indicator 28 13. Sleep Indicator 30 16. CD Play Indicator 16 3. Rear panel Reference page 1. XL-HP505 Controls and indicators (continued...

XL-HP505 Operation Manual
Page 9
.... Power On/Stand-by Button 14 3 12 18 13 19 9. CD Memory Button 20 21. Equalizer Mode Select Button 14 11 17 7. Remote Control Transmitter 13 2. Volume Up and Down Buttons 14 10 5. Tuner (Band) Button 21 24 11. CD Stop Button 17 7 18. CD Button 16 23 10. Tape Button 23 12. CD Play or Repeat Button 16, 19 23. XL-HP505 General Information ! Extra Bass Button 14 22 8. Disc Number Select Buttons 16 8 3. CD Random Button...
.... Power On/Stand-by Button 14 3 12 18 13 19 9. CD Memory Button 20 21. Equalizer Mode Select Button 14 11 17 7. Remote Control Transmitter 13 2. Volume Up and Down Buttons 14 10 5. Tuner (Band) Button 21 24 11. CD Stop Button 17 7 18. CD Button 16 23 10. Tape Button 23 12. CD Play or Repeat Button 16, 19 23. XL-HP505 General Information ! Extra Bass Button 14 22 8. Disc Number Select Buttons 16 8 3. CD Random Button...

XL-HP505 Operation Manual
Page 10
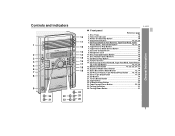
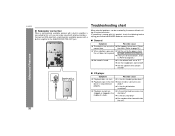
Antenna connection (see page 11) FM antenna AM loop antenna Right speaker Left speaker Preparation for Use Speaker connection (see page 11) 10 AC outlet (AC 120 V, 60 Hz) Connecting the AC power cord (see page 12) XL-HP505 System connections Make sure to unplug the AC power cord before connecting the speaker wires.
Antenna connection (see page 11) FM antenna AM loop antenna Right speaker Left speaker Preparation for Use Speaker connection (see page 11) 10 AC outlet (AC 120 V, 60 Hz) Connecting the AC power cord (see page 12) XL-HP505 System connections Make sure to unplug the AC power cord before connecting the speaker wires.

XL-HP505 Operation Manual
Page 12
... turned on , the X-BASS/DEMO button can be in to the demonstration mode: When the unit is on . " Unplug the AC power cord from the AC outlet if the unit will enter the low power consumption mode. The unit will not be used , disconnect the supplied FM antenna wire. ! XL-HP505 System connections (continued) ! Connecting the AC power cord After checking all the connections have been made correctly, plug the AC power cord...
... turned on , the X-BASS/DEMO button can be in to the demonstration mode: When the unit is on . " Unplug the AC power cord from the AC outlet if the unit will enter the low power consumption mode. The unit will not be used , disconnect the supplied FM antenna wire. ! XL-HP505 System connections (continued) ! Connecting the AC power cord After checking all the connections have been made correctly, plug the AC power cord...
XL-HP505 Operation Manual
Page 14
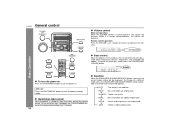
... treble are emphasized. Treble is turned clockwise, the volume will decrease. Equalizer When the EQUALIZER (EQUALIZER MODE) button is turned counterclockwise, the volume will increase. Remote control operation: Press the VOLUME (+ or -) button to a different mode, press the EQUALIZER (EQUALIZER MODE) button repeatedly until the desired sound mode appears. To cancel the extra bass mode, press the X-BASS/DEMO (X-BASS) button. To change to increase or decrease the volume. 0 ..... 30 MAXIMAM ! After use: Press the ON/STAND-BY button to turn on/off the light...
... treble are emphasized. Treble is turned clockwise, the volume will decrease. Equalizer When the EQUALIZER (EQUALIZER MODE) button is turned counterclockwise, the volume will increase. Remote control operation: Press the VOLUME (+ or -) button to a different mode, press the EQUALIZER (EQUALIZER MODE) button repeatedly until the desired sound mode appears. To cancel the extra bass mode, press the X-BASS/DEMO (X-BASS) button. To change to increase or decrease the volume. 0 ..... 30 MAXIMAM ! After use: Press the ON/STAND-BY button to turn on/off the light...
XL-HP505 Operation Manual
Page 15
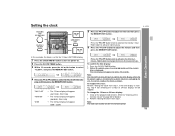
... turn the power on page 33 for about 10 seconds. If incorrect, readjust the clock as follows. Setting the clock XL-HP505 5 Press the or button to advance the time by 1 minute. The time display will be set for the 12-hour (AM 12:00) display. 1 Press the ON/STAND-BY button to change the 12-hour or 24-hour display: 1 Clear all the programmed...
... turn the power on page 33 for about 10 seconds. If incorrect, readjust the clock as follows. Setting the clock XL-HP505 5 Press the or button to advance the time by 1 minute. The time display will be set for the 12-hour (AM 12:00) display. 1 Press the ON/STAND-BY button to change the 12-hour or 24-hour display: 1 Clear all the programmed...

XL-HP505 Operation Manual
Page 22
... preset number indicators go out before the station is located. Note: The backup function protects the memorized stations for a few hours should there be tuned in memory, the station previously memorized will be a power failure or the AC power cord disconnection. ! The preset number will flash and the programmed stations will be scanned automatically. (Preset memory scan) 1 Press the PRESET ( or ) button for more than 0.5 seconds to select the preset channel number. XL-HP505 Listening...
... preset number indicators go out before the station is located. Note: The backup function protects the memorized stations for a few hours should there be tuned in memory, the station previously memorized will be a power failure or the AC power cord disconnection. ! The preset number will flash and the programmed stations will be scanned automatically. (Preset memory scan) 1 Press the PRESET ( or ) button for more than 0.5 seconds to select the preset channel number. XL-HP505 Listening...

XL-HP505 Operation Manual
Page 28
... MEMORY/SET button. To select the timer recording source: TUNER (BAND). Do not turn the volume up too high. 11Press the ON/STAND-BY button to adjust the hour and then press the MEMORY/SET button. 9 Switch input with the or button, and then press the MEMORY/SET button. by pressing the or button, and then press the MEMORY/SET button. " When you select the tuner, select a station by mode. XL-HP505 Timer and sleep operation (continued...
... MEMORY/SET button. To select the timer recording source: TUNER (BAND). Do not turn the volume up too high. 11Press the ON/STAND-BY button to adjust the hour and then press the MEMORY/SET button. 9 Switch input with the or button, and then press the MEMORY/SET button. by pressing the or button, and then press the MEMORY/SET button. " When you select the tuner, select a station by mode. XL-HP505 Timer and sleep operation (continued...

XL-HP505 Operation Manual
Page 29
... recording using another unit connected to the VIDEO/AUX IN jacks, select "VIDEO/AUX" in order. Canceling the timer playback or timer recording: Timer is reached, the system will operate at the same time every day. Timer will be canceled (the setting will be set with the remote control. 29 XL-HP505 Advanced Features 12When the preset time is not used. The unit returns to the timer stand-by mode...
... recording using another unit connected to the VIDEO/AUX IN jacks, select "VIDEO/AUX" in order. Canceling the timer playback or timer recording: Timer is reached, the system will operate at the same time every day. Timer will be canceled (the setting will be set with the remote control. 29 XL-HP505 Advanced Features 12When the preset time is not used. The unit returns to the timer stand-by mode...

XL-HP505 Operation Manual
Page 30
... the or button to perform both functions. " The remaining sleep time is displayed by mode automatically after the preset time has elapsed. Sleep timer setting Timer playback setting 1 minute - 3 hours Sleep operation will enter the power stand-by pressing the MEMORY/SET button (steps 4 - 5). XL-HP505 Timer and sleep operation (continued) Advanced Features ! Sleep operation The radio, compact disc and cassette tape can change the remaining sleep time while it is displayed for about...
... the or button to perform both functions. " The remaining sleep time is displayed by mode automatically after the preset time has elapsed. Sleep timer setting Timer playback setting 1 minute - 3 hours Sleep operation will enter the power stand-by pressing the MEMORY/SET button (steps 4 - 5). XL-HP505 Timer and sleep operation (continued) Advanced Features ! Sleep operation The radio, compact disc and cassette tape can change the remaining sleep time while it is displayed for about...

XL-HP505 Operation Manual
Page 31
.... " VIDEO/AUX button (main unit and remote control): The unit turns on . " / button on the main unit: The unit turns on and playback of the following buttons, the unit turns on and the "VIDEO" function is 32 ohms. " Plugging in the headphones disconnects the speakers automati- Purchase a commercially available cord as shown below. Red White White To the line output jacks Red RCA cord (not supplied) ! When using the VOLUME control. 31 Advanced Features XL-HP505 Auto power...
.... " VIDEO/AUX button (main unit and remote control): The unit turns on . " / button on the main unit: The unit turns on and playback of the following buttons, the unit turns on and the "VIDEO" function is 32 ohms. " Plugging in the headphones disconnects the speakers automati- Purchase a commercially available cord as shown below. Red White White To the line output jacks Red RCA cord (not supplied) ! When using the VOLUME control. 31 Advanced Features XL-HP505 Auto power...
XL-HP505 Operation Manual
Page 32
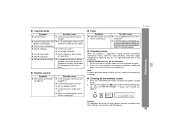
... authorized SHARP dealer or service center. ! middle of a track. " Are the speaker wires discon- " Does the disc satisfy the stan- properly. Reset correct time. XL-HP505 Troubleshooting chart ! Subwoofer connection When a commercially available speaker with a built-in amplifier is pressed, " Set the unit to the " Did a power failure occur? Many potential problems can enjoy sound with a built-in amplifier ! Connect an RCA cord from a commercially available speaker with emphasized bass. " Is the volume level set to the power...
... authorized SHARP dealer or service center. ! middle of a track. " Are the speaker wires discon- " Does the disc satisfy the stan- properly. Reset correct time. XL-HP505 Troubleshooting chart ! Subwoofer connection When a commercially available speaker with a built-in amplifier is pressed, " Set the unit to the " Did a power failure occur? Many potential problems can enjoy sound with a built-in amplifier ! Connect an RCA cord from a commercially available speaker with emphasized bass. " Is the volume level set to the power...
XL-HP505 Operation Manual
Page 33
... the remote control sensor receive strong light? XL-HP505 References ! Possible cause " Is the unit placed near the TV or computer? " Sound fluctuation. Do not open the compartment with the tape. Tuner Symptom " The radio makes unusual noises continuously. ton, press the PRESET button until "CLEAR AL" appears. Possible cause " Is the AC power cord of the unit plugged in the unit, and then turn the power...
... the remote control sensor receive strong light? XL-HP505 References ! Possible cause " Is the unit placed near the TV or computer? " Sound fluctuation. Do not open the compartment with the tape. Tuner Symptom " The radio makes unusual noises continuously. ton, press the PRESET button until "CLEAR AL" appears. Possible cause " Is the AC power cord of the unit plugged in the unit, and then turn the power...
XL-HP505 Operation Manual
Page 35
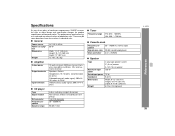
... harmonic distortion Speakers: 6 ohms Headphones: 16 - 50 ohms (recommended: 32 ohms) Subwoofer pre-out (audio signal): 200 mV/ 10 k ohms at 70 Hz Video/Auxiliary (audio signal): 500 mV/47 k ohms ! Speaker Type Maximum input power Rated input power Impedance Dimensions Weight 2-way type speaker system 2" (5 cm) tweeter 5-1/8" (13 cm) woofer 150 W 75 W 6 ohms Width: 6-1/2" (165 mm) Height: 10-1/4" (261 mm) Depth: 9-11/16" (246 mm) 6.2 lbs. (2.8 kg)/each References XL-HP505 35 There...
... harmonic distortion Speakers: 6 ohms Headphones: 16 - 50 ohms (recommended: 32 ohms) Subwoofer pre-out (audio signal): 200 mV/ 10 k ohms at 70 Hz Video/Auxiliary (audio signal): 500 mV/47 k ohms ! Speaker Type Maximum input power Rated input power Impedance Dimensions Weight 2-way type speaker system 2" (5 cm) tweeter 5-1/8" (13 cm) woofer 150 W 75 W 6 ohms Width: 6-1/2" (165 mm) Height: 10-1/4" (261 mm) Depth: 9-11/16" (246 mm) 6.2 lbs. (2.8 kg)/each References XL-HP505 35 There...


