XL-DH259P Operation Manual
Page 1
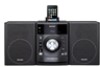
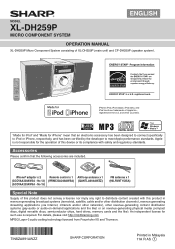
... revenue-generating physical media (compact discs, digital versatile discs, semiconductor chips, hard drives, memory cards and the like). No 15) FM antenna x 1 (92LFANT1535A) Special Note Supply of XL-DH259P (main unit) and CP-DH259P (speaker system). MODEL XL-DH259P MICRO COMPONENT SYSTEM ENGLISH OPERATION MANUAL XL-DH259P Micro Component System consisting of this product in revenue-generating broadcast systems (terrestrial, satellite, cable and/or other distribution channels), revenue generating streaming...
... revenue-generating physical media (compact discs, digital versatile discs, semiconductor chips, hard drives, memory cards and the like). No 15) FM antenna x 1 (92LFANT1535A) Special Note Supply of XL-DH259P (main unit) and CP-DH259P (speaker system). MODEL XL-DH259P MICRO COMPONENT SYSTEM ENGLISH OPERATION MANUAL XL-DH259P Micro Component System consisting of this product in revenue-generating broadcast systems (terrestrial, satellite, cable and/or other distribution channels), revenue generating streaming...
XL-DH259P Operation Manual
Page 2
... the polarized or grounding-type plug. To ensure your assistance in hazardous radiation exposure. O Connect the equipment into your safety. NO USER-SERVICEABLE PARTS INSIDE. Model number Serial number Date of purchase Place of purchase IMPORTANT SAFETY INSTRUCTIONS Electricity is used in accordance with dry cloth. 7) Do not block any unauthorized changes or modifications to operate this equipment. This product...
... the polarized or grounding-type plug. To ensure your assistance in hazardous radiation exposure. O Connect the equipment into your safety. NO USER-SERVICEABLE PARTS INSIDE. Model number Serial number Date of purchase Place of purchase IMPORTANT SAFETY INSTRUCTIONS Electricity is used in accordance with dry cloth. 7) Do not block any unauthorized changes or modifications to operate this equipment. This product...
XL-DH259P Operation Manual
Page 3
... service personnel under the following the operating instructions. Unplug this product, ask the service technician to perform safety checks to determine that has the same overload protection as the original plug. 24) Stand - Adjust only those controls that could result in performance - See Instruction Manual for service. 19) Replacement Parts - If replacement of any kind on a wall or ceiling, be sure the service technician has used , use...
... service personnel under the following the operating instructions. Unplug this product, ask the service technician to perform safety checks to determine that has the same overload protection as the original plug. 24) Stand - Adjust only those controls that could result in performance - See Instruction Manual for service. 19) Replacement Parts - If replacement of any kind on a wall or ceiling, be sure the service technician has used , use...
XL-DH259P Operation Manual
Page 4
... you . E-3 Be sure to the servicer. O Place the speakers at least 12" (30 cm) away from the date of Sharp. SHARP will dust, humidity and electronic/electrical equipment (home computers, not be held responsible for safety. Nor shall Sharp be used as pulling the cord can damage internal wires. Model Specific Section Your Product Model Number & Description: XL-DH259P MICRO COMPONENT SYSTEM (Be sure to have...
... you . E-3 Be sure to the servicer. O Place the speakers at least 12" (30 cm) away from the date of Sharp. SHARP will dust, humidity and electronic/electrical equipment (home computers, not be held responsible for safety. Nor shall Sharp be used as pulling the cord can damage internal wires. Model Specific Section Your Product Model Number & Description: XL-DH259P MICRO COMPONENT SYSTEM (Be sure to have...

XL-DH259P Operation Manual
Page 5
... high volume levels, which occurs while turning the unit on the speakers. Remote control Q Battery installation Use 2 "AAA" size batteries (UM/SUM-4, R3, HP-16 or similar). O Do not use rechargeable batteries (nickel-cadmium battery, etc.). Video cable (not supplied) TV AM loop antenna Installing the AM loop antenna < Assembling > < Attaching to the wall > LEFT RIGHT SPEAKERS To video input jack Wire Plug in the battery compartment. O Hold the speaker plug when...
... high volume levels, which occurs while turning the unit on the speakers. Remote control Q Battery installation Use 2 "AAA" size batteries (UM/SUM-4, R3, HP-16 or similar). O Do not use rechargeable batteries (nickel-cadmium battery, etc.). Video cable (not supplied) TV AM loop antenna Installing the AM loop antenna < Assembling > < Attaching to the wall > LEFT RIGHT SPEAKERS To video input jack Wire Plug in the battery compartment. O Hold the speaker plug when...

XL-DH259P Operation Manual
Page 6
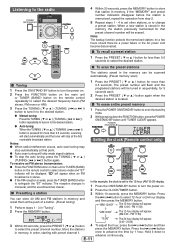
... of input signal or very low sound audibility. CD / USB: In the stop mode. Remote control (continued) Notes concerning use: O Replace the batteries if the operating distance is docked, the unit will begin charging. Q Bass control 1 Press the BASS/TREBLE button to select "BASS". 2 Within 5 seconds, press the VOLUME (+ or -) button Q To turn off ____ power on the unit to a different mode, press the EQUALIZER MODE button repeatedly until the desired sound mode appears. "CHARGE MODE" will be displayed.
... of input signal or very low sound audibility. CD / USB: In the stop mode. Remote control (continued) Notes concerning use: O Replace the batteries if the operating distance is docked, the unit will begin charging. Q Bass control 1 Press the BASS/TREBLE button to select "BASS". 2 Within 5 seconds, press the VOLUME (+ or -) button Q To turn off ____ power on the unit to a different mode, press the EQUALIZER MODE button repeatedly until the desired sound mode appears. "CHARGE MODE" will be displayed.
XL-DH259P Operation Manual
Page 7
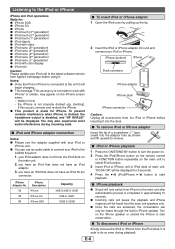
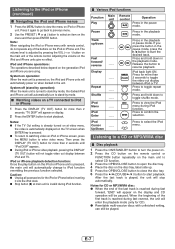
... iPhone adaptor Insert the tip of main unit. Q iPod or iPhone playback 1 Press the ON/STAND-BY button to turn the power on. 2 Press the iPod/iPhone button on the remote control or FUNCTION button repeatedly on the iPhone speaker or undock the iPhone to the unit it into unit and connect your iPod unit to the latest software version from Apple's homepage...
... iPhone adaptor Insert the tip of main unit. Q iPod or iPhone playback 1 Press the ON/STAND-BY button to turn the power on. 2 Press the iPod/iPhone button on the remote control or FUNCTION button repeatedly on the iPhone speaker or undock the iPhone to the unit it into unit and connect your iPod unit to the latest software version from Apple's homepage...
XL-DH259P Operation Manual
Page 8
... automatically change to iPod function overriding the previous function selected. Listening to the iPod or iPhone (continued) Q Navigating the iPod and iPhone menus 1 Press the MENU button to view the menu on iPod or iPhone screen, press the MENU button to enter video menu. O Rewritable multi-session discs with remote control, do not operate any of the first track is automatically displayed on the main unit or the remote control. O Stop button ( ) at video menu, the video...
... automatically change to iPod function overriding the previous function selected. Listening to the iPod or iPhone (continued) Q Navigating the iPod and iPhone menus 1 Press the MENU button to view the menu on iPod or iPhone screen, press the MENU button to enter video menu. O Rewritable multi-session discs with remote control, do not operate any of the first track is automatically displayed on the main unit or the remote control. O Stop button ( ) at video menu, the video...

XL-DH259P Operation Manual
Page 9
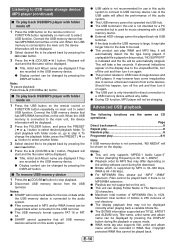
... MEMORY button on the remote control to enter the programing save mode. 2 Press the or buttons on the remote control until "ALL REPEAT" appears. The beginning of tracks on the disc can be played in the stop mode. Press the (CD/USB ) button. For example, to choose 13 1 Press the "10+" button once. 2 Press the "1" button. 3 Press the "3" button. RRMCGA232AWSA Q Direct track search By using the Numeric buttons...
... MEMORY button on the remote control to enter the programing save mode. 2 Press the or buttons on the remote control until "ALL REPEAT" appears. The beginning of tracks on the disc can be played in the stop mode. Press the (CD/USB ) button. For example, to choose 13 1 Press the "10+" button once. 2 Press the "1" button. 3 Press the "3" button. RRMCGA232AWSA Q Direct track search By using the Numeric buttons...

XL-DH259P Operation Manual
Page 10
... be programed. Then press the or button on To play is automatically canceled. Up to 32 tracks can be selected even though it means "Copyright protected WMA file" or "Not supported playback file" is not compatible with folder mode on the remote control to select the desired tracks. 3 Press the MEMORY button to save the folder and track number. 4 Repeat...
... be programed. Then press the or button on To play is automatically canceled. Up to 32 tracks can be selected even though it means "Copyright protected WMA file" or "Not supported playback file" is not compatible with folder mode on the remote control to select the desired tracks. 3 Press the MEMORY button to save the folder and track number. 4 Repeat...
XL-DH259P Operation Manual
Page 11
... unit only supports "MPEG-1 Audio Layer-3" format. (Sampling Frequency is 32, 44.1, 48kHz) O Playback order for use in WMA files. Title name, artist name and album name can be displayed by pressing the DISPLAY button. Playback will start playback with folder mode off 1 Press the USB button on the remote control or FUNCTION button repeatedly on main unit to select USB function. Q To play WMA...
... unit only supports "MPEG-1 Audio Layer-3" format. (Sampling Frequency is 32, 44.1, 48kHz) O Playback order for use in WMA files. Title name, artist name and album name can be displayed by pressing the DISPLAY button. Playback will start playback with folder mode off 1 Press the USB button on the remote control or FUNCTION button repeatedly on main unit to select USB function. Q To play WMA...
XL-DH259P Operation Manual
Page 12
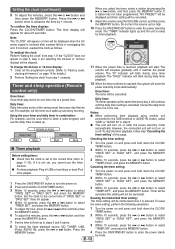
... advance the time by mode. 2 While pressing down to select 12-hour or 24-hour display and then press the MEMORY button. Notes: O When radio interference occurs, auto scan tuning may stop the auto tuning, press the TUNING ( or ) (TUNING ( or )) button again. The preset number will flash and the programed stations will be scanned automatically. (Preset memory scan) Q Tuning 1 Press the ON/STAND-BY button to turn the power on...
... advance the time by mode. 2 While pressing down to select 12-hour or 24-hour display and then press the MEMORY button. Notes: O When radio interference occurs, auto scan tuning may stop the auto tuning, press the TUNING ( or ) (TUNING ( or )) button again. The preset number will flash and the programed stations will be scanned automatically. (Preset memory scan) Q Tuning 1 Press the ON/STAND-BY button to turn the power on...
XL-DH259P Operation Manual
Page 13
The time display will appear for selecting the 24-hour or 12-hour display) will blink during once timer playback. If a station has not been programmed, "NO PRESET" will be cancelled. 9 Adjust the volume using another unit connected to the USB terminal or AUDIO IN socket, select use the timer function. However, the connected unit will be displayed and timer setting will not turn the power on or off. Timer will be...
The time display will appear for selecting the 24-hour or 12-hour display) will blink during once timer playback. If a station has not been programmed, "NO PRESET" will be cancelled. 9 Adjust the volume using another unit connected to the USB terminal or AUDIO IN socket, select use the timer function. However, the connected unit will be displayed and timer setting will not turn the power on or off. Timer will be...
XL-DH259P Operation Manual
Page 14
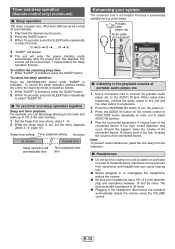
... stand-by mode automatically after the preset time has elapsed. When using the VOLUME control. O Be sure your system The connection cord is indicated, press the SLEEP button. 2 Within 10 seconds, press the SLEEP button repeatedly to select "SLEEP 00". Timer and sleep operation (Remote control only) (continued) Q Sleep operation The radio, compact disc, iPod and USB can all be turned off automatically. 1 Play back the desired sound source. 2 Press the SLEEP button. 3 Within...
... stand-by mode automatically after the preset time has elapsed. When using the VOLUME control. O Be sure your system The connection cord is indicated, press the SLEEP button. 2 Within 10 seconds, press the SLEEP button repeatedly to select "SLEEP 00". Timer and sleep operation (Remote control only) (continued) Q Sleep operation The radio, compact disc, iPod and USB can all be turned off automatically. 1 Play back the desired sound source. 2 Press the SLEEP button. 3 Within...
XL-DH259P Operation Manual
Page 15
... not restored in the previous operation, unplug and plug in the unit again, and then turn it back on. O The video cable is not properly set. If such a problem occurs, do the following before operating the unit. Q Factory reset, clearing all memory 1 Press the POWER ON/STAND-BY button to the power stand-by mode. O Is the device properly connected? O Is it a false MP3 fi...
... not restored in the previous operation, unplug and plug in the unit again, and then turn it back on. O The video cable is not properly set. If such a problem occurs, do the following before operating the unit. Q Factory reset, clearing all memory 1 Press the POWER ON/STAND-BY button to the power stand-by mode. O Is the device properly connected? O Is it a false MP3 fi...
XL-DH259P Operation Manual
Page 16
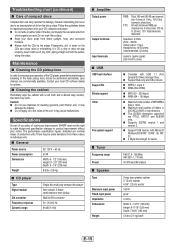
... number of MP3/WMA files is dirty or does not play compact disc player Non-contact, 3-beam semiconductor laser pickup Multi bit D/A converter 20 - 20,000 Hz 90 dB (1 kHz) Q Amplifier Output power Output terminals Input terminals Q USB USB host interface Support file Bitrate support Other File system support Q Tuner Frequency range Preset Q Speaker Type Maximum input power Rated input power Impedance Dimensions Weight RMS: Total 160 watt (80 W per channel...
... number of MP3/WMA files is dirty or does not play compact disc player Non-contact, 3-beam semiconductor laser pickup Multi bit D/A converter 20 - 20,000 Hz 90 dB (1 kHz) Q Amplifier Output power Output terminals Input terminals Q USB USB host interface Support file Bitrate support Other File system support Q Tuner Frequency range Preset Q Speaker Type Maximum input power Rated input power Impedance Dimensions Weight RMS: Total 160 watt (80 W per channel...


