
XL-DH229N Operation Manual
Page 1
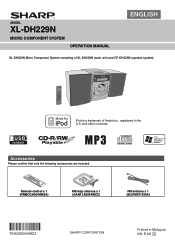
MODEL XL-DH229N MICRO COMPONENT SYSTEM OPERATION MANUAL ENGLISH XL-DH229N Micro Component System consisting of Apple Inc., registered in Malaysia 09L R AS 2 Remote control x 1 (RRMCGA204AWSA) AM loop antenna x 1 (QANTLA004AWZZ) FM antenna x 1 (92LFANT1535A) TINSZA604AWZZ Printed in the U.S. and other countries. Accessories Please confirm that only the following accessories are included. CD USB MICRO C O M PONE XL-DH229 N T SYSTEM iPod is a trademark of XL-DH229N (main unit) and CP-DH229N (speaker system).
MODEL XL-DH229N MICRO COMPONENT SYSTEM OPERATION MANUAL ENGLISH XL-DH229N Micro Component System consisting of Apple Inc., registered in Malaysia 09L R AS 2 Remote control x 1 (RRMCGA204AWSA) AM loop antenna x 1 (QANTLA004AWZZ) FM antenna x 1 (92LFANT1535A) TINSZA604AWZZ Printed in the U.S. and other countries. Accessories Please confirm that only the following accessories are included. CD USB MICRO C O M PONE XL-DH229 N T SYSTEM iPod is a trademark of XL-DH229N (main unit) and CP-DH229N (speaker system).
XL-DH229N Operation Manual
Page 3
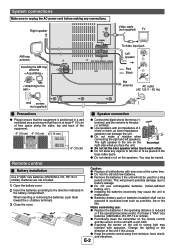
Remote control Battery installation Caution: ● Replace all old batteries with new ones at least 4" (10 cm) of free space along the sides, top and back of the equipment. 4" (10 cm) 4" (10 cm) 4" (10 cm) MICRO COMPONENT SYSTEM XL-DH229 4" (10 cm) ● Connect the black wire to the minus ... are not included. Purchase 2 "AAA" size batteries (UM/SUM-4, R3, HP-16 or similar). ● Periodically clean the transmitter on the remote control and the sensor on the unit with operation. This will not be exposed to excessive heat such as lower impedance speakers can damage the...
Remote control Battery installation Caution: ● Replace all old batteries with new ones at least 4" (10 cm) of free space along the sides, top and back of the equipment. 4" (10 cm) 4" (10 cm) 4" (10 cm) MICRO COMPONENT SYSTEM XL-DH229 4" (10 cm) ● Connect the black wire to the minus ... are not included. Purchase 2 "AAA" size batteries (UM/SUM-4, R3, HP-16 or similar). ● Periodically clean the transmitter on the remote control and the sensor on the unit with operation. This will not be exposed to excessive heat such as lower impedance speakers can damage the...
XL-DH229N Operation Manual
Page 4
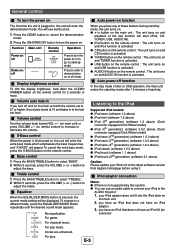
...jack if: 1. Auto power off mode. Volume control Turn the volume knob toward VOL +/- (on main unit) or press VOLUME +/- (on remote control) to stand-by mode after 15 minutes of the last function will appear. POPS FFoor rpoppomp umsiucs. Display brightness control To dim the ...display brightness, hold down the CLEAR/ DIMMER button on . FLAT NNooeqeuqauliazalitzioanti.on the remote control for 2 seconds or more. Function Main unit Power on / off POWER ON/STAND-BY Demo on / off and on the main unit...
...jack if: 1. Auto power off mode. Volume control Turn the volume knob toward VOL +/- (on main unit) or press VOLUME +/- (on remote control) to stand-by mode after 15 minutes of the last function will appear. POPS FFoor rpoppomp umsiucs. Display brightness control To dim the ...display brightness, hold down the CLEAR/ DIMMER button on . FLAT NNooeqeuqauliazalitzioanti.on the remote control for 2 seconds or more. Function Main unit Power on / off POWER ON/STAND-BY Demo on / off and on the main unit...
XL-DH229N Operation Manual
Page 5
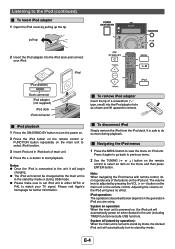
... ("-" type, small) into the iPod dock and connect your TV signal. Please visit Apple's homepage for further information. Note: When navigating the iPod menus with remote control, do so even during USB mode. ● Please make sure to set iPod unit to either NTSC or PAL to stand-by mode. System... ON/STAND-BY button to turn to match your iPod. The volume level is safe to select an item on the main unit or the remote control. Listening to start playback. CD USB iPod iPod (bottom) Dock connector iPod adaptor (not supplied) iPod dock iPod connector To remove iPod adaptor ...
... ("-" type, small) into the iPod dock and connect your TV signal. Please visit Apple's homepage for further information. Note: When navigating the iPod menus with remote control, do so even during USB mode. ● Please make sure to set iPod unit to either NTSC or PAL to stand-by mode. System... ON/STAND-BY button to turn to match your iPod. The volume level is safe to select an item on the main unit or the remote control. Listening to start playback. CD USB iPod iPod (bottom) Dock connector iPod adaptor (not supplied) iPod dock iPod connector To remove iPod adaptor ...
XL-DH229N Operation Manual
Page 6
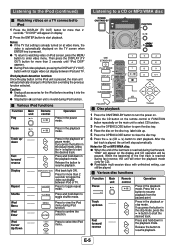
...pressed. ● To return to watching video on the iPod unit is reached during iPod function. Various iPod functions Function Play Main unit Remote control Operation Press in the playback or stop mode. If you press the button in the stop automatically. Press and hold down in the... and hold down to start the desired track. If you press the button in the playback mode. Track up /down Fast forward/ reverse ____ Remote control Operation Press in the playback mode. iPod back light ON. Press for more than 2 seconds. Press to select the iPod menu. Press ...
...pressed. ● To return to watching video on the iPod unit is reached during iPod function. Various iPod functions Function Play Main unit Remote control Operation Press in the playback or stop mode. If you press the button in the stop automatically. Press and hold down in the... and hold down to start the desired track. If you press the button in the playback mode. Track up /down Fast forward/ reverse ____ Remote control Operation Press in the playback mode. iPod back light ON. Press for more than 2 seconds. Press to select the iPod menu. Press ...
XL-DH229N Operation Manual
Page 7
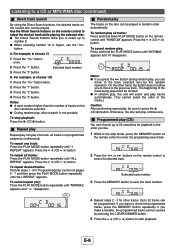
... once. 2 Press the "1" button. 3 Press the "3" button. Press the / (CD / ) button. Otherwise, the disc will play The tracks on the remote control to enter the programing save the track number. 4 Repeat steps 2 - 3 for playback in the stop playback: Press the (CD ) button. Up to ... MODE button on pages 6 - 7 and then press the PLAY MODE button repeatedly until "ALL REPEAT" appears. Programmed play " section on the remote control until "1REPEAT" appears. E-6 A. To repeat one track, all tracks or a programmed sequence continuously. To repeat all tracks: Press and hold...
... once. 2 Press the "1" button. 3 Press the "3" button. Press the / (CD / ) button. Otherwise, the disc will play The tracks on the remote control to enter the programing save the track number. 4 Repeat steps 2 - 3 for playback in the stop playback: Press the (CD ) button. Up to ... MODE button on pages 6 - 7 and then press the PLAY MODE button repeatedly until "ALL REPEAT" appears. Programmed play " section on the remote control until "1REPEAT" appears. E-6 A. To repeat one track, all tracks or a programmed sequence continuously. To repeat all tracks: Press and hold...
XL-DH229N Operation Manual
Page 8
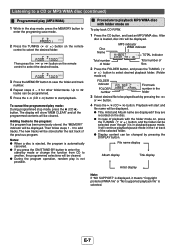
... display Album display Title display Artist display Note: If "NO SUPPORT" is displayed, it is selected. E-7 Then press the or button on the remote control to select the desired tracks. 3 Press the MEMORY button to playback MP3/WMA disc with the folder mode on, press the TUNING ( or... track of files 2 Press the FOLDER button, and press the TUNING ( or ) button to select desired playback folder. (Folder mode on the remote control to the program: If a program has been previously stored, the "MEMORY" indicator will be cleared. ● During the program operation, random play ...
... display Album display Title display Artist display Note: If "NO SUPPORT" is displayed, it is selected. E-7 Then press the or button on the remote control to select the desired tracks. 3 Press the MEMORY button to playback MP3/WMA disc with the folder mode on, press the TUNING ( or... track of files 2 Press the FOLDER button, and press the TUNING ( or ) button to select desired playback folder. (Folder mode on the remote control to the program: If a program has been previously stored, the "MEMORY" indicator will be cleared. ● During the program operation, random play ...
XL-DH229N Operation Manual
Page 9
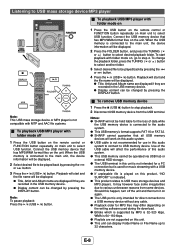
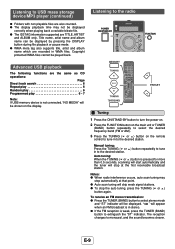
...on the unit. Connect the USB memory device that has MP3/WMA format files on main unit to select USB function. Notes: ● SHARP will work on this audio system. ● USB cable is not recommended for MP3 files may however face some devices. E-8 Playback will start playback... with folder mode off the unit and then turn off 1 Press the USB button on the remote control or FUNCTION button repeatedly on main unit to select USB function. It may differ depending on the writing software used for a PC connection ...
...on the unit. Connect the USB memory device that has MP3/WMA format files on main unit to select USB function. Notes: ● SHARP will work on this audio system. ● USB cable is not recommended for MP3 files may however face some devices. E-8 Playback will start playback... with folder mode off the unit and then turn off 1 Press the USB button on the remote control or FUNCTION button repeatedly on main unit to select USB function. It may differ depending on the writing software used for a PC connection ...
XL-DH229N Operation Manual
Page 10
...: Page Direct track search 6 Repeat play 6 Random play 6 Programmed play 6 - 7 Note: If USB memory device is not connected, "NO MEDIA" will be shown on the remote control to tune in stereo. ● If the FM reception is pressed for more than 0.5 seconds, scanning will start automatically and the tuner will stop...
...: Page Direct track search 6 Repeat play 6 Random play 6 Programmed play 6 - 7 Note: If USB memory device is not connected, "NO MEDIA" will be shown on the remote control to tune in stereo. ● If the FM reception is pressed for more than 0.5 seconds, scanning will start automatically and the tuner will stop...

XL-DH229N Operation Manual
Page 11
... the preset channel number. Note: The "CLOCK" will appear or time will be a power failure or the AC power cord become disconnected. Setting the clock (Remote control only) CD USB 3 Within 30 seconds, press the PRESET ( or ) button to advance the time by 1 minute. If the "MEMORY" and preset number indicators...
... the preset channel number. Note: The "CLOCK" will appear or time will be a power failure or the AC power cord become disconnected. Setting the clock (Remote control only) CD USB 3 Within 30 seconds, press the PRESET ( or ) button to advance the time by 1 minute. If the "MEMORY" and preset number indicators...
XL-DH229N Operation Manual
Page 12
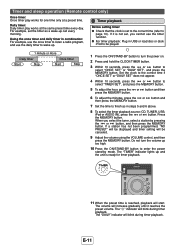
...: Plug in USB or load disc or dock iPod to select "ONCE SET" or "DAILY SET", and press the MEMORY button. Timer and sleep operation (Remote control only) Once timer: Once timer play works at a preset time. For example, set to the correct time (refer to select "TIMER SET", and press...
...: Plug in USB or load disc or dock iPod to select "ONCE SET" or "DAILY SET", and press the MEMORY button. Timer and sleep operation (Remote control only) Once timer: Once timer play works at a preset time. For example, set to the correct time (refer to select "TIMER SET", and press...
XL-DH229N Operation Manual
Page 13
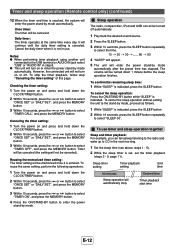
... to enter the power stand-by mode automatically. Timer will be canceled (the setting will enter the power stand-by mode. Timer and sleep operation (Remote control only) (continued) 12 When the timer end time is set, set the timer playback (steps 2 - 9, page 11). Once timer: The timer will automatically stop...
... to enter the power stand-by mode automatically. Timer will be canceled (the setting will enter the power stand-by mode. Timer and sleep operation (Remote control only) (continued) 12 When the timer end time is set, set the timer playback (steps 2 - 9, page 11). Once timer: The timer will automatically stop...
XL-DH229N Operation Manual
Page 14
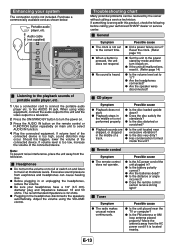
Should this product, check the following before calling your authorized SHARP dealer or service center. Note: To prevent noise interference, place ...shown below. Headphones ● Do not turn the power on. 3 Press the AUDIO IN button on the remote control or FUNCTION button repeatedly on and listen to select AUDIO IN function. 4 Play the connected equipment. ... disc very dirty? ● Has condensation formed inside the unit? Audio cable (not supplied) MICRO COMPONENT SYSTEM XL-DH229 Listening to the playback sounds of a track. ● Is the unit located near the TV or computer...
Should this product, check the following before calling your authorized SHARP dealer or service center. Note: To prevent noise interference, place ...shown below. Headphones ● Do not turn the power on. 3 Press the AUDIO IN button on the remote control or FUNCTION button repeatedly on and listen to select AUDIO IN function. 4 Play the connected equipment. ... disc very dirty? ● Has condensation formed inside the unit? Audio cable (not supplied) MICRO COMPONENT SYSTEM XL-DH229 Listening to the playback sounds of a track. ● Is the unit located near the TV or computer...
XL-DH229N Operation Manual
Page 15
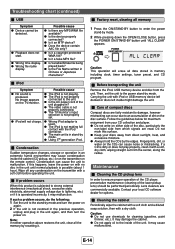
... damage, however mistracking can cause noise or mistracking. Caution: ● Do not use chemicals for options. Possible cause ● Is there any condensation on the remote control. No image appears on . If this happens, leave the power on either side of the unit plugged in the unit again, and then turn...
... damage, however mistracking can cause noise or mistracking. Caution: ● Do not use chemicals for options. Possible cause ● Is there any condensation on the remote control. No image appears on . If this happens, leave the power on either side of the unit plugged in the unit again, and then turn...


