LC-42D64U | LC-46D64U | LC-52D64U Operation Manual
Page 3
... symbol, within the product's enclosure that are not selectable are grayed out. • The examples used throughout this manual are located at the rear of the TV. The exclamation point within a triangle is intended to alert the user to the presence of uninsulated "dangerous voltage" ...TO WIDE SLOT, FULLY INSERT. 1 ENGLISH LC-42D64U LC-46D64U LC-52D64U LIQUID CRYSTAL TELEVISION ENGLISH OPERATION MANUAL • The illustrations and on-screen displays in this operation manual are for explanation purposes and may vary slightly from the actual operations. • Menu items that may...
... symbol, within the product's enclosure that are not selectable are grayed out. • The examples used throughout this manual are located at the rear of the TV. The exclamation point within a triangle is intended to alert the user to the presence of uninsulated "dangerous voltage" ...TO WIDE SLOT, FULLY INSERT. 1 ENGLISH LC-42D64U LC-46D64U LC-52D64U LIQUID CRYSTAL TELEVISION ENGLISH OPERATION MANUAL • The illustrations and on-screen displays in this operation manual are for explanation purposes and may vary slightly from the actual operations. • Menu items that may...

LC-42D64U | LC-46D64U | LC-52D64U Operation Manual
Page 8
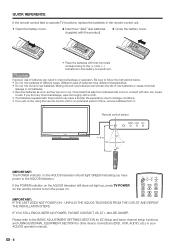
...SHARP ELECTRONICS CORPORATION, LATIN AMERICA GROUP 6100 Blue Lagoon Drive, Suite 150, Miami, Florida 33126, U.S.A. Hex key 2 Attach the supporting post for the stand unit onto the base using it from the AC INPUT terminal. • Before performing work spread cushioning over . 1 Confirm that there are provided with the TV... Page 8 AC cord (g1) Page 7 Cable clamp (g1) Cable tie (g1) Page 7 Stand unit (g1) Page 6 Operation manual (g1) NOTE • Always use the AC cord supplied with the product. QUICK REFERENCE Attaching the stand • Before attaching (or detaching...
...SHARP ELECTRONICS CORPORATION, LATIN AMERICA GROUP 6100 Blue Lagoon Drive, Suite 150, Miami, Florida 33126, U.S.A. Hex key 2 Attach the supporting post for the stand unit onto the base using it from the AC INPUT terminal. • Before performing work spread cushioning over . 1 Confirm that there are provided with the TV... Page 8 AC cord (g1) Page 7 Cable clamp (g1) Cable tie (g1) Page 7 Stand unit (g1) Page 6 Operation manual (g1) NOTE • Always use the AC cord supplied with the product. QUICK REFERENCE Attaching the stand • Before attaching (or detaching...
LC-42D64U | LC-46D64U | LC-52D64U Operation Manual
Page 10
...THE OUTLET AND REPEAT THE INSTALLATION STEPS. IF YOU STILL ENCOUNTER NO POWER, PLEASE CONTACT US AT 1-800-BE-SHARP. IMPORTANT: IF THE UNIT DOES NOT POWER ON - Chemicals that come in contact with their terminals corresponding to ...the (e) and (f) indications in the battery compartment. QUICK REFERENCE If the remote control fails to operate TV functions, replace the batteries in the remote control unit. 1 Open the battery cover. 2 Insert two "AAA" size ... connections (DVD, VCR, AUDIO, etc.) in your AQUOS operation manual. 8 Different types of different types.
...THE OUTLET AND REPEAT THE INSTALLATION STEPS. IF YOU STILL ENCOUNTER NO POWER, PLEASE CONTACT US AT 1-800-BE-SHARP. IMPORTANT: IF THE UNIT DOES NOT POWER ON - Chemicals that come in contact with their terminals corresponding to ...the (e) and (f) indications in the battery compartment. QUICK REFERENCE If the remote control fails to operate TV functions, replace the batteries in the remote control unit. 1 Open the battery cover. 2 Insert two "AAA" size ... connections (DVD, VCR, AUDIO, etc.) in your AQUOS operation manual. 8 Different types of different types.
LC-42D64U | LC-46D64U | LC-52D64U Operation Manual
Page 15
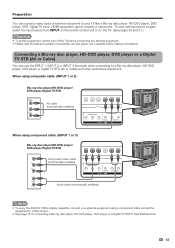
... from INPUT on the remote control unit or on the TV. (See pages 30 and 31.) CAUTION • To protect equipment, always turn off the TV before connecting any external equipment. • Please read the relevant operation manual (Blu-ray disc player, etc.) carefully before making connections.... Connecting a Blu-ray disc player, HD-DVD player, DVD player or a Digital TV STB (Air or Cable) You can...
... from INPUT on the remote control unit or on the TV. (See pages 30 and 31.) CAUTION • To protect equipment, always turn off the TV before connecting any external equipment. • Please read the relevant operation manual (Blu-ray disc player, etc.) carefully before making connections.... Connecting a Blu-ray disc player, HD-DVD player, DVD player or a Digital TV STB (Air or Cable) You can...

LC-42D64U | LC-46D64U | LC-52D64U Operation Manual
Page 22
...audio in another language or something completely different like live sporting events, shows and concerts in dynamic stereo sound. • SAP broadcasts Receive TV broadcasts in either in mono or stereo). Example: when receiving Digital broadcasting Air DIGITAL 2.2 Audio1 : STEREO Air DIGITAL 2.2 Audio2 : ...for the program. This feature is difficult to hear. • Obtain a clearer sound by manually switching to match the television broadcast signal. The TV with MTS can enjoy Hi-Fi stereo sound or SAP broadcasts where available. • Stereo broadcasts View programs...
...audio in another language or something completely different like live sporting events, shows and concerts in dynamic stereo sound. • SAP broadcasts Receive TV broadcasts in either in mono or stereo). Example: when receiving Digital broadcasting Air DIGITAL 2.2 Audio1 : STEREO Air DIGITAL 2.2 Audio2 : ...for the program. This feature is difficult to hear. • Obtain a clearer sound by manually switching to match the television broadcast signal. The TV with MTS can enjoy Hi-Fi stereo sound or SAP broadcasts where available. • Stereo broadcasts View programs...
LC-42D64U | LC-46D64U | LC-52D64U Operation Manual
Page 23
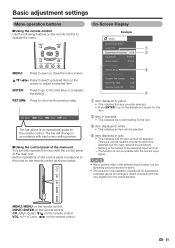
... MENU : Exit The bar above is not compatible with the control panel of the main unit You can be selected. 4 Item displayed in the operation manual are enlarged, others cropped) and may vary slightly from the actual screens. The bar will change in accordance with each menu setting screen. ■ Using...
... MENU : Exit The bar above is not compatible with the control panel of the main unit You can be selected. 4 Item displayed in the operation manual are enlarged, others cropped) and may vary slightly from the actual screens. The bar will change in accordance with each menu setting screen. ■ Using...
LC-42D64U | LC-46D64U | LC-52D64U Operation Manual
Page 25
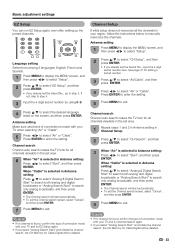
... • To exit the Channel search screen, select "Cancel", and then press ENTER. 7 Press MENU to manually memorize the channels. Channel search Channel auto search makes the TV look for Cable Digital will start automatically. • To exit the Channel search screen, select "Cancel", and ..."CH Search", and then press ENTER. 3 When "Air" is selected in Antenna setting: Press c/d to step 3. When "Cable" is selected in your TV when selecting "Air" or "Cable". 5 Press c/d to exit. Channel Setup If initial setup does not memorize all channels viewable in the set the Secret...
... • To exit the Channel search screen, select "Cancel", and then press ENTER. 7 Press MENU to manually memorize the channels. Channel search Channel auto search makes the TV look for Cable Digital will start automatically. • To exit the Channel search screen, select "Cancel", and ..."CH Search", and then press ENTER. 3 When "Air" is selected in Antenna setting: Press c/d to step 3. When "Cable" is selected in your TV when selecting "Air" or "Cable". 5 Press c/d to exit. Channel Setup If initial setup does not memorize all channels viewable in the set the Secret...

LC-42D64U | LC-46D64U | LC-52D64U Operation Manual
Page 31
...remote control unit. (See page 19.) • Audio menu is grayed out when Output Select is the factory preset value. • When a TV program finishes, this case, please refer to exit. Enable Disable • Five minutes before the power shuts down, the remaining time displays ... "Disable" is set to "Enable", the power will automatically shut down , the remaining time displays every minute. 4 Press MENU to the operation manual of your DVD player. NOTE • You can choose Surround by pressing SURROUND on your DVD player. No signal off When set to select "...
...remote control unit. (See page 19.) • Audio menu is grayed out when Output Select is the factory preset value. • When a TV program finishes, this case, please refer to exit. Enable Disable • Five minutes before the power shuts down, the remaining time displays ... "Disable" is set to "Enable", the power will automatically shut down , the remaining time displays every minute. 4 Press MENU to the operation manual of your DVD player. NOTE • You can choose Surround by pressing SURROUND on your DVD player. No signal off When set to select "...
LC-42D64U | LC-46D64U | LC-52D64U Operation Manual
Page 32
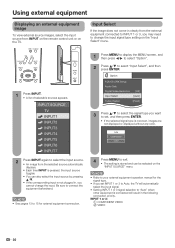
... also select the input source by pressing a/b. • If the corresponding input is not plugged in the following connection priority. INPUT SOURCE TV INPUT1 INPUT2 INPUT3 INPUT4 INPUT5 INPUT6 INPUT7 2 Press INPUT again to select the input source. • An image from INPUT on the ...remote control unit or on the TV. NOTE • Refer to your external equipment operation manual for external equipment connection. 1 Press MENU to display the MENU screen, and then press c/d to select "Option". 2 Press...
... also select the input source by pressing a/b. • If the corresponding input is not plugged in the following connection priority. INPUT SOURCE TV INPUT1 INPUT2 INPUT3 INPUT4 INPUT5 INPUT6 INPUT7 2 Press INPUT again to select the input source. • An image from INPUT on the ...remote control unit or on the TV. NOTE • Refer to your external equipment operation manual for external equipment connection. 1 Press MENU to display the MENU screen, and then press c/d to select "Option". 2 Press...
LC-42D64U | LC-46D64U | LC-52D64U Operation Manual
Page 33
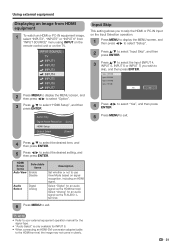
... ENTER. 5 Press c/d to the HDMI terminal, the image may not come in clearly. 31 NOTE • Refer to your external equipment operation manual for the signal type. • "Audio Select" is only available for INPUT 6. • When connecting an HDMI-DVI conversion adapter/cable to ...then press ENTER. Select "Analog" for an audio signal via the R-AUDIO -L terminal. 6 Press MENU to use View Mode based on the TV. Select "Digital" for an audio signal via the HDMI terminal. HDMI Setup items Auto View Selectable items Enable Disable Audio Select Digital Analog Description...
... ENTER. 5 Press c/d to the HDMI terminal, the image may not come in clearly. 31 NOTE • Refer to your external equipment operation manual for the signal type. • "Audio Select" is only available for INPUT 6. • When connecting an HDMI-DVI conversion adapter/cable to ...then press ENTER. Select "Analog" for an audio signal via the R-AUDIO -L terminal. 6 Press MENU to use View Mode based on the TV. Select "Digital" for an audio signal via the HDMI terminal. HDMI Setup items Auto View Selectable items Enable Disable Audio Select Digital Analog Description...
LC-42D64U | LC-46D64U | LC-52D64U Operation Manual
Page 34
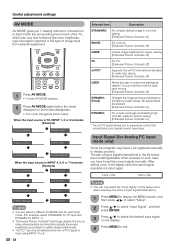
... have low contrast or when the image flickers. 4 Press c/d to adjust the item to your desired position. 5 Press MENU to the TV and switch it cannot be selected. • The default cursor position may not be in the center, because the screen position variable ranges may be...adjustment Ordinarily you can be asymmetrical. • The screen position variable ranges depend on the View Mode or the signal type. In some cases, however, manual adjustment is moved while executing Auto Sync. • Be sure to connect the PC to exit. failed. • Auto Sync. adjustment (for Analog ...
... have low contrast or when the image flickers. 4 Press c/d to adjust the item to your desired position. 5 Press MENU to the TV and switch it cannot be selected. • The default cursor position may not be in the center, because the screen position variable ranges may be...adjustment Ordinarily you can be asymmetrical. • The screen position variable ranges depend on the View Mode or the signal type. In some cases, however, manual adjustment is moved while executing Auto Sync. • Be sure to connect the PC to exit. failed. • Auto Sync. adjustment (for Analog ...
LC-42D64U | LC-46D64U | LC-52D64U Operation Manual
Page 35
...moving it up or down. 4 Press c/d to adjust the item to the desired position. 5 Press MENU to exit. V-Pos. It cannot be manually adjusted. • The screen position variable ranges depend on the screen. 4 Press c/d to input source. Reset If complex adjustments are stored separately according ... automatically adjusted. The ranges can be seen on the screen. 3 Press c/d to select "Yes", and then press ENTER. • "Now, TV will be restored to normal, you already set the Secret No., input the 4-digit secret number here. Language setting You can reset the settings to...
...moving it up or down. 4 Press c/d to adjust the item to the desired position. 5 Press MENU to exit. V-Pos. It cannot be manually adjusted. • The screen position variable ranges depend on the screen. 4 Press c/d to input source. Reset If complex adjustments are stored separately according ... automatically adjusted. The ranges can be seen on the screen. 3 Press c/d to select "Yes", and then press ENTER. • "Now, TV will be restored to normal, you already set the Secret No., input the 4-digit secret number here. Language setting You can reset the settings to...
LC-42D64U | LC-46D64U | LC-52D64U Operation Manual
Page 40
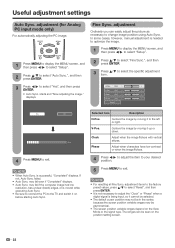
In such case, you have to be registered manually to set the mode for each input mode. (For example, select STANDARD for TV input and DYNAMIC for Analog PC input mode only) Some input signals may have to display properly. Input Signal (for INPUT 1.) • "Enhanced Picture Contrast...factory preset values. Useful adjustment settings AV MODE AV MODE gives you 7 viewing options to choose from to best match the surrounding environment of the TV, which can vary due to factors like room brightness, type of program watched or the type of image input from external equipment. 1 Press AV...
In such case, you have to be registered manually to set the mode for each input mode. (For example, select STANDARD for TV input and DYNAMIC for Analog PC input mode only) Some input signals may have to display properly. Input Signal (for INPUT 1.) • "Enhanced Picture Contrast...factory preset values. Useful adjustment settings AV MODE AV MODE gives you 7 viewing options to choose from to best match the surrounding environment of the TV, which can vary due to factors like room brightness, type of program watched or the type of image input from external equipment. 1 Press AV...
LC-42D64U | LC-46D64U | LC-52D64U Operation Manual
Page 56
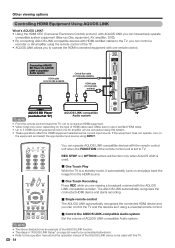
...standby mode, it automatically turns on page 55 need to be completed beforehand. • Refer to this operation manual and the operation manual of the AQUOS LINK device to be connected using this TV. 54 The AQUOS LINK automatically recognizes the connected HDMI device and starts recording. ˙ Single remote control The...connected HDMI device and you are viewing a broadcast recieved with one AV amplifier can be used . ˙ One Touch Play While the TV is in "AQUOS LINK Setup" on and plays back the image from the HDMI source. ˙ One Touch Recording Press REC while you can ...
...standby mode, it automatically turns on page 55 need to be completed beforehand. • Refer to this operation manual and the operation manual of the AQUOS LINK device to be connected using this TV. 54 The AQUOS LINK automatically recognizes the connected HDMI device and starts recording. ˙ Single remote control The...connected HDMI device and you are viewing a broadcast recieved with one AV amplifier can be used . ˙ One Touch Play While the TV is in "AQUOS LINK Setup" on and plays back the image from the HDMI source. ˙ One Touch Recording Press REC while you can ...
LC-42D64U | LC-46D64U | LC-52D64U Operation Manual
Page 58
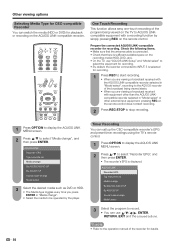
...cable is connected. • Check that there is sufficient available space on the remote control. NOTE • Refer to the operation manual of the broadcast being viewed on the TV to be operated by simply pressing REC on the recording media (HDD, DVD, etc.). • On the... a broadcast received with a recording function by the player. Timer Recording You can call up the CEC-compatible recorder's EPG and preset timer recordings using the TV's remote control. 1 Press OPTION to display the AQUOS LINK MENU screen. 2 Press a/b to record. • You can switch the media (HDD or ...
...cable is connected. • Check that there is sufficient available space on the remote control. NOTE • Refer to the operation manual of the broadcast being viewed on the TV to be operated by simply pressing REC on the recording media (HDD, DVD, etc.). • On the... a broadcast received with a recording function by the player. Timer Recording You can call up the CEC-compatible recorder's EPG and preset timer recordings using the TV's remote control. 1 Press OPTION to display the AQUOS LINK MENU screen. 2 Press a/b to record. • You can switch the media (HDD or ...
LC-42D64U | LC-46D64U | LC-52D64U Operation Manual
Page 59
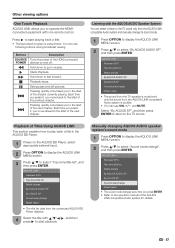
... By AQUOS AUDIO SP By AQUOS SP Sound mode change Model select • The sound from the TV speaker is muted and only the sound from the AQUOS LINKcompatible Audio system and manually change Model select • The sound mode changes every time you to the start of the chapter ... control. AQUOS LINK Recorder EPG Top menu/title list Media change By AQUOS AUDIO SP By AQUOS SP Sound mode change ", and then press ENTER. Manually changing AQUOS AUDIO speaker system's sound mode 1 Press OPTION to display the AQUOS LINK MENU screen. 2 Press a/b to select "Sound mode change Model select...
... By AQUOS AUDIO SP By AQUOS SP Sound mode change Model select • The sound from the TV speaker is muted and only the sound from the AQUOS LINKcompatible Audio system and manually change Model select • The sound mode changes every time you to the start of the chapter ... control. AQUOS LINK Recorder EPG Top menu/title list Media change By AQUOS AUDIO SP By AQUOS SP Sound mode change ", and then press ENTER. Manually changing AQUOS AUDIO speaker system's sound mode 1 Press OPTION to display the AQUOS LINK MENU screen. 2 Press a/b to select "Sound mode change Model select...

LC-42D64U | LC-46D64U | LC-52D64U Operation Manual
Page 65
NOTE • As a precautionary measure, make a note of your secret number above, cut it from this manual, and keep it in a safe place. 63 CLEARING THE SECRET NUMBER If you forget the secret number, clear the secret number using the following procedure. 1 ...", and the Secret number input screen displays. The secret number is . Setup Secret No. Option aaaa 3 Press and hold both CHr and VOLk on the TV simultaneously until the message appears on the screen.
NOTE • As a precautionary measure, make a note of your secret number above, cut it from this manual, and keep it in a safe place. 63 CLEARING THE SECRET NUMBER If you forget the secret number, clear the secret number using the following procedure. 1 ...", and the Secret number input screen displays. The secret number is . Setup Secret No. Option aaaa 3 Press and hold both CHr and VOLk on the TV simultaneously until the message appears on the screen.
LC-42D64U | LC-46D64U | LC-52D64U Operation Manual
Page 67
... WARRANTY GIVES YOU SPECIFIC LEGAL RIGHTS. No other than a Sharp authorized servicer. Sharp does not warrant nor shall Sharp be readily available to the servicer, free and clear of the Product by this Limited Warranty (see Operation Manual on remedies for breach in such states, the limits herein ... modification, tampering, misuse, improper operation or maintenance or any way responsible, for any ): LC-42D64U /LC-46D64U/LC-52D64U LCD Color Television (Be sure to have this information available when you intend to have been subject to abuse (including, but not limited to obtain...
... WARRANTY GIVES YOU SPECIFIC LEGAL RIGHTS. No other than a Sharp authorized servicer. Sharp does not warrant nor shall Sharp be readily available to the servicer, free and clear of the Product by this Limited Warranty (see Operation Manual on remedies for breach in such states, the limits herein ... modification, tampering, misuse, improper operation or maintenance or any way responsible, for any ): LC-42D64U /LC-46D64U/LC-52D64U LCD Color Television (Be sure to have this information available when you intend to have been subject to abuse (including, but not limited to obtain...


