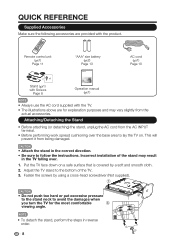
LC-32D59U | LC42D69U Operation Manual
Page 10
... avoid the damages when you turn the TV for explanation purposes and may result in the correct direction. • Be sure to follow the instructions. Remote control unit ( X1) Page 11 42" 32" Stand ( X1) with Screws Page 8 "AAA" size battery ( X2) Page 13 Operation manual ( X1) AC cord ( X1) Page...
LC-32D59U | LC42D69U Operation Manual
Page 12
...; This product must only be connected to any other kind of the television. (See page 12.) 2 Connect the AC plug for the television into the remote control unit.(See page 13.) 10 Connecting it to a 120V, 60Hz AC outlet. QUICK REFERENCE Quick Installation Tips 1 Attach your antenna to the back of...
LC-32D59U | LC42D69U Operation Manual
Page 13
... IF YOU STILL ENCOUNLTCDTEV R NO POWER, PLEASE CONTACT US AT 1-800-BE-SHARP. In such cases, change the angle of the remote control unit. • The remote control unit may not work Remote Control sensor properly if the remote control sensor on . FAVORITE CH A B C D SLEEP CC VIEW MODE ...AV MODE IMPORTANT: IF THE UNIT DOES NOT POWER ON - QUICK REFERENCE Using the Remote Control Unit Use the remote control unit by pointing it towards the remote control sensor on the remote control to shock. The heat may prevent proper operation. GJ221 11 Objects between the...
LC-32D59U | LC42D69U Operation Manual
Page 15
...new batteries. Different types of batteries have a shorter life expectancy due to storage conditions. • If you will not be using the remote control unit for an extended period of time, remove batteries from it. • The batteries (batteries installed) shall not be exposed ... Remove batteries as soon as sunshine, fire or the like. 13 Preparation Installing Batteries in the Remote Control Unit If the remote control fails to operate TV functions, replace the batteries in the remote control unit. 1 Open the battery cover. 3 Close the battery cover. 2 Insert two "AAA"...
LC-32D59U | LC42D69U Operation Manual
Page 16
...INSTRUCTIONS 3 QUICKR EFERENCE...8 Supplied Accessories 8 Attaching/Detaching the Stand 8 Detaching the stand neck for wall mounting 9 Quick Installation Tips 10 Using the Remote Control Unit 11 Antennas ...12 Connecting Antenna Cable 12 Installing Batteries in the Remote Control Unit 13 Contents...14 Part Names ...15 TV(F ront)...15 TV (Side/Rear)...15... Remote Control Unit 16 Introduction to Connectionst 17 WatchingTV ...23 Turning On/Off the Power 23 InitialS etup...23 Direct Button Operation 25 On-Screen ...
LC-32D59U | LC42D69U Operation Manual
Page 17
...; The illustrations in this operation manual are for explanation purposes and may vary slightly from the actual operations. 15 Part Names TV (Front) POWER indicator Remote control sensor Light sensor TV (Side/Rear) *2 Channel buttons CH (CH / ) + VOL MENU INPUT POWER Volume buttons (VOL+ / _) MENU button INPUT button POWER button *3 AC...
LC-32D59U | LC42D69U Operation Manual
Page 18
... the screen. 19 FREEZE: Set the still image. This display will disappear after selecting with the 0-9 buttons. 4 FLASHBACK: Press to switch to standby. Part Names Remote Control Unit POWER 16 INPUT 1 1 2 3 4 5 6 2 17 /7 8 0 9 ENT 3 18 19 DIS P LAY F RE E Z E AUDIO FLASHBACK 4 MUTE + 5 6 20 21 `VOL SURROUND...25 26 EXIT ENTER RETURN A SLEEP FAVORITE CH B C D CC VIEW MODE AV MODE 10 11 12 13 14 15 LCDTV GJ221 • When using the remote control unit, point it at the TV. 1 INPUT: Select a TV input source. (See page 25.) 2 0-9: Set the channel. 3 ENT: Jumps ...
LC-32D59U | LC42D69U Operation Manual
Page 20
.... • The CH List screen displays. 2 Press / to select the input source. • You can also select the input source by pressing INPUT on the remote control unit or on the TV. Displaying an External Equipment Image Display To view external source images, select the input source by pressing INPUT. Each...
LC-32D59U | LC42D69U Operation Manual
Page 21
... a Ø 3.5 mm stereo minijack cable to external equipment, use commercially available cables. To view external source images, select the input source from INPUT on the remote control unit or on the TV. (See pages 18 and 25.)For connecting the TV to the AUDIO PC/HDMI t.erminal . 19 Connecting to External...
LC-32D59U | LC42D69U Operation Manual
Page 25
... Setup screen display at the first use .InPitirael sSsetup TWhealnckomyoeutofour syeouthrepuWrcizhaardsefoorf our SInHitAiaRl SPeLtiuqpu!i!d Crystal Television. disappears. Insert the batteries into the remote control unit. (See page 13.) 2. Plug in the AC cord to the TV. (See page 12.) 3. Please press [OENKT] EtoRs...power will guide you are not going to use this TV for the first time, the Initial Setup will turn on the remote control unit. 1. Welcome TV USB PC MENU EXIT ENTER RETURN 2. Initial Setup When you turn to start the initial setup. use ...
LC-32D59U | LC42D69U Operation Manual
Page 27
... input source toggles. • If you to cancel the sleep timer. • The TV will be canceled by using INPUT on the remote control unit or INPUT on the remote control unit. • To increase the volume, press VOL, . • To decrease the volume, press VOL. . Changing Volume You can change channels...
LC-32D59U | LC42D69U Operation Manual
Page 32
...Example Example ▼ ▼ 1 2 ▼ 3 ▼ ▼ Video Audio TV Setup Parental Video AV Mode Brightness Contrast Saturation Hue Sharpness Color Temperature Advanced Video Ambient Light Sensor User 50 50 50 0 10 On Enter Enter Select Return Exit 1 2 Video AV Mode User Brightness 50...Menu options differ in yellow • This indicates the item currently selected. • Press ► to go to the adjustment screen for the remote control. The bar will change in accordance with each menu setting screen. 1 Press ◄ / ► to enter the desired item or return...
LC-32D59U | LC42D69U Operation Manual
Page 33
... the main unit. ENTER: Press to go to enter it. 2. CH VOL +/-:Cursor / on the remote control. POWER INPUT: ENTER on the remote control. + VOL - Example Video Audio TV Setup Parental AV Mode Brightness Contrast Saturation Hue Sharpness Color Temperature Advanced Video Ambient Light Sensor User 50 50 50 0 10 On Video Enter...
LC-32D59U | LC42D69U Operation Manual
Page 35
... MENU to display the MENU screen, and then press / to select "Audio" and press ENTER or►to enter it possible to turn on the remote control unit. (See page 26.) Equalizer Select the preset audio mode from Off, Rock, Pop, Live, Classic . On-Screen Display Menu Audio Menu Adjusts the...
LC-32D59U | LC42D69U Operation Manual
Page 36
... English Enter Enter Select Return Exit TV USB PC MENU EXIT ENTER RETURN 1. Press MENU to set the item. 3. Press MENU on the remote control and select "TV"/"Favorite channels". 2. Press ϧ / ϰ to select the category that you to program 4 favorite channels, in... you the possibility to select your area. = = = = CH Skip To prevent certain programs from being viewed by pressing CH / buttons on the remote control. 34 To register your favorite channel: 1. Press ϧ / ϰ to swap between main and alternative language, when it . 2. Favorite Channels...
LC-32D59U | LC42D69U Operation Manual
Page 39
... content advisory data are sent by the broadcaster or by the program provider Block certain programs to prevent children from the number buttons on the remote control, a screen prompting you to take effect. • If you to control access to individual programs based on the... remote control. • The default password is 0000. Channel Block This function prevents children from watching certain channels. • Restart the TV for the change to ...
LC-32D59U | LC42D69U Operation Manual
Page 42
... inadvisable for viewing with parent. On-Screen Display Menu Movie rating Description Over 14 years: Could contain themes where violence is set to on the remote control.
LC-32D59U | LC42D69U Operation Manual
Page 43
... you still = = • Color Keys: RED: media type, GREEN: Size, YELLOW: Sort. • CH / : Page up/down. You can be supported to select other sources. 3. remote control and follow the on-screen instructions to enter it. 2. USB storage device compatibility: • USB storage device only support FAT 32 file system and...
LC-32D59U | LC42D69U Operation Manual
Page 44
.../ : Go to operate. • : Play/Pause. • Color Keys GREEN: Duration. While the music is playing, use the color buttons on the remote control and follow the on -screen instructions to the next/previous photo. • DISPLAY: Display the information. • When slide show is playing: • ...key to return to the previous page or exit the option menu. • You can also use the short keys on the remote control and follow the on the remote control to operate. 4. You can select the following options to operate. • Pause • Repeat • Shuffl...
LC-32D59U | LC42D69U Operation Manual
Page 45
Press MENU to display the sub-menu and select the following options to operate. • Pause • Repeat • Show Info • AV Mode • View Mode • You can also use the short keys on the remote control to select a video file. 2. In the file thumbnail browser, press ϧ / ϰ / / to operate. • : Play/Pause. • / : Next/Previous track. • Color Keys: GREEN: Repeat, RED/YELLOW: Backward/Forward seek. DISPLAY: Info. 43 Press ENTER to play the video file. 3. USB ϧ ϧ Play Video 1.