LC-42D64U | LC-46D64U | LC-52D64U Operation Manual
Page 3
...THIS PRODUCT TO RAIN OR MOISTURE. NO USER-SERVICEABLE PARTS INSIDE. REFER SERVICING TO QUALIFIED SERVICE PERSONNEL. The numbers are based on -screen displays in the literature accompanying the product. CAUTION: TO PREVENT ELECTRIC SHOCK, MATCH WIDE BLADE OF PLUG TO WIDE SLOT, FULLY INSERT... at the rear of loss or theft, please record the TV's model and serial numbers in case of the TV. ENGLISH LC-42D64U LC-46D64U LC-52D64U LIQUID CRYSTAL TELEVISION ENGLISH OPERATION MANUAL • The illustrations and on the LC-42D64U model. IMPORTANT: To aid reporting in the space provided....
...THIS PRODUCT TO RAIN OR MOISTURE. NO USER-SERVICEABLE PARTS INSIDE. REFER SERVICING TO QUALIFIED SERVICE PERSONNEL. The numbers are based on -screen displays in the literature accompanying the product. CAUTION: TO PREVENT ELECTRIC SHOCK, MATCH WIDE BLADE OF PLUG TO WIDE SLOT, FULLY INSERT... at the rear of loss or theft, please record the TV's model and serial numbers in case of the TV. ENGLISH LC-42D64U LC-46D64U LC-52D64U LIQUID CRYSTAL TELEVISION ENGLISH OPERATION MANUAL • The illustrations and on the LC-42D64U model. IMPORTANT: To aid reporting in the space provided....
LC-42D64U | LC-46D64U | LC-52D64U Operation Manual
Page 6
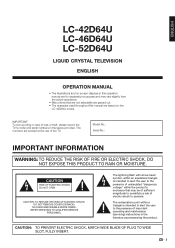
...ventilation openings. for ventilation. Placing the product on a wall, be situated away from heat sources such as a fixed point of the TV. • Lightning - Therefore, it is dropped or applied with no direct sunlight and good ventilation. • Ventilation - For added protection ...for builtin installation; one hand on the screen as radiators, heat registers, stoves, or other openings in the cabinet are followed. • The Liquid Crystal panel used in the vicinity...
...ventilation openings. for ventilation. Placing the product on a wall, be situated away from heat sources such as a fixed point of the TV. • Lightning - Therefore, it is dropped or applied with no direct sunlight and good ventilation. • Ventilation - For added protection ...for builtin installation; one hand on the screen as radiators, heat registers, stoves, or other openings in the cabinet are followed. • The Liquid Crystal panel used in the vicinity...
LC-42D64U | LC-46D64U | LC-52D64U Operation Manual
Page 9
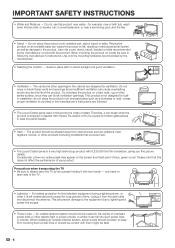
...figure and bundle the cords properly with the cable clamp and the cable tie. Power AC outlet • Place the TV close to turn on the screen. To clean the outer cabinet, use only and should be scratched or broken when dropped or impacted. NOTE • TO ...; TV angle cannot be detached from the box • It's best to use 2 people to lightly moisten. POWER indicator NOTE • Speakers cannot be adjusted. Clean the screen by a heat source or use liquid or aerosol cleaners. Ferrite core 7 The screen is designed for stability. • Lift onto ...
...figure and bundle the cords properly with the cable clamp and the cable tie. Power AC outlet • Place the TV close to turn on the screen. To clean the outer cabinet, use only and should be scratched or broken when dropped or impacted. NOTE • TO ...; TV angle cannot be detached from the box • It's best to use 2 people to lightly moisten. POWER indicator NOTE • Speakers cannot be adjusted. Clean the screen by a heat source or use liquid or aerosol cleaners. Ferrite core 7 The screen is designed for stability. • Lift onto ...
LC-42D64U | LC-46D64U | LC-52D64U Operation Manual
Page 11
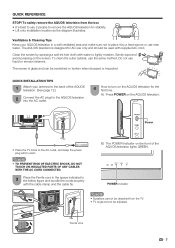
... - Contents IMPORTANT INFORMATION 1 Trademarks 2 DEAR SHARP CUSTOMER 3 IMPORTANT SAFETY INSTRUCTIONS 3 Supplied accessories 6 QUICK REFERENCE 6 Attaching the stand 6 Contents 9 Part names 10 TV (Front 10 TV (Rear/Side 10 Remote control unit 11 Preparation...Calling for Service 65 LIMITED WARRANTY 65 Dimensional drawings • The dimensional drawings for the LCD TV set are shown on the power 16 Turning off the power 16 Initial setup 17 ... 21 Menu operation buttons 21 On-Screen Display 21 Menu items for TV/INPUT 1/2/3 22 Menu items for Analog PC input mode only 32 Fine ...
... - Contents IMPORTANT INFORMATION 1 Trademarks 2 DEAR SHARP CUSTOMER 3 IMPORTANT SAFETY INSTRUCTIONS 3 Supplied accessories 6 QUICK REFERENCE 6 Attaching the stand 6 Contents 9 Part names 10 TV (Front 10 TV (Rear/Side 10 Remote control unit 11 Preparation...Calling for Service 65 LIMITED WARRANTY 65 Dimensional drawings • The dimensional drawings for the LCD TV set are shown on the power 16 Turning off the power 16 Initial setup 17 ... 21 Menu operation buttons 21 On-Screen Display 21 Menu items for TV/INPUT 1/2/3 22 Menu items for Analog PC input mode only 32 Fine ...
LC-42D64U | LC-46D64U | LC-52D64U Operation Manual
Page 13
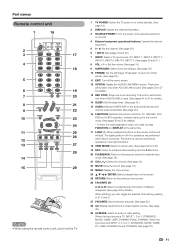
...equipment operational buttons: Operate the external equipment. 5 0 - 9: Set the channel. (See page 18.) 6 • (DOT): (See pages 18 and 52.) 7 INPUT: Select a TV input source. (TV, INPUT 1, INPUT 2, INPUT 3, INPUT 4, INPUT 5, INPUT 6, INPUT 7) (See pages 30 and 31.) 8 VOL k/l: Set the volume. (See page 19.) 9 SURROUND: Select ...DYNAMIC (Fixed), DYNAMIC) (See page 38.) 11 This button is used for performing operations in low-light situations. 18 VIEW MODE: Select the screen size. (See pages 35 and 36.) 19 ENT: Jumps to a channel after selecting with the 0-9 buttons. 20 FLASHBACK: Return to the ...
...equipment operational buttons: Operate the external equipment. 5 0 - 9: Set the channel. (See page 18.) 6 • (DOT): (See pages 18 and 52.) 7 INPUT: Select a TV input source. (TV, INPUT 1, INPUT 2, INPUT 3, INPUT 4, INPUT 5, INPUT 6, INPUT 7) (See pages 30 and 31.) 8 VOL k/l: Set the volume. (See page 19.) 9 SURROUND: Select ...DYNAMIC (Fixed), DYNAMIC) (See page 38.) 11 This button is used for performing operations in low-light situations. 18 VIEW MODE: Select the screen size. (See pages 35 and 36.) 19 ENT: Jumps to a channel after selecting with the 0-9 buttons. 20 FLASHBACK: Return to the ...
LC-42D64U | LC-46D64U | LC-52D64U Operation Manual
Page 18
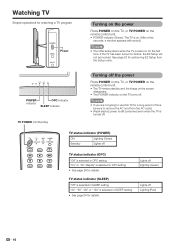
...; See page 34 for details. POWER indicator OPC indicator SLEEP indicator TV POWER (On/Standby) Turning off the power Press POWER on the TV, or TV POWER on the remote control unit. • The TV enters standby and the image on the screen disappears. • The POWER indicator on before, the EZ Setup will... not be sure to use this TV for a long period of time, be invoked....
...; See page 34 for details. POWER indicator OPC indicator SLEEP indicator TV POWER (On/Standby) Turning off the power Press POWER on the TV, or TV POWER on the remote control unit. • The TV enters standby and the image on the screen disappears. • The POWER indicator on before, the EZ Setup will... not be sure to use this TV for a long period of time, be invoked....

LC-42D64U | LC-46D64U | LC-52D64U Operation Manual
Page 19
Perform the following steps before you press TV POWER on the screen, and then press ENTER. Insert the batteries into the remote control unit. (See page 8.) 2. Plug in the AC cord to the AC outlet. (See page 7.) Channel search Channel auto search makes the TV look for the first time, ...it will start automatically. • To exit the Channel search screen, select "Cancel", and then press ENTER. Language Air/Cable CH Search Start Cancel When "Cable" ...
Perform the following steps before you press TV POWER on the screen, and then press ENTER. Insert the batteries into the remote control unit. (See page 8.) 2. Plug in the AC cord to the AC outlet. (See page 7.) Channel search Channel auto search makes the TV look for the first time, ...it will start automatically. • To exit the Channel search screen, select "Cancel", and then press ENTER. Language Air/Cable CH Search Start Cancel When "Cable" ...
LC-42D64U | LC-46D64U | LC-52D64U Operation Manual
Page 21
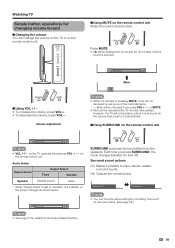
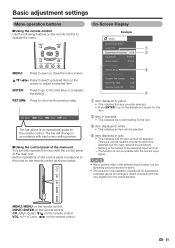
...On and Off. Press MUTE. • M will be canceled by choosing "Surround" on the remote control unit Mutes the current sound output. Watching TV Simple button operations for 30 minutes, and the sound is silenced. 20 Mute NOTE • Within 30 minutes of pressing MUTE, mute can be canceled... Select function. Each time you press VOLk/l or MUTE. • Mute will be displayed on the screen for changing volume/sound ■ Changing the volume You can change the volume on the TV or on the remote control unit. Volume adjustment ■ Using MUTE on the menu items. (See ...
...On and Off. Press MUTE. • M will be canceled by choosing "Surround" on the remote control unit Mutes the current sound output. Watching TV Simple button operations for 30 minutes, and the sound is silenced. 20 Mute NOTE • Within 30 minutes of pressing MUTE, mute can be canceled... Select function. Each time you press VOLk/l or MUTE. • Mute will be displayed on the screen for changing volume/sound ■ Changing the volume You can change the volume on the TV or on the remote control unit. Volume adjustment ■ Using MUTE on the menu items. (See ...
LC-42D64U | LC-46D64U | LC-52D64U Operation Manual
Page 23
... selected. • Press ENTER to go to operate the menu. There are enlarged, others cropped) and may vary slightly from the actual screens. MENU: MENU on the remote control as follows: -Nothing is an operational guide for explanation purposes (some are various reasons why items cannot... below. MENU: Press to the previous step. : Select ENTER : Enter RETURN : Back MENU : Exit The bar above is connected to the adjustment screen for this item. 2 Item in brackets • This indicates the current setting for the item. 3 Item displayed in white • This indicates an...
... selected. • Press ENTER to go to operate the menu. There are enlarged, others cropped) and may vary slightly from the actual screens. MENU: MENU on the remote control as follows: -Nothing is an operational guide for explanation purposes (some are various reasons why items cannot... below. MENU: Press to the previous step. : Select ENTER : Enter RETURN : Back MENU : Exit The bar above is connected to the adjustment screen for this item. 2 Item in brackets • This indicates the current setting for the item. 3 Item displayed in white • This indicates an...
LC-42D64U | LC-46D64U | LC-52D64U Operation Manual
Page 25
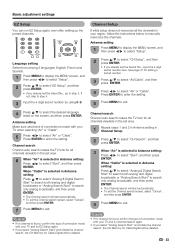
... even after setting up the preset channels. Language setting Select from among 3 languages: English, French and Spanish. 1 Press MENU to display the MENU screen, and then press c/d to select "Setup". 2 Press a/b to select "Start", and then press ENTER. NOTE • If no channel is selected... Press ENTER to enter the setting. 5 Press MENU to exit. 4 Press a/b to enter the setting. Channel search Channel auto search makes the TV look for all channels viewable in the set area. 6 When "Air" is selected in Antenna setting: Press a/b to select "Analog & Digital ...
... even after setting up the preset channels. Language setting Select from among 3 languages: English, French and Spanish. 1 Press MENU to display the MENU screen, and then press c/d to select "Setup". 2 Press a/b to select "Start", and then press ENTER. NOTE • If no channel is selected... Press ENTER to enter the setting. 5 Press MENU to exit. 4 Press a/b to enter the setting. Channel search Channel auto search makes the TV look for all channels viewable in the set area. 6 When "Air" is selected in Antenna setting: Press a/b to select "Analog & Digital ...
LC-42D64U | LC-46D64U | LC-52D64U Operation Manual
Page 26
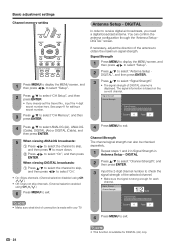
...The signal information is displayed. Channel Strength The channel signal strength can confirm the antenna configuration through the "Antenna Setup DIGITAL" screen. Signal Strength Channel Strength 1 2 CH Signal Strength Current 0 Max 0 4 Press MENU to exit. NOTE • This function is available ...Press a/b to select "Signal Strength". • The signal strength of the selected channel. • Make sure the signal is made with your TV. Signal Strength Channel Strength Signal Strength Current 0 Max 0 4 Press MENU to exit. See page 41 for DIGITAL (Air) only. 24 ...
...The signal information is displayed. Channel Strength The channel signal strength can confirm the antenna configuration through the "Antenna Setup DIGITAL" screen. Signal Strength Channel Strength 1 2 CH Signal Strength Current 0 Max 0 4 Press MENU to exit. NOTE • This function is available ...Press a/b to select "Signal Strength". • The signal strength of the selected channel. • Make sure the signal is made with your TV. Signal Strength Channel Strength Signal Strength Current 0 Max 0 4 Press MENU to exit. See page 41 for DIGITAL (Air) only. 24 ...
LC-42D64U | LC-46D64U | LC-52D64U Operation Manual
Page 27
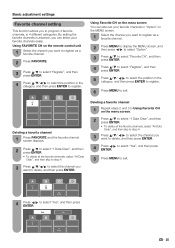
... allows you want to delete, and then press ENTER. A B C D Air Air 3 18 Air 10.1 4 Press c/d to exit. Using Favorite CH on the menu screen You can select your favorite channels in 4 different categories. Yes A B Air 3 No C D Air 10.1 25 A B C D Air 3 Deleting a favorite channel ...advance, you can also set your favorite channels easily. Deleting a favorite channel 1 Repeat steps 2 and 3 in Using Favorite CH on the menu screen. 2 Press a/b to select "1 Data Clear", and then press ENTER. • To delete all the favorite channels, select "All Data Clear",...
... allows you want to delete, and then press ENTER. A B C D Air Air 3 18 Air 10.1 4 Press c/d to exit. Using Favorite CH on the menu screen You can select your favorite channels in 4 different categories. Yes A B Air 3 No C D Air 10.1 25 A B C D Air 3 Deleting a favorite channel ...advance, you can also set your favorite channels easily. Deleting a favorite channel 1 Repeat steps 2 and 3 in Using Favorite CH on the menu screen. 2 Press a/b to select "1 Data Clear", and then press ENTER. • To delete all the favorite channels, select "All Data Clear",...
LC-42D64U | LC-46D64U | LC-52D64U Operation Manual
Page 28
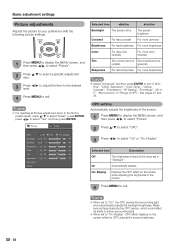
... 3 Press c/d to "On: Display", OPC effect displays on the screen while adjusting the brightness of OPC". Picture Audio OPC Off On Backlight [b12] a16 Contrast [b30] 0 Brightness [ 0] a30 Color [ 0] a30 Tint [ 0] a30 Sharpness [ b2] a10 Advanced Reset On : Display b16 b40 b30 b30 ...b30 b10 Selected item cbutton dbutton Backlight The screen dims The screen brightens Contrast For less contrast For more contrast Brightness For less brightness For ...
... 3 Press c/d to "On: Display", OPC effect displays on the screen while adjusting the brightness of OPC". Picture Audio OPC Off On Backlight [b12] a16 Contrast [b30] 0 Brightness [ 0] a30 Color [ 0] a30 Tint [ 0] a30 Sharpness [ b2] a10 Advanced Reset On : Display b16 b40 b30 b30 ...b30 b10 Selected item cbutton dbutton Backlight The screen dims The screen brightens Contrast For less contrast For more contrast Brightness For less brightness For ...
LC-42D64U | LC-46D64U | LC-52D64U Operation Manual
Page 29
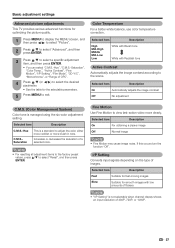
...; See the table for the selectable parameters. 5 Press MENU to exit. Basic adjustment settings Advanced picture adjustments This TV provides various advanced functions for optimizing the picture quality. 1 Press MENU to display the MENU screen, and then press c/d to select "Picture". 2 Press a/b to select "Advanced", and then press ENTER. 3 Press a/b to select...
...; See the table for the selectable parameters. 5 Press MENU to exit. Basic adjustment settings Advanced picture adjustments This TV provides various advanced functions for optimizing the picture quality. 1 Press MENU to display the MENU screen, and then press c/d to select "Picture". 2 Press a/b to select "Advanced", and then press ENTER. 3 Press a/b to select...
LC-42D64U | LC-46D64U | LC-52D64U Operation Manual
Page 30
... select "Audio". The adjustment range of 480P, 720P, or 1080P. 3D-Y/C Provides high quality images with the following settings. 1 Press MENU to display the MENU screen, and then press c/d to a bigger number than the minimum setting. • The minimum setting cannot be set to a smaller number than the maximum setting. •...
... select "Audio". The adjustment range of 480P, 720P, or 1080P. 3D-Y/C Provides high quality images with the following settings. 1 Press MENU to display the MENU screen, and then press c/d to a bigger number than the minimum setting. • The minimum setting cannot be set to a smaller number than the maximum setting. •...

LC-42D64U | LC-46D64U | LC-52D64U Operation Manual
Page 31
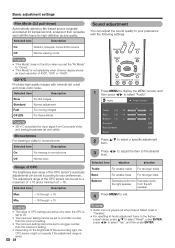
... MENU to exit. Enable Disable • Five minutes before the power shuts down if there is the factory preset value. • When a TV program finishes, this case, please refer to the operation manual of your DVD player. No operation off When set to "Enable", the ... every minute. 4 Press MENU to exit. Basic adjustment settings Surround Surround function allows you to enjoy bass-enhanced sound. 1 Press MENU to display the MENU screen, and then press c/d to select "Audio". 2 Press a/b to select "Bass Enhancer", and then press ENTER. 3 Press c/d to select "On", and then...
... MENU to exit. Enable Disable • Five minutes before the power shuts down if there is the factory preset value. • When a TV program finishes, this case, please refer to the operation manual of your DVD player. No operation off When set to "Enable", the ... every minute. 4 Press MENU to exit. Basic adjustment settings Surround Surround function allows you to enjoy bass-enhanced sound. 1 Press MENU to display the MENU screen, and then press c/d to select "Audio". 2 Press a/b to select "Bass Enhancer", and then press ENTER. 3 Press c/d to select "On", and then...
LC-42D64U | LC-46D64U | LC-52D64U Operation Manual
Page 32
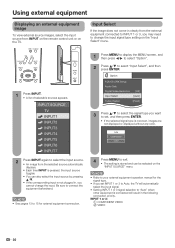
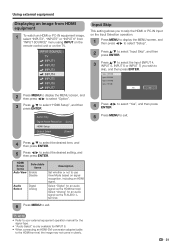
...INPUT SOURCE" menu. NOTE • Refer to your external equipment operation manual for external equipment connection. 1 Press MENU to display the MENU screen, and then press c/d to select "Option". 2 Press a/b to connect the equipment beforehand. Input Select If the image does not come in... the following connection priority. INPUT SOURCE TV INPUT1 INPUT2 INPUT3 INPUT4 INPUT5 INPUT6 INPUT7 2 Press INPUT again to select the input source. • An image from the selected source automatically...
...INPUT SOURCE" menu. NOTE • Refer to your external equipment operation manual for external equipment connection. 1 Press MENU to display the MENU screen, and then press c/d to select "Option". 2 Press a/b to connect the equipment beforehand. Input Select If the image does not come in... the following connection priority. INPUT SOURCE TV INPUT1 INPUT2 INPUT3 INPUT4 INPUT5 INPUT6 INPUT7 2 Press INPUT again to select the input source. • An image from the selected source automatically...
LC-42D64U | LC-46D64U | LC-52D64U Operation Manual
Page 33
... Select "Analog" for INPUT 6. • When connecting an HDMI-DVI conversion adapter/cable to skip, and then press ENTER. INPUT SOURCE TV INPUT1 INPUT2 INPUT3 INPUT4 INPUT5 INPUT6 INPUT7 Input Skip This setting allows you wish to the HDMI terminal, the image may not come in clearly... Audio Select Digital Analog Description Set whether or not to use View Mode based on the Input Selection operation. 1 Press MENU to display the MENU screen, and then press c/d to select "Setup". 2 Press a/b to select "Input Skip", and then press ENTER. 3 Press a/b to select the Input (INPUT 4,...
... Select "Analog" for INPUT 6. • When connecting an HDMI-DVI conversion adapter/cable to skip, and then press ENTER. INPUT SOURCE TV INPUT1 INPUT2 INPUT3 INPUT4 INPUT5 INPUT6 INPUT7 Input Skip This setting allows you wish to the HDMI terminal, the image may not come in clearly... Audio Select Digital Analog Description Set whether or not to use View Mode based on the Input Selection operation. 1 Press MENU to display the MENU screen, and then press c/d to select "Setup". 2 Press a/b to select "Input Skip", and then press ENTER. 3 Press a/b to select the Input (INPUT 4,...
LC-42D64U | LC-46D64U | LC-52D64U Operation Manual
Page 34
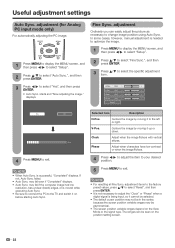
...PC image. Centers the image by moving it cannot be selected. • The default cursor position may not be asymmetrical. • The screen position variable ranges depend on before starting Auto Sync. adjustment items to the factory preset values, press a/b to select "Reset", and then ...press ENTER. • It is moved while executing Auto Sync. • Be sure to connect the PC to the TV and switch it to the left or right. Useful adjustment settings Auto Sync. starts and "Now adjusting the image." displays. 2 Press a/b to ...
...PC image. Centers the image by moving it cannot be selected. • The default cursor position may not be asymmetrical. • The screen position variable ranges depend on before starting Auto Sync. adjustment items to the factory preset values, press a/b to select "Reset", and then ...press ENTER. • It is moved while executing Auto Sync. • Be sure to connect the PC to the TV and switch it to the left or right. Useful adjustment settings Auto Sync. starts and "Now adjusting the image." displays. 2 Press a/b to ...
LC-42D64U | LC-46D64U | LC-52D64U Operation Manual
Page 35
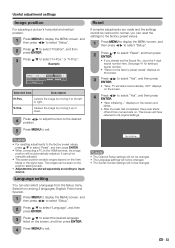
...Press a/b to select "Language", and then press ENTER. 3 Press a/b to select the desired language listed on the screen. 3 Press c/d to select "Yes", and then press ENTER. • "Now, TV will have returned to exit. Language setting You can reset the settings to the factory preset values. 1 Press MENU to... display the MENU screen, and then press c/d to select "Setup". 2 Press a/b to the left or right...
...Press a/b to select "Language", and then press ENTER. 3 Press a/b to select the desired language listed on the screen. 3 Press c/d to select "Yes", and then press ENTER. • "Now, TV will have returned to exit. Language setting You can reset the settings to the factory preset values. 1 Press MENU to... display the MENU screen, and then press c/d to select "Setup". 2 Press a/b to the left or right...


