
HTDD5000 Operation Manual
Page 3
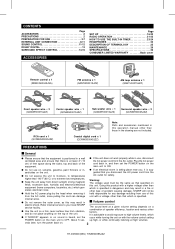
... THE BUILT-IN TIMER 23-24 HEADPHONES 24 DESCRIPTION OF TERMINOLOGY 25 MAINTENANCE 26 SPECIFICATIONS 26 CONSUMER LIMITED WARRANTY Back cover Remote control x 1 (RRMCG0004SJSA) FM antenna x 1 (QANTW0001SJZZ) AM loop antenna x 1 (QANTL0001SJZZ) Front speaker wire.... Plug the AC power cord back in s Volume control electric shock. secticides on . 2 HT-DD5000(SEC) TINSE0009SJZZ higher than those in - internal wires. q If "ERROR" appears or no...later, turn the power back on the unit. main unit to your local SHARP service facility. q Do not remove the outer cover, as that you , ...
... THE BUILT-IN TIMER 23-24 HEADPHONES 24 DESCRIPTION OF TERMINOLOGY 25 MAINTENANCE 26 SPECIFICATIONS 26 CONSUMER LIMITED WARRANTY Back cover Remote control x 1 (RRMCG0004SJSA) FM antenna x 1 (QANTW0001SJZZ) AM loop antenna x 1 (QANTL0001SJZZ) Front speaker wire.... Plug the AC power cord back in s Volume control electric shock. secticides on . 2 HT-DD5000(SEC) TINSE0009SJZZ higher than those in - internal wires. q If "ERROR" appears or no...later, turn the power back on the unit. main unit to your local SHARP service facility. q Do not remove the outer cover, as that you , ...

HTDD5000 Operation Manual
Page 7
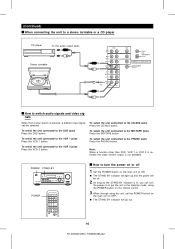
... main unit with new ones at the same time. Please refer to battery leakage. For details consult your nearest SHARP dealer or service center. 6 HT-DD5000(SEC) TINSE0009SJZZ Notes concerning use: q Replace the batteries if the operating distance is reduced or if the operation becomes... direction of time. (Continued) q 2 "AA" size batteries (UM/SUM-3, R6, HP-7 or similar) + + - 8" - 20' (0.2 m - 6 m) 15˚ 15˚ s Remote control ë q When inserting or removing the batteries, push them toward the battery terminal. q Remove the batteries if they are weak or if the unit...
... main unit with new ones at the same time. Please refer to battery leakage. For details consult your nearest SHARP dealer or service center. 6 HT-DD5000(SEC) TINSE0009SJZZ Notes concerning use: q Replace the batteries if the operating distance is reduced or if the operation becomes... direction of time. (Continued) q 2 "AA" size batteries (UM/SUM-3, R6, HP-7 or similar) + + - 8" - 20' (0.2 m - 6 m) 15˚ 15˚ s Remote control ë q When inserting or removing the batteries, push them toward the battery terminal. q Remove the batteries if they are weak or if the unit...
HTDD5000 Operation Manual
Page 11
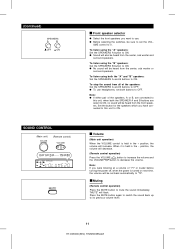
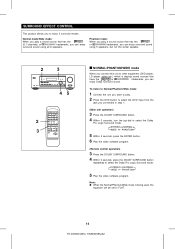
.... POWER STAND-BY POWER s How to turn the power on or put the unit in the stand-by mode, using the POWER button on the remote control. 3 When through using this unit, set the POWER button on . 2 As long as the STAND-BY indicator is not available. To select the unit... the unit connected to the VCR 1 jacks Press the VCR 1 button. q The STAND-BY indicator will light up and the power will go out. 10 HT-DD5000(SEC) TINSE0009SJZZ
.... POWER STAND-BY POWER s How to turn the power on or put the unit in the stand-by mode, using the POWER button on the remote control. 3 When through using this unit, set the POWER button on . 2 As long as the STAND-BY indicator is not available. To select the unit... the unit connected to the VCR 1 jacks Press the VCR 1 button. q The STAND-BY indicator will light up and the power will go out. 10 HT-DD5000(SEC) TINSE0009SJZZ
HTDD5000 Operation Manual
Page 12
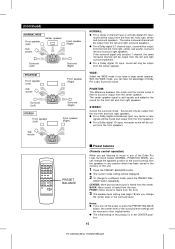
...buttons to set back automatically to decrease the volume. q To use . When it is held in the − position, the volume will decrease. (Remote control operation) Press the VOLUME button to increase the volume and the VOLUME button to "70". s Volume (Main unit operation) When the VOLUME control ... this unit, when both the SPEAKER A and B buttons are connected to this unit to ON. UME control to its previous volume level. 11 HT-DD5000(SEC) TINSE0009SJZZ Press the MUTE button again to switch the sound back up to 0. q No sound will increase. q Before selecting the switches, ...
...buttons to set back automatically to decrease the volume. q To use . When it is held in the − position, the volume will decrease. (Remote control operation) Press the VOLUME button to increase the volume and the VOLUME button to "70". s Volume (Main unit operation) When the VOLUME control ... this unit, when both the SPEAKER A and B buttons are connected to this unit to ON. UME control to its previous volume level. 11 HT-DD5000(SEC) TINSE0009SJZZ Press the MUTE button again to switch the sound back up to 0. q No sound will increase. q Before selecting the switches, ...
HTDD5000 Operation Manual
Page 13
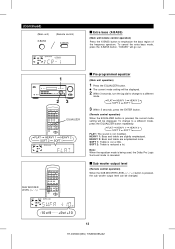
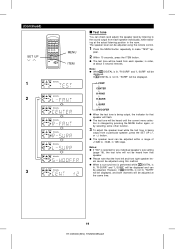
... treble are slightly emphasized. X W SUB WOOFER LEVEL ( ) -10 9 +9 +10 12 HT-DD5000(SEC) TINSE0009SJZZ FLAT HEAVY 1 HEAVY 2 SOFT 2 SOFT 1 3 Within 5 seconds, press the ENTER button. (Remote control operation) When the EQUALIZER button is pressed, the sub woofer output level can be displayed. ...will be changed. To change to emphasize the bass region of the frequency spectrum. (Continued) (Main unit) X-BASS (Remote control) X-BASS s Extra bass (X-BASS) (Main unit/remote control operation) Press the X-BASS button to a different mode. SOFT 1: Treble is not modified. FLAT HEAVY 1 ...
... treble are slightly emphasized. X W SUB WOOFER LEVEL ( ) -10 9 +9 +10 12 HT-DD5000(SEC) TINSE0009SJZZ FLAT HEAVY 1 HEAVY 2 SOFT 2 SOFT 1 3 Within 5 seconds, press the ENTER button. (Remote control operation) When the EQUALIZER button is pressed, the sub woofer output level can be displayed. ...will be changed. To change to emphasize the bass region of the frequency spectrum. (Continued) (Main unit) X-BASS (Remote control) X-BASS s Extra bass (X-BASS) (Main unit/remote control operation) Press the X-BASS button to a different mode. SOFT 1: Treble is not modified. FLAT HEAVY 1 ...
HTDD5000 Operation Manual
Page 15
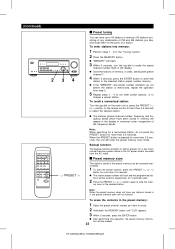
...select the Dolby Pro Logic Surround mode. STEREO NORMAL WIDE PHANTOM 5 Within 5 seconds, press the ENTER button. 6 Play the video software program. (Remote control operation) 3 Press the DOLBY SURROUND button. 4 Within 3 seconds, press the DOLBY SURROUND button repeatedly to select the Dolby Pro Logic Surround mode... unit to other equipment (DVD player, LD player, video etc.) which is being used, the equalizer will be set to FLAT. 14 HT-DD5000(SEC) TINSE0009SJZZ Note: q When the Normal/Phantom/Wide mode is playing sound sources that has the (5.1 channels) or trademarks, you to enjoy...
...select the Dolby Pro Logic Surround mode. STEREO NORMAL WIDE PHANTOM 5 Within 5 seconds, press the ENTER button. 6 Play the video software program. (Remote control operation) 3 Press the DOLBY SURROUND button. 4 Within 3 seconds, press the DOLBY SURROUND button repeatedly to select the Dolby Pro Logic Surround mode... unit to other equipment (DVD player, LD player, video etc.) which is being used, the equalizer will be set to FLAT. 14 HT-DD5000(SEC) TINSE0009SJZZ Note: q When the Normal/Phantom/Wide mode is playing sound sources that has the (5.1 channels) or trademarks, you to enjoy...
HTDD5000 Operation Manual
Page 16
... 1/0 input, monaural sound will be output from the left and surround right speakers. put from the rear. PRESET BALANCE s Preset balance (Remote control operation) While you turn off the power or press the PRESET BALANCE button, the center level or the surround level settings will be ...: More pronounced sound is heard from the front speakers. q The current mode setting will be returned to music in the CENTER position. 15 HT-DD5000(SEC) TINSE0009SJZZ Notes: q If you are listening to their original levels. (Continued) NORMAL/WIDE Front speaker (Left) Sub woofer Center speaker ...
... 1/0 input, monaural sound will be output from the left and surround right speakers. put from the rear. PRESET BALANCE s Preset balance (Remote control operation) While you turn off the power or press the PRESET BALANCE button, the center level or the surround level settings will be ...: More pronounced sound is heard from the front speakers. q The current mode setting will be returned to music in the CENTER position. 15 HT-DD5000(SEC) TINSE0009SJZZ Notes: q If you are listening to their original levels. (Continued) NORMAL/WIDE Front speaker (Left) Sub woofer Center speaker ...
HTDD5000 Operation Manual
Page 20
pear. 2 Within 10 seconds, press the ITEM button. q The speaker level can be adjusted using the remote control. 1 Press the MENU button repeatedly to make "TEST" ap- Notes: q If "NO" is lit, "R-SURR" and "L-SURR" will not be displayed. (Continued) X W SET UP 1... right speaker levels cannot be adjusted within a range of +10dB to the sound output from each speaker individually, while standing at the same time. 19 HT-DD5000(SEC) TINSE0009SJZZ L-FRNT ↓ CENTER ↓ R-FRNT ↓ R-SURR ↓ L-SURR ↓ S-WOOFER q When the test tone is being output, the indicator for...
pear. 2 Within 10 seconds, press the ITEM button. q The speaker level can be adjusted using the remote control. 1 Press the MENU button repeatedly to make "TEST" ap- Notes: q If "NO" is lit, "R-SURR" and "L-SURR" will not be displayed. (Continued) X W SET UP 1... right speaker levels cannot be adjusted within a range of +10dB to the sound output from each speaker individually, while standing at the same time. 19 HT-DD5000(SEC) TINSE0009SJZZ L-FRNT ↓ CENTER ↓ R-FRNT ↓ R-SURR ↓ L-SURR ↓ S-WOOFER q When the test tone is being output, the indicator for...
HTDD5000 Operation Manual
Page 23
... indicators go out before the station is memorized, repeat the operation from the AC outlet. q The station preset number will be erased. 22 HT-DD5000(SEC) TINSE0009SJZZ s Preset memory scan The stations saved in the "Tuning" section. 2 Press the MEMORY button. To erase the contents in memory... button. To recall a memorized station: X Turn the jog dial on the main unit or press the PRESET ( W or ) button on the remote control for more than 0.5 seconds to select the desired station. Backup function: The backup function protects all station presets for a few hours should there ...
... indicators go out before the station is memorized, repeat the operation from the AC outlet. q The station preset number will be erased. 22 HT-DD5000(SEC) TINSE0009SJZZ s Preset memory scan The stations saved in the "Tuning" section. 2 Press the MEMORY button. To erase the contents in memory... button. To recall a memorized station: X Turn the jog dial on the main unit or press the PRESET ( W or ) button on the remote control for more than 0.5 seconds to select the desired station. Backup function: The backup function protects all station presets for a few hours should there ...
HTDD5000 Operation Manual
Page 24
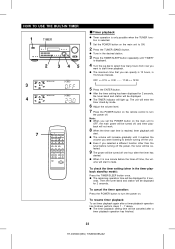
q Tune in the timer playback stand-by mode. 6 Adjust the volume level. 7 Press the POWER button on the remote control to turn the power on. q The TIMER indicator will enter the timer stand-by mode): Press the TIMER/SLEEP button once. q The timer... for 2 seconds, the tuner band and station will be displayed. q Even if you set timer playback again after a timer playback operation has finished. 23 HT-DD5000(SEC) TINSE0009SJZZ onds. q The remaining operation time will be displayed for 2 seconds. Then the tuner band and station will increase gradually until "TIMER" is ...
q Tune in the timer playback stand-by mode. 6 Adjust the volume level. 7 Press the POWER button on the remote control to turn the power on. q The TIMER indicator will enter the timer stand-by mode): Press the TIMER/SLEEP button once. q The timer... for 2 seconds, the tuner band and station will be displayed. q Even if you set timer playback again after a timer playback operation has finished. 23 HT-DD5000(SEC) TINSE0009SJZZ onds. q The remaining operation time will be displayed for 2 seconds. Then the tuner band and station will increase gradually until "TIMER" is ...


