FO-2080 Online Operation Manual
Page 2
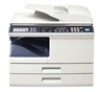
Introduction This manual describes the printer and scanner functions of the FO-2080 digital multifunctional system. ● For information on the following topics, please refer to the Operation Manual for Windows Vista. Note • Basic machine procedures (adding paper, replacing the TD cartridge, removing misfeeds, using peripheral devices) • Copier functions • Scanning from the operation panel of the machine • Specifications ● Where "FO-xxxx" appears in this...
Introduction This manual describes the printer and scanner functions of the FO-2080 digital multifunctional system. ● For information on the following topics, please refer to the Operation Manual for Windows Vista. Note • Basic machine procedures (adding paper, replacing the TD cartridge, removing misfeeds, using peripheral devices) • Copier functions • Scanning from the operation panel of the machine • Specifications ● Where "FO-xxxx" appears in this...

FO-2080 Online Operation Manual
Page 15
...;"USING THE SCANNER MODE" in the Operation Manual, Outline of Button Manager *1 TWAIN is a Windows function that allows a scanner, digital camera or other image acquisition devices. Scanning from a TWAIN*1-compliant or WIA*2-compliant application Scanning from "Control Panel" in your computer, you must first install Button Manager and establish the appropriate settings in the Operation Manual. The WIA driver for scanners and other imaging device to "NORMAL COPYING...
...;"USING THE SCANNER MODE" in the Operation Manual, Outline of Button Manager *1 TWAIN is a Windows function that allows a scanner, digital camera or other image acquisition devices. Scanning from a TWAIN*1-compliant or WIA*2-compliant application Scanning from "Control Panel" in your computer, you must first install Button Manager and establish the appropriate settings in the Operation Manual. The WIA driver for scanners and other imaging device to "NORMAL COPYING...

FO-2080 Online Operation Manual
Page 26
... the Operation Manual. 1 Tab Some applications 1 Click to save your settings 9 4 "Scan Setup" area Set the scan conditions. without making 6 appears when scanning is installed. Refer to let you adjust the 8 "Apply" button 8 scanning conditions. To view Help for a setting, click the button in the upper right-hand corner of the window and then click the setting. ☞To begin scanning using the machine's operation panel, see "SETTING UP BUTTON MANAGER" in the machine display...
... the Operation Manual. 1 Tab Some applications 1 Click to save your settings 9 4 "Scan Setup" area Set the scan conditions. without making 6 appears when scanning is installed. Refer to let you adjust the 8 "Apply" button 8 scanning conditions. To view Help for a setting, click the button in the upper right-hand corner of the window and then click the setting. ☞To begin scanning using the machine's operation panel, see "SETTING UP BUTTON MANAGER" in the machine display...
FO-2080 Online Operation Manual
Page 29
... machine, check the following troubleshooting guide before calling for each of the shared printer. Page Operation Manual Operation Manual - 5 CONTENTS INDEX 29 If you installed the software. The IP address has changed automatically because "Get IP Address Automatically" was changed . → Reconfigure the port setting of the software programs. The README file (readme.txt) is copied to your computer when the software is installed, and can be easily resolved by the user. PRINTING AND SCANNING PROBLEMS...
... machine, check the following troubleshooting guide before calling for each of the shared printer. Page Operation Manual Operation Manual - 5 CONTENTS INDEX 29 If you installed the software. The IP address has changed automatically because "Get IP Address Automatically" was changed . → Reconfigure the port setting of the software programs. The README file (readme.txt) is copied to your computer when the software is installed, and can be easily resolved by the user. PRINTING AND SCANNING PROBLEMS...

FO-2080 Operation Manual for FAX Function
Page 10
...Menu item 0 : RX DATA TRANSFER 1 : DATA TRANSFER 2 : FAX NUMBER 1 : TIMER MODE 1 : SET 2 : CLEAR 2 : ENTRY MODE 1 : FAX NUMBER 2 : DATE&TIME SET 3 : OWN PASSCODE SET 4 : PASSCODE # MODE 5 : DAY LIGHT SAVING 3 : MEMORY STATUS 4 : USER PROGRAM 1 : DOC. Program the name and phone number of the user of received faxes to another fax machine when printing is used to which the machine answers calls in "SELECTING SETTINGS FOR THE FUNCTION" (p.10). Check and delete stored fax jobs waiting for fax transmission. 1 : STANDARD 2 : FINE 3 : SUPER FINE Set the number of rings on which received...
...Menu item 0 : RX DATA TRANSFER 1 : DATA TRANSFER 2 : FAX NUMBER 1 : TIMER MODE 1 : SET 2 : CLEAR 2 : ENTRY MODE 1 : FAX NUMBER 2 : DATE&TIME SET 3 : OWN PASSCODE SET 4 : PASSCODE # MODE 5 : DAY LIGHT SAVING 3 : MEMORY STATUS 4 : USER PROGRAM 1 : DOC. Program the name and phone number of the user of received faxes to another fax machine when printing is used to which the machine answers calls in "SELECTING SETTINGS FOR THE FUNCTION" (p.10). Check and delete stored fax jobs waiting for fax transmission. 1 : STANDARD 2 : FINE 3 : SUPER FINE Set the number of rings on which received...

FO-2080 Operation Manual for FAX Function
Page 33
... RECEPTION PAPER SIZE Set the size of paper to be set the paper size, see "LOADING PAPER" in the Operation Manual (for general information). 29 Press the [MENU] key to exit. To set . If you would like to use (0 to 9). 2 Press the [ ] key ( ) or [ ] key ( ) until "5:# OF RINGS (MANUAL)" appears, and then press the [ENTER] key. INITIAL SETTINGS SETTING THE NUMBER OF RINGS FOR MANUAL RECEPTION The number of rings before the machine answers in MANUAL mode can also be used to print received faxes. Selection "4:USER PROGRAM...
... RECEPTION PAPER SIZE Set the size of paper to be set the paper size, see "LOADING PAPER" in the Operation Manual (for general information). 29 Press the [MENU] key to exit. To set . If you would like to use (0 to 9). 2 Press the [ ] key ( ) or [ ] key ( ) until "5:# OF RINGS (MANUAL)" appears, and then press the [ENTER] key. INITIAL SETTINGS SETTING THE NUMBER OF RINGS FOR MANUAL RECEPTION The number of rings before the machine answers in MANUAL mode can also be used to print received faxes. Selection "4:USER PROGRAM...

FO-2080 Operation Manual for FAX Function
Page 45
... connected on your phone company's distinctive ringing service. If one of the above list. 5 Press the [ENTER] key. 2 Press the [ ] key ( ) or [ ] key ( ) until "4:USER PROGRAM" appears, and then press the [ENTER] key. Select a ringing pattern by some telephone companies that pattern as shown below. Press the [MENU] key to select a ringing pattern. When your fax to a distinctive ringing service. PATTERN 2: One short, one long, and one of these ringing patterns, and use the number...
... connected on your phone company's distinctive ringing service. If one of the above list. 5 Press the [ENTER] key. 2 Press the [ ] key ( ) or [ ] key ( ) until "4:USER PROGRAM" appears, and then press the [ENTER] key. Select a ringing pattern by some telephone companies that pattern as shown below. Press the [MENU] key to select a ringing pattern. When your fax to a distinctive ringing service. PATTERN 2: One short, one long, and one of these ringing patterns, and use the number...

FO-2080 Operation Manual for FAX Function
Page 97
... Messages and signals 91 O Operation panel 13 Optional transmission settings - Rapid key dialing 42 - Speed dialing 44 Connecting - Direct keypad dialing 59 - Redialing 61 - Distinctive ringing 41 - Number of rings for auto reception 28 - Recall interval 34 - Two-sided original 58 - Group keys 47 - Daylight saving time setting 25 - Number of recall times 32 - Setting the tray selection 30 - Your name and fax number 21 H Handles 13 I Index function 36 L Line jack 13 List of alarm beeps 18 Answering machine 48 - Rapid key dialing...
... Messages and signals 91 O Operation panel 13 Optional transmission settings - Rapid key dialing 42 - Speed dialing 44 Connecting - Direct keypad dialing 59 - Redialing 61 - Distinctive ringing 41 - Number of rings for auto reception 28 - Recall interval 34 - Two-sided original 58 - Group keys 47 - Daylight saving time setting 25 - Number of recall times 32 - Setting the tray selection 30 - Your name and fax number 21 H Handles 13 I Index function 36 L Line jack 13 List of alarm beeps 18 Answering machine 48 - Rapid key dialing...

FO-2080 Operation Manual for General Use
Page 68
USER SETTINGS Print mode Program number Program name 1 FORCED OUTPUT 2 USB 2.0 MODE SWITCH* 3 AUTO TRAY SWITCH Setting codes (factory default setting appears in bold) Explanation 1: ON 2: OFF • When this function is enabled, printing in printer mode will automatically continue using the USB 2.0 connector, first verify that the setting should not be disabled. * The scanning speed increases when the USB 2.0 mode is paper of paper runs out in all trays. Note that your computer meets the system requirements (operating system and...
USER SETTINGS Print mode Program number Program name 1 FORCED OUTPUT 2 USB 2.0 MODE SWITCH* 3 AUTO TRAY SWITCH Setting codes (factory default setting appears in bold) Explanation 1: ON 2: OFF • When this function is enabled, printing in printer mode will automatically continue using the USB 2.0 connector, first verify that the setting should not be disabled. * The scanning speed increases when the USB 2.0 mode is paper of paper runs out in all trays. Note that your computer meets the system requirements (operating system and...

FO-2080 Operation Manual for General Use
Page 77
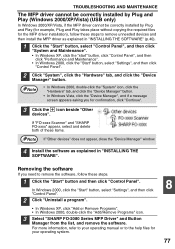
..." button. 4 Check "What action do you want Windows to take?" ("File signature verification" in "INSTALLING THE SOFTWARE". 8 75 To remove the software, see "Removing the software" (p.77). If "Block" has been selected, it will not be installed in Windows 2000/XP, follow these steps to install the MFP driver. In Windows 2000, click the "Start" button, select "Settings", and then click "Control Panel". 2 Click "Performance and Maintenance...
..." button. 4 Check "What action do you want Windows to take?" ("File signature verification" in "INSTALLING THE SOFTWARE". 8 75 To remove the software, see "Removing the software" (p.77). If "Block" has been selected, it will not be installed in Windows 2000/XP, follow these steps to install the MFP driver. In Windows 2000, click the "Start" button, select "Settings", and then click "Control Panel". 2 Click "Performance and Maintenance...
FO-2080 Operation Manual for General Use
Page 79
..., and click the "Device Manager" button. In Windows 2000, click the "Start" button, select "Settings", and then click "Control Panel". 2 Click "Uninstall a program". • In Windows XP, click "Add or Remove Programs". • In Windows 2000, double-click the "Add/Remove Programs" icon. 3 Select "SHARP FO-2080 Series MFP Driver" and Button Manager from the list, and remove the software. For more information, refer to your operating system. 8 77 Note •...
..., and click the "Device Manager" button. In Windows 2000, click the "Start" button, select "Settings", and then click "Control Panel". 2 Click "Uninstall a program". • In Windows XP, click "Add or Remove Programs". • In Windows 2000, double-click the "Add/Remove Programs" icon. 3 Select "SHARP FO-2080 Series MFP Driver" and Button Manager from the list, and remove the software. For more information, refer to your operating system. 8 77 Note •...
FO-2080 Operation Manual for General Use
Page 106
... copy........ 34 Online Manual 6 Operation in copy, printer, and scanner modes 60 Operation manual 6 Operation panel 9, 10 Original guides 9, 25 Original output tray extension....... 9, 26 Original types 28 Originals that cannot be used in the bypass tray ..... 22 Loading the paper tray 19 Long edge 30 LPR (TCP/IP) direct printing 49 M Main features 7 Making copies 24 Margin shift 38 Margin width 64 Memory full 34 [MENU] key 10 MFP driver 40 Misfeed removal - I Initial settings 16 Installing the software 40 Installing...
... copy........ 34 Online Manual 6 Operation in copy, printer, and scanner modes 60 Operation manual 6 Operation panel 9, 10 Original guides 9, 25 Original output tray extension....... 9, 26 Original types 28 Originals that cannot be used in the bypass tray ..... 22 Loading the paper tray 19 Long edge 30 LPR (TCP/IP) direct printing 49 M Main features 7 Making copies 24 Margin shift 38 Margin width 64 Memory full 34 [MENU] key 10 MFP driver 40 Misfeed removal - I Initial settings 16 Installing the software 40 Installing...

FO-2080 Operation Manual Suite
Page 10
... configuring settings is used . The settings in the machine. Store (or delete) fax numbers in Rapid Keys, Speed Dial numbers, and Group Keys. 1 : RAPID KEY 2 : SPEED # 3 : GROUP KEY Set the date and time in the FAX MAIN MENU are allowed to which the machine answers calls in manual reception mode. 0 - 9 (0) Page 69 68 79 79 42, 44, 45, 47 22 21 78 25 62 54 54 37 28 29 6 Program the name and phone number of the user of the machine. PRIORITY 4 : # OF RINGS (AUTO) 5 : # OF RINGS (MANUAL) Settings (factory default setting...
... configuring settings is used . The settings in the machine. Store (or delete) fax numbers in Rapid Keys, Speed Dial numbers, and Group Keys. 1 : RAPID KEY 2 : SPEED # 3 : GROUP KEY Set the date and time in the FAX MAIN MENU are allowed to which the machine answers calls in manual reception mode. 0 - 9 (0) Page 69 68 79 79 42, 44, 45, 47 22 21 78 25 62 54 54 37 28 29 6 Program the name and phone number of the user of the machine. PRIORITY 4 : # OF RINGS (AUTO) 5 : # OF RINGS (MANUAL) Settings (factory default setting...

FO-2080 Operation Manual Suite
Page 33
... machine answers in MANUAL mode can also be used to answer at all in MANUAL Mode, select "0" in the Operation Manual (for general information). 29 Press the [MENU] key to 9). 2 Press the [ ] key ( ) or [ ] key ( ) until "5:# OF RINGS (MANUAL)" appears, and then press the [ENTER] key. Selection "5:# OF RINGS (MANUAL)" 5 Press the [ENTER] key. 2 6 Press the [MENU] key. SELECTING THE RECEPTION PAPER SIZE Set the size of rings you do not want the machine to print received faxes. To set the paper size, see "LOADING PAPER...
... machine answers in MANUAL mode can also be used to answer at all in MANUAL Mode, select "0" in the Operation Manual (for general information). 29 Press the [MENU] key to 9). 2 Press the [ ] key ( ) or [ ] key ( ) until "5:# OF RINGS (MANUAL)" appears, and then press the [ENTER] key. Selection "5:# OF RINGS (MANUAL)" 5 Press the [ENTER] key. 2 6 Press the [MENU] key. SELECTING THE RECEPTION PAPER SIZE Set the size of rings you do not want the machine to print received faxes. To set the paper size, see "LOADING PAPER...

FO-2080 Operation Manual Suite
Page 45
... [MENU] key. 4 Press the [ ] key ( ) or [ ] key ( ) to exit. 41 If you subscribe to a distinctive ringing service, you can set the reception mode of these ringing patterns, and use distinctive ringing, you want your machine to AUTO (See "SELECTING THE RECEPTION MODE" (p.27)). PATTERN 4: Three rings 7. Selection "21:DISTINCTIVE RING" 6 Press the [MENU] key. The selections for ringing are: 1. Important: ● To use the number corresponding to that other numbers is dialed, the machine will automatically answer and...
... [MENU] key. 4 Press the [ ] key ( ) or [ ] key ( ) to exit. 41 If you subscribe to a distinctive ringing service, you can set the reception mode of these ringing patterns, and use distinctive ringing, you want your machine to AUTO (See "SELECTING THE RECEPTION MODE" (p.27)). PATTERN 4: Three rings 7. Selection "21:DISTINCTIVE RING" 6 Press the [MENU] key. The selections for ringing are: 1. Important: ● To use the number corresponding to that other numbers is dialed, the machine will automatically answer and...

FO-2080 Operation Manual Suite
Page 97
... 20 - Number of rings for manual reception 29 - Two-sided original 58 Originals 50 - Date and time 22 - Reception mode 27 - Setting the original 52 - Answering machine backup 49 - Rapid key dialing 44 - Direct keypad dialing 59 - Number of alarm beeps 18 Answering machine 48 - Number of fax functions 6 M Memory 67 Message function 57 Messages and signals 91 O Operation panel 13 Optional transmission settings - INDEX A Alarm beeps - Speed dialing 59 - Reception paper size 29 - Speed dialing 44 Connecting - Search 61 - Size and weight...
... 20 - Number of rings for manual reception 29 - Two-sided original 58 Originals 50 - Date and time 22 - Reception mode 27 - Setting the original 52 - Answering machine backup 49 - Rapid key dialing 44 - Direct keypad dialing 59 - Number of alarm beeps 18 Answering machine 48 - Number of fax functions 6 M Memory 67 Message function 57 Messages and signals 91 O Operation panel 13 Optional transmission settings - INDEX A Alarm beeps - Speed dialing 59 - Reception paper size 29 - Speed dialing 44 Connecting - Search 61 - Size and weight...

FO-2080 Operation Manual Suite
Page 172
... changed while running a TWAIN driver. (For the system requirements, see "System requirements for USB 2.0 (Hi-Speed mode)" (p.57).) 1: ON 2: OFF • If the paper runs out during printing and there is paper of paper runs out in all trays. USER SETTINGS Print mode Program number Program name 1 FORCED OUTPUT 2 USB 2.0 MODE SWITCH* 3 AUTO TRAY SWITCH Setting codes (factory default setting appears in bold) Explanation 1: ON 2: OFF • When this function is enabled, printing in printer mode will automatically continue using...
... changed while running a TWAIN driver. (For the system requirements, see "System requirements for USB 2.0 (Hi-Speed mode)" (p.57).) 1: ON 2: OFF • If the paper runs out during printing and there is paper of paper runs out in all trays. USER SETTINGS Print mode Program number Program name 1 FORCED OUTPUT 2 USB 2.0 MODE SWITCH* 3 AUTO TRAY SWITCH Setting codes (factory default setting appears in bold) Explanation 1: ON 2: OFF • When this function is enabled, printing in printer mode will automatically continue using...

FO-2080 Operation Manual Suite
Page 181
... then install the MFP driver as explained in "INSTALLING THE SOFTWARE". 8 75 In Windows 2000, click the "Start" button, select "Settings", and then click "Control Panel". 2 Click "Performance and Maintenance", and then click "System". PROBLEMS DURING SETUP OF THE SOFTWARE If the software does not install correctly, check the following items on your computer's settings. 1 Click the "start" button and then click "Control Panel". To remove the software, see "Removing the software" (p.77...
... then install the MFP driver as explained in "INSTALLING THE SOFTWARE". 8 75 In Windows 2000, click the "Start" button, select "Settings", and then click "Control Panel". 2 Click "Performance and Maintenance", and then click "System". PROBLEMS DURING SETUP OF THE SOFTWARE If the software does not install correctly, check the following items on your computer's settings. 1 Click the "start" button and then click "Control Panel". To remove the software, see "Removing the software" (p.77...

FO-2080 Operation Manual Suite
Page 242
... on installing Button Manager and establishing the Control Panel settings, see "USING THE SCANNER MODE" in the Operation Manual. 1 Tab Some applications 1 Click to select and change the functions of the six scan menus. the TWAIN screen is shown. 7 "Cancel" button 5 When the checkbox is Click this button to exit the selected, the TWAIN screen dialog box without closing the dialog box. 9 "Help" button Click this setting...
... on installing Button Manager and establishing the Control Panel settings, see "USING THE SCANNER MODE" in the Operation Manual. 1 Tab Some applications 1 Click to select and change the functions of the six scan menus. the TWAIN screen is shown. 7 "Cancel" button 5 When the checkbox is Click this button to exit the selected, the TWAIN screen dialog box without closing the dialog box. 9 "Help" button Click this setting...

FO-2080 Operation Manual Suite
Page 245
..., and make sure that "SHARP FO-xxxx" is selected as a network printer, 1. The machine's IP address was selected. 2. PRINTING AND SCANNING PROBLEMS In addition to this section, troubleshooting information can also be found in the README files for service. The IP address has changed . → Reconfigure the port setting of the software programs. The README file (readme.txt) is installed, and can be found in the "Program Files" "SHARP" - Page Operation Manual Operation Manual - 5 CONTENTS...
..., and make sure that "SHARP FO-xxxx" is selected as a network printer, 1. The machine's IP address was selected. 2. PRINTING AND SCANNING PROBLEMS In addition to this section, troubleshooting information can also be found in the README files for service. The IP address has changed . → Reconfigure the port setting of the software programs. The README file (readme.txt) is installed, and can be found in the "Program Files" "SHARP" - Page Operation Manual Operation Manual - 5 CONTENTS...


