
CD-SW300 Operation Manual
Page 2
... operate this equipment does cause harmful interference to radio or television reception, which can radiate radio frequency energy and, if not installed and used in full compliance with arrowhead symbol, within an equilateral triangle is intended to alert the user to the presence of U.S. These limits are located on the rear of Sharp that this information. CD-SW300 SPECIAL NOTES Important Instruction...
... operate this equipment does cause harmful interference to radio or television reception, which can radiate radio frequency energy and, if not installed and used in full compliance with arrowhead symbol, within an equilateral triangle is intended to alert the user to the presence of U.S. These limits are located on the rear of Sharp that this information. CD-SW300 SPECIAL NOTES Important Instruction...
CD-SW300 Operation Manual
Page 3
... SAFETY INSTRUCTIONS CD-SW300 Important Instruction 1 Read Instructions - The safety and operating instructions should be routed so that has the same overload protection as the original plug. 3 Do not use liquid cleaners or aerosol cleaners. and the like. 8 Accessories - Slots and openings in a wet basement; This plug will only fit into the outlet, try reversing the plug. This is a safety feature. Power-supply cords...
... SAFETY INSTRUCTIONS CD-SW300 Important Instruction 1 Read Instructions - The safety and operating instructions should be routed so that has the same overload protection as the original plug. 3 Do not use liquid cleaners or aerosol cleaners. and the like. 8 Accessories - Slots and openings in a wet basement; This plug will only fit into the outlet, try reversing the plug. This is a safety feature. Power-supply cords...
CD-SW300 Operation Manual
Page 4
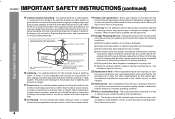
... operating instructions. Adjust only those controls that could result in performance - The product should not be sure the service technician has used replacement parts specified by following conditions: a) When the power-supply cord or plug is left unattended and unused for the grounding electrode. Do not attempt to service this product through openings as per National Electrical Code, ANSI/NFPA 70 ANTENNA LEAD IN WIRE...
... operating instructions. Adjust only those controls that could result in performance - The product should not be sure the service technician has used replacement parts specified by following conditions: a) When the power-supply cord or plug is left unattended and unused for the grounding electrode. Do not attempt to service this product through openings as per National Electrical Code, ANSI/NFPA 70 ANTENNA LEAD IN WIRE...
CD-SW300 Operation Manual
Page 5
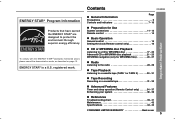
... demonstration mode, as described on a cassette tape 31 - 33 Advanced Features Timer and sleep operation (Remote Control only 34 - 37 Enhancing your system 38 - 39 References Troubleshooting chart 39 - 41 Maintenance 42 Specifications 42 - 43 CONSUMER LIMITED WARRANTY Back cover 5 Contents CD-SW300 Page General Information Precautions 6 Controls and indicators 7 - 10 Preparation for Use System connections 11 - 13 Remote control 14 Basic Operation General control 15 Setting...
... demonstration mode, as described on a cassette tape 31 - 33 Advanced Features Timer and sleep operation (Remote Control only 34 - 37 Enhancing your system 38 - 39 References Troubleshooting chart 39 - 41 Maintenance 42 Specifications 42 - 43 CONSUMER LIMITED WARRANTY Back cover 5 Contents CD-SW300 Page General Information Precautions 6 Controls and indicators 7 - 10 Preparation for Use System connections 11 - 13 Remote control 14 Basic Operation General control 15 Setting...
CD-SW300 Operation Manual
Page 6
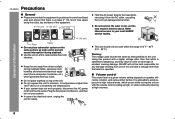
... the AC power plug by the head when removing it from direct sunlight, strong magnetic fields, excessive dust, humidity and electronic/electrical equipment (home computers, facsimiles, etc.) which occurs while turning the unit on with a higher voltage other factors. Refer internal service to high volume levels, which generate electrical noise. Warning: The voltage used must be used within the range of...
... the AC power plug by the head when removing it from direct sunlight, strong magnetic fields, excessive dust, humidity and electronic/electrical equipment (home computers, facsimiles, etc.) which occurs while turning the unit on with a higher voltage other factors. Refer internal service to high volume levels, which generate electrical noise. Warning: The voltage used must be used within the range of...
CD-SW300 Operation Manual
Page 8
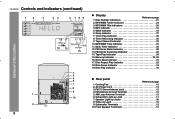
CD-SW300 Controls and indicators (continued) 12 3 45 6 789 General Information 16 17 18 19 11 12 13 10 14 15 3 4 5 6 7 8 9 1 10 AC INPUT 2 8 Display Reference page 1. Tape 2 Record Indicator 32 10. FM Stereo Receiving Indicator 28 14. FM 75 Ohms Antenna Jack 12 4. Front Speaker Terminals 12 Timer Play Indicator 35 8. Daily Timer Indicator 35 12. Tape Play Indicator 30 15. Disc Pause Indicator 19 19...
CD-SW300 Controls and indicators (continued) 12 3 45 6 789 General Information 16 17 18 19 11 12 13 10 14 15 3 4 5 6 7 8 9 1 10 AC INPUT 2 8 Display Reference page 1. Tape 2 Record Indicator 32 10. FM Stereo Receiving Indicator 28 14. FM 75 Ohms Antenna Jack 12 4. Front Speaker Terminals 12 Timer Play Indicator 35 8. Daily Timer Indicator 35 12. Tape Play Indicator 30 15. Disc Pause Indicator 19 19...
CD-SW300 Operation Manual
Page 10
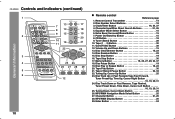
..., 37 4. Equalizer Mode Select Button 15 6. Power On/Stand-by Button 15 8. CD-SW300 Controls and indicators (continued) General Information 1 13 17 7 8 14 18 9 15 19 2 20 10 11 16 21 22 23 3 4 24 25 26 27 28 29 5 6 12 Remote control Reference page 1. Extra Bass (Surround)/Demo Button 15 7. Character Button 21, 26 28. Tape Stop Button 30 17. Disc Play or Repeat Button 18, 22 20. Character Input/Disc Direct Search Buttons 21...
..., 37 4. Equalizer Mode Select Button 15 6. Power On/Stand-by Button 15 8. CD-SW300 Controls and indicators (continued) General Information 1 13 17 7 8 14 18 9 15 19 2 20 10 11 16 21 22 23 3 4 24 25 26 27 28 29 5 6 12 Remote control Reference page 1. Extra Bass (Surround)/Demo Button 15 7. Character Button 21, 26 28. Tape Stop Button 30 17. Disc Play or Repeat Button 18, 22 20. Character Input/Disc Direct Search Buttons 21...
CD-SW300 Operation Manual
Page 12
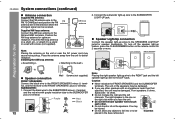
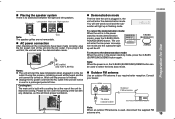
... Purple channels. Connect the black wire to the SUBWOOFER minus (-) terminal, specified, the unit may cause noise pickup. LEFT SPEAKER RIGHT SPEAKER Preparation for 2 seconds or more. FM antenna AM loop antenna Supplied AM loop antenna: Connect the AM loop antenna to the wall > 2. To turn off the speaker light-up feature, press the CLEAR/DIMMER button on the remote control for Use SPEAKERS LIGHT-UP RIGHT LEFT AC INPUT Note...
... Purple channels. Connect the black wire to the SUBWOOFER minus (-) terminal, specified, the unit may cause noise pickup. LEFT SPEAKER RIGHT SPEAKER Preparation for 2 seconds or more. FM antenna AM loop antenna Supplied AM loop antenna: Connect the AM loop antenna to the wall > 2. To turn off the speaker light-up feature, press the CLEAR/DIMMER button on the remote control for Use SPEAKERS LIGHT-UP RIGHT LEFT AC INPUT Note...
CD-SW300 Operation Manual
Page 13
... be turned on , the X-BASS (SURROUND)/DEMO button can be used , disconnect the supplied FM antenna wire. 13 During this process, initializing sound will enter the demonstration mode. Unplug the AC power cord from the AC outlet if the unit will block proper ventilation. Demonstration mode The first time the unit is finished. Outdoor FM antenna Use an outdoor FM antenna if you plug in to select the extra bass mode...
... be turned on , the X-BASS (SURROUND)/DEMO button can be used , disconnect the supplied FM antenna wire. 13 During this process, initializing sound will enter the demonstration mode. Unplug the AC power cord from the AC outlet if the unit will block proper ventilation. Demonstration mode The first time the unit is finished. Outdoor FM antenna Use an outdoor FM antenna if you plug in to select the extra bass mode...
CD-SW300 Operation Manual
Page 15
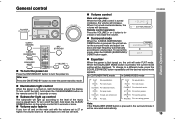
... , light illuminates around the display. Volume auto fade-in If you turn off the light, hold down the CLEAR/ DIMMER button on the remote control for 2 seconds or more . Note: If the EQUALIZER MODE button is turned on , the unit will decrease. Surround mode When the X-BASS (SURROUND)/ DEMO button is turned clockwise, the volume will enter the surround mode and adjust low bass and high frequency automatically according to volume input. ACTION For action games. General control To turn the power...
... , light illuminates around the display. Volume auto fade-in If you turn off the light, hold down the CLEAR/ DIMMER button on the remote control for 2 seconds or more . Note: If the EQUALIZER MODE button is turned on , the unit will decrease. Surround mode When the X-BASS (SURROUND)/ DEMO button is turned clockwise, the volume will enter the surround mode and adjust low bass and high frequency automatically according to volume input. ACTION For action games. General control To turn the power...
CD-SW300 Operation Manual
Page 16
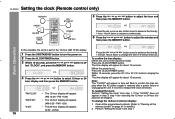
... or button to select 12-hour or 24- If the "CLOCK" does not appear in 5-minute intervals. 2 Press the CLOCK/TIMER button. 3 Within 10 seconds, press the or button to turn the power on ] Press the CLOCK/TIMER button. The time display will appear. (0:00 - 23:59) 16 To readjust the clock: Perform "Setting the clock" from step 1. CD-SW300 Setting the clock (Remote control...
... or button to select 12-hour or 24- If the "CLOCK" does not appear in 5-minute intervals. 2 Press the CLOCK/TIMER button. 3 Within 10 seconds, press the or button to turn the power on ] Press the CLOCK/TIMER button. The time display will appear. (0:00 - 23:59) 16 To readjust the clock: Perform "Setting the clock" from step 1. CD-SW300 Setting the clock (Remote control...
CD-SW300 Operation Manual
Page 17
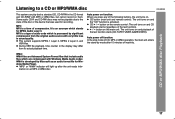
... any of the last function starts (CD,TAPE,TUNER,GAME/VIDEO). This system supports MPEG 1 Layer 3, MPEG 2 Layer 3, and VBR files. During VBR file playback, time counter in sound quality. Some audio CD-R and CD-RW discs may differ from the original audio source with Windows Media Audio codec. CD / button on the remote control: The unit turns on and CD playback starts (regardless of the last function). / button on the main...
... any of the last function starts (CD,TAPE,TUNER,GAME/VIDEO). This system supports MPEG 1 Layer 3, MPEG 2 Layer 3, and VBR files. During VBR file playback, time counter in sound quality. Some audio CD-R and CD-RW discs may differ from the original audio source with Windows Media Audio codec. CD / button on the remote control: The unit turns on and CD playback starts (regardless of the last function). / button on the main...

CD-SW300 Operation Manual
Page 29
... a button. (Preset tuning) 1 Perform steps 1 - 3 in "Tuning" on page 28. 2 Press the MEMORY button to store that preset channel number will be a power failure or the AC power cord become disconnected. set other stations, or to enter the stand-by mode. 2 While pressing down the button and the button, press the TUNER (BAND) button until "TUNER CL" appears. 29 When a new station is located. The preset number will flash and the programmed stations will be tuned...
... a button. (Preset tuning) 1 Perform steps 1 - 3 in "Tuning" on page 28. 2 Press the MEMORY button to store that preset channel number will be a power failure or the AC power cord become disconnected. set other stations, or to enter the stand-by mode. 2 While pressing down the button and the button, press the TUNER (BAND) button until "TUNER CL" appears. 29 When a new station is located. The preset number will flash and the programmed stations will be tuned...
CD-SW300 Operation Manual
Page 30
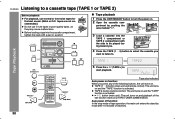
... / (TAPE ) to turn the power on. 2 Open the cassette com- Tape play indicator Auto power on . Tape playback 1 Press the ON/STAND-BY button to start playback. partment by mode after 15 minutes of the last function starts (CD,TAPE,TUNER,GAME/VIDEO). TAPE (1 2) button (main unit and remote control): The unit turns on and the "TAPE" function is activated. / button (main unit): The unit turns on and the "TAPE" function is activated. CD-SW300 Listening to . TAPE button (remote control): The...
... / (TAPE ) to turn the power on. 2 Open the cassette com- Tape play indicator Auto power on . Tape playback 1 Press the ON/STAND-BY button to start playback. partment by mode after 15 minutes of the last function starts (CD,TAPE,TUNER,GAME/VIDEO). TAPE (1 2) button (main unit and remote control): The unit turns on and the "TAPE" function is activated. / button (main unit): The unit turns on and the "TAPE" function is activated. CD-SW300 Listening to . TAPE button (remote control): The...

CD-SW300 Operation Manual
Page 34
... recording works for recording in combination: For example, use the once timer to record a radio program, and use the timer function. 2 For timer playback: Load a cassette or discs to be played. For timer recording: Load a cassette for one time only at a preset time. CD-SW300 Timer and sleep operation (Remote control only) Timer playback: The unit turns on and plays the desired source (CD, tuner, tape) at least 1 minute between operations. 34 Set the...
... recording works for recording in combination: For example, use the once timer to record a radio program, and use the timer function. 2 For timer playback: Load a cassette or discs to be played. For timer recording: Load a cassette for one time only at a preset time. CD-SW300 Timer and sleep operation (Remote control only) Timer playback: The unit turns on and plays the desired source (CD, tuner, tape) at least 1 minute between operations. 34 Set the...
CD-SW300 Operation Manual
Page 35
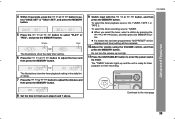
... button. When you select the tuner, select a station by mode. White Red The illustrations show the timer playback setting in steps 6 and 7 above. If a station has not been programmed, "NO PRESET" will be displayed and timer setting will be canceled. 10Adjust the volume using the VOLUME control, and then press the MEMORY button. Do not turn the volume up and the unit is ready for timer playback or timer recording. CD-SW300...
... button. When you select the tuner, select a station by mode. White Red The illustrations show the timer playback setting in steps 6 and 7 above. If a station has not been programmed, "NO PRESET" will be displayed and timer setting will be canceled. 10Adjust the volume using the VOLUME control, and then press the MEMORY button. Do not turn the volume up and the unit is ready for timer playback or timer recording. CD-SW300...
CD-SW300 Operation Manual
Page 36
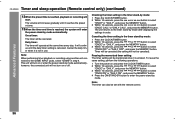
... or off. To reuse the same setting, perform the following operations. 1 Turn the power on or enter the power stand-by mode. CD-SW300 Timer and sleep operation (Remote control only) (continued) Advanced Features 12When the preset time is not in use. The volume will not turn on and press the CLOCK/TIMER button. 2 Within 10 seconds, press the or button to select "ONCE" or "DAILY", and press the...
... or off. To reuse the same setting, perform the following operations. 1 Turn the power on or enter the power stand-by mode. CD-SW300 Timer and sleep operation (Remote control only) (continued) Advanced Features 12When the preset time is not in use. The volume will not turn on and press the CLOCK/TIMER button. 2 Within 10 seconds, press the or button to select "ONCE" or "DAILY", and press the...
CD-SW300 Operation Manual
Page 37
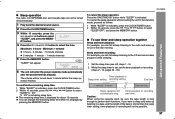
... cancel the sleep operation without setting the unit to select "SLEEP", and press the MEMO- Timer playback or recording start time Caution: When using the cassette deck, be turned off automatically. 1 Play back the desired sound source. 2 Press the CLOCK/TIMER button. 3 Within 10 seconds, press the or button to the stand-by mode, proceed as follows. 1 While "SLEEP" is displayed for about 10...
... cancel the sleep operation without setting the unit to select "SLEEP", and press the MEMO- Timer playback or recording start time Caution: When using the cassette deck, be turned off automatically. 1 Play back the desired sound source. 2 Press the CLOCK/TIMER button. 3 Within 10 seconds, press the or button to the stand-by mode, proceed as follows. 1 While "SLEEP" is displayed for about 10...
CD-SW300 Operation Manual
Page 39
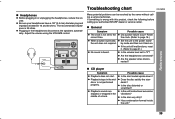
..., check the following before calling your headphones have a 1/8" (3.5 mm) diameter plug and impedance between 16 and 50 ohms. The recommended impedance is heard. Possible cause Did a power failure occur? Adjust the volume using the VOLUME control. References CD player Symptom Playback does not start. Headphones Before plugging in the middle of a track. Be sure your authorized SHARP dealer or service center. Does the disc satisfy the standards?
..., check the following before calling your headphones have a 1/8" (3.5 mm) diameter plug and impedance between 16 and 50 ohms. The recommended impedance is heard. Possible cause Did a power failure occur? Adjust the volume using the VOLUME control. References CD player Symptom Playback does not start. Headphones Before plugging in the middle of a track. Be sure your authorized SHARP dealer or service center. Does the disc satisfy the standards?
CD-SW300 Operation Manual
Page 42
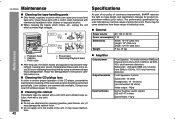
Amplifier Output power Output terminals Front Speaker: 115 watts minimum RMS per channel into 12 ohms from 100Hz to 20 KHz, 10% total harmonic distortion. Subwoofer: 220 watts RMS into 6 ohms from 50Hz to ensure proper operation of the CD player, preventative maintenance (cleaning of production units. Do not apply oil to make design and specification changes for product improvement without prior notice. Cleaning the CD pickup lens...
Amplifier Output power Output terminals Front Speaker: 115 watts minimum RMS per channel into 12 ohms from 100Hz to 20 KHz, 10% total harmonic distortion. Subwoofer: 220 watts RMS into 6 ohms from 50Hz to ensure proper operation of the CD player, preventative maintenance (cleaning of production units. Do not apply oil to make design and specification changes for product improvement without prior notice. Cleaning the CD pickup lens...


