Operation Manual
Page 1
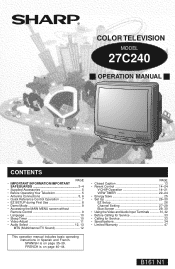
...Before Calling for Service 33 • Calling for Service 33 • Specifications 34 • Limited Warranty 47 B161 N1 1 COLOR TELEVISION MODEL 27C240 H OPERATION MANUAL H CONTENTS PAGE • IMPORTANT INFORMATION/IMPORTANT SAFEGUARDS 2-4 • Supplied Accessories 5 • Before Operating Your Television 5 ... Reference Control Operation 7 • EZ SETUP during First Use 8 • Demo Mode 9 • Accessing the MAIN MENU screen without Remote Control 9 • Language 10 • Sleep Timer 10 • Video Adjust 11 • Audio Select 12, 13 MTS (Multichannel ...
...Before Calling for Service 33 • Calling for Service 33 • Specifications 34 • Limited Warranty 47 B161 N1 1 COLOR TELEVISION MODEL 27C240 H OPERATION MANUAL H CONTENTS PAGE • IMPORTANT INFORMATION/IMPORTANT SAFEGUARDS 2-4 • Supplied Accessories 5 • Before Operating Your Television 5 ... Reference Control Operation 7 • EZ SETUP during First Use 8 • Demo Mode 9 • Accessing the MAIN MENU screen without Remote Control 9 • Language 10 • Sleep Timer 10 • Video Adjust 11 • Audio Select 12, 13 MTS (Multichannel ...

Operation Manual
Page 5
...reversing the plug. The following is a flat "twin-lead" cable that magnets, electric clocks, toys using the television, prepare the Remote Control To use the remote control, insert batteries first. Should it fail to fit, contact an electrician. Insert two batteries (size "AA"). A 300-ohm ... turn off the radio. • If you are listening to an AM broadcast, turn the TV off. Supplied Accessories TV Infrared Remote Control RRMCG1324CESC Size AA Dry Batteries Before Operating Your Television Location • For normal operation, your thumbnail, pull up Battery Cover •...
...reversing the plug. The following is a flat "twin-lead" cable that magnets, electric clocks, toys using the television, prepare the Remote Control To use the remote control, insert batteries first. Should it fail to fit, contact an electrician. Insert two batteries (size "AA"). A 300-ohm ... turn off the radio. • If you are listening to an AM broadcast, turn the TV off. Supplied Accessories TV Infrared Remote Control RRMCG1324CESC Size AA Dry Batteries Before Operating Your Television Location • For normal operation, your thumbnail, pull up Battery Cover •...
Operation Manual
Page 7
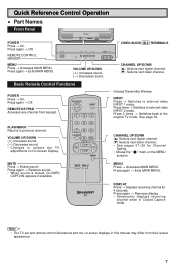
Quick Reference Control Operation • Part Names Front Panel POWER Press → On. REMOTE CONTROL SENSOR MENU Press → Accesses MAIN MENU. Basic Remote Control Functions POWER Press → On. REMOTE KEYPAD Accesses any channel from their actual appearance. 7 FLASHBACK Returns to external video INPUT 1 ...; Exits MAIN MENU. Press 3 times → Switches back to external video INPUT 2 mode. Note: • The TV set and remote control illustrations and the on-screen displays in Closed Caption mode. TV VIDEO/AUDIO IN 2 TERMINALS CHANNEL UP/DOWN (a) Selects next higher channel...
Quick Reference Control Operation • Part Names Front Panel POWER Press → On. REMOTE CONTROL SENSOR MENU Press → Accesses MAIN MENU. Basic Remote Control Functions POWER Press → On. REMOTE KEYPAD Accesses any channel from their actual appearance. 7 FLASHBACK Returns to external video INPUT 1 ...; Exits MAIN MENU. Press 3 times → Switches back to external video INPUT 2 mode. Note: • The TV set and remote control illustrations and the on-screen displays in Closed Caption mode. TV VIDEO/AUDIO IN 2 TERMINALS CHANNEL UP/DOWN (a) Selects next higher channel...
Operation Manual
Page 8
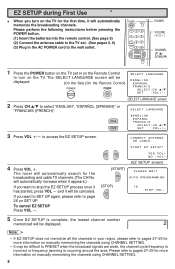
...l. Please perform the following instructions before pressing the POWER button. (1) Insert the batteries into the remote control. (See page 5) (2) Connect the antenna cable to the TV set or on the Remote Control to pages 27-29 for the broadcasting and cable TV channels. (The CH No. SE... time, it appears.) If you want to access the EZ SETUP screen. will automatically increase when it will be displayed. (On the Set) (On the Remote Control) POWER SE L ECT L ANGUAGE ENGL I SH E S P A ÑO L FRANCA I S SE L ECT : CH 8/ 9 SET : VOL + / - (SELECT LANGUAGE screen) 2 Press ...
...l. Please perform the following instructions before pressing the POWER button. (1) Insert the batteries into the remote control. (See page 5) (2) Connect the antenna cable to the TV set or on the Remote Control to pages 27-29 for the broadcasting and cable TV channels. (The CH No. SE... time, it appears.) If you want to access the EZ SETUP screen. will automatically increase when it will be displayed. (On the Set) (On the Remote Control) POWER SE L ECT L ANGUAGE ENGL I SH E S P A ÑO L FRANCA I S SE L ECT : CH 8/ 9 SET : VOL + / - (SELECT LANGUAGE screen) 2 Press ...
Operation Manual
Page 9
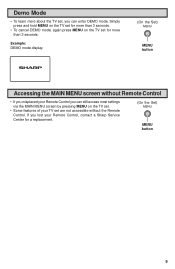
If you can still access most settings via the MAIN MENU screen by pressing MENU on the TV set , you lost your Remote Control, contact a Sharp Service Center for a replacement. (On the Set) MENU button 9 Simply press and hold MENU on the TV set for more than 3 seconds. ...Example: DEMO mode display (On the Set) MENU button Accessing the MAIN MENU screen without Remote Control • If you misplaced your Remote Control you can...
If you can still access most settings via the MAIN MENU screen by pressing MENU on the TV set , you lost your Remote Control, contact a Sharp Service Center for a replacement. (On the Set) MENU button 9 Simply press and hold MENU on the TV set for more than 3 seconds. ...Example: DEMO mode display (On the Set) MENU button Accessing the MAIN MENU screen without Remote Control • If you misplaced your Remote Control you can...

Operation Manual
Page 10
... ON SCREEN DISPLAY can preset your television to exit. Sleep Timer • You can be briefly displayed on-screen at regular intervals or when the Remote's DISPLAY key is active, the time remaining will automatically reset. 10 M REMAIN" during step 3. • While SLEEP TIMER is pressed twice. 5 minutes before shutting off...
... ON SCREEN DISPLAY can preset your television to exit. Sleep Timer • You can be briefly displayed on-screen at regular intervals or when the Remote's DISPLAY key is active, the time remaining will automatically reset. 10 M REMAIN" during step 3. • While SLEEP TIMER is pressed twice. 5 minutes before shutting off...

Operation Manual
Page 17
... press VOL k/l to exit. V - I NPUT SECRET No . 1234 9 When done, press MENU to select either "BLOCK" or unblock). → TV-Y7 AGE : BLOCK D : ----- using the REMOTE KEYPAD. 123 456 789 ENTER 0 100 I NPUT SECRET No . ---- 8 Enter a 4-digit SECRET No. VVV - : V I EW V: B LOCK MENU : RETURN Note: • If SECRET No. will be...
... press VOL k/l to exit. V - I NPUT SECRET No . 1234 9 When done, press MENU to select either "BLOCK" or unblock). → TV-Y7 AGE : BLOCK D : ----- using the REMOTE KEYPAD. 123 456 789 ENTER 0 100 I NPUT SECRET No . ---- 8 Enter a 4-digit SECRET No. VVV - : V I EW V: B LOCK MENU : RETURN Note: • If SECRET No. will be...

Operation Manual
Page 18
..."DOWNLOAD". will disappear, once downloading is already set up as follows. I NPUT SECRET No . 1234 PLEASE WA I T NOW DOWNLOADI NG V-CH I NES REMOTE KEYPAD VOLUME (k)/(l) CHANNEL UP (a)/ DOWN (s) MENU 3 Press VOL k/l to exit. 123 456 789 ENTER 0 100 • Downloading V-CHIP data 1 If ...you are not watching a program containing "new rating system data". 18 using the REMOTE KEYPAD. 6 Press MENU to select "DOWNLOAD : ON". is finished. DOWNLOAD : ON STATUS : OFF I NES 4 Press MENU, then "INPUT SECRET No...
..."DOWNLOAD". will disappear, once downloading is already set up as follows. I NPUT SECRET No . 1234 PLEASE WA I T NOW DOWNLOADI NG V-CH I NES REMOTE KEYPAD VOLUME (k)/(l) CHANNEL UP (a)/ DOWN (s) MENU 3 Press VOL k/l to exit. 123 456 789 ENTER 0 100 • Downloading V-CHIP data 1 If ...you are not watching a program containing "new rating system data". 18 using the REMOTE KEYPAD. 6 Press MENU to select "DOWNLOAD : ON". is finished. DOWNLOAD : ON STATUS : OFF I NES 4 Press MENU, then "INPUT SECRET No...

Operation Manual
Page 20
... MENU, then "INPUT SECRET No." is chosen, "SECRET No. I NPUT SECRET No . ---- 4 Enter a 4-digit secret No. using the REMOTE KEYPAD. 123 456 789 ENTER 0 100 5 Press MENU and the secret No. using the REMOTE KEYPAD, then V- will be displayed. is already set, skip to "STATUS". will not operate.) MPAA TV GU I DEL...
... MENU, then "INPUT SECRET No." is chosen, "SECRET No. I NPUT SECRET No . ---- 4 Enter a 4-digit secret No. using the REMOTE KEYPAD. 123 456 789 ENTER 0 100 5 Press MENU and the secret No. using the REMOTE KEYPAD, then V- will be displayed. is already set, skip to "STATUS". will not operate.) MPAA TV GU I DEL...

Operation Manual
Page 21
... "INPUT SECRET No." Set V-CHIP BLOCK again. 123 456 789 ENTER 0 100 I NPUT SECRET No . ---- 2 Enter the 4-digit secret No. will be displayed. using the REMOTE KEYPAD and the V-CHIP select screen will be displayed. disappears. (On the Set) 3 Press the MENU button twice to 4 of To temporarily cancel the V-CHIP...
... "INPUT SECRET No." Set V-CHIP BLOCK again. 123 456 789 ENTER 0 100 I NPUT SECRET No . ---- 2 Enter the 4-digit secret No. will be displayed. using the REMOTE KEYPAD and the V-CHIP select screen will be displayed. disappears. (On the Set) 3 Press the MENU button twice to 4 of To temporarily cancel the V-CHIP...

Operation Manual
Page 23
...1 hour of TV, turn the TV off in this case. • To cancel the VIEW TIMER (While the TV set VIEWTIMER. will appear. using the REMOTE KEYPAD. If the wrong secret No. IS INCORRECT" is chosen, "SECRET No. When you choose the correct secret No., the VIEW TIMER access screen is... set.) 1 Turn on the right. • You can choose to set is OFF but the VIEW TIMER is displayed. using the REMOTE KEYPAD. 10 Press MENU, and secret No. Parent Control (VIEW TIMER) (Continued) 9 Enter the 4-digit secret No. a blue screen message "TIME OVER" will be ...
...1 hour of TV, turn the TV off in this case. • To cancel the VIEW TIMER (While the TV set VIEWTIMER. will appear. using the REMOTE KEYPAD. If the wrong secret No. IS INCORRECT" is chosen, "SECRET No. When you choose the correct secret No., the VIEW TIMER access screen is... set.) 1 Turn on the right. • You can choose to set is OFF but the VIEW TIMER is displayed. using the REMOTE KEYPAD. 10 Press MENU, and secret No. Parent Control (VIEW TIMER) (Continued) 9 Enter the 4-digit secret No. a blue screen message "TIME OVER" will be ...
Operation Manual
Page 28
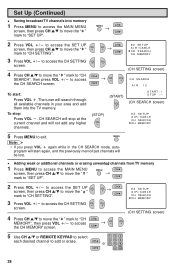
...) → (START) CH SEARCH AIR 12 START : + STOP : - (CH SEARCH screen) (STOP) EZ SETUP A I R / CABLE CH SEARCH CH MEMOR Y (CH SETTING screen) 5 Use CH a/s or REMOTE KEYPAD to select each desired channel to add or erase. 123 456 or 7 8 9 ENTER 0 100 28 Note: • If you press VOL k again while in...
...) → (START) CH SEARCH AIR 12 START : + STOP : - (CH SEARCH screen) (STOP) EZ SETUP A I R / CABLE CH SEARCH CH MEMOR Y (CH SETTING screen) 5 Use CH a/s or REMOTE KEYPAD to select each desired channel to add or erase. 123 456 or 7 8 9 ENTER 0 100 28 Note: • If you press VOL k again while in...
Operation Manual
Page 32
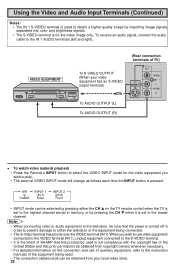
...and use video equipment connected to the VIDEO terminal (IN 1), unplug equipment connected to the S-VIDEO terminal. • It is the intent of SHARP that this product be used in memory, or by importing image signals. Note: • When connecting video or audio equipment to the television,... video equipment has an S-VIDEO output terminal) To AUDIO OUTPUT (L) To AUDIO OUTPUT (R) • To watch video material playback • Press the Remote's INPUT button to select the VIDEO INPUT mode for the video image only. Using the Video and Audio Input Terminals (Continued) Notes: • The...
...and use video equipment connected to the VIDEO terminal (IN 1), unplug equipment connected to the S-VIDEO terminal. • It is the intent of SHARP that this product be used in memory, or by importing image signals. Note: • When connecting video or audio equipment to the television,... video equipment has an S-VIDEO output terminal) To AUDIO OUTPUT (L) To AUDIO OUTPUT (R) • To watch video material playback • Press the Remote's INPUT button to select the VIDEO INPUT mode for the video image only. Using the Video and Audio Input Terminals (Continued) Notes: • The...
Operation Manual
Page 33
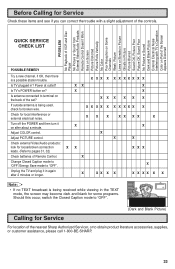
...broken wire. QUICK SERVICE CHECK LIST PROBLEM No Playback of VCR and Disc Player No Picture or Sound from External Video/Audio Products Remote Control Doesn't Work Bars on Screen Picture Distorted Picture Rolls Vertically No Color Poor Reception on the back of... OK, Picture Poor Picture OK, Sound Poor No Picture or Sound Dark and Blank Picture External Electrical Noise Interfering with a slight adjustment of the nearest Sharp Authorized Servicer, or to "OFF". X X XX X XX X X X XXX X XX X X If outside antenna is being received while viewing in again after about a minute. X X XX X XX X...
...broken wire. QUICK SERVICE CHECK LIST PROBLEM No Playback of VCR and Disc Player No Picture or Sound from External Video/Audio Products Remote Control Doesn't Work Bars on Screen Picture Distorted Picture Rolls Vertically No Color Poor Reception on the back of... OK, Picture Poor Picture OK, Sound Poor No Picture or Sound Dark and Blank Picture External Electrical Noise Interfering with a slight adjustment of the nearest Sharp Authorized Servicer, or to "OFF". X X XX X XX X X X XXX X XX X X If outside antenna is being received while viewing in again after about a minute. X X XX X XX X...


