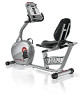
Assembly and Owner's Manual
Page 2
... 6 User Setup Mode 32 Hardware 7 Profile Programs 36 Tools 7 Fitness Test 37 Assembly 8 Heart Rate Control Workout 37 Moving the Bike 21 Distance Goal Workout 38 Leveling the Bike 21 Results/Cool Down Mode 38 Pausing or Stopping 39 Important Safety Instructions 22 User ... Or call 1 (800) NAUTILUS (628-8458). Nautilus, Inc. (www.NautilusInc.com) trademarks include NAUTILUS®, BOWFLEX®, SCHWINN® and UNIVERSAL® and respective logos. Other trademarks are the property of Contents Important Safety Instructions - Table of their respective owners 2
Assembly and Owner's Manual
Page 3
... movements on your own. • Set up this machine on this machine outdoors or in a wet or moist location. • Make sure assembly is done in an appropriate work space away from the product you are necessary, use genuine replacement parts can lead to the machine until the... with the Manual. • Read and understand the complete Manual supplied with this machine and will void the warranty. • If replacement parts are assembling at all warnings on a solid, level, horizontal surface. • Do not try to change the design or functionality of this machine before first use...
Assembly and Owner's Manual
Page 5
...holes to set up and operate your machine: • Read and understand the "Important Safety Instructions" before assembly. • Collect all the pieces necessary for each assembly step. • Using the recommended wrenches, turn the bolts and nuts to the right (clockwise) to ... and the left (counterclockwise) to loosen, unless instructed otherwise. • When attaching 2 pieces, lightly lift and look through the holes. • The assembly requires 2 people. 5 Specifications 46" (117 cm) 63" (160 cm) Maximum User Weight: 300 lbs. (136 kg) Power Requirements: Operational Voltage:...
Assembly and Owner's Manual
Page 8
Hardware is not on hardware card. 4 X7 11 D G 2. Remove Seat Rail Bracket from Frame and Disconnect Heart Rate Cable NOTICE: Make sure that the heart rate cable does not fall into the frame tube. Remove Seat Rail from Seat Rail NOTICE: Hardware is not on hardware card. 8 X2 G D 8 ASSEMBLY 1.
Assembly and Owner's Manual
Page 10
5. Loosen and Pull the Seat Post Adjustment Knob to Seat Frame Assembly X8 G K 9 10 6. Note: L ock the Adjustment Knob into one of the Seat Rail locking holes. 11 10 Attach Seat Pads to Slide Seat Assembly onto Seat Rail NOTICE: Do not crimp the Heart Rate Cable.
Assembly and Owner's Manual
Page 11
7. Hardware was pre-installed and not on hardware card. Attach Seat Rail Bracket to Seat Assembly NOTICE: Do not crimp the Heart Rate Cable. 8. X2 8 G D 11 Connect Heart Rate Cable to Seat Rail Assembly NOTICE: Do not crimp the Heart Rate Cable.
Assembly and Owner's Manual
Page 12
Attach Seat Rail Assembly to Frame Assembly NOTICE: Do not crimp the Heart Rate Cable. 9. Hardware was pre-installed and not on hardware card. X7 G D 12
Assembly and Owner's Manual
Page 13
Attach Console Mast to Frame Assembly NOTICE: Align the clips on the cable connectors and make sure the connectors lock. 10. Do not crimp Console Cable. 12 I X4 D 13
Assembly and Owner's Manual
Page 17
Do not crimp Console Cable. X4 * 17 Do not fully tighten the hardware. Connect Cables and Attach Console to Frame Assembly NOTICE: Align the clips on the cable connectors and make sure the connectors lock. 14.
Assembly and Owner's Manual
Page 20
Do not use until the machine has been fully assembled and inspected for correct performance in accordance with the Owner's Manual. 20 Final Inspection Inspect your machine to Frame Assembly 13 18. Connect AC Adapter to ensure that all hardware is tight and components are properly assembled. 17.
Assembly and Owner's Manual
Page 45
A Console B Console Bracket C Console Cable D Heart Rate Sensor Cable, Upper E Console Adjustment Knob F Handlebar, Upper G Console Mast H Seat Adjustment Knob I Seat Bottom J Handlebar, Side K Seat Back L Transport Handle M HR Sensors N Leveler O Rear Stabilizer P Pedal, Left Q Center Plate R Shroud, Left S Crank Arm T Speed Sensor U Speed Sensor Magnet V Drive Belt W Flywheel X Brake Assembly Y Front Stabilizer Z Transport Wheel AA Shroud, Right BB AC Adapter Plug CC Pedal, Right 45
Warranty
Page 1
...or inspection, at our discretion. Standard ground shipping of environmental conditions such as specified in the Product Documentation (Manuals, (Assembly, Owner's Manuals, etc.). • Product must be paid by Nautilus, Inc. Reasonable substitution may be defective in ... natural disasters, power surges. • A machine placed or used in a commercial or institutional setting. trademarks include NAUTILUS®, BOWFLEX®, SCHWINN® and UNIVERSAL® and respective logos. 1-800-NAUTILUS www.nautilus.com. Terms • Frame 5 years • Mechanical parts 1 ...