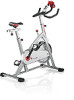
Schwinn IC2 Indoor Cycling Bike Support Question
Schwinn IC2 Indoor Cycling Bike Support Question
Find answers below for this question about Schwinn IC2 Indoor Cycling Bike.Need a Schwinn IC2 Indoor Cycling Bike manual? We have 2 online manuals for this item!
Question posted by rickdesorda on March 26th, 2015
Brake Assembly On The Schwinn Ic Stationary Bike, 2012 Model
How do I attach the brake assembly on a Schwinn IC Stationary Bike, 2012 model. Are there any drawings of how the bolts and nuts are assembled?
Current Answers
Answer #1: Posted by TechSupport101 on March 26th, 2015 10:35 PM
TechSupport101

Member since:
May 24th, 2013 Points: 12,171,305

Member since:
May 24th, 2013 Points: 12,171,305
The maintenance section of the product model's manual here http://www.sportsmith.net/images/product_support%5Cschwinn%5Cowners_manuals%5CIC%20Pro_IC%20Elite%20Owners%20Manual.pdf is seemingly silect abount advance maintenance like the one in question. You will need to contact customer service for the best advice on your options.
Related Schwinn IC2 Indoor Cycling Bike Manual Pages
Assembly and Owner's Manual - Page 2

... Number 4
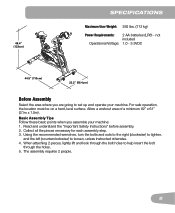
Specifications
5
Before Assembly
5
Parts
6
Hardware
7
Tools
7
Assembly
8
Leveling the Bike
14
Moving the Bike
14
Important Safety Instructions -
... trademark or registered trademark. Nautilus, Inc. (www.NautilusInc.com) trademarks include NAUTILUS®, BOWFLEX®, SCHWINN® and UNIVERSAL® and respective logos. Nautilus, Inc., (800) NAUTILUS / (800) 628-...
Assembly and Owner's Manual - Page 3
...outdoors or in a wet or moist location. • Make sure assembly is done in the assembly manual. • Do not assemble this machine before first use only genuine replacement parts and hardware supplied... Some components of this machine and will void the warranty. • If replacement parts are assembling at all warnings on a solid, level, horizontal surface. • Do not try to users...
Assembly and Owner's Manual - Page 5
... machine: 1. Read and understand the "Important Safety Instructions" before assembly. 2. Collect all the pieces necessary for each assembly step. 3. Using the recommended wrenches, turn the bolts and nuts to the right (clockwise) to tighten,
and the left (counterclockwise) to loosen, unless instructed otherwise. 4. When attaching 2 pieces, lightly lift and look through the holes. 5.
Allow...
Assembly and Owner's Manual - Page 7
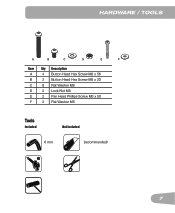
HARDWARE / TOOLs
Item Qty Description
A
4 Button Head Hex Screw M8 x 56
B
2 Button Head Hex Screw M8 x 20
C
8 Flat Washer M8
D
2 Lock Nut M8
E
2 Pan Head Phillips Screw M6 x 50
F
2 Flat Washer M6
Tools
Included
Not Included
6 mm
(recommended)
7
Assembly and Owner's Manual - Page 8
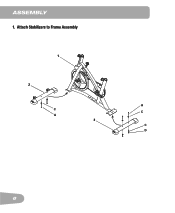
Attach Stabilizers to Frame Assembly
1
2 A
C C
A 3 C D
8 ASSEMBLY
1.
Assembly and Owner's Manual - Page 9

Be sure the Seat is straight. Tighten the bolt (6b) and nut (6c) on the Seat bracket (6a) to Seat Post and Frame
NOTICE: S lide the Seat (6) onto the Seat Post (7) and install the Seat Post in the Frame. Attach Seat to hold the Seat in the Seat Post. 2. Make sure the adjustment knob (7a) engages the holes in position.
6
6b 6c
6a
7 7a
9
Assembly and Owner's Manual - Page 10
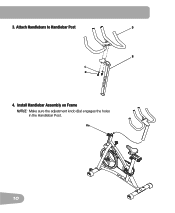
3. Install Handlebar Assembly on Frame
NOTICE: M ake sure the adjustment knob (8a) engages the holes in the Handlebar Post.
8a
10 Attach Handlebars to Handlebar Post
9
8
C B
4.
Assembly and Owner's Manual - Page 11
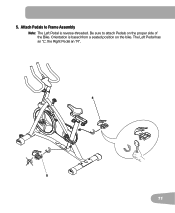
The Left Pedal has an "L", the Right Pedal an "R".
4
5
11 Attach Pedals to attach Pedals on the bike. Be sure to Frame Assembly
Note: T he Left Pedal is based from a seated position on the proper side of the Bike. Orientation is reverse-threaded. 5.
Assembly and Owner's Manual - Page 12
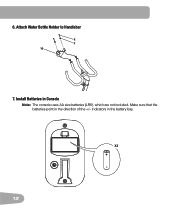
Attach Water Bottle Holder to Handlebar
E F 10
7. Install Batteries in the battery bay. X2
+ -
12 6. indicators in Console
Note: T he console uses AA size batteries (LR6), which are not included.
Make sure that the batteries point in the direction of the +/-
Assembly and Owner's Manual - Page 14
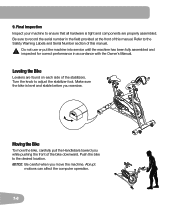
...while pushing the front of the stabilizers. Leveling the Bike
Levelers are properly assembled. Final Inspection
Inspect your machine to adjust the ...the machine into service until the machine has been fully assembled and inspected for correct performance in the field provided ....
14 Make sure the bike is tight and components are found on each side of the bike downward. Be sure to ...
Assembly and Owner's Manual - Page 16

FEATURES
A
O N
B C D E
J
K M
H
G
L
I
F
C
G
A Console B Handlebar Assembly C Adjustment Knob D Brake/Resistance Knob E Seat F Seat Slider G Stabilizers H Levelers
H
I Pedals J Flywheel K Brake Assembly L Chain Guard M Transport Wheels N Battery Bay O Water Bottle Holder
16
Assembly and Owner's Manual - Page 17
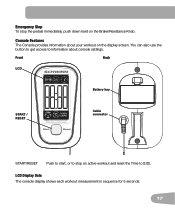
... physician.
Front
Back
LCD
Battery bay
START / RESET
WARNING: If you feel any unusual pain, shortness of breath or dizziness, consult your workout on the Brake/Resistance Knob. Start
Reset
Cable connector
START/RESET Push to start, or to stop the pedals immediately, push down hard on the display screen.
LCD...
Assembly and Owner's Manual - Page 19
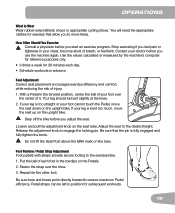
...bike before you use the machine again. Foot Position / Pedal Strap Adjustment Foot pedals with straps provide secure footing to Wear Wear rubber-soled athletic shoes or appropriate cycling shoes. You will need the appropriate clothes for 30 minutes each foot in the toeclips on the Pedals. 2. How Often Should You Exercise...knee. 2. Operations
What to the exercise bike. 1. With a Pedal in ...
Assembly and Owner's Manual - Page 20
... the workout are added to count up from the RPM sensor as you exercise.
Changing the Resistance Level Turn the Brake/Resistance Knob to engage the locking pin. During Pause state, the console ...Off (Sleep Mode)
If the Console does not receive any time during your workout. Adjust the handlebar assembly to stop the workout.
After 5 minutes in Sleep Mode.
20 Push the button to the desired...
Assembly and Owner's Manual - Page 22

... California to ease operation. Note: Do not use , examine the exercise machine for smooth seat and handlebar operation. NOTICE: D o not clean...: Avoid excessive moisture on the Console. Lubricate chain with bike chain oil. This product, its packaging, and components contain...Console free of moisture.
22
Repair or replace all bolts and screws are tight.
Equipment must be used to...
Assembly and Owner's Manual - Page 23

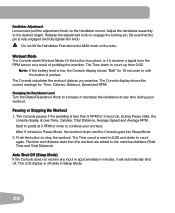
Maintenance Parts
A R
A
R K
T
B
C D E F
S N
M
I J K
H
F G
Q R
O NP
G L
M
A Console B Handlebars C Brake/Resistance Knob D Brake Assembly E Chain Guard F Chain Guard Inside G Crank Arms
H Pedals I Seat J Seat Post K Adjustment Knob L Chain Guard Door M Levelers N Chain
O Speed Sensor Magnet P RPM Sensor Q Sprocket drive R Data Cable S Flywheel T Brake Cover
23
Assembly and Owner's Manual - Page 24
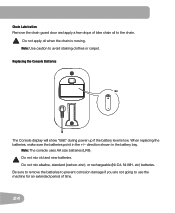
... (LR6).
! Be sure to remove the batteries to prevent corrosion damage if you are not going to use the machine for an extended period of bike chain oil to avoid staining clothes or carpet. Chain Lubrication Remove the chain guard door and apply a few drops of time.
24
The Console display...
Assembly and Owner's Manual - Page 25
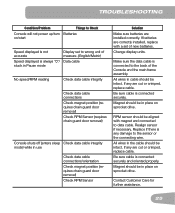
... in cable should be intact.
Contact Customer Care for further assistance.
25
If any damage to wrong unit of the Console and the main frame assembly. Realign sensor if necessary. Be sure cable is connected securely. All wires in place on sprocket drive. Replace if there is connected to data cable...
Assembly and Owner's Manual - Page 26
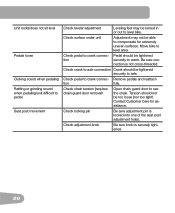
...may be turned in or out to axle. Contact Customer Care for extremely uneven surfaces. Move bike to crank connec- Check pedal to level area.
Remove pedals and reattach
tion
fully.
Unit ...
Leveling feet may not be able to crank. Tension should be tightened securely to level bike. Check locking pin
Be sure adjustment pin is securely tightened.
26 Check crank to axle...
Warranty - Page 1

... your machine outside of replacement parts involved in the Product's Assembly and Owner's manual.
Expirations If the warranty has expired, .... Nautilus, Inc. This includes gyms, corporations, work places, clubs, fitness centers and any territories or countries outside these services. Some states do ...SCHWINN® and UNIVERSAL® and respective logos. 1-800-NAUTILUS www.NautilusInc...
Similar Questions

Map My Fitness Connection
How to connect swinn 470 elliptical to map my fitness app on my Google 6 phone?
How to connect swinn 470 elliptical to map my fitness app on my Google 6 phone?
(Posted by loringbar 1 year ago)

E-1
the bike was given to me. E-1 appears in digital screen after I plug in power. What is the trouble c...
the bike was given to me. E-1 appears in digital screen after I plug in power. What is the trouble c...
(Posted by prayingmom45 2 years ago)

Swinn 103/203 Recumbent Bi
How do I disassemble my stationary bike and move it to my upstairs room.
How do I disassemble my stationary bike and move it to my upstairs room.
(Posted by smtroha 8 years ago)

Location Of Electrical Connection On Schwinn 230
Where is the electrical connection located on my Schwinn 230 stationary bike?
Where is the electrical connection located on my Schwinn 230 stationary bike?
(Posted by pcbridges24 9 years ago)
Adjustment Of Chain
I am assuming the bike I just put together needs the chain adjusted to tighten it up as it makes a n...
I am assuming the bike I just put together needs the chain adjusted to tighten it up as it makes a n...
(Posted by mbenson04 10 years ago)