Schwinn IC2 Indoor Cycling Bike Support Question
Schwinn IC2 Indoor Cycling Bike Support Question
Find answers below for this question about Schwinn IC2 Indoor Cycling Bike.Need a Schwinn IC2 Indoor Cycling Bike manual? We have 2 online manuals for this item!
Question posted by mbenson04 on October 4th, 2013
Adjustment Of Chain
I am assuming the bike I just put together needs the chain adjusted to tighten it up as it makes a noise as if the chain has slack in it resulting in a clunking noise especially when I stand up and ride it. I have not been able to find any directions on how to adjust this in the manual that came with the bike.
Current Answers
Related Schwinn IC2 Indoor Cycling Bike Manual Pages
Assembly and Owner's Manual - Page 2

...Before Assembly
5
Parts
6
Hardware
7
Tools
7
Assembly
8
Leveling the Bike
14
Moving the Bike
14
Important Safety Instructions - Owner's 15
Features
16
Emergency Stop
17
Console Features
17
Operations
19
Adjustments
19
Workout Mode
20
Pausing or Stopping
20
Service Mode
21
Maintenance
22
Chain Lubrication
24
Replacing the Console Batteries
24
Troubleshooting
25...
Assembly and Owner's Manual - Page 3
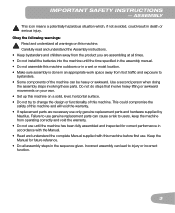
Obey the following warnings:
! This could result in the assembly manual. • Do not assemble this machine and will void the warranty. &#... can lead to change the design or functionality of this machine outdoors or in a wet or moist location. • Make sure assembly is done in an appropriate work space away from foot traffic and exposure to users, keep the machine from the...
Assembly and Owner's Manual - Page 5
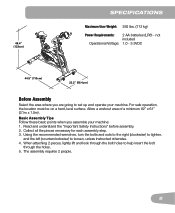
..." before assembly. 2. Collect all the pieces necessary for each assembly step. 3. Using the recommended wrenches, turn the bolts and nuts to the right (clockwise) to tighten,
and the left (counterclockwise) to loosen, unless instructed otherwise. 4. When attaching 2 pieces, lightly lift and look through the bolt holes to help insert the bolt...
Assembly and Owner's Manual - Page 9

Make sure the adjustment knob (7a) engages the holes in position.
6
6b 6c
6a
7 7a
9 Tighten the bolt (6b) and nut (6c) on the Seat bracket (6a) to Seat Post and Frame
NOTICE: S lide the Seat (6) onto the Seat Post (7) and install the Seat Post in the Frame. Be sure the Seat is straight. Attach Seat to hold the Seat in the Seat Post. 2.
Assembly and Owner's Manual - Page 10
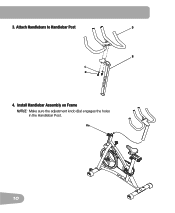
Install Handlebar Assembly on Frame
NOTICE: M ake sure the adjustment knob (8a) engages the holes in the Handlebar Post.
8a
10 Attach Handlebars to Handlebar Post
9
8
C B
4. 3.
Assembly and Owner's Manual - Page 11
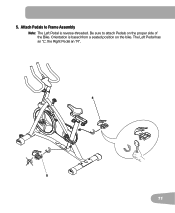
The Left Pedal has an "L", the Right Pedal an "R".
4
5
11 5. Be sure to Frame Assembly
Note: T he Left Pedal is based from a seated position on the proper side of the Bike. Orientation is reverse-threaded. Attach Pedals to attach Pedals on the bike.
Assembly and Owner's Manual - Page 12
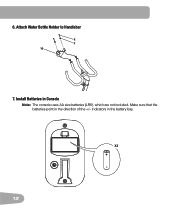
Attach Water Bottle Holder to Handlebar
E F 10
7.
6. X2
+ -
12 Install Batteries in the direction of the +/- Make sure that the batteries point in Console
Note: T he console uses AA size batteries (LR6), which are not included. indicators in the battery bay.
Assembly and Owner's Manual - Page 14
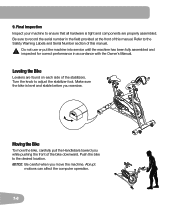
...level and stable before you while pushing the front of this manual.
!
Push the bike to adjust the stabilizer foot. Abrupt
motions can affect the computer operation.
14 Turn the knob...Owner's Manual. Make sure the bike is tight and components are found on each side of this manual. NOTICE: B e careful when you move the bike, carefully pull the Handlebars toward you exercise. 9. Be...
Assembly and Owner's Manual - Page 15

... Safety Instructions
! This icon means a potentially hazardous situation which, if not avoided, could result in this weight.
• This machine is in your doctor before servicing this machine.
...surface.
• Make the Pedals stable before you use .
• Do not over this manual.
• Correctly adjust and safely engage all power before you start an exercise program. Keep ...
Assembly and Owner's Manual - Page 16

FEATURES
A
O N
B C D E
J
K M
H
G
L
I
F
C
G
A Console B Handlebar Assembly C Adjustment Knob D Brake/Resistance Knob E Seat F Seat Slider G Stabilizers H Levelers
H
I Pedals J Flywheel K Brake Assembly L Chain Guard M Transport Wheels N Battery Bay O Water Bottle Holder
16
Assembly and Owner's Manual - Page 18
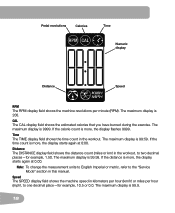
... per hour (mph), to one decimal place-for example, 1.50. CAL The CAL display field shows the estimated calories that you have burned during the exercise.
Assembly and Owner's Manual - Page 19
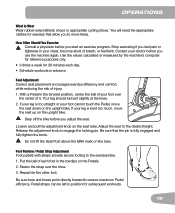
...is fully engaged and fully tighten the knob.
! Adjust the seat to the exercise bike. 1. Contact your leg is...adjustment knob to ensure maximum Pedal efficiency.
Stop exercising if you start an exercise program. Be sure toes and knees point directly forward to engage the locking pin. Step off the bike before you to Wear Wear rubber-soled athletic shoes or appropriate cycling...
Assembly and Owner's Manual - Page 20
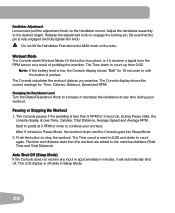
.... The Console calculates the workout data as a result of pedaling the machine. The time and distance ... a signal from the RPM sensor as you exercise. After 5 minutes in Sleep Mode.
20 ...Adjustment Loosen and pull the adjustment knob on the tube. Adjust the handlebar assembly to engage the locking pin. Release the adjustment...tighten the knob.
! Auto Shut-Off (Sleep ...
Assembly and Owner's Manual - Page 22

...NOTICE: D o not clean with bike chain oil. Only manufacturer supplied components can be used to ...make sure that regular maintenance is provided in this condition. This product, its packaging, and components contain chemicals known to cause cancer, birth defects, or reproductive harm. Do not use , examine the exercise machine for loose, broken, damaged, or worn parts.
Tighten...
Assembly and Owner's Manual - Page 23

Maintenance Parts
A R
A
R K
T
B
C D E F
S N
M
I J K
H
F G
Q R
O NP
G L
M
A Console B Handlebars C Brake/Resistance Knob D Brake Assembly E Chain Guard F Chain Guard Inside G Crank Arms
H Pedals I Seat J Seat Post K Adjustment Knob L Chain Guard Door M Levelers N Chain
O Speed Sensor Magnet P RPM Sensor Q Sprocket drive R Data Cable S Flywheel T Brake Cover
23
Assembly and Owner's Manual - Page 24
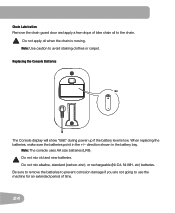
Note: Use caution to use the machine for an extended period of bike chain oil to the chain.
! Do not mix old and new batteries.
The Console display will show... carpet. Replacing the Console Batteries
X2
+ - When replacing the batteries, make sure the batteries point in the battery bay.
Do not apply oil when the chain is low.
direction shown in the +/- Note: The console uses AA ...
Assembly and Owner's Manual - Page 25
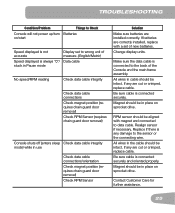
...in place on /start
Speed displayed is not accurate
Speed displayed is connected securely. Make sure the data cable is connected securely and oriented properly. Be sure cable is ... in use
Check data cable connections/orientation Check magnet position (requires chain guard door removal) Check RPM Sensor
Solution Make sure batteries are cut or crimped, replace cable.
RPM sensor should...
Assembly and Owner's Manual - Page 26
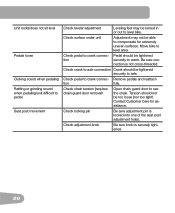
... (nor too tight).
Check locking pin
Be sure adjustment pin is securely tightened.
26 Check pedal to level area. Tension should be tightened
tion
securely to crank.
Remove pedals and reattach
tion
fully.
Check surface under unit
Adjustment may be turned in or out to level bike. Move bike to crank connec- Be sure con- Check...
Warranty - Page 1

...indicate a trademark or registered trademark. This includes gyms, corporations, work places, clubs, fitness centers and any public or privately entity that replacement parts or components do not allow limitations.... Any implied warranties, including the WARRANTY OF MERCHANTABILITY and any WARRANTY OF FITNESS FOR A PARTICULAR PURPOSE, are the sole and exclusive express warranties made by...
Similar Questions

Map My Fitness Connection
How to connect swinn 470 elliptical to map my fitness app on my Google 6 phone?
How to connect swinn 470 elliptical to map my fitness app on my Google 6 phone?
(Posted by loringbar 1 year ago)

The Bike Display Flashes U3orv3 When Connected To Current. What Does This Mean?
(Posted by Awoneal 1 year ago)

Troubleshooting Recumbant Bike 213
Bike makes noise when powered, after about 1 minute of riding, it hardens and then turns off by itse...
Bike makes noise when powered, after about 1 minute of riding, it hardens and then turns off by itse...
(Posted by nsengasa 2 years ago)
Swinn 103/203 Recumbent Bi
How do I disassemble my stationary bike and move it to my upstairs room.
How do I disassemble my stationary bike and move it to my upstairs room.
(Posted by smtroha 8 years ago)

Brake Assembly On The Schwinn Ic Stationary Bike, 2012 Model
How do I attach the brake assembly on a Schwinn IC Stationary Bike, 2012 model. Are there any drawin...
How do I attach the brake assembly on a Schwinn IC Stationary Bike, 2012 model. Are there any drawin...
(Posted by rickdesorda 9 years ago)