
User Manual
Page 2
... grounding prong. REFER SERVICING TO QUALIFIED SERVICE PERSONNEL. Follow all instructions. 5. Only use this apparatus during lightning storms or when unused for LCD HDTV 1. Do not use attachments/accessories specified by the manufacturer, or sold with liquids, such as radiators, heat registers, stoves, or... other . NO USER-SERVICEABLE PARTS INSIDE. Use only with the cart, stand, tripod, bracket, or table specified by the manufacturer. 12. Do not install near water. 6. "Apparatus shall not be connected to the...
... grounding prong. REFER SERVICING TO QUALIFIED SERVICE PERSONNEL. Follow all instructions. 5. Only use this apparatus during lightning storms or when unused for LCD HDTV 1. Do not use attachments/accessories specified by the manufacturer, or sold with liquids, such as radiators, heat registers, stoves, or... other . NO USER-SERVICEABLE PARTS INSIDE. Use only with the cart, stand, tripod, bracket, or table specified by the manufacturer. 12. Do not install near water. 6. "Apparatus shall not be connected to the...
User Manual
Page 4
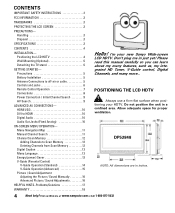
...AV Search 9 ADVANCED AV CONNECTIONS- Do not position the unit in inches. 4 Need help? DP52848 NOTE: All dimensions are in a confined area. Visit our Web site at www.sanyoctv.com... ON-SCREEN MENU OPERATION- POSITIONING THE LCD HDTV Always use a firm-flat surface when positioning your new Sanyo Wide-screen LCD HDTV. Don't plug me in just... SAFETY INSTRUCTIONS 2 FCC INFORMATION 3 TRADEMARKS 3 PROTECTING THE LCD SCREEN 3 PRECAUTIONS- Positioning the LCD HDTV 4 Wall Mounting (Optional 5 Detaching the TV stand 5 GETTING STARTED- Menu Navigation Map 11 Manual Channel Search...
...AV Search 9 ADVANCED AV CONNECTIONS- Do not position the unit in inches. 4 Need help? DP52848 NOTE: All dimensions are in a confined area. Visit our Web site at www.sanyoctv.com... ON-SCREEN MENU OPERATION- POSITIONING THE LCD HDTV Always use a firm-flat surface when positioning your new Sanyo Wide-screen LCD HDTV. Don't plug me in just... SAFETY INSTRUCTIONS 2 FCC INFORMATION 3 TRADEMARKS 3 PROTECTING THE LCD SCREEN 3 PRECAUTIONS- Positioning the LCD HDTV 4 Wall Mounting (Optional 5 Detaching the TV stand 5 GETTING STARTED- Menu Navigation Map 11 Manual Channel Search...
User Manual
Page 5
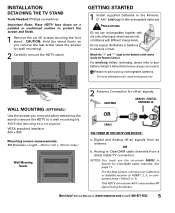
...mounting kit. Do not expose the Remote or batteries to protect the screen and finish. 1 Remove the six (6) screws securing the foot stand. NOTES: You must use rechargeables together with dry cells, other types, mixed new and old, or batteries with marks inside the Remote... included). Digital and Analog off -air signals. Match the "+" and "-" signs on the batteries with different charge levels. INSTALLATION DETACHING THE TV STAND Tools Needed: Phillips screwdriver Important Note: Place HDTV face down on a padded or cushioned surface to moisture or heat. For more information visit...
...mounting kit. Do not expose the Remote or batteries to protect the screen and finish. 1 Remove the six (6) screws securing the foot stand. NOTES: You must use rechargeables together with dry cells, other types, mixed new and old, or batteries with marks inside the Remote... included). Digital and Analog off -air signals. Match the "+" and "-" signs on the batteries with different charge levels. INSTALLATION DETACHING THE TV STAND Tools Needed: Phillips screwdriver Important Note: Place HDTV face down on a padded or cushioned surface to moisture or heat. For more information visit...


