Owners Manual
Page 2
... REMOVE COVER (OR BACK). Keep these instructions. 2. Follow all warnings. 4. Do not install near water. 6. Use only with one wider than the other electrical light or power circuits, or where it can fall into such power lines or circuits. EXAMPLE OF ANTENNA GROUNDING ACCORDING TO NATIONAL ELECTRICAL CODE, ANSI/NFPA 70 "Note to CATV system installer: This reminder is used as power-supply cord or plug...
... REMOVE COVER (OR BACK). Keep these instructions. 2. Follow all warnings. 4. Do not install near water. 6. Use only with one wider than the other electrical light or power circuits, or where it can fall into such power lines or circuits. EXAMPLE OF ANTENNA GROUNDING ACCORDING TO NATIONAL ELECTRICAL CODE, ANSI/NFPA 70 "Note to CATV system installer: This reminder is used as power-supply cord or plug...
Owners Manual
Page 3
... is Listed by one or more of Audyssey Laboratories. Reorient or relocate the receiving antenna. - Dimensions: MODEL WIDTH HEIGHT DEPTH DP50740 w/o stand 49.0 33.2 31.4 14.2 5.2 NOTE: Dimensions are in inches Need help . This symbol on a circuit different from Audyssey Laboratories. It is connected. - U.S. Increase the separation between the equipment and receiver. - This Class B digital apparatus complies with the instructions, may void the user's authority...
... is Listed by one or more of Audyssey Laboratories. Reorient or relocate the receiving antenna. - Dimensions: MODEL WIDTH HEIGHT DEPTH DP50740 w/o stand 49.0 33.2 31.4 14.2 5.2 NOTE: Dimensions are in inches Need help . This symbol on a circuit different from Audyssey Laboratories. It is connected. - U.S. Increase the separation between the equipment and receiver. - This Class B digital apparatus complies with the instructions, may void the user's authority...
Owners Manual
Page 4
... when cleaning the screen; CONTENTS IMPORTANT SAFETY INSTRUCTIONS 2 FCC INFORMATION 3 TRADEMARKS 3 PC RESOLUTIONS 3 CONTENTS 4 SPECIFICATIONS 4 PROTECTING THE PLASMA SCREEN 4 POSITIONING THE PLASMA HDTV 5 STAND REMOVAL / WALL MOUNTING 5 GETTING STARTED- excessive pressure can be used for off-air or cable 5 BACK PANEL JACKS 6 A/V CONNECTIONS 7 POWER CONNECTION / INITIAL CHANNEL SEARCH . . .8 REMOTE CONTROL OPERATION 9 ON-SCREEN MENU OPERATION- Handling by the cabinet only. If the Plasma HDTV is not to clean the screen. • Do not use hard objects such...
... when cleaning the screen; CONTENTS IMPORTANT SAFETY INSTRUCTIONS 2 FCC INFORMATION 3 TRADEMARKS 3 PC RESOLUTIONS 3 CONTENTS 4 SPECIFICATIONS 4 PROTECTING THE PLASMA SCREEN 4 POSITIONING THE PLASMA HDTV 5 STAND REMOVAL / WALL MOUNTING 5 GETTING STARTED- excessive pressure can be used for off-air or cable 5 BACK PANEL JACKS 6 A/V CONNECTIONS 7 POWER CONNECTION / INITIAL CHANNEL SEARCH . . .8 REMOTE CONTROL OPERATION 9 ON-SCREEN MENU OPERATION- Handling by the cabinet only. If the Plasma HDTV is not to clean the screen. • Do not use hard objects such...
Owners Manual
Page 5
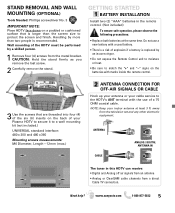
... screw. 2 Carefully remove the stand. GETTING STARTED BATTERY INSTALLATION Install two (2) "AAA" batteries in this HDTV can receive: • Digital and Analog off air signals from an antenna • Analog or ClearQAM cable channels from the television set and any other electronic equipment. Do not use of a 75 OHM coaxial cable. NOTE: Keep your cable service to the HDTV's ANT terminal with the use a new battery with marks inside the remote control. 3 Use...
... screw. 2 Carefully remove the stand. GETTING STARTED BATTERY INSTALLATION Install two (2) "AAA" batteries in this HDTV can receive: • Digital and Analog off air signals from an antenna • Analog or ClearQAM cable channels from the television set and any other electronic equipment. Do not use of a 75 OHM coaxial cable. NOTE: Keep your cable service to the HDTV's ANT terminal with the use a new battery with marks inside the remote control. 3 Use...
Owners Manual
Page 6
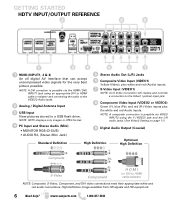
... Video Input (VIDEO2 or VIDEO3) Green (Y), blue (Pb), and red (Pr) Video inputs plus white and red (Audio) inputs. 7 S-Video Input (VIDEO1) NOTE: An S-Video connection will replace and override a connection to HDMI cable/adapter) NOTE: Composite, S-Video, Component, and DVI video connections need their appropriate white and red audio connections. NOTE: A composite connection is possible via VIDEO INPUT2 using an appropriate DVI to HDMI cable or adapter and connecting the audio to the VIDEO3 Audio jacks. 2 Analog / Digital Antenna Input 3 USB Input View pictures stored in JPEG format...
... Video Input (VIDEO2 or VIDEO3) Green (Y), blue (Pb), and red (Pr) Video inputs plus white and red (Audio) inputs. 7 S-Video Input (VIDEO1) NOTE: An S-Video connection will replace and override a connection to HDMI cable/adapter) NOTE: Composite, S-Video, Component, and DVI video connections need their appropriate white and red audio connections. NOTE: A composite connection is possible via VIDEO INPUT2 using an appropriate DVI to HDMI cable or adapter and connecting the audio to the VIDEO3 Audio jacks. 2 Analog / Digital Antenna Input 3 USB Input View pictures stored in JPEG format...
Owners Manual
Page 7
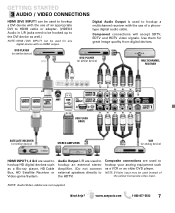
... DVD player. Component connections will accept SDTV, EDTV and HDTV video signals. Audio Output L/R are used to hookup an external stereo Amplifier. (Do not connect external speakers directly to the HDTV) Composite connections are not supplied Need help? Digital Audio Output is used to hookup a multichannel receiver with an HDMI output. NOTE: Audio/Video cables are used to hookup HD digital devices such as well.) NOTE: HDMI (DVI) INPUT1 can be used instead of a phonotype digital audio cable. GETTING STARTED AUDIO / VIDEO CONNECTIONS HDMI (DVI) INPUT1 can be used to hookup a DVI...
... DVD player. Component connections will accept SDTV, EDTV and HDTV video signals. Audio Output L/R are used to hookup an external stereo Amplifier. (Do not connect external speakers directly to the HDTV) Composite connections are not supplied Need help? Digital Audio Output is used to hookup a multichannel receiver with an HDMI output. NOTE: Audio/Video cables are used to hookup HD digital devices such as well.) NOTE: HDMI (DVI) INPUT1 can be used instead of a phonotype digital audio cable. GETTING STARTED AUDIO / VIDEO CONNECTIONS HDMI (DVI) INPUT1 can be used to hookup a DVI...

Owners Manual
Page 8
... display level. AV INPUT SELECTION Press the INPUT key to select the correct AV input for on screen trouble shooting guide. HOOK UP AC POWER CORD (120V AC, 60Hz) to the HDTV and plug in to set an Initial Energy Saving Mode, and perform an Initial Channel/Signal Search. TURN ON TV (PRESS POWER BUTTON) Wait for the video source you wish to access an on -screen instructions to set the backlight to watch. 8 Need...
... display level. AV INPUT SELECTION Press the INPUT key to select the correct AV input for on screen trouble shooting guide. HOOK UP AC POWER CORD (120V AC, 60Hz) to the HDTV and plug in to set an Initial Energy Saving Mode, and perform an Initial Channel/Signal Search. TURN ON TV (PRESS POWER BUTTON) Wait for the video source you wish to access an on -screen instructions to set the backlight to watch. 8 Need...
Owners Manual
Page 9
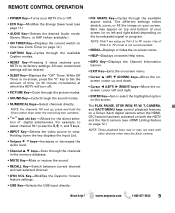
...; CAPTION Key-Cycles through the available aspect ratios. All user customized settings will turn off. • PICTURE Key-Cycle through the picture modes. • SOUND Key-Cycle through the sound modes. • NUMERICAL Keys-Select channels directly. keys-Increases or decreases the audio level. • Channel L M keys-Scan through the channels in TV mode is on-screen, press the "0" key to view. REMOTE CONTROL OPERATION • POWER Key-Turns your HDTV to its factory settings...
...; CAPTION Key-Cycles through the available aspect ratios. All user customized settings will turn off. • PICTURE Key-Cycle through the picture modes. • SOUND Key-Cycle through the sound modes. • NUMERICAL Keys-Select channels directly. keys-Increases or decreases the audio level. • Channel L M keys-Scan through the channels in TV mode is on-screen, press the "0" key to view. REMOTE CONTROL OPERATION • POWER Key-Turns your HDTV to its factory settings...
Owners Manual
Page 10
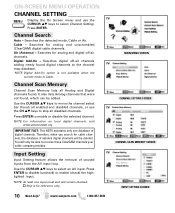
... ClearQAM channels your cable company provides. It also lists Analog channels that were not found digital channels to skip all Analog and Digital channels found. Air (Antenna) - Use the CURSOR LM keys to move the channel select bar throuh all enabled and disabled channels, or use the CURSOR LM keys to select an AV input. www.sanyoctv.com 1-800-877-5032 MAIN MENU SCREEN CHANNEL SETTING SCREEN CHANNEL SCAN MEMORY SCREEN INPUT SETTING SCREEN Channel Search Auto -
... ClearQAM channels your cable company provides. It also lists Analog channels that were not found digital channels to skip all Analog and Digital channels found. Air (Antenna) - Use the CURSOR LM keys to move the channel select bar throuh all enabled and disabled channels, or use the CURSOR LM keys to select an AV input. www.sanyoctv.com 1-800-877-5032 MAIN MENU SCREEN CHANNEL SETTING SCREEN CHANNEL SCAN MEMORY SCREEN INPUT SETTING SCREEN Channel Search Auto -
Owners Manual
Page 11
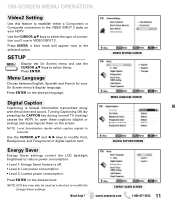
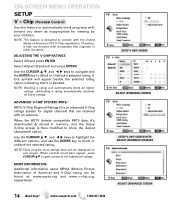
...-5032 11 SETUP Display the On Screen menu and use in VIDEO INPUT 2. Menu Language Choose between English, Spanish and French for your HDTV. NOTE: Local broadcasters decide which caption signals to open these captions (digital or analog) and superimpose them on your On Screen menu's display language. Press ENTER on the desired level. Need help? Turning Captioning ON (by pressing the CAPTION key during normal TV viewing) causes the HDTV to...
...-5032 11 SETUP Display the On Screen menu and use in VIDEO INPUT 2. Menu Language Choose between English, Spanish and French for your HDTV. NOTE: Local broadcasters decide which caption signals to open these captions (digital or analog) and superimpose them on your On Screen menu's display language. Press ENTER on the desired level. Need help? Turning Captioning ON (by pressing the CAPTION key during normal TV viewing) causes the HDTV to...
Owners Manual
Page 12
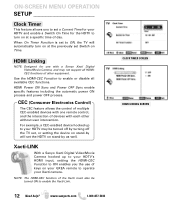
...-enabled devices with one remote control, and the interaction of other without user intervention. www.sanyoctv.com 1-800-877-5032 CLOCK TIMER SCREEN HDMI LINKING SCREEN ON-SCREEN MENU OPERATION SETUP Clock Timer This feature allows you the use with a Sanyo Xacti Digital VIdeo/Movie Camera, and may be turned ON to enable the Xacti-Link. 12 Need help? HDMI Linking NOTE: Designed for the HDTV to enable or...
...-enabled devices with one remote control, and the interaction of other without user intervention. www.sanyoctv.com 1-800-877-5032 CLOCK TIMER SCREEN HDMI LINKING SCREEN ON-SCREEN MENU OPERATION SETUP Clock Timer This feature allows you the use with a Sanyo Xacti Digital VIdeo/Movie Camera, and may be turned ON to enable the Xacti-Link. 12 Need help? HDMI Linking NOTE: Designed for the HDTV to enable or...
Owners Manual
Page 13
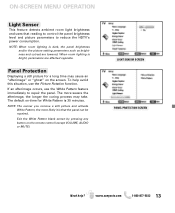
... remove a still picture and activate White Pattern, the more severe the afterimage, the longer the curing process may cause an "afterimage" or "ghost" on the remote control (except VOLUME, AUDIO or MUTE) LIGHT SENSOR SCREEN PANEL PROTECTION SCREEN Need help avoid this situation, use the White Pattern feature immediately to reduce the HDTV's power consumption. ON-SCREEN MENU OPERATION Light Sensor This feature detects ambient room light brightness and uses that the panel can be repaired...
... remove a still picture and activate White Pattern, the more severe the afterimage, the longer the curing process may cause an "afterimage" or "ghost" on the remote control (except VOLUME, AUDIO or MUTE) LIGHT SENSOR SCREEN PANEL PROTECTION SCREEN Need help avoid this situation, use the White Pattern feature immediately to reduce the HDTV's power consumption. ON-SCREEN MENU OPERATION Light Sensor This feature detects ambient room light brightness and uses that the panel can be repaired...
Owners Manual
Page 14
Chip (Parental Control) Use this feature to automatically block programs with content you deem as inappropriate for digital channels that originate in memory, and the Setup V-Chip screen is designed to comply with an antenna. ADVANCED V-CHIP SYSTEM (RRT5) RRT5 (V-Chip Regional Ratings 5) is blocked. When the HDTV detects compatible RRT5 data, it's downloaded & stored in other countries. MORE INFORMATION Additional information about...
Chip (Parental Control) Use this feature to automatically block programs with content you deem as inappropriate for digital channels that originate in memory, and the Setup V-Chip screen is designed to comply with an antenna. ADVANCED V-CHIP SYSTEM (RRT5) RRT5 (V-Chip Regional Ratings 5) is blocked. When the HDTV detects compatible RRT5 data, it's downloaded & stored in other countries. MORE INFORMATION Additional information about...
Owners Manual
Page 15
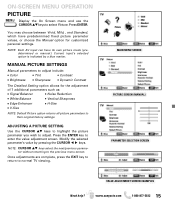
...Size • V-Size NOTE: Default Picture option returns all picture parameters to select Picture. MAIN MENU SCREEN PICTURE SCREEN (MANUAL) PARAMETER SELECTION SCREEN VALUE ADJUSTMENT SCREEN EXAMPLES Need help? MANUAL PICTURE SETTINGS Manual parameters to adjust include: • Color • Tint • Contrast • Brightness • Sharpness • Dynamic Contrast The Detailed Setting option allows for customized personal settings. Modify the selected parameter's value by a blue marker. ON-SCREEN MENU OPERATION PICTURE Display the On Screen menu and use...
...Size • V-Size NOTE: Default Picture option returns all picture parameters to select Picture. MAIN MENU SCREEN PICTURE SCREEN (MANUAL) PARAMETER SELECTION SCREEN VALUE ADJUSTMENT SCREEN EXAMPLES Need help? MANUAL PICTURE SETTINGS Manual parameters to adjust include: • Color • Tint • Contrast • Brightness • Sharpness • Dynamic Contrast The Detailed Setting option allows for customized personal settings. Modify the selected parameter's value by a blue marker. ON-SCREEN MENU OPERATION PICTURE Display the On Screen menu and use...
Owners Manual
Page 16
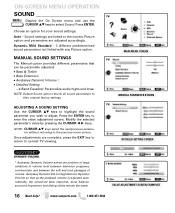
... to adjust. ON-SCREEN MENU OPERATION SOUND Display the On Screen menu and use the CURSOR LM keys to select Sound. Choose an option for your sound settings: Auto - MANUAL SOUND SETTINGS The Manual option provides different parameters that as the playback volume is integrated into Dynamic Volume so that can be personally adjusted: • Bass & Treble • Bass Extension • Audyssey Dynamic Volume 1 • Detailed Setting - 4-Band Equalizer: Personalize audio highs...
... to adjust. ON-SCREEN MENU OPERATION SOUND Display the On Screen menu and use the CURSOR LM keys to select Sound. Choose an option for your sound settings: Auto - MANUAL SOUND SETTINGS The Manual option provides different parameters that as the playback volume is integrated into Dynamic Volume so that can be personally adjusted: • Bass & Treble • Bass Extension • Audyssey Dynamic Volume 1 • Detailed Setting - 4-Band Equalizer: Personalize audio highs...
Owners Manual
Page 17
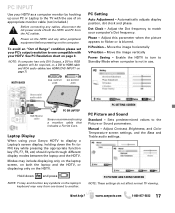
... monitor by hooking up your HDTV. Power on the HDTV and any cables, disconnect the AC power cords of Range" condition please set your PC's output resolution to one brand to the TV with the use . Move the image vertically Power Saving - See PC Resolution chart on page 7.) PC Setting Auto Adjustment - Phase - Enable the HDTV to turn to the Picture or Sound parameters. Adjust Contrast, Brightness, and Color Temperature screen settings, and the Bass and Treble audio settings. Need...
... monitor by hooking up your HDTV. Power on the HDTV and any cables, disconnect the AC power cords of Range" condition please set your PC's output resolution to one brand to the TV with the use . Move the image vertically Power Saving - See PC Resolution chart on page 7.) PC Setting Auto Adjustment - Phase - Enable the HDTV to turn to the Picture or Sound parameters. Adjust Contrast, Brightness, and Color Temperature screen settings, and the Bass and Treble audio settings. Need...
Owners Manual
Page 18
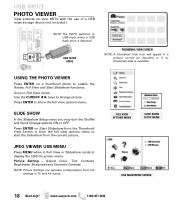
... picture. Adjust Color, Tint, Contrast, Brightness, Sharpness and Dynamic Contrast. JPEG VIEWER USB MENU Press MENU when in TV and AV inputs. Once in Full View mode: Use the CURSOR keys to start the slideshow from the settings in Full View or Slideshow mode to display the USB On screen menu. USB INPUT PHOTO VIEWER View pictures on your HDTV with the use of a USB mass storage device (not included.) NOTE: The HDTV switches to USB Input when a USB flash...
... picture. Adjust Color, Tint, Contrast, Brightness, Sharpness and Dynamic Contrast. JPEG VIEWER USB MENU Press MENU when in TV and AV inputs. Once in Full View mode: Use the CURSOR keys to start the slideshow from the settings in Full View or Slideshow mode to display the USB On screen menu. USB INPUT PHOTO VIEWER View pictures on your HDTV with the use of a USB mass storage device (not included.) NOTE: The HDTV switches to USB Input when a USB flash...
Owners Manual
Page 19
... the remote control. During the first 90 days under normal use and conditions for the same model, or a replacement model of purchase, please keep the original-dated-sales receipt for future reference. www.sanyoctv.com 1-800-877-5032 19 Return the defective TV to state. (EFFECTIVE: March 1, 2007) Your Sanyo HDTV is registered at the retailer. This warranty expresses specific...
... the remote control. During the first 90 days under normal use and conditions for the same model, or a replacement model of purchase, please keep the original-dated-sales receipt for future reference. www.sanyoctv.com 1-800-877-5032 19 Return the defective TV to state. (EFFECTIVE: March 1, 2007) Your Sanyo HDTV is registered at the retailer. This warranty expresses specific...


