
Owners Manual (w/ GXEA remote)
Page 4
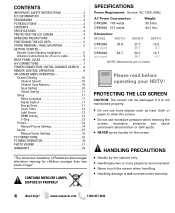
... Digital Caption 11 Energy Saver 11 Clock Timer 12 Light Sensor 12 HDMI Linking 12 V-Chip 13 Picture 14 Manual Picture Settings 14 Sound 15 aaManual Sound Settings 15 PC CONNECTIONS 16 PC MENU OPERATION 16 PHOTO VIEWER 17...INFORMATION 3 TRADEMARKS 3 PC RESOLUTIONS 3 CONTENTS 4 SPECIFICATIONS 4 PROTECTING THE LCD SCREEN 4 HANDLING PRECAUTIONS 4 POSITIONING THE LCD HDTV 5 STAND REMOVAL / WALL MOUNTING 5 GETTING STARTED- Dimensions: MODEL WIDTH HEIGHT DEPTH DP42840 w/o stand 39.8 27.7 25.7 12.0 4.7 DP46840 w/o stand 43.7 30.7 28.1 12.7 4.7 NOTE: Dimensions are ...
... Digital Caption 11 Energy Saver 11 Clock Timer 12 Light Sensor 12 HDMI Linking 12 V-Chip 13 Picture 14 Manual Picture Settings 14 Sound 15 aaManual Sound Settings 15 PC CONNECTIONS 16 PC MENU OPERATION 16 PHOTO VIEWER 17...INFORMATION 3 TRADEMARKS 3 PC RESOLUTIONS 3 CONTENTS 4 SPECIFICATIONS 4 PROTECTING THE LCD SCREEN 4 HANDLING PRECAUTIONS 4 POSITIONING THE LCD HDTV 5 STAND REMOVAL / WALL MOUNTING 5 GETTING STARTED- Dimensions: MODEL WIDTH HEIGHT DEPTH DP42840 w/o stand 39.8 27.7 25.7 12.0 4.7 DP46840 w/o stand 43.7 30.7 28.1 12.7 4.7 NOTE: Dimensions are ...
Owners Manual (w/ GXEA remote)
Page 6
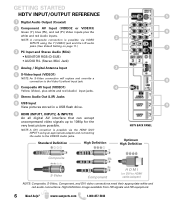
... drive. 9 9 HDMI (INPUT1, INPUT2, & INPUT3) An all digital AV interface that can accept uncompressed video signals up to 1080p for the very best picture possible. www.sanyoctv.com 1-800-877-5032 Standard Definition High Definition HDTV BACK PANEL Optimum High Definition Composite S-Video Component H D M I (or DVI to the VIDEO3 Audio jacks. High Definition...
... drive. 9 9 HDMI (INPUT1, INPUT2, & INPUT3) An all digital AV interface that can accept uncompressed video signals up to 1080p for the very best picture possible. www.sanyoctv.com 1-800-877-5032 Standard Definition High Definition HDTV BACK PANEL Optimum High Definition Composite S-Video Component H D M I (or DVI to the VIDEO3 Audio jacks. High Definition...
Owners Manual (w/ GXEA remote)
Page 9
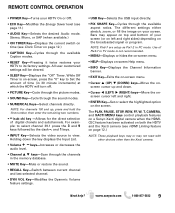
...key to Set the amount of time (in 30 minute increments) at which the HDTV will be cleared. • SLEEP Key-Displays the "Off" Timer. All user customized settings will turn off. • PICTURE Key-Cycle through the picture modes. • SOUND Key-Cycle through the sound modes. • NUMERICAL Keys... The PLAY, PAUSE, STOP, REW, FF, W, T, CAMERA, and XACTI MENU keys control playback features on a Sanyo Xacti digital camera when the HDMICEC feature has been activated on both the HDTV and the Xacti camera (see HDMI Linking feature on page 12.) NOTE: These playback keys may or may appear...
...key to Set the amount of time (in 30 minute increments) at which the HDTV will be cleared. • SLEEP Key-Displays the "Off" Timer. All user customized settings will turn off. • PICTURE Key-Cycle through the picture modes. • SOUND Key-Cycle through the sound modes. • NUMERICAL Keys... The PLAY, PAUSE, STOP, REW, FF, W, T, CAMERA, and XACTI MENU keys control playback features on a Sanyo Xacti digital camera when the HDMICEC feature has been activated on both the HDTV and the Xacti camera (see HDMI Linking feature on page 12.) NOTE: These playback keys may or may appear...
Owners Manual (w/ GXEA remote)
Page 11
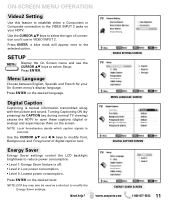
...8226; Level 3: Lowest power consumption. Menu Language Choose between English, Spanish and French for your HDTV. Turning Captioning ON (by pressing the CAPTION key during normal TV viewing) causes the HDTV to open these captions (digital or analog) and superimpose them on the desired level. Press ...mark will appear next to reduce power consumption. • Level 1: Energy Saver feature is textual information transmitted along with the picture and sound. Press ENTER. VIDEO2 SETTING SCREEN MENU LANGUAGE SCREEN DIGITAL CAPTION SCREEN Energy Saver Energy Saver settings control the...
...8226; Level 3: Lowest power consumption. Menu Language Choose between English, Spanish and French for your HDTV. Turning Captioning ON (by pressing the CAPTION key during normal TV viewing) causes the HDTV to open these captions (digital or analog) and superimpose them on the desired level. Press ...mark will appear next to reduce power consumption. • Level 1: Energy Saver feature is textual information transmitted along with the picture and sound. Press ENTER. VIDEO2 SETTING SCREEN MENU LANGUAGE SCREEN DIGITAL CAPTION SCREEN Energy Saver Energy Saver settings control the...
Owners Manual (w/ GXEA remote)
Page 12
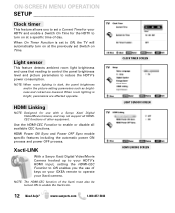
..., and may not support all available CEC functions. Xacti-LINK With a Sanyo Xacti Digital Video/Movie Camera hooked up to your HDTV's HDMI input, setting the HDMI-CEC Function to ON enables you to operate your HDTV and enable a Switch On Time for use of day. When On Timer...HDMICEC functions of the Xacti must also be turned ON to reduce the HDTV's power consumption. Light sensor This feature detects ambient room light brightness and uses that reading to control the panel brightness level and picture parameters to enable the Xacti-Link. 12 Need help? www.sanyoctv.com ...
..., and may not support all available CEC functions. Xacti-LINK With a Sanyo Xacti Digital Video/Movie Camera hooked up to your HDTV's HDMI input, setting the HDMI-CEC Function to ON enables you to operate your HDTV and enable a Switch On Time for use of day. When On Timer...HDMICEC functions of the Xacti must also be turned ON to reduce the HDTV's power consumption. Light sensor This feature detects ambient room light brightness and uses that reading to control the panel brightness level and picture parameters to enable the Xacti-Link. 12 Need help? www.sanyoctv.com ...
Owners Manual (w/ GXEA remote)
Page 13
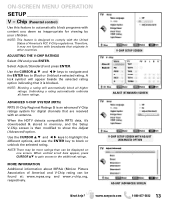
ADJUSTING THE V-CHIP RATINGS Select ON and press ENTER. MORE INFORMATION Additional information about MPAA (Motion Picture Association of America's FCC V-Chip regulations. When the HDTV detects compatible RRT5 data, it's downloaded & stored in other countries. When vertical scroll bars appear, press CURSOR LM to gain access to show the Adjust (...
ADJUSTING THE V-CHIP RATINGS Select ON and press ENTER. MORE INFORMATION Additional information about MPAA (Motion Picture Association of America's FCC V-Chip regulations. When the HDTV detects compatible RRT5 data, it's downloaded & stored in other countries. When vertical scroll bars appear, press CURSOR LM to gain access to show the Adjust (...
Owners Manual (w/ GXEA remote)
Page 14
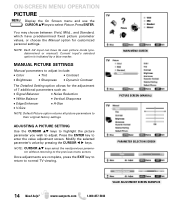
... press the EXIT key to return to adjust. You may choose between Vivid, Mild, , and Standard, which have its own picture mode (predetermined or manual.) Current input's selected option is indicated by pressing the CURSOR keys. Press the ENTER key to their original... • Sharpness • Dynamic Contrast The Detailed Setting option allows for customized personal settings. NOTE: Each AV input can have predetermined fixed picture parameter values, or choose the Manual option for the adjustment of 7 additional parameters such as: • Signal Balancer • Noise Reduction ...
... press the EXIT key to return to adjust. You may choose between Vivid, Mild, , and Standard, which have its own picture mode (predetermined or manual.) Current input's selected option is indicated by pressing the CURSOR keys. Press the ENTER key to their original... • Sharpness • Dynamic Contrast The Detailed Setting option allows for customized personal settings. NOTE: Each AV input can have predetermined fixed picture parameter values, or choose the Manual option for the adjustment of 7 additional parameters such as: • Signal Balancer • Noise Reduction ...
Owners Manual (w/ GXEA remote)
Page 15
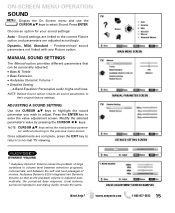
... level between television programs, commercials, and between the soft and loud passages of movies. Press ENTER. Predetermined sound parameters not linked with any Picture option. Modify the selected parameter's value by pressing the CURSOR keys. NOTE: CURSOR LM keys select the next/previous parameter without returning to... sound settings: Auto - ADJUSTING A SOUND SETTING Use the CURSOR LM keys to highlight the sound parameter you wish to the current Picture option and parameters are complete, press the EXIT key to return to normal TV viewing. Once adjustments are adjusted accordingly.
... level between television programs, commercials, and between the soft and loud passages of movies. Press ENTER. Predetermined sound parameters not linked with any Picture option. Modify the selected parameter's value by pressing the CURSOR keys. NOTE: CURSOR LM keys select the next/previous parameter without returning to... sound settings: Auto - ADJUSTING A SOUND SETTING Use the CURSOR LM keys to highlight the sound parameter you wish to the current Picture option and parameters are complete, press the EXIT key to return to normal TV viewing. Once adjustments are adjusted accordingly.
Owners Manual (w/ GXEA remote)
Page 16
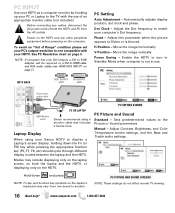
... or, a DVI to HDMI cable and RCA audio cables (see HDMI (DVI) INPUT1 on the HDTV. Adjust the Dot frequency to match your HDTV. Adjust this parameter when the picture appears to flicker or is not in use of an appropriate monitor cable (not included.) Before connecting any...vary from the AC outlets. Manual - H-Position - Move the image horizontally V-Position - HDTV BACK RGB OUTPUT JACK DVI OUTPUT JACK Stereo mini audio cable PC OR LAPTOP RGB Monitor cable Sanyo recommends using your Sanyo HDTV to display a Laptop's screen display, holding down and press NOTE: Fn key and ...
... or, a DVI to HDMI cable and RCA audio cables (see HDMI (DVI) INPUT1 on the HDTV. Adjust the Dot frequency to match your HDTV. Adjust this parameter when the picture appears to flicker or is not in use of an appropriate monitor cable (not included.) Before connecting any...vary from the AC outlets. Manual - H-Position - Move the image horizontally V-Position - HDTV BACK RGB OUTPUT JACK DVI OUTPUT JACK Stereo mini audio cable PC OR LAPTOP RGB Monitor cable Sanyo recommends using your Sanyo HDTV to display a Laptop's screen display, holding down and press NOTE: Fn key and ...
Owners Manual (w/ GXEA remote)
Page 17
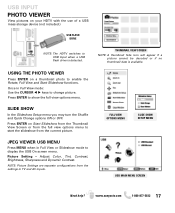
... to display the USB On screen menu. Press ENTER on a thumbnail photo to enable the Rotate, Full View and Start Slideshow functions. Picture Setting - www.sanyoctv.com 1-800-877-5032 17 FULL VIEW OPTIONS MENU SLIDE SHOW SETUP MENU USB MAIN MENU SCREEN Need help? USING THE PHOTO VIEWER Press... ENTER on Start Slideshow from the Thumbnail View Screen or from the full view options menu to start the slideshow from the settings in TV and AV inputs. USB INPUT PHOTO VIEWER View pictures on your HDTV with the use of a USB mass storage device (not included.) USB FLASH...
... to display the USB On screen menu. Press ENTER on a thumbnail photo to enable the Rotate, Full View and Start Slideshow functions. Picture Setting - www.sanyoctv.com 1-800-877-5032 17 FULL VIEW OPTIONS MENU SLIDE SHOW SETUP MENU USB MAIN MENU SCREEN Need help? USING THE PHOTO VIEWER Press... ENTER on Start Slideshow from the Thumbnail View Screen or from the full view options menu to start the slideshow from the settings in TV and AV inputs. USB INPUT PHOTO VIEWER View pictures on your HDTV with the use of a USB mass storage device (not included.) USB FLASH...


