
Owners Manual
Page 3
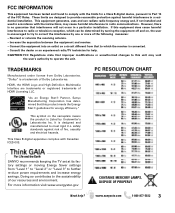
... are designed to provide reasonable protection against risk of the FCC Rules. "As an Energy Star® Partner, Sanyo Manufacturing Corporation has determined that to which can radiate radio frequency energy and, if not installed and used in accordance... in a particular installation. Increase the separation between the equipment and receiver. - PC RESOLUTION CHART SANYO recommends keeping the TV set at its factory settings or moving Energy Saver settings from Dolby Laboratories. CAUTION: FCC Regulations state that interference will not occur in a residential installation....
... are designed to provide reasonable protection against risk of the FCC Rules. "As an Energy Star® Partner, Sanyo Manufacturing Corporation has determined that to which can radiate radio frequency energy and, if not installed and used in accordance... in a particular installation. Increase the separation between the equipment and receiver. - PC RESOLUTION CHART SANYO recommends keeping the TV set at its factory settings or moving Energy Saver settings from Dolby Laboratories. CAUTION: FCC Regulations state that interference will not occur in a residential installation....
Owners Manual
Page 4
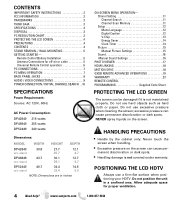
... Sound 16 Manual Sound Settings 16 PHOTO VIEWER 17 HDMI LINKING 18 MOTION SYNC 18 GXDB REMOTE ADVANCED OPERATIONS 19 WARRANTY 23 REMOTE CONTROL PROGRAMMING Supplied Code Sheet PROTECTING THE LCD SCREEN The screen can be damaged if it is not ...CONNECTIONS 9 POWER CONNECTION / INITIAL CHANNEL SEARCH . .10 SPECIFICATIONS Power Requirement: Source: AC 120V, 60Hz AC Power Consumption: DP42849 216 watts DP46849 255 watts DP52449 240 watts Dimensions: MODEL WIDTH HEIGHT DEPTH DP42849 w/o stand 39.8 27.7 25.7 12.1 4.7 DP46849 w/o stand 43.7 30.1 28.1 12.7 4.7 DP52449 w/o stand 49...
... Sound 16 Manual Sound Settings 16 PHOTO VIEWER 17 HDMI LINKING 18 MOTION SYNC 18 GXDB REMOTE ADVANCED OPERATIONS 19 WARRANTY 23 REMOTE CONTROL PROGRAMMING Supplied Code Sheet PROTECTING THE LCD SCREEN The screen can be damaged if it is not ...CONNECTIONS 9 POWER CONNECTION / INITIAL CHANNEL SEARCH . .10 SPECIFICATIONS Power Requirement: Source: AC 120V, 60Hz AC Power Consumption: DP42849 216 watts DP46849 255 watts DP52449 240 watts Dimensions: MODEL WIDTH HEIGHT DEPTH DP42849 w/o stand 39.8 27.7 25.7 12.1 4.7 DP46849 w/o stand 43.7 30.1 28.1 12.7 4.7 DP52449 w/o stand 49...
Owners Manual
Page 7
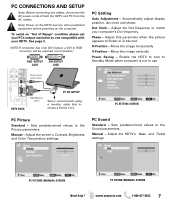
... - Stereo mini audio cable HDTV BACK PC OR LAPTOP RGB Monitor cable Sanyo recommends using a monitor cable that includes a Ferrite Core. See page 3. Manual - Adjust the HDTV's Bass and Treble settings. Move the image horizontally V-Position - Manual - PC Sound Standard - Sets predetermined values to flicker or is not in use. Adjust this parameter...
... - Stereo mini audio cable HDTV BACK PC OR LAPTOP RGB Monitor cable Sanyo recommends using a monitor cable that includes a Ferrite Core. See page 3. Manual - Adjust the HDTV's Bass and Treble settings. Move the image horizontally V-Position - Manual - PC Sound Standard - Sets predetermined values to flicker or is not in use. Adjust this parameter...
Owners Manual
Page 11
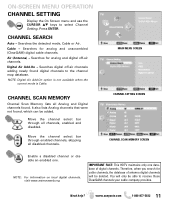
... mode is Cable. Move the channel select bar through all Analog and Digital channels found , which can be able to select Channel Setting. You will be deleted. It also lists Analog channels that were not found . Need help? ON-SCREEN MENU OPERATION CHANNEL...for cable channels, the database of digital channels. Therefore, when you search for analog and unscrambled (ClearQAM) digital cable channels. MAIN MENU SCREEN CHANNEL SETTING SCREEN CHANNEL SCAN MEMORY SCREEN Enable a disabled channel or disable an enabled one database of antenna digital channels will only be added.
... mode is Cable. Move the channel select bar through all Analog and Digital channels found , which can be able to select Channel Setting. You will be deleted. It also lists Analog channels that were not found . Need help? ON-SCREEN MENU OPERATION CHANNEL...for cable channels, the database of digital channels. Therefore, when you search for analog and unscrambled (ClearQAM) digital cable channels. MAIN MENU SCREEN CHANNEL SETTING SCREEN CHANNEL SCAN MEMORY SCREEN Enable a disabled channel or disable an enabled one database of antenna digital channels will only be added.
Owners Manual
Page 12
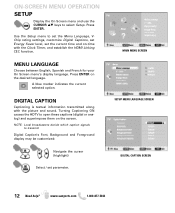
..., and establish the HDMI Linking CEC function. NOTE: Local broadcasters decide which caption signals to set the Menu Language, VChip rating settings, customize Digital Captions, set Energy Saver level, set parameter. MENU LANGUAGE Choose between English, Spanish and French for your On Screen menu's display... language. Digital Caption's Font, Background and Foreground display may be customized: Navigate the cursor (highlight) Select / set the current time and on the desired language. Use the Setup menu to transmit. MAIN MENU SCREEN SETUP MENU LANGUAGE SCREEN DIGITAL...
..., and establish the HDMI Linking CEC function. NOTE: Local broadcasters decide which caption signals to set the Menu Language, VChip rating settings, customize Digital Captions, set Energy Saver level, set parameter. MENU LANGUAGE Choose between English, Spanish and French for your On Screen menu's display... language. Digital Caption's Font, Background and Foreground display may be customized: Navigate the cursor (highlight) Select / set the current time and on the desired language. Use the Setup menu to transmit. MAIN MENU SCREEN SETUP MENU LANGUAGE SCREEN DIGITAL...
Owners Manual
Page 14
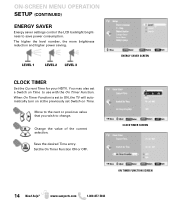
... the level number, the more brightness reduction and higher power saving. You may also set Switch on Time to ON, the TV will automatically turn on at the previously set a Switch on Time. Save the desired Time entry. Set the On Timer Function ON or OFF. LEVEL 1 LEVEL 2 LEVEL 3 CLOCK TIMER... next or previous value that you wish to save power consumption. www.sanyoctv.com 1-800-877-5032 When On Timer Function is set to use with the On Timer Function. ON-SCREEN MENU OPERATION SETUP (CONTINUED) ENERGY SAVER Energy saver settings control the LCD backlight brightness to change.
... the level number, the more brightness reduction and higher power saving. You may also set Switch on Time to ON, the TV will automatically turn on at the previously set a Switch on Time. Save the desired Time entry. Set the On Timer Function ON or OFF. LEVEL 1 LEVEL 2 LEVEL 3 CLOCK TIMER... next or previous value that you wish to save power consumption. www.sanyoctv.com 1-800-877-5032 When On Timer Function is set to use with the On Timer Function. ON-SCREEN MENU OPERATION SETUP (CONTINUED) ENERGY SAVER Energy saver settings control the LCD backlight brightness to change.
Owners Manual
Page 15
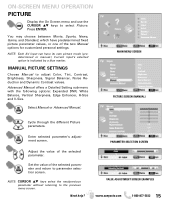
...Color, Tint, Contrast, Brightness, Sharpness, Signal Balancer, Noise Reduction and Dynamic Contrast values. Enter selected parameter's adjustment screen. Set the value of the selected parameter and return to select Picture. NOTE: Each AV input can have predetermined fixed picture parameter...selected parameter. Press ENTER. MAIN MENU SCREEN PICTURE SCREEN (MANUAL) Cycle through the different Picture parameters. Advanced Manual offers a Detailed Setting sub-menu with the following options: Expanded DNR, White Balance, Vertical Sharpness, Edge Enhancer, H-Size and V-Size. ON-SCREEN...
...Color, Tint, Contrast, Brightness, Sharpness, Signal Balancer, Noise Reduction and Dynamic Contrast values. Enter selected parameter's adjustment screen. Set the value of the selected parameter and return to select Picture. NOTE: Each AV input can have predetermined fixed picture parameter...selected parameter. Press ENTER. MAIN MENU SCREEN PICTURE SCREEN (MANUAL) Cycle through the different Picture parameters. Advanced Manual offers a Detailed Setting sub-menu with the following options: Expanded DNR, White Balance, Vertical Sharpness, Edge Enhancer, H-Size and V-Size. ON-SCREEN...
Owners Manual
Page 16
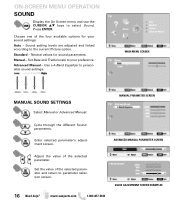
...return to select Sound. Press ENTER. Use a 4-Band Equalizer to the current Picture option. Sound setting levels are adjusted and linked according to personalize sound settings. Neutral values for your preference. Manual - Advanced Manual - MANUAL PARAMETER SCREEN Cycle through the different ... keys to parameter selection screen. 16 Need help? MAIN MENU SCREEN MANUAL SOUND SETTINGS Select Manual or Advanced Manual. Set Bass and Treble levels to your sound settings: Auto - Enter selected parameter's adjustment screen. Set the value of the selected parameter.
...return to select Sound. Press ENTER. Use a 4-Band Equalizer to the current Picture option. Sound setting levels are adjusted and linked according to personalize sound settings. Neutral values for your preference. Manual - Advanced Manual - MANUAL PARAMETER SCREEN Cycle through the different ... keys to parameter selection screen. 16 Need help? MAIN MENU SCREEN MANUAL SOUND SETTINGS Select Manual or Advanced Manual. Set Bass and Treble levels to your sound settings: Auto - Enter selected parameter's adjustment screen. Set the value of the selected parameter.
Owners Manual
Page 17
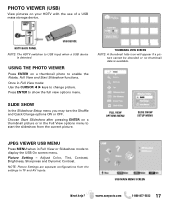
...SLIDE SHOW SETUP MENU JPEG VIEWER USB MENU Press MENU when in Full View mode: Use the CURSOR keys to start the slideshow from the settings in TV and AV inputs. www.sanyoctv.com 1-800-877-5032 17 USING THE PHOTO VIEWER Press ENTER on a thumbnail picture or in the Full ...Sharpness and Dynamic Contrast. SLIDE SHOW In the Slideshow Setup menu you may turn the Shuffle and Quick Change options ON or OFF. NOTE: Picture Settings are separate configurations from the current picture. USB MAIN MENU SCREEN Need help? USB DEVICE HDTV BACK PANEL NOTE: The HDTV switches to enable the...
...SLIDE SHOW SETUP MENU JPEG VIEWER USB MENU Press MENU when in Full View mode: Use the CURSOR keys to start the slideshow from the settings in TV and AV inputs. www.sanyoctv.com 1-800-877-5032 17 USING THE PHOTO VIEWER Press ENTER on a thumbnail picture or in the Full ...Sharpness and Dynamic Contrast. SLIDE SHOW In the Slideshow Setup menu you may turn the Shuffle and Quick Change options ON or OFF. NOTE: Picture Settings are separate configurations from the current picture. USB MAIN MENU SCREEN Need help? USB DEVICE HDTV BACK PANEL NOTE: The HDTV switches to enable the...
Owners Manual
Page 18
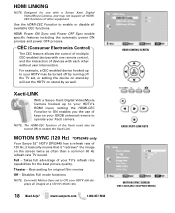
... SYNC (120 Hz) *DP52449 only Your Sanyo 52" HDTV DP52449 has a refresh rate of devices with each other equipment. Disables Full mode functions NOTE: Even with Motion Sync set to your Xacti camera. HDMI LINKING NOTE: Designed for use of your TV's refresh rate capabilities for original film movies Off... also be turned off by turning off the TV set, or setting the device on stand-by as often than a common 60 Hz refresh rate TV would. Full - NOTE: The HDMI-CEC function of other without user intervention. Xacti-LINK With a Sanyo Xacti Digital Video/Movie Camera hooked up to Off...
... SYNC (120 Hz) *DP52449 only Your Sanyo 52" HDTV DP52449 has a refresh rate of devices with each other equipment. Disables Full mode functions NOTE: Even with Motion Sync set to your Xacti camera. HDMI LINKING NOTE: Designed for use of your TV's refresh rate capabilities for original film movies Off... also be turned off by turning off the TV set, or setting the device on stand-by as often than a common 60 Hz refresh rate TV would. Full - NOTE: The HDMI-CEC function of other without user intervention. Xacti-LINK With a Sanyo Xacti Digital Video/Movie Camera hooked up to Off...
Owners Manual
Page 19
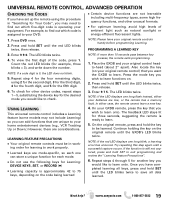
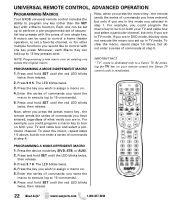
... formats. www.sanyoctv.com 1-800-877-5032 19 Press and hold the key to be in "Searching for Learning: DEVICE KEYS, SET, or RECORD (G) G Learning capacity is approximately 42 to learn a new key. 4. G Do not use the following keys for Your Code", you may not include Learning) so ...you can store a unique function for the desired mode you have completed learning all keys, press and hold SET until the GXDB's LED blinks twice...
... formats. www.sanyoctv.com 1-800-877-5032 19 Press and hold the key to be in "Searching for Learning: DEVICE KEYS, SET, or RECORD (G) G Learning capacity is approximately 42 to learn a new key. 4. G Do not use the following keys for Your Code", you may not include Learning) so ...you can store a unique function for the desired mode you have completed learning all keys, press and hold SET until the GXDB's LED blinks twice...
Owners Manual
Page 20
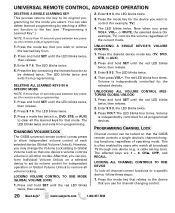
... operation or Global Volume Unlock to Global Volume Lock so that one device's volume controls volume in all broadcast TV through one device (e.g., a cable set its original programming for the mode you use for channel changing control. 20 Need help? DELETING ALL LEARNED KEYS...controls a single device's channel-changing functions, regardless of each selected device (Global Volume Unlock). This is independently controlled for example, TV.) 4. Press and hold SET until the red LED blinks twice, then release. 3. Press the key containing the learned function to the key (see "Programming ...
... operation or Global Volume Unlock to Global Volume Lock so that one device's volume controls volume in all broadcast TV through one device (e.g., a cable set its original programming for the mode you use for channel changing control. 20 Need help? DELETING ALL LEARNED KEYS...controls a single device's channel-changing functions, regardless of each selected device (Global Volume Unlock). This is independently controlled for example, TV.) 4. Press and hold SET until the red LED blinks twice, then release. 3. Press the key containing the learned function to the key (see "Programming ...
Owners Manual
Page 21
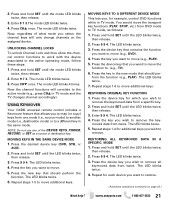
... TV). 6. Press the key you , for each device you wish to move (e.g., PLAY). 5. The mode LED blinks 4 times. MOVING KEYS TO A DIFFERENT DEVICE MODE This lets you want to move . 5. The LED blinks twice. 4. The LED blinks twice. 5. The LED blinks twice. 3. Press and hold SET ...until the LED blinks twice, then release. 3. Press the device key that should perform the function. Press the device key that should per- The LED blinks twice. 4. Press 9 9 4. Press the key in TV mode.
... TV). 6. Press the key you , for each device you wish to move (e.g., PLAY). 5. The mode LED blinks 4 times. MOVING KEYS TO A DIFFERENT DEVICE MODE This lets you want to move . 5. The LED blinks twice. 4. The LED blinks twice. 5. The LED blinks twice. 3. Press and hold SET ...until the LED blinks twice, then release. 3. Press the device key that should perform the function. Press the device key that should per- The LED blinks twice. 4. Press 9 9 4. Press the key in TV mode.
Owners Manual
Page 22
...to 15 key presses total. A macro can be set up to assign a macro on . 4. Press 9 9 5. Press and hold SET until the red LED blinks twice, then release. By pressing the TV key on your remote control the Sanyo TV control code is dedicated only to turn on both... your TV and cable box and select a particular channel. Press 9 7 8. The LED blinks twice. 4. IMPOTANT FACT: "TV" mode is reactivated. ...
...to 15 key presses total. A macro can be set up to assign a macro on . 4. Press 9 9 5. Press and hold SET until the red LED blinks twice, then release. By pressing the TV key on your remote control the Sanyo TV control code is dedicated only to turn on both... your TV and cable box and select a particular channel. Press 9 7 8. The LED blinks twice. 4. IMPOTANT FACT: "TV" mode is reactivated. ...
Quik 'N Easy Setup Guide
Page 2
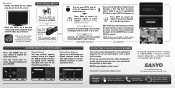
...Analog Digital Digital Digital Digital 64 65 66 03-1 06-1 06-2 09-1 WREG-DT WCVB WEXT NICK NICK VBCT PROTECTING YOUR HDTV's LCD SCREEN The screen can cause permanent discoloration or dark spots. NEVER spray liquids on your receiver and its remote. You may perform another ... maintained properly. excessive pressure can be glad to assist you receive Satellite or Cable service through a Set Top Box (receiver), please hook it up to the RF antenna terminal. Sanyo Manufacturing Corp. 3333 Sanyo Road, Forrest City, AR 72335 Need help? Place the HDTV on a flat firm surface and...
...Analog Digital Digital Digital Digital 64 65 66 03-1 06-1 06-2 09-1 WREG-DT WCVB WEXT NICK NICK VBCT PROTECTING YOUR HDTV's LCD SCREEN The screen can cause permanent discoloration or dark spots. NEVER spray liquids on your receiver and its remote. You may perform another ... maintained properly. excessive pressure can be glad to assist you receive Satellite or Cable service through a Set Top Box (receiver), please hook it up to the RF antenna terminal. Sanyo Manufacturing Corp. 3333 Sanyo Road, Forrest City, AR 72335 Need help? Place the HDTV on a flat firm surface and...
GXDB Remote Guide
Page 1
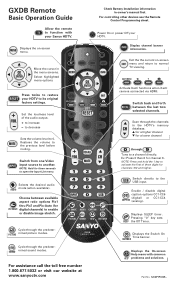
...to function with common HELP problems and solutions. Power On or power Off your Sanyo HDTV. Set the loudness level of three digits for channels 100 and higher. to decrease XACTI MENU W T LIST RESET Sets the volume level to the previous level before muting. Restores the volume to 0. ...NOTE: Hold for PIX SHAPE digital channels) to normal TV viewing. Cycle through the predeterSOUND mined sound modes. For assistance call the...
...to function with common HELP problems and solutions. Power On or power Off your Sanyo HDTV. Set the loudness level of three digits for channels 100 and higher. to decrease XACTI MENU W T LIST RESET Sets the volume level to the previous level before muting. Restores the volume to 0. ...NOTE: Hold for PIX SHAPE digital channels) to normal TV viewing. Cycle through the predeterSOUND mined sound modes. For assistance call the...


