
Quik 'N Easy Setup Guide
Page 2
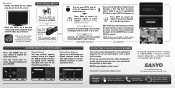
...the remote control. Searches for Antenna signals or Cable signals connected to select Channel Setting and press ENTER. CHANNEL SEARCH If you ! HDMI, the HDMI Logo and High-Definition Multimedia Interface ...are trademarks or registered trademarks of all Analog and Digital channels found. Sanyo Manufacturing Corp. 3333 Sanyo Road, Forrest City, AR 72335 Need help? Please save the carton and...WREG-DT WCVB WEXT NICK NICK VBCT PROTECTING YOUR HDTV's LCD SCREEN The screen can cause permanent discoloration or dark spots. Do not use excessive pressure ...
...the remote control. Searches for Antenna signals or Cable signals connected to select Channel Setting and press ENTER. CHANNEL SEARCH If you ! HDMI, the HDMI Logo and High-Definition Multimedia Interface ...are trademarks or registered trademarks of all Analog and Digital channels found. Sanyo Manufacturing Corp. 3333 Sanyo Road, Forrest City, AR 72335 Need help? Please save the carton and...WREG-DT WCVB WEXT NICK NICK VBCT PROTECTING YOUR HDTV's LCD SCREEN The screen can cause permanent discoloration or dark spots. Do not use excessive pressure ...
TV Guide Manual
Page 8
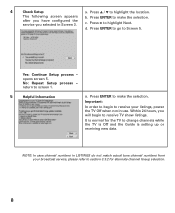
...screen 5. Press ENTER to receive TV show listings. Press > to screen 1. 5 Helpful Information a. Yes: Continue Setup process - return to highlight Next. Important: In order to begin to make the selection. It is setting up or receiving new data. NOTE: In case channel numbers in LISTINGS do not match... actual tune channel numbers from your listings, power the TV Off when not in Screen 3.
...screen 5. Press ENTER to receive TV show listings. Press > to screen 1. 5 Helpful Information a. Yes: Continue Setup process - return to highlight Next. Important: In order to begin to make the selection. It is setting up or receiving new data. NOTE: In case channel numbers in LISTINGS do not match... actual tune channel numbers from your listings, power the TV Off when not in Screen 3.

TV Guide Manual
Page 10
... you have completed Guide setup you can modify any information you want to change your system settings: 1. To change your connected broadcast service or move your location and connected service(s). • Select the channels that appear in the On sceen Guide to make the Setup screen appear. 2. This is...M to a new ZIP or Postal Code. Press MENU in the Guide. 3.3.1 Changing System Configuration after Initial Setup You can : • Modify general system settings, such as your TV to highlight No, repeat setup process and press ENTER. 10 The Guide confirmation screen appears. 3.
... you have completed Guide setup you can modify any information you want to change your system settings: 1. To change your connected broadcast service or move your location and connected service(s). • Select the channels that appear in the On sceen Guide to make the Setup screen appear. 2. This is...M to a new ZIP or Postal Code. Press MENU in the Guide. 3.3.1 Changing System Configuration after Initial Setup You can : • Modify general system settings, such as your TV to highlight No, repeat setup process and press ENTER. 10 The Guide confirmation screen appears. 3.
TV Guide Manual
Page 11
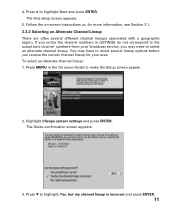
...ENTER. Highlight Change system settings and press ENTER. The Guide confirmation screen appears. 3. Follow the on-screen instructions or, for your broadcast service, you receive the correct channel lineup for more information, see Section 3.1. 3.3.2 Selecting an Alternate Channel Lineup There are often ...several lineup options before you may need to highlight Yes, but my channel lineup is incorrect and press ENTER. 11 To select an alternate channel lineup: 1. Press M to select an alternate channel lineup. Press > to make the Setup screen appear. 2. 4. The first...
...ENTER. Highlight Change system settings and press ENTER. The Guide confirmation screen appears. 3. Follow the on-screen instructions or, for your broadcast service, you receive the correct channel lineup for more information, see Section 3.1. 3.3.2 Selecting an Alternate Channel Lineup There are often ...several lineup options before you may need to highlight Yes, but my channel lineup is incorrect and press ENTER. 11 To select an alternate channel lineup: 1. Press M to select an alternate channel lineup. Press > to make the Setup screen appear. 2. 4. The first...

TV Guide Manual
Page 12
... ENTER. To modify your area, appears. 5. Press > to highlight Next and press ENTER. A channel lineup screen, which lists all available channel lineups in the Channel Editor screen. NOTE: The default settings for each channel are determined by the transmitted data received by your TV. Press MENU in LISTINGS. Press > to highlight Next and press ENTER. Your...
... ENTER. To modify your area, appears. 5. Press > to highlight Next and press ENTER. A channel lineup screen, which lists all available channel lineups in the Channel Editor screen. NOTE: The default settings for each channel are determined by the transmitted data received by your TV. Press MENU in LISTINGS. Press > to highlight Next and press ENTER. Your...
TV Guide Manual
Page 13
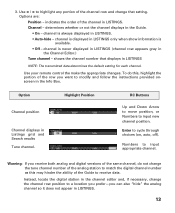
... your remote control the make the appropriate changes. Options are: Position - shows the channel number that setting. To do not change the channel row position to a location you prefer-you want to cycle through choices (on, auto, off). Option Channel position Channel displays in the Info Box. Enter to modify and follow the instructions provided...
... your remote control the make the appropriate changes. Options are: Position - shows the channel number that setting. To do not change the channel row position to a location you prefer-you want to cycle through choices (on, auto, off). Option Channel position Channel displays in the Info Box. Enter to modify and follow the instructions provided...
DP32649 Manual
Page 4
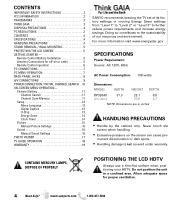
... THE LCD SCREEN ...DP32649 31.3 22.1 8.9 w/o stand 20.8 4.7 NOTE: Dimensions are in a confined area. Never touch the screen when handling. • Excessive pressure on the screen can cause per- Channel Setting 11 Channel Search 11 Channel... Scan Memory 11 Setup 12 Menu Language 12 Digital Caption 12 V-Chip 13 Energy Saver 14 Clock Timer 14 Picture 15 Manual Picture Settings 15 Sound 16 aaManual Sound Settings 16 PHOTO VIEWER 17 TV GUIDE OPERATION 18 WARRANTY 19 SANYO recommends keeping the TV set at its factory settings...
... THE LCD SCREEN ...DP32649 31.3 22.1 8.9 w/o stand 20.8 4.7 NOTE: Dimensions are in a confined area. Never touch the screen when handling. • Excessive pressure on the screen can cause per- Channel Setting 11 Channel Search 11 Channel... Scan Memory 11 Setup 12 Menu Language 12 Digital Caption 12 V-Chip 13 Energy Saver 14 Clock Timer 14 Picture 15 Manual Picture Settings 15 Sound 16 aaManual Sound Settings 16 PHOTO VIEWER 17 TV GUIDE OPERATION 18 WARRANTY 19 SANYO recommends keeping the TV set at its factory settings...
DP32649 Manual
Page 11
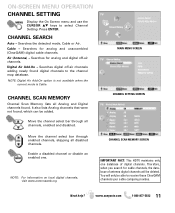
... Cable. MAIN MENU SCREEN CHANNEL SETTING SCREEN Move the channel select bar through all channels, enabled and disabled. Searches the detected mode, Cable or Air. Searches for analog and unscrambled (ClearQAM) digital cable channels. CHANNEL SCAN MEMORY Channel Scan Memory lists all disabled channels. Move the channel select bar through enabled channels, skipping all Analog and Digital channels found. NOTE: For...
... Cable. MAIN MENU SCREEN CHANNEL SETTING SCREEN Move the channel select bar through all channels, enabled and disabled. Searches the detected mode, Cable or Air. Searches for analog and unscrambled (ClearQAM) digital cable channels. CHANNEL SCAN MEMORY Channel Scan Memory lists all disabled channels. Move the channel select bar through enabled channels, skipping all Analog and Digital channels found. NOTE: For...

DP32649 Manual
Page 18
... listings menu NOTE: Until the initial 24 hours of the same channel. 18 Need help? NOTE: Guide Setup may also be accesed and updated by pressing MENU in the TV Guide menu screen and selecting Change System Settings. ON to always display, OFF to never display or AUTO to begin the setup process...
... listings menu NOTE: Until the initial 24 hours of the same channel. 18 Need help? NOTE: Guide Setup may also be accesed and updated by pressing MENU in the TV Guide menu screen and selecting Change System Settings. ON to always display, OFF to never display or AUTO to begin the setup process...


