Owners Manual
Page 1
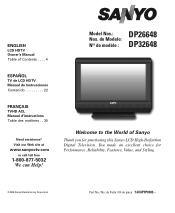
... Modelo: Nos de modèle : DP32648 Welcome to the World of Contents . . . . 4 ESPAÑOL TV de LCD HDTV Manual de Instrucciones Contenido 22 FRANÇAIS TVHD ACL Manuel d'instructions Table des matières . . 39 Need assistance? ENGLISH LCD HDTV Owner's Manual Table of Sanyo Thank you for Performance, Reliability, Features, Value...
... Modelo: Nos de modèle : DP32648 Welcome to the World of Contents . . . . 4 ESPAÑOL TV de LCD HDTV Manual de Instrucciones Contenido 22 FRANÇAIS TVHD ACL Manuel d'instructions Table des matières . . 39 Need assistance? ENGLISH LCD HDTV Owner's Manual Table of Sanyo Thank you for Performance, Reliability, Features, Value...

Owners Manual
Page 2
WARNING: TO REDUCE THE RISK OF FIRE OR ELECTRIC SHOCK, DO NOT EXPOSE THIS APPLIANCE TO RAIN OR MOISTURE. Keep these instructions. 2. Do not use attachments/accessories specified by the manufacturer. 12. Install in accordance with one wider than the other. A polarized plug has two blades with the manufacturer's instructions. 8. Protect the power cord from being walked on the apparatus." 19. Unplug this apparatus near any way, such as to qualified service personnel. Heed all servicing to provide some protection against voltage surges and built up static charges. ...
WARNING: TO REDUCE THE RISK OF FIRE OR ELECTRIC SHOCK, DO NOT EXPOSE THIS APPLIANCE TO RAIN OR MOISTURE. Keep these instructions. 2. Do not use attachments/accessories specified by the manufacturer. 12. Install in accordance with one wider than the other. A polarized plug has two blades with the manufacturer's instructions. 8. Protect the power cord from being walked on the apparatus." 19. Unplug this apparatus near any way, such as to qualified service personnel. Heed all servicing to provide some protection against voltage surges and built up static charges. ...

Owners Manual
Page 3
...Underwriters' Laboratories Inc. Consult the dealer or an experienced radio/TV technician for energy efficiency." "Dolby" is encouraged to try... to provide reasonable protection against risk of Dolby Laboratories. PROTECTING THE LCD SCREEN The screen can cause permanent discoloration or dark spots. •... to radio communications. "As an Energy Star® Partner, Sanyo Manufacturing Corporation has determined that improper modifications or unauthorized changes to ...LAMPS, DISPOSE OF PROPERLY DP26648 DP32648 120 watts 160 watts Need help . TRADEMARKS Manufactured under warranty. Increase the...
...Underwriters' Laboratories Inc. Consult the dealer or an experienced radio/TV technician for energy efficiency." "Dolby" is encouraged to try... to provide reasonable protection against risk of Dolby Laboratories. PROTECTING THE LCD SCREEN The screen can cause permanent discoloration or dark spots. •... to radio communications. "As an Energy Star® Partner, Sanyo Manufacturing Corporation has determined that improper modifications or unauthorized changes to ...LAMPS, DISPOSE OF PROPERLY DP26648 DP32648 120 watts 160 watts Need help . TRADEMARKS Manufactured under warranty. Increase the...
Owners Manual
Page 4
I'm your new Sanyo Wide- Visit our Web site at www.sanyoctv.com or Call 1-800-877-5032 screen LCD HDTV. Menu Navigation Map 12 Manual Channel Search 12 Channel Scan Memory 13 Adding Channels to off-air or cable 5 Controls and...11 PC Monitor Setup 11 PC Menu Operating Tips 11 Manual Adjustments 11 ON-SCREEN MENU OPERATION- Handling 3 Disposal 3 SPECIFICATIONS 3 CONTENTS 4 ASSEMBLY-ATTACHING THE TV STAND 4 INSTALLATION- Tools Needed: Phillips screwdriver (remove screws from Scan Memory 13 V-Guide (Parental Control) V-Guide Operation 14 V-Guide Operation (Advanced 15 ...
I'm your new Sanyo Wide- Visit our Web site at www.sanyoctv.com or Call 1-800-877-5032 screen LCD HDTV. Menu Navigation Map 12 Manual Channel Search 12 Channel Scan Memory 13 Adding Channels to off-air or cable 5 Controls and...11 PC Monitor Setup 11 PC Menu Operating Tips 11 Manual Adjustments 11 ON-SCREEN MENU OPERATION- Handling 3 Disposal 3 SPECIFICATIONS 3 CONTENTS 4 ASSEMBLY-ATTACHING THE TV STAND 4 INSTALLATION- Tools Needed: Phillips screwdriver (remove screws from Scan Memory 13 V-Guide (Parental Control) V-Guide Operation 14 V-Guide Operation (Advanced 15 ...
Owners Manual
Page 5
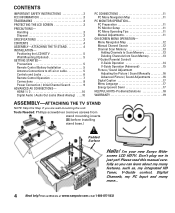
... Remote or batteries to your Cable box or Satellite receiver to a wall mounting kit. NOTE:Wall Mounting kit is not supplied. DP26648 (DP32648) GETTING STARTED 1 Install supplied batteries in the Remote. (2 "AAA" eneloop Ni-MH rechargeable batteries) PRECAUTIONS Do not use the on-screen ...new and old, or batteries with marks inside the Remote Control. Allow adequate space for off -air signals from a direct Cable TV connection. INSTALLATION POSITIONING THE LCD HDTV Always use a firm-flat surface when positioning your HDTV to secure it to HDMI1, 2, or component jacks (Video2 or ...
... Remote or batteries to your Cable box or Satellite receiver to a wall mounting kit. NOTE:Wall Mounting kit is not supplied. DP26648 (DP32648) GETTING STARTED 1 Install supplied batteries in the Remote. (2 "AAA" eneloop Ni-MH rechargeable batteries) PRECAUTIONS Do not use the on-screen ...new and old, or batteries with marks inside the Remote Control. Allow adequate space for off -air signals from a direct Cable TV connection. INSTALLATION POSITIONING THE LCD HDTV Always use a firm-flat surface when positioning your HDTV to secure it to HDMI1, 2, or component jacks (Video2 or ...
Owners Manual
Page 6
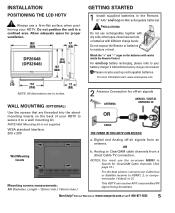
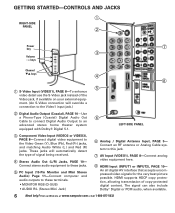
Connect stereo audio equipment to these jacks. PC Input (15-Pin Monitor and Mini Stereo Audio) Page 11-Connect computer and audio outputs to the Video Green (Y), Blue (Pb), Red (Pr) jacks, and matching Audio White (L ) and Red (R) jacks. Visit our Web site at www.sanyoctv.com or Call 1-800-877-5032 LEFT-SIDE PANEL Ž Component Video Input (VIDEO2 or VIDEO3), PAGE 8-Connect digital video equipment to these terminals. • MONITOR RGB (D-SUB) • AUDIO R/L (Stereo Mini Jack) ‘ Analog / Digital Antenna Input, PAGE 5- HDMI supports HDCP copy protection, allowing ...
Connect stereo audio equipment to these jacks. PC Input (15-Pin Monitor and Mini Stereo Audio) Page 11-Connect computer and audio outputs to the Video Green (Y), Blue (Pb), Red (Pr) jacks, and matching Audio White (L ) and Red (R) jacks. Visit our Web site at www.sanyoctv.com or Call 1-800-877-5032 LEFT-SIDE PANEL Ž Component Video Input (VIDEO2 or VIDEO3), PAGE 8-Connect digital video equipment to these terminals. • MONITOR RGB (D-SUB) • AUDIO R/L (Stereo Mini Jack) ‘ Analog / Digital Antenna Input, PAGE 5- HDMI supports HDCP copy protection, allowing ...
Owners Manual
Page 7
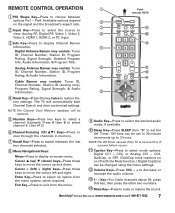
... & Program Title. Cursor < (left) > (right) keys-Press these keys to move the cursor left and right. NOTE:The Off Timer cancels if the TV is turned off or if a power failure occurs. 11 Caption Key-Press to select mode options: Digital CC1 ~ CC6, or Analog CC1 ~ CC4, QuikCap,... & Audio Information. NOTE:The Channel Scan Memory database will automatically start Channel Search and clear customized settings. Exit Key-Press to select a channel. The TV will be changed using the menu settings. 12 Volume Keys-Press VOL - + to decrease or increase the audio volume. 13 1- - Visit our Web...
... & Program Title. Cursor < (left) > (right) keys-Press these keys to move the cursor left and right. NOTE:The Off Timer cancels if the TV is turned off or if a power failure occurs. 11 Caption Key-Press to select mode options: Digital CC1 ~ CC6, or Analog CC1 ~ CC4, QuikCap,... & Audio Information. NOTE:The Channel Scan Memory database will automatically start Channel Search and clear customized settings. Exit Key-Press to select a channel. The TV will be changed using the menu settings. 12 Volume Keys-Press VOL - + to decrease or increase the audio volume. 13 1- - Visit our Web...

Owners Manual
Page 8
Connect an AV cable to the VIDEO1 jacks on your new HDTV to provide continued compatibility with older analog devices, such as a VCR. Press the INPUT key to step through the signal inputs to select Video 1. 4 Digital Signal Connections- Press the INPUT key to step through the signal inputs to select Video 2 or Video 3. DVD PLAYER ANALOG DEVICE INPUT KEY SATELLITE RECEIVER 8 Need help? Match the connector colors to the matching set of White and Red audio jacks, as shown. Connect a COMPONENT cable to a set of Green, Blue, and Red video jacks (Video2 or Video3) on the ...
Connect an AV cable to the VIDEO1 jacks on your new HDTV to provide continued compatibility with older analog devices, such as a VCR. Press the INPUT key to step through the signal inputs to select Video 1. 4 Digital Signal Connections- Press the INPUT key to step through the signal inputs to select Video 2 or Video 3. DVD PLAYER ANALOG DEVICE INPUT KEY SATELLITE RECEIVER 8 Need help? Match the connector colors to the matching set of White and Red audio jacks, as shown. Connect a COMPONENT cable to a set of Green, Blue, and Red video jacks (Video2 or Video3) on the ...
Owners Manual
Page 9
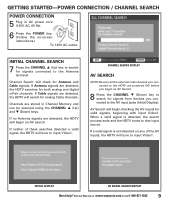
If Antenna signals are detected, the HDTV will begin checking the AV inputs for signals connected to the AV input jacks (Initial Display). If Cable signals are detected, the HDTV will tune to input Video1. If a valid signal is detected, the search process ends and the HDTV tunes to input Video1. INITIAL CHANNEL SEARCH 7 Press the CHANNEL L (Up) key to search for valid signals, beginning with input Video1. Channels are powered ON before you begin an AV search. If neither of the AV inputs, the HDTV will search for both analog and digital off-air channels. Visit our Web site...
If Antenna signals are detected, the HDTV will begin checking the AV inputs for signals connected to the AV input jacks (Initial Display). If Cable signals are detected, the HDTV will tune to input Video1. If a valid signal is detected, the search process ends and the HDTV tunes to input Video1. INITIAL CHANNEL SEARCH 7 Press the CHANNEL L (Up) key to search for valid signals, beginning with input Video1. Channels are powered ON before you begin an AV search. If neither of the AV inputs, the HDTV will search for both analog and digital off-air channels. Visit our Web site...
Owners Manual
Page 10
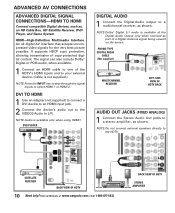
NOTE:Do not connect external speakers directly to the VIDEO3 Audio In L/R. DVI TO HDMI 1 Use an adapter (not supplied) to connect a DVI device to an HDMI input jack. 2 Connect the device's audio out to the HDTV. SATELLITE RECEIVER BACK VIEW OF HDTV 10 Need help? Visit our Web site at the Digital Audio Output only when received as shown. NOTE:Dolby® Digital 5.1 audio is available only when using HDMI1. DVD PLAYER DIGITAL AUDIO 1 Connect the Digital Audio output to a stereo amplifier, as part of a Digital Antenna signal being viewed on the screen. ADVANCED AV ...
NOTE:Do not connect external speakers directly to the VIDEO3 Audio In L/R. DVI TO HDMI 1 Use an adapter (not supplied) to connect a DVI device to an HDMI input jack. 2 Connect the device's audio out to the HDTV. SATELLITE RECEIVER BACK VIEW OF HDTV 10 Need help? Visit our Web site at the Digital Audio Output only when received as shown. NOTE:Dolby® Digital 5.1 audio is available only when using HDMI1. DVD PLAYER DIGITAL AUDIO 1 Connect the Digital Audio output to a stereo amplifier, as part of a Digital Antenna signal being viewed on the screen. ADVANCED AV ...
Owners Manual
Page 11
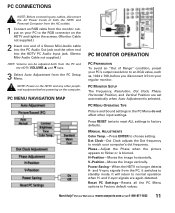
NOTE: Power on the HDTV and any cables, disconnect the AC Power Cords of both from the PC and the HDTV VOLUME L and M keys. 3 Select Auto Adjustment from the PC Setup Menu. Power Saving-When the HDTV no longer detects H- PC CONNECTIONS NOTE: Before connecting any other peripheral equipment before you disconnect it switches to the RGB connector on the HDTV and tighten the screws. (Monitor Cable not supplied.) 2 Insert one end of a Stereo Mini-Audio cable into the HDTV PC Audio Input jack. (Stereo Mini-Audio Cable not supplied.) HINT: Volume can be adjusted both the HDTV and...
NOTE: Power on the HDTV and any cables, disconnect the AC Power Cords of both from the PC and the HDTV VOLUME L and M keys. 3 Select Auto Adjustment from the PC Setup Menu. Power Saving-When the HDTV no longer detects H- PC CONNECTIONS NOTE: Before connecting any other peripheral equipment before you disconnect it switches to the RGB connector on the HDTV and tighten the screws. (Monitor Cable not supplied.) 2 Insert one end of a Stereo Mini-Audio cable into the HDTV PC Audio Input jack. (Stereo Mini-Audio Cable not supplied.) HINT: Volume can be adjusted both the HDTV and...

Owners Manual
Page 12
... will tune to the lowest ClearQAM channel, if available. After the search is complete, the HDTV will exit the menu system and return to normal TV viewing. ON-SCREEN MENU OPERATION MENU NAVIGATION MAP MANUAL CHANNEL SEARCH MAIN MENU SUB-MENU OPTIONS MANUAL CHANNEL SEARCH HAS THREE CATEGORIES • Cable •...
... will tune to the lowest ClearQAM channel, if available. After the search is complete, the HDTV will exit the menu system and return to normal TV viewing. ON-SCREEN MENU OPERATION MENU NAVIGATION MAP MANUAL CHANNEL SEARCH MAIN MENU SUB-MENU OPTIONS MANUAL CHANNEL SEARCH HAS THREE CATEGORIES • Cable •...
Owners Manual
Page 13
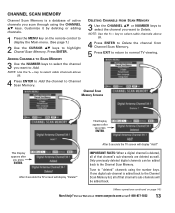
key to select cable channels above 99. 4 Press ENTER to Delete the channel from Channel Scan Memory. 5 Press EXIT to return to normal TV viewing. 4 Press ENTER to Add the channel to Channel Scan Memory. IMPORTANT FACTS: When a digital channel is a database of active channels you scan through...highlight Chanel Scan Memory. This Display appears after you want to select cable channels above 99. Tune to the Channel Scan Memory. After 3 seconds the TV screen will display "Add?" Visit our Web site at www.sanyoctv.com or Call 1-800-877-5032 13 NOTE: Use the 1- - After 3 seconds ...
key to select cable channels above 99. 4 Press ENTER to Delete the channel from Channel Scan Memory. 5 Press EXIT to return to normal TV viewing. 4 Press ENTER to Add the channel to Channel Scan Memory. IMPORTANT FACTS: When a digital channel is a database of active channels you scan through...highlight Chanel Scan Memory. This Display appears after you want to select cable channels above 99. Tune to the Channel Scan Memory. After 3 seconds the TV screen will display "Add?" Visit our Web site at www.sanyoctv.com or Call 1-800-877-5032 13 NOTE: Use the 1- - After 3 seconds ...

Owners Manual
Page 14
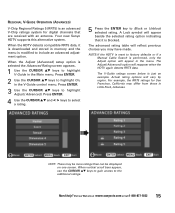
... L, S, and V). Press ENTER. 2 Use the CURSOR LM keys to highlight Adjust. By blocking just the L and S content ratings of America) and TV Parental Guidelines rating codes. nels, Digital channels, and Video1 signals. Visit our Web site at : www.mpaa.org and www.v-chip.org, respectively. ON-SCREEN... WITH THE UNITED STATES OF AMERICA'S FCC V-CHIP REGULATIONS. Press ENTER. 3 Use the CURSOR LM keys to highlight On, in the Main menu. This Sanyo television is blocked. When these codes are under the letters FV, D, L, S, and V. 5 Press the ENTER key to Block or Unblock selected rating....
... L, S, and V). Press ENTER. 2 Use the CURSOR LM keys to highlight Adjust. By blocking just the L and S content ratings of America) and TV Parental Guidelines rating codes. nels, Digital channels, and Video1 signals. Visit our Web site at : www.mpaa.org and www.v-chip.org, respectively. ON-SCREEN... WITH THE UNITED STATES OF AMERICA'S FCC V-CHIP REGULATIONS. Press ENTER. 3 Use the CURSOR LM keys to highlight On, in the Main menu. This Sanyo television is blocked. When these codes are under the letters FV, D, L, S, and V. 5 Press the ENTER key to Block or Unblock selected rating....
Owners Manual
Page 15
Your new Sanyo HDTV supports this alternative system. A Lock symbol will appear beside the selected rating option indicating that are received with an antenna. The advanced rating table ...
Your new Sanyo HDTV supports this alternative system. A Lock symbol will appear beside the selected rating option indicating that are received with an antenna. The advanced rating table ...
Owners Manual
Page 16
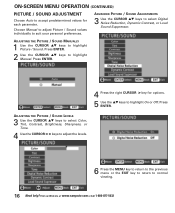
ON-SCREEN MENU OPERATION (CONTINUED) PICTURE / SOUND ADJUSTMENT Choose Auto to highlight Manual. Press ENTER. 2 Use the CURSOR LM keys to accept predetermined values for options. 5 Use the LM keys to highlight Picture / Sound. Press ENTER. Press ENTER. 4 Press the right CURSOR > key for each parameter. ADJUSTING THE PICTURE / SOUND MANUALLY 1 Use the CURSOR LM keys to highlight On or Off. Visit our Web site at www.sanyoctv.com or Call 1-800-877-5032 ADJUSTING THE PICTURE / SOUND LEVELS 3 Use the CURSOR LM keys to select Color, Tint, Contrast, Brightness, Sharpness, or ...
ON-SCREEN MENU OPERATION (CONTINUED) PICTURE / SOUND ADJUSTMENT Choose Auto to highlight Manual. Press ENTER. 2 Use the CURSOR LM keys to accept predetermined values for options. 5 Use the LM keys to highlight Picture / Sound. Press ENTER. Press ENTER. 4 Press the right CURSOR > key for each parameter. ADJUSTING THE PICTURE / SOUND MANUALLY 1 Use the CURSOR LM keys to highlight On or Off. Visit our Web site at www.sanyoctv.com or Call 1-800-877-5032 ADJUSTING THE PICTURE / SOUND LEVELS 3 Use the CURSOR LM keys to select Color, Tint, Contrast, Brightness, Sharpness, or ...
Owners Manual
Page 17
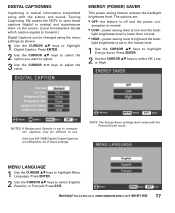
ENERGY (POWER) SAVER This power saving feature reduces the backlight brightness level. light brightness level is lower than normal. • HIGH-power saving level is low and the back- Need help? NOTE: The Energy Saver settings level varies with the picture and sound. Visit our Web site at www.sanyoctv.com or Call 1-800-877-5032 17 sumption is normal. • LOW-power saving level is high and the back- Press ENTER. 2 Use the CURSOR LM keys to see. NOTES: If Background Opacity is set to the lowest level. 1 Use the CURSOR LM keys to highlight Menu Language. Press ...
ENERGY (POWER) SAVER This power saving feature reduces the backlight brightness level. light brightness level is lower than normal. • HIGH-power saving level is low and the back- Need help? NOTE: The Energy Saver settings level varies with the picture and sound. Visit our Web site at www.sanyoctv.com or Call 1-800-877-5032 17 sumption is normal. • LOW-power saving level is high and the back- Press ENTER. 2 Use the CURSOR LM keys to see. NOTES: If Background Opacity is set to the lowest level. 1 Use the CURSOR LM keys to highlight Menu Language. Press ...
Owners Manual
Page 18
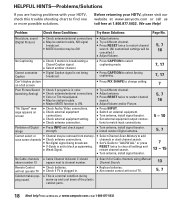
... No digital signal being Caption broadcast. G Set V-Guide to match input connections. 7, 17 7, 17 7 5, 7 16 5 - 10 Pixilation of TV. 13 5, 7 18 Need help? G Replace batteries. G Press CAPTION to select captioning mode. G Press INPUT. G Select Channel Scan Memory to ...RESET twice to find one or more possible solutions. G This is set to restart channel search. (All customized settings will not operate TV Cabinet makes popping sound. G Check antenna/external connections. G Turn antenna, install signal booster. G Turn antenna, install signal booster....
... No digital signal being Caption broadcast. G Set V-Guide to match input connections. 7, 17 7, 17 7 5, 7 16 5 - 10 Pixilation of TV. 13 5, 7 18 Need help? G Replace batteries. G Press CAPTION to select captioning mode. G Press INPUT. G Select Channel Scan Memory to ...RESET twice to find one or more possible solutions. G This is set to restart channel search. (All customized settings will not operate TV Cabinet makes popping sound. G Check antenna/external connections. G Turn antenna, install signal booster. G Turn antenna, install signal booster....
Owners Manual
Page 19
... exchange at www.sanyoctv.com or Call 1-800-877-5032 19 OBLIGATIONS For one year from the date of purchase, Sanyo Manufacturing Corporation warrants this TV to state. (EFFECTIVE: March 1, 2007) For your protection in the event of theft or loss of this warranty for ...replace any manufacturing defect or malfunction Sanyo Manufacturing Corporation will be contingent on back of Purchase Serial No Located on availability and at the retailer. To ensure proper warranty application, keep the original-dated-sales receipt for any defective TV via exchange at the sole discretion ...
... exchange at www.sanyoctv.com or Call 1-800-877-5032 19 OBLIGATIONS For one year from the date of purchase, Sanyo Manufacturing Corporation warrants this TV to state. (EFFECTIVE: March 1, 2007) For your protection in the event of theft or loss of this warranty for ...replace any manufacturing defect or malfunction Sanyo Manufacturing Corporation will be contingent on back of Purchase Serial No Located on availability and at the retailer. To ensure proper warranty application, keep the original-dated-sales receipt for any defective TV via exchange at the sole discretion ...