
Owners Manual
Page 1
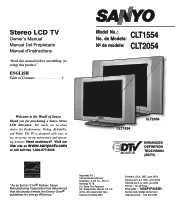
... Contents 3 ESPAÑOL Contenido 19 FRANÇAIS Table des matières 37 Welcome to use on-screen set-up instructions and operating features. SMC, Junio 2004 Imprimé aux É.-U. Stereo LCD TV Owner's Manual Manual Del Propietario Manuel d'instructions "Read this manual before assembling (or using) this product meets the ENERGY STAR® guidelines for Performance, Styling, Reliability, and Value...
... Contents 3 ESPAÑOL Contenido 19 FRANÇAIS Table des matières 37 Welcome to use on-screen set-up instructions and operating features. SMC, Junio 2004 Imprimé aux É.-U. Stereo LCD TV Owner's Manual Manual Del Propietario Manuel d'instructions "Read this manual before assembling (or using) this product meets the ENERGY STAR® guidelines for Performance, Styling, Reliability, and Value...
Owners Manual
Page 2
... replacement of overhead power lines or other electrical light or power circuits, or where it can fall into the apparatus, the apparatus has been exposed to Article 820-40 of cable entry as close to grounding electrodes, and requirements for long periods of the National Electrical Code provides information with the manufacturer's instructions. 8. NO USER-SERVICEABLE PARTS INSIDE. If the provided plug...
... replacement of overhead power lines or other electrical light or power circuits, or where it can fall into the apparatus, the apparatus has been exposed to Article 820-40 of cable entry as close to grounding electrodes, and requirements for long periods of the National Electrical Code provides information with the manufacturer's instructions. 8. NO USER-SERVICEABLE PARTS INSIDE. If the provided plug...
Owners Manual
Page 3
...chassis. Wall Mounting 7 Using the Component Video and Audio Input Jacks 8 Connecting a DVD Player 8 Using the Audio / Video Input Jacks 9 Connecting a VCR or DVD Player 9 Using the Remote Control 10 TV Adjustment and Setup 11 ~ 13 How to the fine surface. 1. Contents Important Safety Instructions 2 Care and Cleaning 3 Features 4 Specifications 4 Getting Started 5 ~ 6 Positioning the LCD TV 5 Using the Tilt Stand 5 Removing the TV Tilt Stand 5 Power Connection 5 Installing Batteries in the Remote Control. . . . . . 6 Connecting Cable, RF Antenna, or a Satellite Receiver to...
...chassis. Wall Mounting 7 Using the Component Video and Audio Input Jacks 8 Connecting a DVD Player 8 Using the Audio / Video Input Jacks 9 Connecting a VCR or DVD Player 9 Using the Remote Control 10 TV Adjustment and Setup 11 ~ 13 How to the fine surface. 1. Contents Important Safety Instructions 2 Care and Cleaning 3 Features 4 Specifications 4 Getting Started 5 ~ 6 Positioning the LCD TV 5 Using the Tilt Stand 5 Removing the TV Tilt Stand 5 Power Connection 5 Installing Batteries in the Remote Control. . . . . . 6 Connecting Cable, RF Antenna, or a Satellite Receiver to...
Owners Manual
Page 4
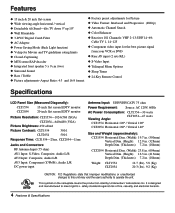
...; Closed-Captioning ◆ MTS stereo/SAP decoder ◆ Integrated front speaker 5 x 9 cm (two) ◆ Surround Sound ◆ Bass / Treble ◆ Picture adjustments-Aspect Ratio: 4:3 and 16:9 format ◆ Factory preset adjustments for the best picture signal from your VCR or DVD ◆ Rear AV input (2 sets R/L) ◆ S-Video Input ◆ Trilingual Menu Options ◆ Sleep Timer ◆ 24-Key Remote Control Specifications LCD Panel Size (Measured Diagonally): CLT1554 15-inch flat screen EDTV monitor CLT2054 20-inch flat screen EDTV monitor Picture Resolution: CLT1554...
...; Closed-Captioning ◆ MTS stereo/SAP decoder ◆ Integrated front speaker 5 x 9 cm (two) ◆ Surround Sound ◆ Bass / Treble ◆ Picture adjustments-Aspect Ratio: 4:3 and 16:9 format ◆ Factory preset adjustments for the best picture signal from your VCR or DVD ◆ Rear AV input (2 sets R/L) ◆ S-Video Input ◆ Trilingual Menu Options ◆ Sleep Timer ◆ 24-Key Remote Control Specifications LCD Panel Size (Measured Diagonally): CLT1554 15-inch flat screen EDTV monitor CLT2054 20-inch flat screen EDTV monitor Picture Resolution: CLT1554...
Owners Manual
Page 5
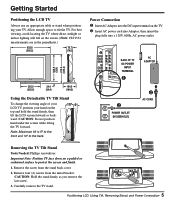
... TV Tilt Stand To change the viewing angle of your LCD TV, position your TV. Remove the screw from the metal bracket. CAUTION: Hold the stand firmly as you remove the last screw. 3. Positioning LCD, Using Tilt, Removing Stand, and Power Connection 5 Getting Started Positioning the LCD TV Always use an appropriate table or stand when positioning your hand on the top and hold the stand firmly, then tilt the LCD screen forward...
... TV Tilt Stand To change the viewing angle of your LCD TV, position your TV. Remove the screw from the metal bracket. CAUTION: Hold the stand firmly as you remove the last screw. 3. Positioning LCD, Using Tilt, Removing Stand, and Power Connection 5 Getting Started Positioning the LCD TV Always use an appropriate table or stand when positioning your hand on the top and hold the stand firmly, then tilt the LCD screen forward...

Owners Manual
Page 6
... Antenna mode for available channels. Note: Do not mix old batteries with equipment which is designed to use the TV as a monitor only, with a DVD player or some other type of external equipment, and no signal reception (cable out or station not broadcasting). After channel search is complete (2 searches), you connect. ■ TV will not automatically switch off automatically after connecting the signal and turning on the remote control...
... Antenna mode for available channels. Note: Do not mix old batteries with equipment which is designed to use the TV as a monitor only, with a DVD player or some other type of external equipment, and no signal reception (cable out or station not broadcasting). After channel search is complete (2 searches), you connect. ■ TV will not automatically switch off automatically after connecting the signal and turning on the remote control...

Owners Manual
Page 7
...: Extra cables are needed for advance connections. Note: S-Video connection overrides the AV1 video connection. 480i/p Component Video / Audio Input Jacks (AV3) Connect external equipment to the Y, Pb, Pr and Audio L/R jacks. (See page 8.) DC Power Input Jack Connect AC Adaptor to this jack as shown on pages 8~9. Note: Wall Mounting kit is designed so that it using a wall mounting kit. Top and Back Panel Top View NOTE: The Channel ▲ (up) / ▼ (down), Volume + (up...
...: Extra cables are needed for advance connections. Note: S-Video connection overrides the AV1 video connection. 480i/p Component Video / Audio Input Jacks (AV3) Connect external equipment to the Y, Pb, Pr and Audio L/R jacks. (See page 8.) DC Power Input Jack Connect AC Adaptor to this jack as shown on pages 8~9. Note: Wall Mounting kit is designed so that it using a wall mounting kit. Top and Back Panel Top View NOTE: The Channel ▲ (up) / ▼ (down), Volume + (up...
Owners Manual
Page 8
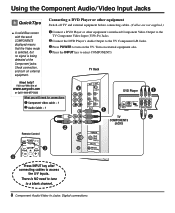
... Back Need help? Check connection, and turn on external equipment also. ❹ Press the INPUT key to access the A/V inputs. Using the Component Audio/Video Input Jacks QuickTips ■ A solid Blue screen with the word COMPONENT3 displayed means that the Video mode is selected, but no signal is NO need for connections: ❶ Component video cable - 1 ❷ Audio Cable - 1 ❹ Remote Control INPUT POWER RESET MENU VOL RECALL CH VOL ❸ ❷ AV2 AV1 S-VIDEO V V L (MONO) R L (MONO) R AV3 ❶ Y L Pb R Pr DVD Player ❶ VIDEO OUT...
... Back Need help? Check connection, and turn on external equipment also. ❹ Press the INPUT key to access the A/V inputs. Using the Component Audio/Video Input Jacks QuickTips ■ A solid Blue screen with the word COMPONENT3 displayed means that the Video mode is selected, but no signal is NO need for connections: ❶ Component video cable - 1 ❷ Audio Cable - 1 ❹ Remote Control INPUT POWER RESET MENU VOL RECALL CH VOL ❸ ❷ AV2 AV1 S-VIDEO V V L (MONO) R L (MONO) R AV3 ❶ Y L Pb R Pr DVD Player ❶ VIDEO OUT...
Owners Manual
Page 9
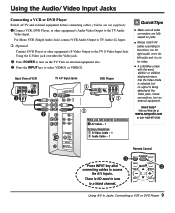
... the colors; Back View of VCR IN R-AUDIO-L VIDEO OUT R-AUDIO-L VIDEO RF CHANNEL 34 IN FROM ANT. Check connections, turn on external equipment. MENU VOL RECALL CH VOL ❷ There is being detected at www.sanyoctv.com or Call 1-800-877-5032 Remote Control ❸ INPUT POWER RESET Press INPUT key after connecting cables to select VIDEO1 or VIDEO2. For Mono VCR (Single Audio Jack) connect VCR Audio Output to TV Audio (L) Input. ① Optional Connect DVD Player...
... the colors; Back View of VCR IN R-AUDIO-L VIDEO OUT R-AUDIO-L VIDEO RF CHANNEL 34 IN FROM ANT. Check connections, turn on external equipment. MENU VOL RECALL CH VOL ❷ There is being detected at www.sanyoctv.com or Call 1-800-877-5032 Remote Control ❸ INPUT POWER RESET Press INPUT key after connecting cables to select VIDEO1 or VIDEO2. For Mono VCR (Single Audio Jack) connect VCR Audio Output to TV Audio (L) Input. ① Optional Connect DVD Player...
Owners Manual
Page 10
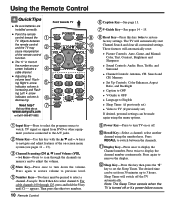
... a channel; Sleep Timer will automatically reset: • Picture Controls: Auto, Game, and Manual: Color, Tint, Contrast, Brightness and Sharpness • Sound Controls: Audio, Bass, Treble, and Surround • Channel Controls: Antenna, CH. ing Right4arrow indicates volume is decreasing. For cable channels 100 through the channels in front of the remote control function. ■ The "C" in memory and to adjust the volume. ➃ Mute Key-Press once to 3 hours. select another channel using the menu options. ➀ Input Key...
... a channel; Sleep Timer will automatically reset: • Picture Controls: Auto, Game, and Manual: Color, Tint, Contrast, Brightness and Sharpness • Sound Controls: Audio, Bass, Treble, and Surround • Channel Controls: Antenna, CH. ing Right4arrow indicates volume is decreasing. For cable channels 100 through the channels in front of the remote control function. ■ The "C" in memory and to adjust the volume. ➃ Mute Key-Press once to 3 hours. select another channel using the menu options. ➀ Input Key...
Owners Manual
Page 11
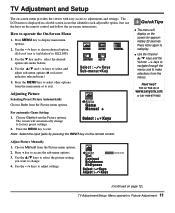
... Adjustment/Setup: Menu operation, Picture Adjustment 11 Use the - /+ keys to exit. Press MENU key to adjustments and settings. Visit our Web site at www.sanyoctv.com or Call 1-800-877-5032 For automatic Game Setting 1. Note: Select the input jacks by pressing the INPUT key on -screen instructions. TV Adjustment and Setup The on-screen menu provides the viewer with easy access to display main menu options. 2. Just use the keys on the remote control...
... Adjustment/Setup: Menu operation, Picture Adjustment 11 Use the - /+ keys to exit. Press MENU key to adjustments and settings. Visit our Web site at www.sanyoctv.com or Call 1-800-877-5032 For automatic Game Setting 1. Note: Select the input jacks by pressing the INPUT key on -screen instructions. TV Adjustment and Setup The on-screen menu provides the viewer with easy access to display main menu options. 2. Just use the keys on the remote control...
Owners Manual
Page 12
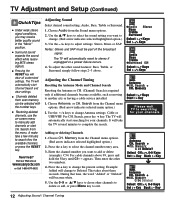
... menu. Need help? Choose Antenna or CH. The TV will automatically start CH. appears. This takes about three seconds. The TV will automatically reset to change Antenna settings: Cable or UHF/VHF. Use the ▲/▼ keys to select the sound setting you want to complete the search. To adjust the other two numbers. 4. Choose CH. TV Adjustment and Setup (Continued) QuickTips ■ Under weak stereo signal...
... menu. Need help? Choose Antenna or CH. The TV will automatically start CH. appears. This takes about three seconds. The TV will automatically reset to change Antenna settings: Cable or UHF/VHF. Use the ▲/▼ keys to select the sound setting you want to complete the search. To adjust the other two numbers. 4. Choose CH. TV Adjustment and Setup (Continued) QuickTips ■ Under weak stereo signal...
Owners Manual
Page 13
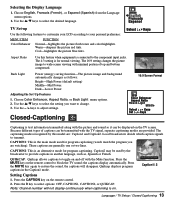
...: MENU ITEM Color Enhancer FUNCTION Normal-highlights the picture flesh tones and color highlights. Aspect Ratio Use this model are generally one or two lines. Closed-Captioning 16:9 Screen Format Captioning is connected to transmit. Local broadcasters decide which caption signals to the component input jacks. CAPTION1: This is the main mode used by this feature when equipment is text information transmitted along with the Mute function. Note: Channel number...
...: MENU ITEM Color Enhancer FUNCTION Normal-highlights the picture flesh tones and color highlights. Aspect Ratio Use this model are generally one or two lines. Closed-Captioning 16:9 Screen Format Captioning is connected to transmit. Local broadcasters decide which caption signals to the component input jacks. CAPTION1: This is the main mode used by this feature when equipment is text information transmitted along with the Mute function. Note: Channel number...
Owners Manual
Page 14
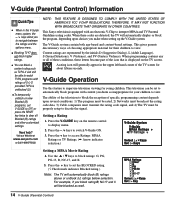
... 4. Press the + key to set V-GUIDE to OFF, or press the RESET key twice to clear all of the icon that is displayed on the remote control to display menu. 2. This television can block a content rating such as well. 14 V-Guide (Parental Control) Press the + key to switch V-Guide ON. 3. This Sanyo television is unblocked (U). ■ To temporarily unblock or view Blocked (B) programs, set the BLOCKED rating. (√ Check...
... 4. Press the + key to set V-GUIDE to OFF, or press the RESET key twice to clear all of the icon that is displayed on the remote control to display menu. 2. This television can block a content rating such as well. 14 V-Guide (Parental Control) Press the + key to switch V-Guide ON. 3. This Sanyo television is unblocked (U). ■ To temporarily unblock or view Blocked (B) programs, set the BLOCKED rating. (√ Check...
Owners Manual
Page 15
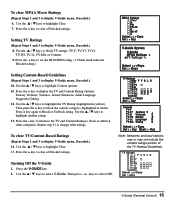
... Content. 9. Use the ▲ / ▼ keys to Block or Unblock rating. Press the + key to set the BLOCKED rating. (√ Check mark indicates Blocked rating.) Setting Content-Based Guidelines (Repeat Steps 1 and 3 to display V-Guide menu, if needed .) 14. Turning Off the V-Guide 1. Note: Networks and local stations may or may not include the content ratings portion of the TV Parental Guidelines.
... Content. 9. Use the ▲ / ▼ keys to Block or Unblock rating. Press the + key to set the BLOCKED rating. (√ Check mark indicates Blocked rating.) Setting Content-Based Guidelines (Repeat Steps 1 and 3 to display V-Guide menu, if needed .) 14. Turning Off the V-Guide 1. Note: Networks and local stations may or may not include the content ratings portion of the TV Parental Guidelines.
Owners Manual
Page 16
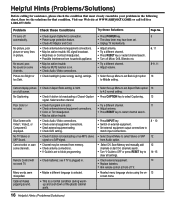
... Screen with Video1, Video2, or Component3 displayed. Menu words seem misspelled. No Captioning. Check these Solutions • Press POWER key. • The sleep timer may be MUTE function is on external equipment. • Set external equipment output connections to match input connections. • Select Sound Menu to set . • Unplug TV momentarily. • Adjust antenna. • Try a different channel. • Press RESET key or restart channel search. • Turn off automatically. Remote Control will not work...
... Screen with Video1, Video2, or Component3 displayed. Menu words seem misspelled. No Captioning. Check these Solutions • Press POWER key. • The sleep timer may be MUTE function is on external equipment. • Set external equipment output connections to match input connections. • Select Sound Menu to set . • Unplug TV momentarily. • Adjust antenna. • Try a different channel. • Press RESET key or restart channel search. • Turn off automatically. Remote Control will not work...
Owners Manual
Page 17
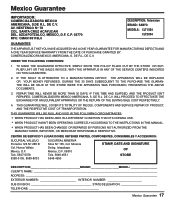
... 78 COL. C.P. 02770 RFC: CMA9109119L0 DESCRIPTION: Television BRAND: SANYO MODELS: CLT1554 CLT2054 GUARANTEE THE APPARATUS THAT YOU HAVE ACQUIRED HAS A ONE YEAR GUARANTEE FOR MANUFACTURING DEFECTS AND A ONE YEAR SERVICE WARRANTY FROM THE DATE OF PURCHASE GRANTED BY: COMERCIALIZADORA MEXICO-AMERICANA, S. THIS GUARANTEE WILL COVER ITS TOTALITY OF PIECES, COMPONENTS AND SERVICE REPAIR OF PRODUCT, AND THE RESPECTIVE COST...
... 78 COL. C.P. 02770 RFC: CMA9109119L0 DESCRIPTION: Television BRAND: SANYO MODELS: CLT1554 CLT2054 GUARANTEE THE APPARATUS THAT YOU HAVE ACQUIRED HAS A ONE YEAR GUARANTEE FOR MANUFACTURING DEFECTS AND A ONE YEAR SERVICE WARRANTY FROM THE DATE OF PURCHASE GRANTED BY: COMERCIALIZADORA MEXICO-AMERICANA, S. THIS GUARANTEE WILL COVER ITS TOTALITY OF PIECES, COMPONENTS AND SERVICE REPAIR OF PRODUCT, AND THE RESPECTIVE COST...
Owners Manual
Page 18
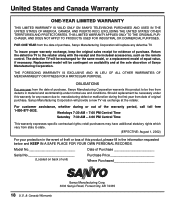
... OWN PERSONAL RECORDS. Model No Date of Purchase Serial No Located on availability and at the retailer. Weekdays 7:30 AM - 7:00 PM Central Time Saturday 7:30 AM - 4:00 PM Central Time This warranty expresses specific contractual rights; To insure proper warranty exchange, keep the original sales receipt for the same model, or a replacement model of purchase. Should replacement be exchanged for evidence...
... OWN PERSONAL RECORDS. Model No Date of Purchase Serial No Located on availability and at the retailer. Weekdays 7:30 AM - 7:00 PM Central Time Saturday 7:30 AM - 4:00 PM Central Time This warranty expresses specific contractual rights; To insure proper warranty exchange, keep the original sales receipt for the same model, or a replacement model of purchase. Should replacement be exchanged for evidence...

Owners Manual
Page 19
... climb on or play with furniture and television sets. 5 Avoid placing any items on this hidden hazard of the home with your family and friends. Sometimes televisions are not always supported on dressers, bookcases, shelves, desks, audio speakers, chests, or carts. The industry is large enough to support the weight of TVs such as VCRs and remotes that may cause...
... climb on or play with furniture and television sets. 5 Avoid placing any items on this hidden hazard of the home with your family and friends. Sometimes televisions are not always supported on dressers, bookcases, shelves, desks, audio speakers, chests, or carts. The industry is large enough to support the weight of TVs such as VCRs and remotes that may cause...


