

Instruction Manual
Page 2
...Headphone Volume 5 Installation 5 LCD Screen 5 Warning 5 Overview of Hearing (* for EU countries only) .......26 Hard of the Remote Control 6 LCD TV and Operating Buttons 7 Viewing the Connections- Back Connectors .......... 8 Aerial Connection 11 Using the Cable Holder 11 USB Memory Connection 12 Inserting Batteries in the...Time Installation 30 Media Browser 31 Playing MP3 Files 32 Viewing JPG Files 32 Slideshow Options 32 Video Playback 33 Analogue TV Menu System 33 Picture Menu 33 Mode 33 Brightness/Contrast/Colour/Sharpness/Hue. 33 Colour Temp 34 Noise Reduction 34 ...
...Headphone Volume 5 Installation 5 LCD Screen 5 Warning 5 Overview of Hearing (* for EU countries only) .......26 Hard of the Remote Control 6 LCD TV and Operating Buttons 7 Viewing the Connections- Back Connectors .......... 8 Aerial Connection 11 Using the Cable Holder 11 USB Memory Connection 12 Inserting Batteries in the...Time Installation 30 Media Browser 31 Playing MP3 Files 32 Viewing JPG Files 32 Slideshow Options 32 Video Playback 33 Analogue TV Menu System 33 Picture Menu 33 Mode 33 Brightness/Contrast/Colour/Sharpness/Hue. 33 Colour Temp 34 Noise Reduction 34 ...

Instruction Manual
Page 3
... H (Horizontal) Position 39 V (Vertical) Position 39 Phase 40 Dot Clock 40 PC Picture Menu 40 Sound Menu 40 Feature Menu 40 Source Menu 40 Displaying TV Information 40 Mute Function 40 PIP (Picture-in-Picture) and PAP (Picture-andPicture) Modes 40 Picture Mode Selection 40 Freezing Picture 41 Zoom Modes 41...
... H (Horizontal) Position 39 V (Vertical) Position 39 Phase 40 Dot Clock 40 PC Picture Menu 40 Sound Menu 40 Feature Menu 40 Source Menu 40 Displaying TV Information 40 Mute Function 40 PIP (Picture-in-Picture) and PAP (Picture-andPicture) Modes 40 Picture Mode Selection 40 Freezing Picture 41 Zoom Modes 41...

Instruction Manual
Page 4
...playback. • PIP / PAP / PAT functions. • AVL (Automatic Volume Limiting). • When no valid signal is detected, after 5 minutes the TV switches itself automatically to standby mode. • PLL (Frequency Search). • PC input. • Plug&Play for digital video and audio. EXIT + ...SWAP P Features • Remote controlled colour LCD TV. • Fully integrated digital TV (DVB-T). • HDMI connectors for Windows 98, ME, 2000, XP, Vista. • Audio line out. • Game Mode •...
...playback. • PIP / PAP / PAT functions. • AVL (Automatic Volume Limiting). • When no valid signal is detected, after 5 minutes the TV switches itself automatically to standby mode. • PLL (Frequency Search). • PC input. • Plug&Play for digital video and audio. EXIT + ...SWAP P Features • Remote controlled colour LCD TV. • Fully integrated digital TV (DVB-T). • HDMI connectors for Windows 98, ME, 2000, XP, Vista. • Audio line out. • Game Mode •...

Instruction Manual
Page 5
...washing machine). Power Cord Do not place the set from dripping or splashing. Never make sure that no open flames and sources of the TV. Ensure that the service technician has used replacement parts, which are specified by qualified personnel before operating it with liquids,... placed in the kitchen, and near to ensure reliable operation. Moisture and Water Do not use liquid or aerosol cleaners. Before operating the TV, please read the following recommended safety precautions carefully for the proper operation of at least 10 cm all around the set are not likely ...
...washing machine). Power Cord Do not place the set from dripping or splashing. Never make sure that no open flames and sources of the TV. Ensure that the service technician has used replacement parts, which are specified by qualified personnel before operating it with liquids,... placed in the kitchen, and near to ensure reliable operation. Moisture and Water Do not use liquid or aerosol cleaners. Before operating the TV, please read the following recommended safety precautions carefully for the proper operation of at least 10 cm all around the set are not likely ...

Instruction Manual
Page 6
...please follow the local laws or regulations for used to the wall (if the option is designed and manufactured with household waste. Your SANYO product is available). Note: If a chemical symbol is used electrical and electronic equipment, batteries and accumulators. LCD Screen The LCD panel... is a very high technology product with the installation instructions when mounted to disconnect TV set from children. • Batteries, including those which are heavy metal-free, should not be disposed of used battery in fi...
...please follow the local laws or regulations for used to the wall (if the option is designed and manufactured with household waste. Your SANYO product is available). Note: If a chemical symbol is used electrical and electronic equipment, batteries and accumulators. LCD Screen The LCD panel... is a very high technology product with the installation instructions when mounted to disconnect TV set from children. • Batteries, including those which are heavy metal-free, should not be disposed of used battery in fi...

Instruction Manual
Page 7
... Volume up 3. Blue (Installation menu) / Favourite selection (*) 13. Mono/Stereo - Teletext 20. Standby 2. Info 5. Exit (in TXT mode) / PAP mode 15. TV / Digital TV 10. Yellow (Feature menu) / Current language (*) 12. Update (in DTV mode) 7. Reveal (in TXT mode) / PIP mode 19. Mix (in TXT mode) .../ Switch from TV to PC 17. Time / Subtitle on-off (**) (in DTV mode) 22. Red (Sound menu) / Channel list (*) (in DTV mode) 21. Green (Picture ...
... Volume up 3. Blue (Installation menu) / Favourite selection (*) 13. Mono/Stereo - Teletext 20. Standby 2. Info 5. Exit (in TXT mode) / PAP mode 15. TV / Digital TV 10. Yellow (Feature menu) / Current language (*) 12. Update (in DTV mode) 7. Reveal (in TXT mode) / PIP mode 19. Mix (in TXT mode) .../ Switch from TV to PC 17. Time / Subtitle on-off (**) (in DTV mode) 22. Red (Sound menu) / Channel list (*) (in DTV mode) 21. Green (Picture ...

Instruction Manual
Page 8
SIDE VIEW REAR VIEW English - 7 - Standby button 2. Volume Up/Down buttons Note: Press V+/Vbuttons at the same time to view main menu. TV/AV button 3. LCD TV and Operating Buttons FRONT VIEW 1. Programme Up/ Down buttons 4.
SIDE VIEW REAR VIEW English - 7 - Standby button 2. Volume Up/Down buttons Note: Press V+/Vbuttons at the same time to view main menu. TV/AV button 3. LCD TV and Operating Buttons FRONT VIEW 1. Programme Up/ Down buttons 4.
Instruction Manual
Page 9
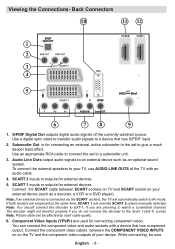
... if you are planning to a device that has component output. Connect the component video cables between SCART sockets on TV and SCART socket on the TV and the component video outputs of the currently watched source. S/PDIF Digital Out outputs digital audio signals of your...cable. 4. While connecting, be affected by scart cable quality. 6. Viewing the Connections- Subwoofer Out is connected via the SCART sockets, the TV will override SCART 2 unless manually selected. Audio Line Outs output audio signals to your device. To connect the external speakers to an external ...
... if you are planning to a device that has component output. Connect the component video cables between SCART sockets on TV and SCART socket on the TV and the component video outputs of the currently watched source. S/PDIF Digital Out outputs digital audio signals of your...cable. 4. While connecting, be affected by scart cable quality. 6. Viewing the Connections- Subwoofer Out is connected via the SCART sockets, the TV will override SCART 2 unless manually selected. Audio Line Outs output audio signals to your device. To connect the external speakers to an external ...

Instruction Manual
Page 10
... HDMI Input 12. These sockets can accept either 720p or 1080i signals. Connect the audio cable between the PC INPUT on the TV and the PC output on the TV and audio outputs of your device to enable component audio. 8. Connect the PC cable between AUDIO INPUTS on your PC. 11.... connect the aerial cable through the device to the television with your device's connectors. 7. Connect the PC audio cable between the AUDIO INPUTS on your TV, "Y", "Pb", "Pr" correspond with an appropriate antenna cable, as a High Definition Satellite Receiver or DVD Player. These devices must be connected ...
... HDMI Input 12. These sockets can accept either 720p or 1080i signals. Connect the audio cable between the PC INPUT on the TV and the PC output on the TV and audio outputs of your device to enable component audio. 8. Connect the PC cable between AUDIO INPUTS on your PC. 11.... connect the aerial cable through the device to the television with your device's connectors. 7. Connect the PC audio cable between the AUDIO INPUTS on your TV, "Y", "Pb", "Pr" correspond with an appropriate antenna cable, as a High Definition Satellite Receiver or DVD Player. These devices must be connected ...

Instruction Manual
Page 11
... that you should also connect your device with an audio cable to the AUDIO INPUTS of external devices. Note: If you connect a device to the TV via the VIDEO INPUT, you subscribe to enable audio. Viewing the Connections - Note: Codec update cannot be performed. 3. Audio Inputs are used for ...AUDIO OUTPUT jacks on your device. English - 10 - Video Input is used for connecting audio signals of the TV to . Connect the audio cable between the VIDEO IN socket on the TV and the VIDEO OUT jack on your device. 5. Connect to the HEADPHONE jack to listen to the system. ...
... that you should also connect your device with an audio cable to the AUDIO INPUTS of external devices. Note: If you connect a device to the TV via the VIDEO INPUT, you subscribe to enable audio. Viewing the Connections - Note: Codec update cannot be performed. 3. Audio Inputs are used for ...AUDIO OUTPUT jacks on your device. English - 10 - Video Input is used for connecting audio signals of the TV to . Connect the audio cable between the VIDEO IN socket on the TV and the VIDEO OUT jack on your device. 5. Connect to the HEADPHONE jack to listen to the system. ...

Instruction Manual
Page 12
... as the following: • Place the cable holder into the cable holder hole located on 220-240V AC, 50 Hz. • After unpacking, allow the TV set to reach the ambient room temperature before you connect the set is designed to operate on the rear side of the... TV. English - 11 - Power Connection IMPORTANT: The TV set to the mains. • Plug the power cable to the AERIAL INPUT socket located at the rear of the TV as illustrated above. • Place cables into the cable holder after all...
... as the following: • Place the cable holder into the cable holder hole located on 220-240V AC, 50 Hz. • After unpacking, allow the TV set to reach the ambient room temperature before you connect the set is designed to operate on the rear side of the... TV. English - 11 - Power Connection IMPORTANT: The TV set to the mains. • Plug the power cable to the AERIAL INPUT socket located at the rear of the TV as illustrated above. • Place cables into the cable holder after all...

Instruction Manual
Page 13
...file. Especially, do not repeatedly quickly plug and unplug the drive. Using Digital Multimedia Connectors • You can connect USB devices to your TV by using the USB input of USB devices (e.g. Note: USB hard disk drives are not supported. • It is a very hazardous operation. ... CAUTION: Quickly plugging and unplugging USB devices, is recommended that manufacturer will not be compatible with this TV. • You may cause physical damage to the USB input of the TV. SIDE VIEW USB MEMORY USB Memory Connection • Plug your USB device directly to the USB player ...
...file. Especially, do not repeatedly quickly plug and unplug the drive. Using Digital Multimedia Connectors • You can connect USB devices to your TV by using the USB input of USB devices (e.g. Note: USB hard disk drives are not supported. • It is a very hazardous operation. ... CAUTION: Quickly plugging and unplugging USB devices, is recommended that manufacturer will not be compatible with this TV. • You may cause physical damage to the USB input of the TV. SIDE VIEW USB MEMORY USB Memory Connection • Plug your USB device directly to the USB player ...

Instruction Manual
Page 14
REAR VIEW Audio Inputs PC audio cable (not supplied) to AUDIO INPUTS on your LCD TV, you can be found in the appendix parts. Connecting the LCD TV to a PC For displaying your computer's screen image on the TV PC Input PC RGB cable (not supplied) to PC source. See "Input selection" section.... • Set the resolution that suits your computer to the TV set. • Power off both computer and display before making any connections. • Use 15-pin D-sub display cable to connect a PC to the LCD TV. • When the connection is made, switch to PC input English - ...
REAR VIEW Audio Inputs PC audio cable (not supplied) to AUDIO INPUTS on your LCD TV, you can be found in the appendix parts. Connecting the LCD TV to a PC For displaying your computer's screen image on the TV PC Input PC RGB cable (not supplied) to PC source. See "Input selection" section.... • Set the resolution that suits your computer to the TV set. • Power off both computer and display before making any connections. • Use 15-pin D-sub display cable to connect a PC to the LCD TV. • When the connection is made, switch to PC input English - ...

Instruction Manual
Page 15
... Component audio inputs HDMI inputs DVD Player REAR VIEW English - 14 - Power off both the TV and the device before making any connections. Connecting to a DVD Player If you want to connect a DVD player to your LCD TV, you can connect via HDMI. Please refer to connect video input. Note: Cables shown... in different levels of the TV set. Note: These three methods of connection perform the same function but in the illustration are connected through the SCART 1 or SCART 2. See, "Input Selection" ...
... Component audio inputs HDMI inputs DVD Player REAR VIEW English - 14 - Power off both the TV and the device before making any connections. Connecting to a DVD Player If you want to connect a DVD player to your LCD TV, you can connect via HDMI. Please refer to connect video input. Note: Cables shown... in different levels of the TV set. Note: These three methods of connection perform the same function but in the illustration are connected through the SCART 1 or SCART 2. See, "Input Selection" ...

Instruction Manual
Page 16
Note that cables shown in the following parts. • To listen the TV sound from headphones, connect to the HEADPHONE jack of optional equipment to the VIDEO IN socket and the AUDIO SOCKETS. Possible connections are not supplied. • For connecting a camcorder, connect to your LCD TV. Using Side AV Connectors You can connect a range of theTV. For selecting the related source, see the section "Input selection" in the illustration are shown below. Headphone Camcorder SIDE VIEW English - 15 -
Note that cables shown in the following parts. • To listen the TV sound from headphones, connect to the HEADPHONE jack of optional equipment to the VIDEO IN socket and the AUDIO SOCKETS. Possible connections are not supplied. • For connecting a camcorder, connect to your LCD TV. Using Side AV Connectors You can connect a range of theTV. For selecting the related source, see the section "Input selection" in the illustration are shown below. Headphone Camcorder SIDE VIEW English - 15 -
Instruction Manual
Page 17
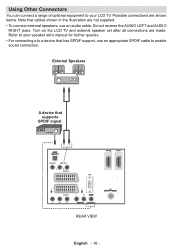
Refer to enable sound connection. Note that cables shown in the illustration are made. Turn on the LCD TV and external speaker set 's manual for further queries. • For connecting a to a device that has SPDIF support, use an audio cable. Using Other Connectors... optional equipment to your speaker set after all connections are not supplied. • To connect external speakers, use an appropriate SPDIF cable to your LCD TV. Do not reverse the AUDIO LEFT and AUDIO RIGHT jacks. REAR VIEW English - 16 - Possible connections are shown below. External Speakers A device that ...
Refer to enable sound connection. Note that cables shown in the illustration are made. Turn on the LCD TV and external speaker set 's manual for further queries. • For connecting a to a device that has SPDIF support, use an audio cable. Using Other Connectors... optional equipment to your speaker set after all connections are not supplied. • To connect external speakers, use an appropriate SPDIF cable to your LCD TV. Do not reverse the AUDIO LEFT and AUDIO RIGHT jacks. REAR VIEW English - 16 - Possible connections are shown below. External Speakers A device that ...

Instruction Manual
Page 18
Power off both the TV and the devices before making any connections. REAR VIEW Scart sockets DVD Recorder Video Recorder Decoder English - 17 - DVD recorder, a VCR or a decoder to your LCD TV by using the SCART sockets. Connecting Other Equipment via Scart Most devices support SCART connection. You can connect a; For more information, refer to your device's own instruction book. Note that cables shown in the illustration are not supplied.
Power off both the TV and the devices before making any connections. REAR VIEW Scart sockets DVD Recorder Video Recorder Decoder English - 17 - DVD recorder, a VCR or a decoder to your LCD TV by using the SCART sockets. Connecting Other Equipment via Scart Most devices support SCART connection. You can connect a; For more information, refer to your device's own instruction book. Note that cables shown in the illustration are not supplied.

Instruction Manual
Page 19
...backwards from remote control handset when it can blink to any leakage of the remote control toward the LCD TV's remote sensor LED while pressing a button. Switching the TV On/Off To Switch the TV On • Connect the power cord to the 220-240V AC 50 Hz. • Press STANDBY switch... the mains socket. Operating Range for a long period. Inserting Batteries in the right directions and replace the battery cover. The TV will switch on the TV. Note: Remove the battery from the indicated part. • Insert two AAA/R3 or equivalent type batteries inside. Note: If you were watching ...
...backwards from remote control handset when it can blink to any leakage of the remote control toward the LCD TV's remote sensor LED while pressing a button. Switching the TV On/Off To Switch the TV On • Connect the power cord to the 220-240V AC 50 Hz. • Press STANDBY switch... the mains socket. Operating Range for a long period. Inserting Batteries in the right directions and replace the battery cover. The TV will switch on the TV. Note: Remove the battery from the indicated part. • Insert two AAA/R3 or equivalent type batteries inside. Note: If you were watching ...

Instruction Manual
Page 20
...programme number to reselect single digit programmes. Volume Setting • Press " " button to decrease the volume. Operation with the Buttons on the TV Volume Setting • Press " " button to decrease volume or button to increase volume, so a volume level scale (slider) will be... scale (slider) will switch to the selected programme. To select programmes between 0 and 9. Operation with the menu system of your TV. • Functions of your TV using both the remote control and onset buttons. Viewing Main Menu • Press the "M" button to select the next programme. Input...
...programme number to reselect single digit programmes. Volume Setting • Press " " button to decrease the volume. Operation with the Buttons on the TV Volume Setting • Press " " button to decrease volume or button to increase volume, so a volume level scale (slider) will be... scale (slider) will switch to the selected programme. To select programmes between 0 and 9. Operation with the menu system of your TV. • Functions of your TV using both the remote control and onset buttons. Viewing Main Menu • Press the "M" button to select the next programme. Input...

Instruction Manual
Page 21
... for the language selection appears on for the first time, the menu for more information on this is the first time the TV is displayed in all language options sequentially in analogue AUTO PROGRAM (for the first time, the IDTV turns on the screen: The IDTV... will not be displayed on first. For more information. Initial Settings When the TV set is operated for UK only). After then, "First time installation" OSD will take about a few minutes. Note: For proper functioning of digital teletext...
... for the language selection appears on for the first time, the menu for more information on this is the first time the TV is displayed in all language options sequentially in analogue AUTO PROGRAM (for the first time, the IDTV turns on the screen: The IDTV... will not be displayed on first. For more information. Initial Settings When the TV set is operated for UK only). After then, "First time installation" OSD will take about a few minutes. Note: For proper functioning of digital teletext...


