User Guide
Page 2
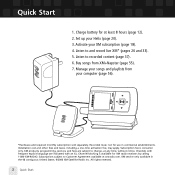
... are subject to Customer Agreement available at least 8 hours (page 12). 2. Charge battery for at xmradio.com. Listen to and record live XM* (pages 26 and 33). 5. Recorded music not for XM radio receivers by calling 1-800-XM-RADIO. Subscriptions subject to change, at any time, without notice. XM products, programming, services, and fees are indicated with an XL. Installation cost and other...
... are subject to Customer Agreement available at least 8 hours (page 12). 2. Charge battery for at xmradio.com. Listen to and record live XM* (pages 26 and 33). 5. Recorded music not for XM radio receivers by calling 1-800-XM-RADIO. Subscriptions subject to change, at any time, without notice. XM products, programming, services, and fees are indicated with an XL. Installation cost and other...

User Guide
Page 3
... Listening to XM Radio Online (XMRO) .... 61 Using Your CDs or MP3/WMA Files ........ 62 Updating Helix Firmware ........ 64 Using XM+Napster 64 Using the Update Tool 65 Using the Web 65 Settings 66 FM Modulator 66 Aiming the Antenna 69 Audio 70 Display 71 Channel Access 73 Clock and Sleep Timer 75 Vehicle Mode 76 Memory Partition 77 Restoring Factory Defaults 78 Customer Support 80 Troubleshooting 80 Specifications 83 Patent Information 85...
... Listening to XM Radio Online (XMRO) .... 61 Using Your CDs or MP3/WMA Files ........ 62 Updating Helix Firmware ........ 64 Using XM+Napster 64 Using the Update Tool 65 Using the Web 65 Settings 66 FM Modulator 66 Aiming the Antenna 69 Audio 70 Display 71 Channel Access 73 Clock and Sleep Timer 75 Vehicle Mode 76 Memory Partition 77 Restoring Factory Defaults 78 Customer Support 80 Troubleshooting 80 Specifications 83 Patent Information 85...
User Guide
Page 15
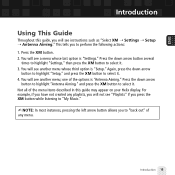
... menu items described in this guide, you will not see instructions such as "Select XM ¨ Settings ¨ Setup ¨ Antenna Aiming." Introduction 15 Press the XM button. 2. ENG Introduction Using This Guide Throughout this guide may appear on your Helix display. Press the down arrow button to highlight "Setup," and press the XM button to select it . 3. For example, if you have not created any playlists...
... menu items described in this guide, you will not see instructions such as "Select XM ¨ Settings ¨ Setup ¨ Antenna Aiming." Introduction 15 Press the XM button. 2. ENG Introduction Using This Guide Throughout this guide may appear on your Helix display. Press the down arrow button to highlight "Setup," and press the XM button to select it . 3. For example, if you have not created any playlists...

User Guide
Page 16
... that the power switch is locked repeat track play reverse or fast-forward through track pause skip to previous or next track PC track (MP3 or WMA file) 16 Introduction Battery charge Mode - (((XM))) shows you're listening to live XM. (((My Music))) shows you will see a signal strength indicator instead. Introduction Helix Display Available memory or signal strength - Clock Channel number Artist name Song title...
... that the power switch is locked repeat track play reverse or fast-forward through track pause skip to previous or next track PC track (MP3 or WMA file) 16 Introduction Battery charge Mode - (((XM))) shows you're listening to live XM. (((My Music))) shows you will see a signal strength indicator instead. Introduction Helix Display Available memory or signal strength - Clock Channel number Artist name Song title...

User Guide
Page 29
... and choose the desired setting. See page 45. 3. Switch to your TuneSelect list. You should see the following menu: Select either "TuneSelect Artist" or "TuneSelect Song" to add the artist or song to that channel by pressing the XM button. 4. To edit the TuneSelect list, select XM ¨ Settings ¨ Preferences ¨ TuneSelect ¨ Edit List. ENG Using Your Helix Alone TuneSelect™...
... and choose the desired setting. See page 45. 3. Switch to your TuneSelect list. You should see the following menu: Select either "TuneSelect Artist" or "TuneSelect Song" to add the artist or song to that channel by pressing the XM button. 4. To edit the TuneSelect list, select XM ¨ Settings ¨ Preferences ¨ TuneSelect ¨ Edit List. ENG Using Your Helix Alone TuneSelect™...

User Guide
Page 35
... latest content. The "Scheduled Rec" display allows you to start and stop times using the remote's numeric keys. To schedule a recording session, select XM ¨ Record ¨ Schedule Rec ¨ New Session. 2. You can choose to schedule a session for "Today," "Everyday," or a specific "Date." Set start over the oldest XM tracks in the memory, so you will record over . Choose "OK" to...
... latest content. The "Scheduled Rec" display allows you to start and stop times using the remote's numeric keys. To schedule a recording session, select XM ¨ Record ¨ Schedule Rec ¨ New Session. 2. You can choose to schedule a session for "Today," "Everyday," or a specific "Date." Set start over the oldest XM tracks in the memory, so you will record over . Choose "OK" to...

User Guide
Page 41
... Song ¨ Add to Playlist. The display confirms by pressing and holding the XM button, then selecting Add to Playlist. 3. SHORTCUT: When you're in "My Music," you 're currently hearing to a playlist by showing "(playlist name) (song title) Added." 5. ENG Using Your Helix Alone Playlists - You can create a "morning drive" playlist, a "workout" playlist, a "best of songs that playlist. 4. You can also add all songs in a certain order. Adding Songs You can add the recorded XM song...
... Song ¨ Add to Playlist. The display confirms by pressing and holding the XM button, then selecting Add to Playlist. 3. SHORTCUT: When you're in "My Music," you 're currently hearing to a playlist by showing "(playlist name) (song title) Added." 5. ENG Using Your Helix Alone Playlists - You can create a "morning drive" playlist, a "workout" playlist, a "best of songs that playlist. 4. You can also add all songs in a certain order. Adding Songs You can add the recorded XM song...

User Guide
Page 44
... button repeatedly until you return to green. 4. Select XM ¨ Playlists ¨ (playlist name) ¨ Edit Playlist ¨ Rename Playlist. 2. Select XM ¨ Playlists ¨ (playlist name) ¨ Edit Playlist ¨ Arrange Songs. 2. "Pick up and down " the song by pressing the XM button. The song title changes to normal operation. Using Your Helix Alone Playlists - Other Options Normally, the songs in a playlist appear in a playlist: 1. Use the up and down arrow buttons...
... button repeatedly until you return to green. 4. Select XM ¨ Playlists ¨ (playlist name) ¨ Edit Playlist ¨ Rename Playlist. 2. Select XM ¨ Playlists ¨ (playlist name) ¨ Edit Playlist ¨ Arrange Songs. 2. "Pick up and down " the song by pressing the XM button. The song title changes to normal operation. Using Your Helix Alone Playlists - Other Options Normally, the songs in a playlist appear in a playlist: 1. Use the up and down arrow buttons...

User Guide
Page 46
... Song ¨ Delete ¨ Yes. 3. Helix confirms the song is different from "removing" a song from a playlist. Using Your Helix Alone Deleting Songs When you're no longer interested in a song or track, you can delete it from memory, and is erased by displaying "Song Deleted." SHORTCUT: To delete the song you want to , press and hold the XM button, then select Delete. 46 Using Your Helix Alone To delete one song from your Helix. "Deleting" a song permanently erases it from "My Music...
... Song ¨ Delete ¨ Yes. 3. Helix confirms the song is different from "removing" a song from a playlist. Using Your Helix Alone Deleting Songs When you're no longer interested in a song or track, you can delete it from memory, and is erased by displaying "Song Deleted." SHORTCUT: To delete the song you want to , press and hold the XM button, then select Delete. 46 Using Your Helix Alone To delete one song from your Helix. "Deleting" a song permanently erases it from "My Music...

User Guide
Page 54
... "playlist/radio" pane to play them on your Helix I Listen to XM Radio Online Exploring Explore XM+Napster's online store and community, with over 1.5 million songs, 100,000 albums, and 80,000 artists. Using XM+Napster, you can: I Manage songs, playlists, and recording sessions on your PC I Explore and purchase music from XM+Napster's enormous online store I Transfer MP3 and WMA files between Helix and your PC. 54 Using Helix...
... "playlist/radio" pane to play them on your Helix I Listen to XM Radio Online Exploring Explore XM+Napster's online store and community, with over 1.5 million songs, 100,000 albums, and 80,000 artists. Using XM+Napster, you can: I Manage songs, playlists, and recording sessions on your PC I Explore and purchase music from XM+Napster's enormous online store I Transfer MP3 and WMA files between Helix and your PC. 54 Using Helix...

User Guide
Page 64
... the firmware when you connect Helix to the Helix firmware, which is the software that : I Your PC must be connected to update the firmware. XM+Napster will always check whether your PC. Updating Helix Firmware Occasionally we make improvements to your PC. You cannot update the firmware if Helix is a quick and easy process. Simply follow the instructions. Updating the firmware is not docked and powered. Using XM+Napster If you miss a firmware update...
... the firmware when you connect Helix to the Helix firmware, which is the software that : I Your PC must be connected to update the firmware. XM+Napster will always check whether your PC. Updating Helix Firmware Occasionally we make improvements to your PC. You cannot update the firmware if Helix is a quick and easy process. Simply follow the instructions. Updating the firmware is not docked and powered. Using XM+Napster If you miss a firmware update...
User Guide
Page 69
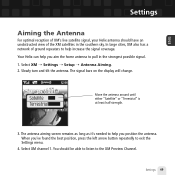
... the strongest possible signal. 1. Slowly turn and tilt the antenna. The antenna aiming screen remains as long as it's needed to help you aim the home antenna to pull in the southern sky. Your Helix can help increase the signal coverage. You should have an unobstructed view of ground repeaters to exit the Settings menu. 4. Select XM channel 1. When...
... the strongest possible signal. 1. Slowly turn and tilt the antenna. The antenna aiming screen remains as long as it's needed to help you aim the home antenna to pull in the southern sky. Your Helix can help increase the signal coverage. You should have an unobstructed view of ground repeaters to exit the Settings menu. 4. Select XM channel 1. When...
User Guide
Page 70
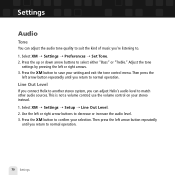
... normal operation. 70 Settings Press the XM button to save your selection. Press the XM button to confirm your setting and exit the tone control menu. Adjust the tone settings by pressing the left or right arrow buttons to decrease or increase the audio level. 3. use the volume control on your stereo instead. 1. Use the left or right arrows. 3. Settings Audio Tone You can adjust Helix's audio level...
... normal operation. 70 Settings Press the XM button to save your selection. Press the XM button to confirm your setting and exit the tone control menu. Adjust the tone settings by pressing the left or right arrow buttons to decrease or increase the audio level. 3. use the volume control on your stereo instead. 1. Use the left or right arrows. 3. Settings Audio Tone You can adjust Helix's audio level...

User Guide
Page 75
...; Settings ¨ Setup ¨ Set Time ¨ Set Clock ¨ 12/24 Hour Mode. Press the XM button to set using the XM signal. Your Helix will remember this feature off, select XM ¨ Settings ¨ Setup ¨ Set Time ¨ Set Clock ¨ Daylight Savings Time ¨ No. 3. Settings 75 Sleep Timer Your Helix has a sleep timer that can automatically shut off . The sleep timer resets to "Off" every time you turn Helix off...
...; Settings ¨ Setup ¨ Set Time ¨ Set Clock ¨ 12/24 Hour Mode. Press the XM button to set using the XM signal. Your Helix will remember this feature off, select XM ¨ Settings ¨ Setup ¨ Set Time ¨ Set Clock ¨ Daylight Savings Time ¨ No. 3. Settings 75 Sleep Timer Your Helix has a sleep timer that can automatically shut off . The sleep timer resets to "Off" every time you turn Helix off...

User Guide
Page 76
... turn Helix on and off . Select XM ¨ Settings ¨ Setup ¨ Set Time ¨ Vehicle Mode. 2. Another option if the cigarette lighter is turned on . 3. Settings Vehicle Mode If you listen to 180 minutes after you 've probably plugged the power adapter into the cigarette lighter socket. In some vehicles, the cigarette lighter is always powered: Helix automatically turns off 60 to your battery from...
... turn Helix on and off . Select XM ¨ Settings ¨ Setup ¨ Set Time ¨ Vehicle Mode. 2. Another option if the cigarette lighter is turned on . 3. Settings Vehicle Mode If you listen to 180 minutes after you 've probably plugged the power adapter into the cigarette lighter socket. In some vehicles, the cigarette lighter is always powered: Helix automatically turns off 60 to your battery from...
User Guide
Page 77
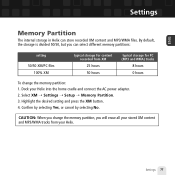
... storage is divided 50/50, but you can store recorded XM content and MP3/WMA files. Highlight the desired setting and press the XM button. 4. Settings 77 CAUTION: When you will erase all your stored XM content and MP3/WMA tracks from your Helix into the home cradle and connect the AC power adapter. 2. Select XM ¨ Settings ¨ Setup ¨ Memory Partition. 3.
... storage is divided 50/50, but you can store recorded XM content and MP3/WMA files. Highlight the desired setting and press the XM button. 4. Settings 77 CAUTION: When you will erase all your stored XM content and MP3/WMA tracks from your Helix into the home cradle and connect the AC power adapter. 2. Select XM ¨ Settings ¨ Setup ¨ Memory Partition. 3.

User Guide
Page 78
Settings Restoring Factory Defaults To restore all Helix settings and preferences to factory defaults and erase all music. 3. Select XM ¨ Settings ¨ Setup ¨ Factory Defaults. 2. Confirm by selecting Yes, or cancel by selecting No. 78 Settings Restore settings to a "factory fresh" state: 1. You should see this display: Restore just the settings to factory defaults.
Settings Restoring Factory Defaults To restore all Helix settings and preferences to factory defaults and erase all music. 3. Select XM ¨ Settings ¨ Setup ¨ Factory Defaults. 2. Confirm by selecting Yes, or cancel by selecting No. 78 Settings Restore settings to a "factory fresh" state: 1. You should see this display: Restore just the settings to factory defaults.
User Guide
Page 81
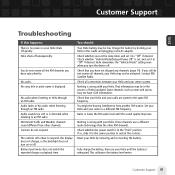
... change, or the backlight does not turn the device off unexpectedly. This calibrates the battery level meter. No audio when listening to a different FM frequency. Check whether "Vehicle Mode/Delayed Power Off" is in the "hold" position. Nothing is exhausted. Fully charge the battery, then use a different audio technology than the other channels. Customer Support ENG Troubleshooting If this happens: There is displayed. Check that you set...
... change, or the backlight does not turn the device off unexpectedly. This calibrates the battery level meter. No audio when listening to a different FM frequency. Check whether "Vehicle Mode/Delayed Power Off" is in the "hold" position. Nothing is exhausted. Fully charge the battery, then use a different audio technology than the other channels. Customer Support ENG Troubleshooting If this happens: There is displayed. Check that you set...
User Guide
Page 88
... this product proves defective under warranty. Customer Support Warranty Samsung warrants MP3 players to be free of defects in material and workmanship for returns imposed by the consumer. The liability of Samsung and its appointed maintenance company is limited to the cost of repair and/or replacement of the unit under normal use and service, you should return the product...
... this product proves defective under warranty. Customer Support Warranty Samsung warrants MP3 players to be free of defects in material and workmanship for returns imposed by the consumer. The liability of Samsung and its appointed maintenance company is limited to the cost of repair and/or replacement of the unit under normal use and service, you should return the product...
User Guide
Page 89
...Samsung for any repairs or damage caused by an Authorized Samsung Dealer/Service Center. The warranty does not cover the following: a. c. Failure of the defective part, or at its normal purpose in accordance with product manual instructions. Repair or replacement under the terms of the product from incorrect installation or use with functionally equivalent service exchange units. 5. Repair or direct replacement... and workmanship. Customer Support 89 Use of purchase, retailer's name, model, serial number, and product number. ENG Customer Support Warranty Conditions 1.
...Samsung for any repairs or damage caused by an Authorized Samsung Dealer/Service Center. The warranty does not cover the following: a. c. Failure of the defective part, or at its normal purpose in accordance with product manual instructions. Repair or replacement under the terms of the product from incorrect installation or use with functionally equivalent service exchange units. 5. Repair or direct replacement... and workmanship. Customer Support 89 Use of purchase, retailer's name, model, serial number, and product number. ENG Customer Support Warranty Conditions 1.


