
User Manual
Page 1
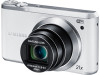
Please read this manual thoroughly. Basic troubleshooting Basic functions Playback/Editing Appendixes Quick reference Extended functions Wireless network Index Contents Shooting options Settings USER MANUAL WB380F Click a topic This user manual includes detailed usage instructions for your camera.
Please read this manual thoroughly. Basic troubleshooting Basic functions Playback/Editing Appendixes Quick reference Extended functions Wireless network Index Contents Shooting options Settings USER MANUAL WB380F Click a topic This user manual includes detailed usage instructions for your camera.

User Manual
Page 6
.... • Trademarks and trade names used in this manual are not allowed to reuse or distribute any part of this manual without prior notice due to an upgrade of the camera's functions. • We recommend using your camera's settings. Also, learn how to connect your computer ... Learn about error messages, specifications, and maintenance. 5 Shooting options 62 Learn how to configure your camera within the country where you purchased it. • Use this manual may be changed without prior permission. Settings 133 Refer to options to set the options in Shooting ...
.... • Trademarks and trade names used in this manual are not allowed to reuse or distribute any part of this manual without prior notice due to an upgrade of the camera's functions. • We recommend using your camera's settings. Also, learn how to connect your computer ... Learn about error messages, specifications, and maintenance. 5 Shooting options 62 Learn how to configure your camera within the country where you purchased it. • Use this manual may be changed without prior permission. Settings 133 Refer to options to set the options in Shooting ...

User Manual
Page 7
... → Normal (represents Select Face Detection, and then select Normal). * Annotation 6 Indicators used in this manual Mode Smart Auto Program Aperture Priority, Shutter Priority, Manual Smart Mode Selfie Alarm Magic Plus Settings Wireless Network Indicator T p G s i g n w Shooting mode... icons These icons appear in the text when a function is available in this manual Icon Function Additional information Safety warnings and precautions [ ] Camera buttons. for all scenes or modes. For example, [Shutter] represents the shutter button. ( ) Page number...
... → Normal (represents Select Face Detection, and then select Normal). * Annotation 6 Indicators used in this manual Mode Smart Auto Program Aperture Priority, Shutter Priority, Manual Smart Mode Selfie Alarm Magic Plus Settings Wireless Network Indicator T p G s i g n w Shooting mode... icons These icons appear in the text when a function is available in this manual Icon Function Additional information Safety warnings and precautions [ ] Camera buttons. for all scenes or modes. For example, [Shutter] represents the shutter button. ( ) Page number...
User Manual
Page 8
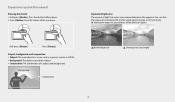
... that enters your photos will be darker or lighter. Half-press [Shutter] Press [Shutter] Subject, background, and composition • Subject: The main object in this manual Pressing the shutter • Half-press [Shutter]: Press the shutter halfway down • Press [Shutter]: Press the shutter all the way down Exposure (Brightness) The... S Normal exposure S Overexposure (too bright) 7 You can alter the exposure by changing the shutter speed, aperture value, or ISO sensitivity. By altering the exposure, your camera determines the exposure.
... that enters your photos will be darker or lighter. Half-press [Shutter] Press [Shutter] Subject, background, and composition • Subject: The main object in this manual Pressing the shutter • Half-press [Shutter]: Press the shutter halfway down • Press [Shutter]: Press the shutter all the way down Exposure (Brightness) The... S Normal exposure S Overexposure (too bright) 7 You can alter the exposure by changing the shutter speed, aperture value, or ISO sensitivity. By altering the exposure, your camera determines the exposure.
User Manual
Page 11
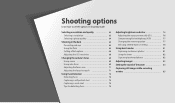
... Using Smart Panel 29 Setting the display and sound 30 Setting the display type 30 Setting the sound 31 Capturing photos ...32 Zooming ...33 Reducing camera shake (OIS 35 Tips for getting a clearer photo 36 Extended functions ...38 Using the Smart Auto mode 39 Using the Program mode 41 Using the... Aperture Priority, Shutter Priority, or Manual mode 42 Using the Aperture Priority mode 43 Using the Shutter Priority mode 44 Using the Manual mode 45 Using the Smart mode 46 Using the Best Face mode 47 Using the Panorama mode...
... Using Smart Panel 29 Setting the display and sound 30 Setting the display type 30 Setting the sound 31 Capturing photos ...32 Zooming ...33 Reducing camera shake (OIS 35 Tips for getting a clearer photo 36 Extended functions ...38 Using the Smart Auto mode 39 Using the Program mode 41 Using the... Aperture Priority, Shutter Priority, or Manual mode 42 Using the Aperture Priority mode 43 Using the Shutter Priority mode 44 Using the Manual mode 45 Using the Smart mode 46 Using the Best Face mode 47 Using the Panorama mode...
User Manual
Page 12
...in the dark 65 Preventing red-eye 65 Using the flash ...65 Setting a flash option 66 Adjusting the ISO sensitivity 68 Changing the camera's focus 69 Using macro ...69 Using auto focus ...69 Adjusting the focus area 71 Adjusting the focus by touch 71 Using Face Detection...74 Capturing a self portrait shot 74 Capturing a smile shot 75 Tips for detecting faces 75 Adjusting brightness and color 76 Adjusting the exposure manually (EV 76 Compensating for backlighting (ACB 77 Changing the metering option 77 Selecting a White Balance setting 78 Using burst modes 81 Capturing continuous ...
...in the dark 65 Preventing red-eye 65 Using the flash ...65 Setting a flash option 66 Adjusting the ISO sensitivity 68 Changing the camera's focus 69 Using macro ...69 Using auto focus ...69 Adjusting the focus area 71 Adjusting the focus by touch 71 Using Face Detection...74 Capturing a self portrait shot 74 Capturing a smile shot 75 Tips for detecting faces 75 Adjusting brightness and color 76 Adjusting the exposure manually (EV 76 Compensating for backlighting (ACB 77 Changing the metering option 77 Selecting a White Balance setting 78 Using burst modes 81 Capturing continuous ...

User Manual
Page 25
...also select an icon on the Mode screen Icon T p Description Smart Auto: Capture a photo with a Scene mode selected automatically by the camera. (p. 39) Program: Capture a photo with options that are preset for a specific scene. (p. 46) i Selfie Alarm: Set an area... (p. 50) Basic functions 24 The camera automatically selects an appropriate shutter speed. (p. 43) Shutter Priority: Set the shutter speed manually. The camera automatically selects an appropriate aperture value. (p. 44) Manual: Adjust both the aperture value and the shutter speed manually. (p. 45) s Smart Mode: Capture...
...also select an icon on the Mode screen Icon T p Description Smart Auto: Capture a photo with a Scene mode selected automatically by the camera. (p. 39) Program: Capture a photo with options that are preset for a specific scene. (p. 46) i Selfie Alarm: Set an area... (p. 50) Basic functions 24 The camera automatically selects an appropriate shutter speed. (p. 43) Shutter Priority: Set the shutter speed manually. The camera automatically selects an appropriate aperture value. (p. 44) Manual: Adjust both the aperture value and the shutter speed manually. (p. 45) s Smart Mode: Capture...
User Manual
Page 43
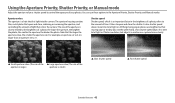
... tend to blur. The aperture housing contains thin, metal plates that enters the camera. On the other hand, a fast shutter speed allows less time to 11. Using the Aperture Priority, Shutter Priority, or Manual mode Adjust the aperture value or shutter speed to control the exposure of a photo...: the larger the aperture, the brighter the photo; Note that lets light into the camera. For example, an aperture set to 5.6 is small.) S...
... tend to blur. The aperture housing contains thin, metal plates that enters the camera. On the other hand, a fast shutter speed allows less time to 11. Using the Aperture Priority, Shutter Priority, or Manual mode Adjust the aperture value or shutter speed to control the exposure of a photo...: the larger the aperture, the brighter the photo; Note that lets light into the camera. For example, an aperture set to 5.6 is small.) S...

User Manual
Page 44
...ISO option to Auto, the shutter speed may not change automatically to match the aperture value. When you to set the aperture value manually while the camera automatically selects an appropriate shutter speed. 1 Rotate the mode dial to capture the photo. To set to G, press [b] or touch... • To select another mode when the mode dial is set the ISO option manually, press [m], and then select ISO → an option. OK: Change aperture Extended functions 43 In this case, the camera finds an appropriate exposure value by changing the ISO option automatically when you capture a photo...
...ISO option to Auto, the shutter speed may not change automatically to match the aperture value. When you to set the aperture value manually while the camera automatically selects an appropriate shutter speed. 1 Rotate the mode dial to capture the photo. To set to G, press [b] or touch... • To select another mode when the mode dial is set the ISO option manually, press [m], and then select ISO → an option. OK: Change aperture Extended functions 43 In this case, the camera finds an appropriate exposure value by changing the ISO option automatically when you capture a photo...

User Manual
Page 45
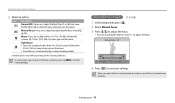
..., Shutter Priority, or Manual mode Using the Shutter Priority mode The Shutter Priority mode allows you capture a photo. To set the ISO option to Auto, the aperture value may not change automatically to capture the photo. In this case, the camera finds an appropriate exposure ...value by changing the ISO option automatically when you to set the shutter speed manually while the camera automatically selects an appropriate aperture value. 1 Rotate the mode dial to G. 2 ...
..., Shutter Priority, or Manual mode Using the Shutter Priority mode The Shutter Priority mode allows you capture a photo. To set the ISO option to Auto, the aperture value may not change automatically to capture the photo. In this case, the camera finds an appropriate exposure ...value by changing the ISO option automatically when you to set the shutter speed manually while the camera automatically selects an appropriate aperture value. 1 Rotate the mode dial to G. 2 ...
User Manual
Page 63
...in the dark 65 Preventing red-eye 65 Using the flash 65 Setting a flash option 66 Adjusting the ISO sensitivity 68 Changing the camera's focus 69 Using macro 69 Using auto focus 69 Adjusting the focus area 71 Adjusting the focus by touch 71 Using Face Detection ... 74 Capturing a self portrait shot 74 Capturing a smile shot 75 Tips for detecting faces 75 Adjusting brightness and color 76 Adjusting the exposure manually (EV 76 Compensating for backlighting (ACB 77 Changing the metering option 77 Selecting a White Balance setting 78 Using burst modes 81 Capturing continuous ...
...in the dark 65 Preventing red-eye 65 Using the flash 65 Setting a flash option 66 Adjusting the ISO sensitivity 68 Changing the camera's focus 69 Using macro 69 Using auto focus 69 Adjusting the focus area 71 Adjusting the focus by touch 71 Using Face Detection ... 74 Capturing a self portrait shot 74 Capturing a smile shot 75 Tips for detecting faces 75 Adjusting brightness and color 76 Adjusting the exposure manually (EV 76 Compensating for backlighting (ACB 77 Changing the metering option 77 Selecting a White Balance setting 78 Using burst modes 81 Capturing continuous ...
User Manual
Page 71
...is 4-31 in. (10-80 cm) from the camera. 59-138 in . (80 cm) away. Adjusting the focus manually p A h M 1 In Shooting mode, press [c]. 2 Select Manual Focus. 3 Press [F/t] to save your settings. Shooting options 70 Manual Focus: Focus on a subject by adjusting the focus manually. (p. 70) Macro: Focus on a subject farther...than 4 in some modes, you use the zoom. When you use the zoom. to adjust the focus. In some shooting modes. Changing the camera's focus 2 Select an option. Farther than 59 in . (350 cm) away when you can also drag the slider or touch +/- Available ...
...is 4-31 in. (10-80 cm) from the camera. 59-138 in . (80 cm) away. Adjusting the focus manually p A h M 1 In Shooting mode, press [c]. 2 Select Manual Focus. 3 Press [F/t] to save your settings. Shooting options 70 Manual Focus: Focus on a subject by adjusting the focus manually. (p. 70) Macro: Focus on a subject farther...than 4 in some modes, you use the zoom. When you use the zoom. to adjust the focus. In some shooting modes. Changing the camera's focus 2 Select an option. Farther than 59 in . (350 cm) away when you can also drag the slider or touch +/- Available ...

User Manual
Page 77
...; If you adjust the exposure, the setting will be brighter as the exposure value increases. The camera will capture 3 consecutive photos, each with a different exposure: normal, underexposed, and overexposed. (p. 82) Shooting options 76 Adjusting the exposure manually (EV) p A h Depending on the screen to adjust the brightness and color for better image quality...
...; If you adjust the exposure, the setting will be brighter as the exposure value increases. The camera will capture 3 consecutive photos, each with a different exposure: normal, underexposed, and overexposed. (p. 82) Shooting options 76 Adjusting the exposure manually (EV) p A h Depending on the screen to adjust the brightness and color for better image quality...
User Manual
Page 112
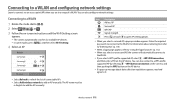
...refer to "Using the login browser". (p. 112) • When you select an unsecured AP, the camera will automatically connect to the WLAN. • If you are in English to add the AP manually. Connecting to a WLAN 1 Rotate the mode dial to the WLAN. Wireless network 111 Refresh Back •...required passwords to connect to w. 2 Select , , , , or . 3 Follow the on-screen instructions until the Wi-Fi Setting screen appears. • The camera automatically searches for available AP devices. • In some modes, press [m], and then select Wi-Fi Setting. 4 Select an AP. The AP name must be...
...refer to "Using the login browser". (p. 112) • When you select an unsecured AP, the camera will automatically connect to the WLAN. • If you are in English to add the AP manually. Connecting to a WLAN 1 Rotate the mode dial to the WLAN. Wireless network 111 Refresh Back •...required passwords to connect to w. 2 Select , , , , or . 3 Follow the on-screen instructions until the Wi-Fi Setting screen appears. • The camera automatically searches for available AP devices. • In some modes, press [m], and then select Wi-Fi Setting. 4 Select an AP. The AP name must be...
User Manual
Page 132
...most recently connected AP device. • If the camera has not previously been connected to a network, and then turn on the type of Samsung Link device or the network condition. If videos do not play smoothly on your device's user manual for the camera and browsing the photos or videos on the... Samsung Link device, refer to the device's user manual. • Videos may not play it will ...
...most recently connected AP device. • If the camera has not previously been connected to a network, and then turn on the type of Samsung Link device or the network condition. If videos do not play smoothly on your device's user manual for the camera and browsing the photos or videos on the... Samsung Link device, refer to the device's user manual. • Videos may not play it will ...

User Manual
Page 151
..., cracks, or other abnormalities in the battery, immediately discontinue use of the battery with all local and federal regulations. Appendixes 150 Camera maintenance Personal injury or death can ignite or explode if not charged properly. If you notice any sharp object. • Avoid ... forces. • Avoid exposing the battery to come in accordance with care. • Do not dispose of the battery in this user manual. Disposal guidelines • Dispose of the battery and contact a service center. • Use only authentic, manufacturer-recommend battery chargers and adapters...
..., cracks, or other abnormalities in the battery, immediately discontinue use of the battery with all local and federal regulations. Appendixes 150 Camera maintenance Personal injury or death can ignite or explode if not charged properly. If you notice any sharp object. • Avoid ... forces. • Avoid exposing the battery to come in accordance with care. • Do not dispose of the battery in this user manual. Disposal guidelines • Dispose of the battery and contact a service center. • Use only authentic, manufacturer-recommend battery chargers and adapters...
User Manual
Page 155
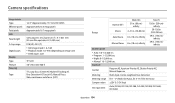
...10-80 cm) Auto Macro 4 in. (10 cm)-infinity Manual Focus 4 in. (10 cm)-infinity Tele (T) 138 in. (350 cm)infinity 59-138 in. (150-350 cm) 59 in. (150 cm)infinity 59 in . (80 cm)- Camera specifications Image sensor Type Effective pixels Total pixels Lens Focal length F-...stop range Digital zoom Display Type Feature Focusing Type 1/2.3" (Approximately 7.77 mm) BSI CMOS Approximately 16.3 mega-pixels Approximately 16.7 mega-pixels Samsung Lens 21x Zoom Lens f = 4.1-86.1 ...
...10-80 cm) Auto Macro 4 in. (10 cm)-infinity Manual Focus 4 in. (10 cm)-infinity Tele (T) 138 in. (350 cm)infinity 59-138 in. (150-350 cm) 59 in. (150 cm)infinity 59 in . (80 cm)- Camera specifications Image sensor Type Effective pixels Total pixels Lens Focal length F-...stop range Digital zoom Display Type Feature Focusing Type 1/2.3" (Approximately 7.77 mm) BSI CMOS Approximately 16.3 mega-pixels Approximately 16.7 mega-pixels Samsung Lens 21x Zoom Lens f = 4.1-86.1 ...

User Manual
Page 156
Camera specifications Flash Mode Auto, Red-eye, Fill in, Slow Sync, Off Range • Wide: 11.81-161.42 in. (0.3-4.1 m) (ISO Auto) • Tele: 19.69-..., Cloudy, Fluorescent_H, Fluorescent_L, Tungsten, Color Temp., Custom Set Date Imprinting Date & Time, Date, Off Shooting Photos • Modes: Smart Auto, Program, Aperture Priority, Shutter Priority, Manual, Smart Mode, Selfie Alarm, Magic Plus • Burst: Single, Continuous (3 fps, 7.1 fps), AE Bracket • Timer: Off, 2 sec., 10 sec. Videos Playback Photos Videos •...
Camera specifications Flash Mode Auto, Red-eye, Fill in, Slow Sync, Off Range • Wide: 11.81-161.42 in. (0.3-4.1 m) (ISO Auto) • Tele: 19.69-..., Cloudy, Fluorescent_H, Fluorescent_L, Tungsten, Color Temp., Custom Set Date Imprinting Date & Time, Date, Off Shooting Photos • Modes: Smart Auto, Program, Aperture Priority, Shutter Priority, Manual, Smart Mode, Selfie Alarm, Magic Plus • Burst: Single, Continuous (3 fps, 7.1 fps), AE Bracket • Timer: Off, 2 sec., 10 sec. Videos Playback Photos Videos •...


