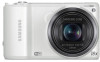
User Manual Ver.1.0 (English)
Page 6
Extended functions 42 Learn how to play back photos or videos, and edit photos. Settings 131 Refer to options to all laws and regulations concerning its use functions. Outline of the User Manual Basic functions 19 ... trademarks of the Wi-Fi Alliance. • Trademarks and trade names used in Shooting mode. Playback/Editing 87 Learn how to capture a photo and record a video by selecting a mode. Appendixes 137 Get information about your camera's settings. Shooting options 63 Learn how to an upgrade of the camera's functions. • We...
Extended functions 42 Learn how to play back photos or videos, and edit photos. Settings 131 Refer to options to all laws and regulations concerning its use functions. Outline of the User Manual Basic functions 19 ... trademarks of the Wi-Fi Alliance. • Trademarks and trade names used in Shooting mode. Playback/Editing 87 Learn how to capture a photo and record a video by selecting a mode. Appendixes 137 Get information about your camera's settings. Shooting options 63 Learn how to an upgrade of the camera's functions. • We...
User Manual Ver.1.0 (English)
Page 15
... > Motion Photo f 57 • g mode > Photo Filter f 58 • Image Adjust (to adjust Sharpness, Contrast, or Saturation) f 85 Applying effects to videos • g mode > Movie Filter f 59 Reducing camera shake • Optical Image Stabilization (OIS) f 39 • Viewing files as thumbnails f 90 • ...• Viewing files on a TV f 101 • Connecting your camera to a computer f 102 • Sending photos or videos via email f 124 • Using photo or video sharing websites f 125 • Adjusting sound and volume f 133 • Adjusting the brightness of the display f 134 •...
... > Motion Photo f 57 • g mode > Photo Filter f 58 • Image Adjust (to adjust Sharpness, Contrast, or Saturation) f 85 Applying effects to videos • g mode > Movie Filter f 59 Reducing camera shake • Optical Image Stabilization (OIS) f 39 • Viewing files as thumbnails f 90 • ...• Viewing files on a TV f 101 • Connecting your camera to a computer f 102 • Sending photos or videos via email f 124 • Using photo or video sharing websites f 125 • Adjusting sound and volume f 133 • Adjusting the brightness of the display f 134 •...
User Manual Ver.1.0 (English)
Page 16
... Using the Split Shot mode 56 Using the Motion Photo mode 57 Using the Photo Filter mode 58 Using the Movie Filter mode 59 Recording a video ...60 Recording a video with the Smart Scene Detection function 61 15
... Using the Split Shot mode 56 Using the Motion Photo mode 57 Using the Photo Filter mode 58 Using the Movie Filter mode 59 Recording a video ...60 Recording a video with the Smart Scene Detection function 61 15

User Manual Ver.1.0 (English)
Page 18
... a WLAN 112 Using the login browser 113 Network connection tips 114 Entering text ...115 Saving files to a smart phone automatically 116 Sending photos or videos to a smart phone 117 Using a smart phone as a remote shutter release 118 Using Auto Backup to send photos or... Auto Backup on your PC 120 Sending photos or videos to a PC 120 Sending photos or videos via email 122 Changing email settings 122 Sending photos or videos via email 124 Using photo or video sharing websites 125 Accessing a website 125 Uploading photos or videos 125 Using AllShare Play to send files 127 Uploading...
... a WLAN 112 Using the login browser 113 Network connection tips 114 Entering text ...115 Saving files to a smart phone automatically 116 Sending photos or videos to a smart phone 117 Using a smart phone as a remote shutter release 118 Using Auto Backup to send photos or... Auto Backup on your PC 120 Sending photos or videos to a PC 120 Sending photos or videos via email 122 Changing email settings 122 Sending photos or videos via email 124 Using photo or video sharing websites 125 Accessing a website 125 Uploading photos or videos 125 Using AllShare Play to send files 127 Uploading...

User Manual Ver.1.0 (English)
Page 23
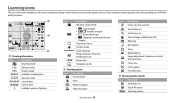
Camera layout DIRECT LINK button Start a preset Wi-Fi function Status lamp • Blinking: When the camera is saving a photo or video, being read by a computer, when the image is out of focus, there is a problem charging the battery, or when the camera is connecting to WLAN ...
Camera layout DIRECT LINK button Start a preset Wi-Fi function Status lamp • Blinking: When the camera is saving a photo or video, being read by a computer, when the image is out of focus, there is a problem charging the battery, or when the camera is connecting to WLAN ...

User Manual Ver.1.0 (English)
Page 24
Go back. Confirm the highlighted option or menu. Camera layout Buttons Button Description Start recording a video. Change the macro option. Other functions Move up Move down Move left Move right Using the DIRECT LINK button You can select a Wi-Fi function ...
Go back. Confirm the highlighted option or menu. Camera layout Buttons Button Description Start recording a video. Change the macro option. Other functions Move up Move down Move left Move right Using the DIRECT LINK button You can select a Wi-Fi function ...
User Manual Ver.1.0 (English)
Page 29
... Camera shake Zoom indicator Photo resolution when the Intelli zoom is on Zoom ratio Histogram (p. 34) 2 Shooting option Icon Description ISO sensitivity Flash Photo resolution Video resolution Icon Description Frame rate (per second) Sound Alive on Intelli zoom on the screen change according to the mode you select or the options...
... Camera shake Zoom indicator Photo resolution when the Intelli zoom is on Zoom ratio Histogram (p. 34) 2 Shooting option Icon Description ISO sensitivity Flash Photo resolution Video resolution Icon Description Frame rate (per second) Sound Alive on Intelli zoom on the screen change according to the mode you select or the options...

User Manual Ver.1.0 (English)
Page 31
... to be animated to create a GIF animation. (p. 57) Photo Filter: Capture a photo with various filter effects. (p. 58) Movie Filter: Record a video with various filter effects. (p. 59) Photo Editor: Edit photos with various effects. (p. 97) Settings: Adjust settings to match your preferences. (p. 131)... Icon Description w MobileLink: Send photos or videos to a smart phone. (p. 117) Remote Viewfinder: Use a smart phone as a remote shutter release and see a preview on your smart phone ...
... to be animated to create a GIF animation. (p. 57) Photo Filter: Capture a photo with various filter effects. (p. 58) Movie Filter: Record a video with various filter effects. (p. 59) Photo Editor: Edit photos with various effects. (p. 97) Settings: Adjust settings to match your preferences. (p. 131)... Icon Description w MobileLink: Send photos or videos to a smart phone. (p. 117) Remote Viewfinder: Use a smart phone as a remote shutter release and see a preview on your smart phone ...

User Manual Ver.1.0 (English)
Page 43
Extended functions Learn how to capture a photo and record a video by selecting a mode. Using the Smart Auto mode 43 Using the Program mode 45 Using the Aperture Priority, Shutter Priority, or Manual mode 46 Using ... Using the Split Shot mode 56 Using the Motion Photo mode 57 Using the Photo Filter mode 58 Using the Movie Filter mode 59 Recording a video 60 Recording a video with the Smart Scene Detection function 61
Extended functions Learn how to capture a photo and record a video by selecting a mode. Using the Smart Auto mode 43 Using the Program mode 45 Using the Aperture Priority, Shutter Priority, or Manual mode 46 Using ... Using the Split Shot mode 56 Using the Motion Photo mode 57 Using the Photo Filter mode 58 Using the Movie Filter mode 59 Recording a video 60 Recording a video with the Smart Scene Detection function 61

User Manual Ver.1.0 (English)
Page 55
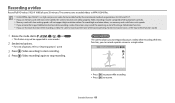
You cannot select a video file, GIF file, or a photo captured in Panorama mode. 4 Touch Use. • To recapture a background photo, touch Retake. 5 Select a frame. • To draw a new frame ...
You cannot select a video file, GIF file, or a photo captured in Panorama mode. 4 Touch Use. • To recapture a background photo, touch Retake. 5 Select a frame. • To draw a new frame ...

User Manual Ver.1.0 (English)
Page 60
...tone effect. Apply a black and white effect. Option Description Miniature Apply a tilt-shift effect to make the subject appear in the video. • Depending on the option you cannot record sound in miniature. Vignetting Apply the retro-looking colors, high contrast, and strong... vignette effect of a fisheye lens. Create a cold and monotone effect. 4 Press 5 Press (Video recording) to start recording. (Video recording) again to stop recording. • If you select Miniature, playback speed will increase. • If you select Miniature, ...
...tone effect. Apply a black and white effect. Option Description Miniature Apply a tilt-shift effect to make the subject appear in the video. • Depending on the option you cannot record sound in miniature. Vignetting Apply the retro-looking colors, high contrast, and strong... vignette effect of a fisheye lens. Create a cold and monotone effect. 4 Press 5 Press (Video recording) to start recording. (Video recording) again to stop recording. • If you select Miniature, playback speed will increase. • If you select Miniature, ...
User Manual Ver.1.0 (English)
Page 61
.... 2 Set desired options. • For a list of options, refer to "Shooting options". (p. 63) 3 Press (Video recording) to start recording. 4 Press (Video recording) again to temporarily pause a video while recording. Pause recording The camera allows you use the Sound Alive function. (p. 86) 1 Rotate the mode dial to ...; If you can record separate scenes as MP4 (H.264) files. • H.264 (MPEG-4 part10/AVC) is a high-compression video format established by the international standards organizations ISO-IEC and ITU-T. • If you to stop recording. With this function, you use...
.... 2 Set desired options. • For a list of options, refer to "Shooting options". (p. 63) 3 Press (Video recording) to start recording. 4 Press (Video recording) again to temporarily pause a video while recording. Pause recording The camera allows you use the Sound Alive function. (p. 86) 1 Rotate the mode dial to ...; If you can record separate scenes as MP4 (H.264) files. • H.264 (MPEG-4 part10/AVC) is a high-compression video format established by the international standards organizations ISO-IEC and ITU-T. • If you to stop recording. With this function, you use...

User Manual Ver.1.0 (English)
Page 62
...T. 2 Set the desired options. • For a list of options, refer to 6 photos). Recording a video Capturing still images while recording a video You can capture still images while recording a video without switching to the photo shooting modes (up to "Shooting options". (p. 63) 3 Align your camera automatically... the appropriate camera settings based on the size of the recorded video. • You cannot capture still images when you pause the video recording. • The quality of images captured while recording a video may be lower than those captured normally. • This feature...
...T. 2 Set the desired options. • For a list of options, refer to 6 photos). Recording a video Capturing still images while recording a video You can capture still images while recording a video without switching to the photo shooting modes (up to "Shooting options". (p. 63) 3 Align your camera automatically... the appropriate camera settings based on the size of the recorded video. • You cannot capture still images when you pause the video recording. • The quality of images captured while recording a video may be lower than those captured normally. • This feature...

User Manual Ver.1.0 (English)
Page 63
Recording a video Icon Description Landscapes Sunsets Blue skies Forested areas 4 Press 5 Press (Video recording) to start recording. (Video recording) again to stop recording. • If the camera does not recognize an appropriate scene mode, it uses the default settings for the Smart Scene Detection mode. • The camera may not select the correct scene depending on the shooting conditions, such as camera shake, lighting, and distance to the subject. Extended functions 62
Recording a video Icon Description Landscapes Sunsets Blue skies Forested areas 4 Press 5 Press (Video recording) to start recording. (Video recording) again to stop recording. • If the camera does not recognize an appropriate scene mode, it uses the default settings for the Smart Scene Detection mode. • The camera may not select the correct scene depending on the shooting conditions, such as camera shake, lighting, and distance to the subject. Extended functions 62

User Manual Ver.1.0 (English)
Page 65
.... 1280 X 720: HD files to play back on an HDTV. 640 X 480: SD files to play back on a web page. Shooting options 64 Setting the video resolution 1 In Shooting mode, press [m]. 2 Select Movie Size. 3 Select an option. When you increase the resolution, your photo or... video will also increase. For Sharing: Post on a larger screen. Selecting a resolution T p A h M s i g As you use a high resolution, the file size will include more pixels, so it ...
.... 1280 X 720: HD files to play back on an HDTV. 640 X 480: SD files to play back on a web page. Shooting options 64 Setting the video resolution 1 In Shooting mode, press [m]. 2 Select Movie Size. 3 Select an option. When you increase the resolution, your photo or... video will also increase. For Sharing: Post on a larger screen. Selecting a resolution T p A h M s i g As you use a high resolution, the file size will include more pixels, so it ...

User Manual Ver.1.0 (English)
Page 87
.... Sound Alive Off: Turn off the Sound Alive function. The camera can record the sound of the zoom T p A h M s i g When you use the zoom while recording videos, the camera can record the zoom noise. Mute: Do not record sounds. • Do not block the microphone when you use the Sound Alive function...
.... Sound Alive Off: Turn off the Sound Alive function. The camera can record the sound of the zoom T p A h M s i g When you use the zoom while recording videos, the camera can record the zoom noise. Mute: Do not record sounds. • Do not block the microphone when you use the Sound Alive function...

User Manual Ver.1.0 (English)
Page 88
Also, learn how to connect your camera to play back photos or videos, and edit photos. Playback/Editing Learn how to your computer or TV. Viewing photos or videos in Playback mode ... 88 Starting Playback mode 88 Viewing photos 93 Playing a video 95 Editing a photo 97 Resizing photos 97 Rotating a photo 97 Cropping a photo...
Also, learn how to connect your camera to play back photos or videos, and edit photos. Playback/Editing Learn how to your computer or TV. Viewing photos or videos in Playback mode ... 88 Starting Playback mode 88 Viewing photos 93 Playing a video 95 Editing a photo 97 Resizing photos 97 Rotating a photo 97 Cropping a photo...

User Manual Ver.1.0 (English)
Page 89
... file information on and display the most recent file will turn on the screen, press [D]. Playback/Editing 88 Starting Playback mode View photos or play videos stored in your camera. 1 Press [P]. • The most recent file. 2 Press [F/t] to scroll through files. • You can also drag the ...play back files that were captured with other devices. Viewing photos or videos in Playback mode Learn how to play back photos or videos and how to edit or play back these files. • Photos or videos captured in portrait orientation do not rotate automatically and are displayed in ...
... file information on and display the most recent file will turn on the screen, press [D]. Playback/Editing 88 Starting Playback mode View photos or play videos stored in your camera. 1 Press [P]. • The most recent file. 2 Press [F/t] to scroll through files. • You can also drag the ...play back files that were captured with other devices. Viewing photos or videos in Playback mode Learn how to play back photos or videos and how to edit or play back these files. • Photos or videos captured in portrait orientation do not rotate automatically and are displayed in ...

User Manual Ver.1.0 (English)
Page 90
... [F/t] or drag the image left to return to a desired folder. • The camera will automatically play back photos in Playback mode Video file information File Information Icon Description Current file/Total files Folder name-File name Video file Protected file Play videos To display file information on the screen, press [D]. Viewing photos or...
... [F/t] or drag the image left to return to a desired folder. • The camera will automatically play back photos in Playback mode Video file information File Information Icon Description Current file/Total files Folder name-File name Video file Protected file Play videos To display file information on the screen, press [D]. Viewing photos or...

User Manual Ver.1.0 (English)
Page 91
Date: View files by the file type. Viewing photos or videos in full screen view. File Type: View files by the date they were saved. Rotate [Zoom] to the left once more to display more thumbnails (...
Date: View files by the file type. Viewing photos or videos in full screen view. File Type: View files by the date they were saved. Rotate [Zoom] to the left once more to display more thumbnails (...


