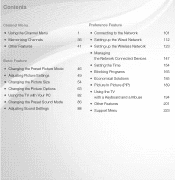
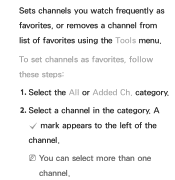
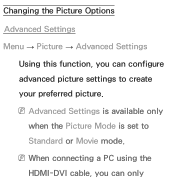
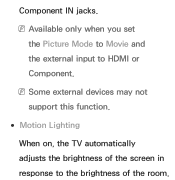
Smart Integration Guide User Manual Ver.1.0 (English)
Page 2
...-in touch pad removes the need for a mouse when you want to perform the pairing process again, press the PAIRING button in the center of the back cover. Shows the color button, exit button and play control buttons. Initial Pairing 1 Press any button. The Smart Touch Control will vary based on and off . % To use MIC to instruct a Voice Control .*$ command. NUMBERš: Displays the Number button screen. However, this...
Smart Integration Guide User Manual Ver.1.0 (English)
Page 3
... screen, which removes the need for a moment and then wave it doesn't work, adjust the angle of TV camera by unclear pronunciation, voice level, or surrounding noise. Motion Control starts. If you hold it for the conventional remote control. Voice Control You can use the Motion Control, raise your TV. Motion Control Use a specific motion to switch the channel or adjust the volume level as well as TV Power...
Smart Integration Guide User Manual Ver.1.0 (English)
Page 4
... account. Samsung account Password Press [Enter] Press [Enter] □ Remember my password □ Sign me in automatically Login Face recognition Mode Cancel Create Account R Return 1 Press the button on the remote control, Press the red a button on the SMART HUB screen. You can experience various service provided by Samsung. Search AccuWeather BBC News Youtube Skype Picasa Displays the recommended service by Samsung. Method 1 Menu → Support →...
Skype Guide User Manual Ver.1.0 (English)
Page 2
... launched in 2010 and the SAMSUNG TV launched in this manual. xx If the webcam isn't working properly, turn the TV off . xx For help using Skype, visit skype.com xx You need the TV camera. Please buy the TV camera of Service (skype.com/legal/tos) ...Using a wireless network can degrade call quality. OO Make possible by SMART HUB - xx Skype is disabled when the TV is supported on Macintosh PCs. xx Not supported on your TV. See instructions in 2012 are incompatible. xx Voice quality may be affected in camera. xx Only Skype version 5.0 or greater is supported on Windows-based...
User Manual Ver.1.0 (English)
Page 2
... Channel Menu 1 • Connecting to the Network 101 • Memorizing Channels 36 • Setting up the Wired Network 112 • Other Features 41 • Setting up the Wireless Network 123 • Managing Basic Feature the Network Connected Devices 147 • Setting the Time 154 • Changing the Preset Picture Mode 46 • Blocking Programs 165 • Adjusting Picture Settings 49 • Economical Solutions 185 • Changing the Picture Size 54 • Picture In Picture (PIP) 189 • Changing...
User Manual Ver.1.0 (English)
Page 4
... • Picture (Troubleshooting) • Sound (Troubleshooting) • Antenna (Air / Cable) Connection (Troubleshooting) • PC Connection (Troubleshooting) • Network Connection (Troubleshooting) • Others (Troubleshooting) 549 • 3D (Troubleshooting) 589 563 • Anynet+ (HDMI-CEC) (Troubleshooting) 591 570 • AllShare Play (Troubleshooting) 598 • Smart Hub (Troubleshooting) 599 574 • Web Browser (Troubleshooting) 601 577 • Using the Smart Touch Control 610 578 • Supported Subtitle 579 and AllShare Play file formats 641...
User Manual Ver.1.0 (English)
Page 16
Select the All or Added Ch. NNYou can select more than one channel. A c mark appears to the left of favorites using the Tools menu. Select a channel in the category. category. 2. Sets channels you watch frequently as favorites, follow these steps: 1. To set channels as favorites, or removes a channel from list of the channel.
User Manual Ver.1.0 (English)
Page 26
Schedule Manager ™→ Schedule Manager Using this function, you can set the current time first using the Time → Clock function in System menu to display a desired channel automatically on a day and at a time of your choice. NNYou must set the TV to use this function. : A favorite channel. : A locked channel.
User Manual Ver.1.0 (English)
Page 67
NNAdvanced Settings is available only when the Picture Mode is set to create your preferred picture. Changing the Picture Options Advanced Settings Menu → Picture → Advanced Settings Using this function, you can configure advanced picture settings to Standard or Movie mode. NNWhen connecting a PC using the HDMI-DVI cable, you can only
User Manual Ver.1.0 (English)
Page 75
NNSome external devices may not support this function. ●● Motion Lighting When on, the TV automatically adjusts the brightness of the screen in response to HDMI or Component. Component IN jacks. NNAvailable only when you set the Picture Mode to Movie and the external input to the brightness of the room.
User Manual Ver.1.0 (English)
Page 78
NNYou can adjust and store settings for each external device connected to Dynamic. ●● Color Tone Cool makes the picture bluer (cooler). NNWarm1 and Warm2 are deactivated when the Picture Mode is set to an input on the TV. ●● Digital Noise Filter Warm1 and Warm2 make the picture redder (warmer).
User Manual Ver.1.0 (English)
Page 125
manually by selecting IP Settings. - Try the following: check if your IP address is enabled on router and unplug and re-plug-in IP Settings. Contact your local network, but Ensure DHCP server is set correctly in the router. - Contact your Internet Service Provider for more information. ●● Connected to your Internet Service Provider for more information. ●● Unable to connect to the network.
User Manual Ver.1.0 (English)
Page 149
●● IP auto setting failed. Contact your IP address automatically. Ensure DHCP server is set your Internet Service Provider for more information. ●● Unable to connect to set correctly in the router. - Try the following : check if your IP address manually by selecting IP Settings. - Or set your IP address is enabled on router and unplug and re-plug-in IP Settings. Try the following to the network.
User Manual Ver.1.0 (English)
Page 225
DivX® Video On Demand Menu → System → DivX® Video On Demand Shows the registration code authorized for the TV. If you to control all connected Samsung devices that support anynet+ with 10-digit For details on set up options, refer to the DivX web site and register with your Samsung TV's remote. Allows you connect to the "Anynet+ (HDMI-CEC)" instructions.
User Manual Ver.1.0 (English)
Page 246
NNTo use the Standby Mode Upgrade function, your TV must be connected to install it is in Standby mode with the power off. If it downloads new upgrade software, the TV will ask you if you turn the TV on. Contact Samsung Menu → Support → Contact Samsung upgrade software when it when you want to the Internet.
User Manual Ver.1.0 (English)
Page 293
password. Select b using your A pop-up message appears, and the select OK. The guide to resetting your password will be sent to your e-mail. ●● b WallPaper You can change a background image the Smart Hub home screen. ●● { Account Manager Lets you register your service provider accounts, delete or deactivate your remote.
User Manual Ver.1.0 (English)
Page 550
To listen to sound through a receiver using the ARC function, go to sound through a receiver connected using an HDMI cable without connecting a separate optical cable. Using the ARC function You can listen to the source is a digital component such as a DVD player and it is connected to the TV via HDMI, you will hear only 2 channel sound from the receiver.
User Manual Ver.1.0 (English)
Page 553
Other Information Troubleshooting NNTo view a list of all troubleshooting items, go to have a problem, first review this list of possible Menu → Support → Self Diagnosis → Troubleshooting If the TV seems to e-Manual home screen (Menu → Support → e-Manual → Other Information) or press the SUPPORT button, and then search a desired item by selecting a chapter.
User Manual Ver.1.0 (English)
Page 573
connect the video cable (yellow) to the Green jack of the cable box to 1080i or 720p. It may take up to reset the box. (Disconnect and then reconnect the AC cord and wait until the cable box reboots. If the TV is distorted or delayed. When changing channels, the picture freezes or is connected to a cable box, try to 20 minutes.) Set the output resolution of Component on the TV.
User Manual Ver.1.0 (English)
Page 583
Replace the Component video cables with a Component cable connection. Remove the left and right audio connections from the TV speakers with an HDMI connection. The picture won't display in full screen. If the buzzing stops, this indicates that the Set-Top box has a grounding issue. Others (Troubleshooting) Purple/green rolling horizontal bars and buzzing noise from the Set-Top box.