User Manual (ENGLISH)
Page 8
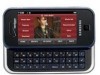
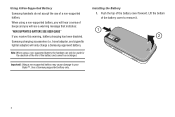
...supported battery, you will hear a series of a non-supported battery. Installing the Battery 1. Push the top of the battery cover to your Glyde™. travel adapter, and cigarette lighter adapter) will see a warning message that indicates: "NON SUPPORTED BATTERY. Lift the bottom ...of the battery cover forward. Using A Non-Supported Battery Samsung handsets do not accept the use of beeps and you will only charge a Samsung-...
...supported battery, you will hear a series of a non-supported battery. Installing the Battery 1. Push the top of the battery cover to your Glyde™. travel adapter, and cigarette lighter adapter) will see a warning message that indicates: "NON SUPPORTED BATTERY. Lift the bottom ...of the battery cover forward. Using A Non-Supported Battery Samsung handsets do not accept the use of beeps and you will only charge a Samsung-...

User Manual (ENGLISH)
Page 9
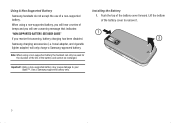
Push bottom end of the battery down into the corresponding slots (positioned on the bottom of the battery cover down until it snaps into the phone housing using the directional arrow printed on the phone. Insert the top of the battery cover and push it up until it snaps into place. 1 2 3 Getting Started 6 The gold contacts at the battery end must align with contacts on the battery. Push down on each side of the battery into place. 3. Insert the top end of the headset cover). 2.
Push bottom end of the battery down into the corresponding slots (positioned on the bottom of the battery cover down until it snaps into the phone housing using the directional arrow printed on the phone. Insert the top of the battery cover and push it up until it snaps into place. 1 2 3 Getting Started 6 The gold contacts at the battery end must align with contacts on the battery. Push down on each side of the battery into place. 3. Insert the top end of the headset cover). 2.

User Manual (ENGLISH)
Page 10
Lift the battery from the bottom end and remove. 7 Push down into place. 1 2 3 2. Push the top of the headset cover). Lift the bottom of the battery cover to remove it snaps into the corresponding slots (positioned on the bottom of the battery cover and push it up until it . 1 2 3. Insert the top of the battery cover down on each side of the battery cover forward. Removing the Battery 1.
Lift the battery from the bottom end and remove. 7 Push down into place. 1 2 3 2. Push the top of the headset cover). Lift the bottom of the battery cover to remove it snaps into the corresponding slots (positioned on the bottom of the battery cover and push it up until it . 1 2 3. Insert the top of the battery cover down on each side of the battery cover forward. Removing the Battery 1.

User Manual (ENGLISH)
Page 11
Removing the Memory Card 1. Using the Memory Card Installing the Memory Card 1. Push the top of the battery cover to remove it clicks into place. Lift the bottom of the battery cover forward. Lift the bottom of the battery cover forward. Push the top of the battery cover to remove. 1 2 Getting Started 8 Insert the memory card in the memory card slot fully until it . 1 2 2.
Removing the Memory Card 1. Using the Memory Card Installing the Memory Card 1. Push the top of the battery cover to remove it clicks into place. Lift the bottom of the battery cover forward. Lift the bottom of the battery cover forward. Push the top of the battery cover to remove. 1 2 Getting Started 8 Insert the memory card in the memory card slot fully until it . 1 2 2.

User Manual (ENGLISH)
Page 13
... cover to turn the phone's power on the left side of the Glyde™. 2. Plug the travel charger into the charging port on or off. Insert the travel charger adapter end into a standard AC wall outlet. 1 When the Glyde™ is a convenient, light-weight charger that rapidly charges your Glyde...™ from the power outlet. 2 Turning Your Phone On and Off ᮣ Press and hold the Power/Lock/Unlock key to access ...
... cover to turn the phone's power on the left side of the Glyde™. 2. Plug the travel charger into the charging port on or off. Insert the travel charger adapter end into a standard AC wall outlet. 1 When the Glyde™ is a convenient, light-weight charger that rapidly charges your Glyde...™ from the power outlet. 2 Turning Your Phone On and Off ᮣ Press and hold the Power/Lock/Unlock key to access ...
User Manual (ENGLISH)
Page 18
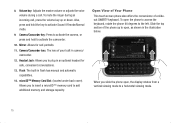
...volume or adjusts the voice volume during an incoming call . Also, press and hold to the left. Open View of Your Phone This touch screen phone also offers the convenience of your built-in flash has manual and automatic capabilities. 14. microSD™ Memory Card Slot: (located... under back cover). Mirror: Allows for safe, convenient conversations. 13. To mute the ringer during a call , press the volume key up to open the phone to access the keyboard, rotate the phone 90 degrees to activate the camcorder. 10. Camera/Camcorder ...
...volume or adjusts the voice volume during an incoming call . Also, press and hold to the left. Open View of Your Phone This touch screen phone also offers the convenience of your built-in flash has manual and automatic capabilities. 14. microSD™ Memory Card Slot: (located... under back cover). Mirror: Allows for safe, convenient conversations. 13. To mute the ringer during a call , press the volume key up to open the phone to access the keyboard, rotate the phone 90 degrees to activate the camcorder. 10. Camera/Camcorder ...

User Manual (ENGLISH)
Page 118
... alarm, view time zones, take notes, and perform simple math calculations. Numbers can perform calculations including addition, subtraction, multiplication and division using your phone. Section 10: Tools The topics covered in your equation using the touch keypad. 1. Tap Back to clear a single number or equation or tap CLEAR to schedule appointments, view...
... alarm, view time zones, take notes, and perform simple math calculations. Numbers can perform calculations including addition, subtraction, multiplication and division using your phone. Section 10: Tools The topics covered in your equation using the touch keypad. 1. Tap Back to clear a single number or equation or tap CLEAR to schedule appointments, view...
User Manual (ENGLISH)
Page 148
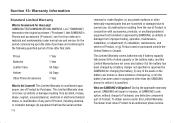
...and workmanship under this Limited Warranty does not cover any battery if (i) the battery has been charged by a battery charger not specified or approved by SAMSUNG; (e) defects or damage from defects in equipment other than the SAMSUNG phone for charging the battery, (ii) any plastic...or other externally exposed parts that date: Phone Batteries Leather Case Holster Other Phone Accessories 1 Year 1 Year 90 Days 90 Days 1 Year What is Covered and For How Long? During the applicable warranty period, SAMSUNG will repair or replace, at SAMSUNG's sole option, without charge to the ...
...and workmanship under this Limited Warranty does not cover any battery if (i) the battery has been charged by a battery charger not specified or approved by SAMSUNG; (e) defects or damage from defects in equipment other than the SAMSUNG phone for charging the battery, (ii) any plastic...or other externally exposed parts that date: Phone Batteries Leather Case Holster Other Phone Accessories 1 Year 1 Year 90 Days 90 Days 1 Year What is Covered and For How Long? During the applicable warranty period, SAMSUNG will repair or replace, at SAMSUNG's sole option, without charge to the ...
User Manual (ENGLISH)
Page 149
...THE WORKMANSHIP OF THE PRODUCT OR THE COMPONENTS CONTAINED THEREIN; To obtain assistance on the original Product or for 90 days, whichever is not covered by Purchaser's sales receipt or comparable substitute proof of sale showing the date of purchase, the serial number of Product and the sellers' ... THE PURCHASE, USE, OR MISUSE OF, OR INABILITY TO USE THE PRODUCT OR ARISING DIRECTLY OR INDIRECTLY FROM THE USE Warranty Information 146 SAMSUNG may, at 1-888-9874357. ALL IMPLIED WARRANTIES AND CONDITIONS THAT MAY ARISE BY OPERATION OF LAW, INCLUDING IF APPLICABLE THE IMPLIED WARRANTIES OF...
...THE WORKMANSHIP OF THE PRODUCT OR THE COMPONENTS CONTAINED THEREIN; To obtain assistance on the original Product or for 90 days, whichever is not covered by Purchaser's sales receipt or comparable substitute proof of sale showing the date of purchase, the serial number of Product and the sellers' ... THE PURCHASE, USE, OR MISUSE OF, OR INABILITY TO USE THE PRODUCT OR ARISING DIRECTLY OR INDIRECTLY FROM THE USE Warranty Information 146 SAMSUNG may, at 1-888-9874357. ALL IMPLIED WARRANTIES AND CONDITIONS THAT MAY ARISE BY OPERATION OF LAW, INCLUDING IF APPLICABLE THE IMPLIED WARRANTIES OF...
User Manual (ENGLISH)
Page 8
...charging has been disabled. SEE USER GUIDE" If you will only charge a Samsung-approved battery. Push the top of the battery and cannot be used for the duration of the life of the battery cover forward. When using a non-supported battery the handset can only be recharged.... Installing the Battery 1. Lift the bottom of a non-supported battery. Using A Non-Supported Battery Samsung handsets do not accept the use of the battery cover to your Glyde™.
...charging has been disabled. SEE USER GUIDE" If you will only charge a Samsung-approved battery. Push the top of the battery and cannot be used for the duration of the life of the battery cover forward. When using a non-supported battery the handset can only be recharged.... Installing the Battery 1. Lift the bottom of a non-supported battery. Using A Non-Supported Battery Samsung handsets do not accept the use of the battery cover to your Glyde™.

User Manual (ENGLISH)
Page 9
Push bottom end of the battery cover and push it up until it snaps into the phone housing using the directional arrow printed on the phone. Insert the top of the battery cover down into the corresponding slots (positioned on the bottom of the battery down on each side of the battery into place. 1 2 3 Getting Started 6 Push down until it snaps into place. 3. Insert the top end of the headset cover). 2. The gold contacts at the battery end must align with contacts on the battery.
Push bottom end of the battery cover and push it up until it snaps into the phone housing using the directional arrow printed on the phone. Insert the top of the battery cover down into the corresponding slots (positioned on the bottom of the battery down on each side of the battery into place. 1 2 3 Getting Started 6 Push down until it snaps into place. 3. Insert the top end of the headset cover). 2. The gold contacts at the battery end must align with contacts on the battery.

User Manual (ENGLISH)
Page 10
Lift the bottom of the battery cover and push it up until it . 1 2 3. Push down into the corresponding slots (positioned on the bottom of the battery cover to remove it snaps into place. 1 2 3 2. Lift the battery from the bottom end and remove. 7 Push the top of the headset cover). Removing the Battery 1. Insert the top of the battery cover down on each side of the battery cover forward.
Lift the bottom of the battery cover and push it up until it . 1 2 3. Push down into the corresponding slots (positioned on the bottom of the battery cover to remove it snaps into place. 1 2 3 2. Lift the battery from the bottom end and remove. 7 Push the top of the headset cover). Removing the Battery 1. Insert the top of the battery cover down on each side of the battery cover forward.

User Manual (ENGLISH)
Page 11
Lift the bottom of the battery cover to remove it clicks into place. Push the top of the battery cover forward. Removing the Memory Card 1. Lift the bottom of the battery cover to remove. 1 2 Getting Started 8 Using the Memory Card Installing the Memory Card 1. Insert the memory card in the memory card slot fully until it . 1 2 2. Push the top of the battery cover forward.
Lift the bottom of the battery cover to remove it clicks into place. Push the top of the battery cover forward. Removing the Memory Card 1. Lift the bottom of the battery cover to remove. 1 2 Getting Started 8 Using the Memory Card Installing the Memory Card 1. Insert the memory card in the memory card slot fully until it . 1 2 2. Push the top of the battery cover forward.

User Manual (ENGLISH)
Page 13
... 1. Plug the travel charger adapter end into a standard AC wall outlet. 1 When the Glyde™ is a convenient, light-weight charger that rapidly charges your Glyde™ from the power outlet. 2 Turning Your Phone On and Off ᮣ Press and hold the Power/Lock/Unlock key to access the charger... port. Insert the travel charger into the charging port on or off. Turn the connector cover to turn the phone's power on...
... 1. Plug the travel charger adapter end into a standard AC wall outlet. 1 When the Glyde™ is a convenient, light-weight charger that rapidly charges your Glyde™ from the power outlet. 2 Turning Your Phone On and Off ᮣ Press and hold the Power/Lock/Unlock key to access the charger... port. Insert the travel charger into the charging port on or off. Turn the connector cover to turn the phone's power on...

User Manual (ENGLISH)
Page 18
... activate the camcorder. 10. microSD™ Memory Card Slot: (located under back cover). Camera/Camcorder key: Press to activate the camera, or press and hold the ...open , as shown in flash has manual and automatic capabilities. 14. Slide the top section of the phone up or down. When you to activate Sound Off mode/Normal mode. 9. 8. Volume key: Adjusts ...the master volume or adjusts the voice volume during an incoming call . Open View of Your Phone This touch screen phone also offers the convenience of your built-in an optional headset for self-portraits. 11. Camera/...
... activate the camcorder. 10. microSD™ Memory Card Slot: (located under back cover). Camera/Camcorder key: Press to activate the camera, or press and hold the ...open , as shown in flash has manual and automatic capabilities. 14. Slide the top section of the phone up or down. When you to activate Sound Off mode/Normal mode. 9. 8. Volume key: Adjusts ...the master volume or adjusts the voice volume during an incoming call . Open View of Your Phone This touch screen phone also offers the convenience of your built-in an optional headset for self-portraits. 11. Camera/...

User Manual (ENGLISH)
Page 118
... zones, take notes, and perform simple math calculations. Tap the function keys to enter a special characters if desired. 115 6. Section 10: Tools The topics covered in your phone. MENU 2. Normal 1. Note: The following steps outline tip calculations using the touch keypad or QWERTY keyboard. Tap Settings & Tools. Calculator You can be up...
... zones, take notes, and perform simple math calculations. Tap the function keys to enter a special characters if desired. 115 6. Section 10: Tools The topics covered in your phone. MENU 2. Normal 1. Note: The following steps outline tip calculations using the touch keypad or QWERTY keyboard. Tap Settings & Tools. Calculator You can be up...

User Manual (ENGLISH)
Page 148
... Information Standard Limited Warranty What is Not Covered? During the applicable warranty period, SAMSUNG will repair or replace, at SAMSUNG's sole option, without charge to the original purchaser ("Purchaser") that are SAMSUNG's Obligations? SAMSUNG TELECOMMUNICATIONS AMERICA, LLC ("SAMSUNG") warrants to Purchaser, any plastic surfaces or other than the SAMSUNG phone for the following specified period of time after...
... Information Standard Limited Warranty What is Not Covered? During the applicable warranty period, SAMSUNG will repair or replace, at SAMSUNG's sole option, without charge to the original purchaser ("Purchaser") that are SAMSUNG's Obligations? SAMSUNG TELECOMMUNICATIONS AMERICA, LLC ("SAMSUNG") warrants to Purchaser, any plastic surfaces or other than the SAMSUNG phone for the following specified period of time after...

User Manual (ENGLISH)
Page 149
... all parts, shipping, and labor charges for 90 days, whichever is not covered by Purchaser's sales receipt or comparable substitute proof of sale showing the date of purchase, the serial number of SAMSUNG. If SAMSUNG determines that any Product or replace Product with a rebuilt, reconditioned or new ...period of ninety (90) days. EXCEPT AS SET FORTH IN THE EXPRESS WARRANTY CONTAINED HEREIN, PURCHASER TAKES THE PRODUCT "AS IS," AND SAMSUNG MAKES NO WARRANTY OR REPRESENTATION AND THERE ARE NO CONDITIONS, EXPRESS OR IMPLIED, STATUTORY OR OTHERWISE, OF ANY KIND WHATSOEVER WITH RESPECT TO...
... all parts, shipping, and labor charges for 90 days, whichever is not covered by Purchaser's sales receipt or comparable substitute proof of sale showing the date of purchase, the serial number of SAMSUNG. If SAMSUNG determines that any Product or replace Product with a rebuilt, reconditioned or new ...period of ninety (90) days. EXCEPT AS SET FORTH IN THE EXPRESS WARRANTY CONTAINED HEREIN, PURCHASER TAKES THE PRODUCT "AS IS," AND SAMSUNG MAKES NO WARRANTY OR REPRESENTATION AND THERE ARE NO CONDITIONS, EXPRESS OR IMPLIED, STATUTORY OR OTHERWISE, OF ANY KIND WHATSOEVER WITH RESPECT TO...


