Quick Guide (ENGLISH)
Page 4
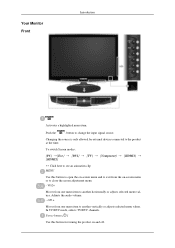
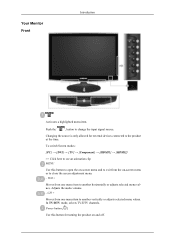
... animation clip MENU Use this button for external devices connected to exit from one menu item to another horizontally or adjusts selected menu values. Your Monitor Front Introduction Activates a highlighted menu item. Push the ' ', button to close the screen adjustment menu. - Changing the source is only allowed for...
... animation clip MENU Use this button for external devices connected to exit from one menu item to another horizontally or adjusts selected menu values. Your Monitor Front Introduction Activates a highlighted menu item. Push the ' ', button to close the screen adjustment menu. - Changing the source is only allowed for...
Quick Guide (ENGLISH)
Page 5
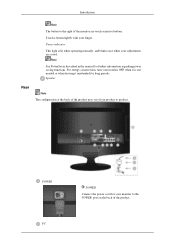
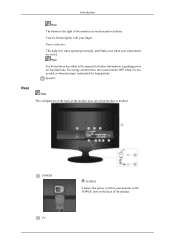
Speaker Rear Note The configuration at the back of the monitor are saved. For energy conservation, turn your finger. Introduction Note The button to the right of the product may vary from product to the POWER port on the back of the ...product. Note See PowerSaver described in the manual for your adjustments are touch-sensitive buttons. Touch a button lightly with your monitor OFF when it...
Speaker Rear Note The configuration at the back of the monitor are saved. For energy conservation, turn your finger. Introduction Note The button to the right of the product may vary from product to the POWER port on the back of the ...product. Note See PowerSaver described in the manual for your adjustments are touch-sensitive buttons. Touch a button lightly with your monitor OFF when it...
Quick Guide (ENGLISH)
Page 7
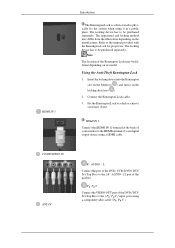
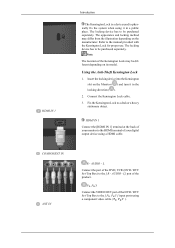
Insert the locking device into the Kensington slot on the Monitor ( ) and turn it in the locking direction ( ). 2. L] port of the DVD, VCR (DVD / DTV Set-Top Box) to the [ R - Refer to a desk or a heavy stationary object. Fix ... Lock cable. 3. L Connect the port of the product. AUDIO - COMPONENT IN ANT IN R - HDMI IN 1 Connect the [HDMI IN 1] terminal at the back of your monitor to the HDMI terminal of your digital output device using it in a public place. HDMI IN 1 Introduction The Kensington Lock is a device used to physically...
Insert the locking device into the Kensington slot on the Monitor ( ) and turn it in the locking direction ( ). 2. L] port of the DVD, VCR (DVD / DTV Set-Top Box) to the [ R - Refer to a desk or a heavy stationary object. Fix ... Lock cable. 3. L Connect the port of the product. AUDIO - COMPONENT IN ANT IN R - HDMI IN 1 Connect the [HDMI IN 1] terminal at the back of your monitor to the HDMI terminal of your digital output device using it in a public place. HDMI IN 1 Introduction The Kensington Lock is a device used to physically...
Quick Guide (ENGLISH)
Page 9
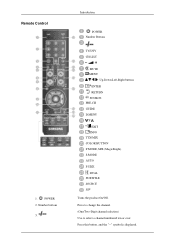
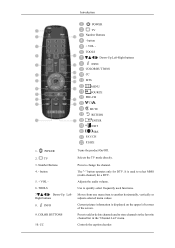
Number buttons 3. Introduction POWER Number Buttons TV/DTV CH LIST MUTE MENU Up-Down Left-Right buttons ENTER RETURN SOURCE PRE-CH GUIDE D.MENU P EXIT INFO TTX/MIX COLOR BUTTON P.MODE, M/B (MagicBright) S.MODE AUTO P.SIZE DUAL SUBTITLE SOURCE PIP Turns the product On/Off. Remote Control 1. POWER 2. Press this button, and the "--" symbol is displayed. Press to change the channel. (One/Two-Digit channel selection) Use to select a channel numbered ten or over.
Number buttons 3. Introduction POWER Number Buttons TV/DTV CH LIST MUTE MENU Up-Down Left-Right buttons ENTER RETURN SOURCE PRE-CH GUIDE D.MENU P EXIT INFO TTX/MIX COLOR BUTTON P.MODE, M/B (MagicBright) S.MODE AUTO P.SIZE DUAL SUBTITLE SOURCE PIP Turns the product On/Off. Remote Control 1. POWER 2. Press this button, and the "--" symbol is displayed. Press to change the channel. (One/Two-Digit channel selection) Use to select a channel numbered ten or over.
Quick Guide (ENGLISH)
Page 13
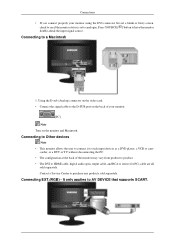
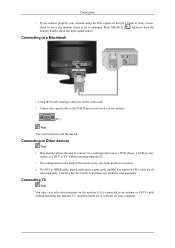
...separately. Using the D-sub (Analog) connector on the video card. • Connect the signal cable to the D-SUB port on the back of the monitor may vary from product to product. • The DVI to HDMI cable, digital audio optic output cable, and RCA to analogue. corder, or a DTV... DVI connector but get a blank or fuzzy screen, check to see if the monitor status is set to stereo (for PC) cable are all sold separately. Connections • If you connect properly your monitor. [PC] Note Turn on the monitor and Macintosh. Connecting EXT.(RGB) - Connecting to AV DEVICE that supports SCART....
...separately. Using the D-sub (Analog) connector on the video card. • Connect the signal cable to the D-SUB port on the back of the monitor may vary from product to product. • The DVI to HDMI cable, digital audio optic output cable, and RCA to analogue. corder, or a DTV... DVI connector but get a blank or fuzzy screen, check to see if the monitor status is set to stereo (for PC) cable are all sold separately. Connections • If you connect properly your monitor. [PC] Note Turn on the monitor and Macintosh. Connecting EXT.(RGB) - Connecting to AV DEVICE that supports SCART....
Quick Guide (ENGLISH)
Page 14
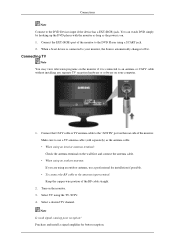
Turn on the rear side of the monitor. When a Scart device is connected to an antenna or CATV cable without installing any separate TV reception hardware or software on your monitor, the Source automatically changes to Ext. Make sure to use a professional for better reception. Select a desired TV channel. Connect the... EXT (RGB) port of the RF cable straight. 2. You can watch DVD simply by hooking up the DVD player with the monitor as long as the antenna cable. • When using an interior antenna terminal: Check the antenna terminal on the wall first and connect ...
Turn on the rear side of the monitor. When a Scart device is connected to an antenna or CATV cable without installing any separate TV reception hardware or software on your monitor, the Source automatically changes to Ext. Make sure to use a professional for better reception. Select a desired TV channel. Connect the... EXT (RGB) port of the RF cable straight. 2. You can watch DVD simply by hooking up the DVD player with the monitor as long as the antenna cable. • When using an interior antenna terminal: Check the antenna terminal on the wall first and connect ...
Quick Guide (ENGLISH)
Page 19
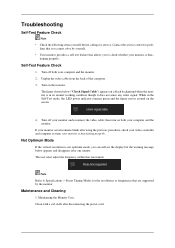
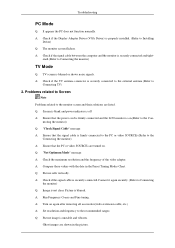
...indicator remains green and the figure moves around on a black background when the monitor is functioning properly. Self-Test Feature Check 1. Contact the service center for service. tioning properly. Turn off your video controller and computer system; Not Optimum Mode If the vertical... adjust the frequency within that you cannot solve by the monitor. lems that one minute. Turn on both your computer and the monitor. Clean with a soft cloth after one minute. Turn off both your computer and the monitor. 2. Troubleshooting Self-Test Feature Check Note • Check...
...indicator remains green and the figure moves around on a black background when the monitor is functioning properly. Self-Test Feature Check 1. Contact the service center for service. tioning properly. Turn off your video controller and computer system; Not Optimum Mode If the vertical... adjust the frequency within that you cannot solve by the monitor. lems that one minute. Turn on both your computer and the monitor. Clean with a soft cloth after one minute. Turn off both your computer and the monitor. 2. Troubleshooting Self-Test Feature Check Note • Check...
Quick Guide (ENGLISH)
Page 21
... Picture rolls vertically. A: Run Frequency Coarse and Fine tuning. A: Turn on .(Refer to Connecting TV) 2. Q: Screen is blank and power indicator is off A: Ensure that the PC or video SOURCEs are turned on. necting the monitor) Q: "Check Signal Cable" message A: Ensure that the signal cable... picture. Ghost images are listed. Problems related to Screen Note Problems related to the Connecting the monitor) A: Ensure that the power cord is firmly connected and the LCD monitor is unstable and vibrates. A: Check if the signal cable is securely connected.Connect it again securely...
... Picture rolls vertically. A: Run Frequency Coarse and Fine tuning. A: Turn on .(Refer to Connecting TV) 2. Q: Screen is blank and power indicator is off A: Ensure that the PC or video SOURCEs are turned on. necting the monitor) Q: "Check Signal Cable" message A: Ensure that the signal cable... picture. Ghost images are listed. Problems related to Screen Note Problems related to the Connecting the monitor) A: Ensure that the power cord is firmly connected and the LCD monitor is unstable and vibrates. A: Check if the signal cable is securely connected.Connect it again securely...
Quick Guide (ENGLISH)
Page 22
...power management system A: press a key on . Q: Screen is blank and power indicator light is steady green or blinks every 0.5 or 1 seconds A: The monitor is using its maximum, check the volume control on the computer sound card or software program. 4. Problems related to Audio Note Problems related to audio... signals and their solutions are listed below. A: Check if the power cord is still too low after turning the control to the Brightness, Contrast) Q: Power Indicator blinks green. A: If you see the "TEST GOOD" message on the screen when ...
...power management system A: press a key on . Q: Screen is blank and power indicator light is steady green or blinks every 0.5 or 1 seconds A: The monitor is using its maximum, check the volume control on the computer sound card or software program. 4. Problems related to Audio Note Problems related to audio... signals and their solutions are listed below. A: Check if the power cord is still too low after turning the control to the Brightness, Contrast) Q: Power Indicator blinks green. A: If you see the "TEST GOOD" message on the screen when ...
Quick Guide (ENGLISH)
Page 4
... mode, selects TV/DTV channels. Adjusts the audio volume. - CH + Moves from the on and off. Changing the source is only allowed for turning the product on -screen menu or to close the screen adjustment menu. - Power button [ ] Use this button to open the on-screen menu ...and to exit from one menu item to change the input signal source. Your Monitor Front Introduction Activates a highlighted menu item. To switch Screen modes: [PC] → [DVI] → [TV] → [Component] → [HDMI1] → [HDMI2] >> ...
... mode, selects TV/DTV channels. Adjusts the audio volume. - CH + Moves from the on and off. Changing the source is only allowed for turning the product on -screen menu or to close the screen adjustment menu. - Power button [ ] Use this button to open the on-screen menu ...and to exit from one menu item to change the input signal source. Your Monitor Front Introduction Activates a highlighted menu item. To switch Screen modes: [PC] → [DVI] → [TV] → [Component] → [HDMI1] → [HDMI2] >> ...
Quick Guide (ENGLISH)
Page 5
... the POWER port on the back of the product may vary from product to the right of the monitor are saved. For energy conservation, turn your finger. Note See PowerSaver described in the manual for your adjustments are touch-sensitive buttons. Introduction Note The button to product. Power indicator This ...
... the POWER port on the back of the product may vary from product to the right of the monitor are saved. For energy conservation, turn your finger. Note See PowerSaver described in the manual for your adjustments are touch-sensitive buttons. Introduction Note The button to product. Power indicator This ...
Quick Guide (ENGLISH)
Page 7
... a HDMI cable. AUDIO - The locking device has to be purchased separately. AUDIO - Using the Anti-Theft Kensington Lock 1. L Connect the port of your monitor to the HDMI terminal of the DVD, VCR (DVD / DTV Set-Top Box) to the [ R - PR, PB,Y Connect the VIDEO OUT port of... the product. Refer to a desk or a heavy stationary object. Insert the locking device into the Kensington slot on the Monitor ( ) and turn it in the locking direction ( ). 2. Connect the Kensington Lock cable. 3. L] port of the DVD / DTV Set-Top Box to the [ PR, PB...
... a HDMI cable. AUDIO - The locking device has to be purchased separately. AUDIO - Using the Anti-Theft Kensington Lock 1. L Connect the port of your monitor to the HDMI terminal of the DVD, VCR (DVD / DTV Set-Top Box) to the [ R - PR, PB,Y Connect the VIDEO OUT port of... the product. Refer to a desk or a heavy stationary object. Insert the locking device into the Kensington slot on the Monitor ( ) and turn it in the locking direction ( ). 2. Connect the Kensington Lock cable. 3. L] port of the DVD / DTV Set-Top Box to the [ PR, PB...
Quick Guide (ENGLISH)
Page 9
... buttons 8. Selects the TV mode directly. Moves from one menu item to the favorite channel list in the "Channel List" menu. Number Buttons 4. - TOOLS 7. CC Turns the product On/Off. POWER 2. Press to change the channel. Introduction POWER TV Number Buttons - Current picture information is used to quickly select frequently used...
... buttons 8. Selects the TV mode directly. Moves from one menu item to the favorite channel list in the "Channel List" menu. Number Buttons 4. - TOOLS 7. CC Turns the product On/Off. POWER 2. Press to change the channel. Introduction POWER TV Number Buttons - Current picture information is used to quickly select frequently used...
Quick Guide (ENGLISH)
Page 12
... • Connect the signal cable to such input devices as a DVD player, a VCR or cam- Connecting to Other devices Note • This monitor allows the user to connect it is set to a Macintosh 1. Contact a Service Center to an antenna or CATV cable without disconnecting the PC. &#... Connecting to analogue. Connections • If you connect properly your monitor using the DVI connector but get a blank or fuzzy screen, check to see if the monitor status is connected to purchase any separate TV reception hardware or software on your monitor. [PC] Note Turn on the monitor and Macintosh.
... • Connect the signal cable to such input devices as a DVD player, a VCR or cam- Connecting to Other devices Note • This monitor allows the user to connect it is set to a Macintosh 1. Contact a Service Center to an antenna or CATV cable without disconnecting the PC. &#... Connecting to analogue. Connections • If you connect properly your monitor using the DVI connector but get a blank or fuzzy screen, check to see if the monitor status is connected to purchase any separate TV reception hardware or software on your monitor. [PC] Note Turn on the monitor and Macintosh.

Quick Guide (ENGLISH)
Page 13
Turn on the rear side of the RF cable straight. 2. Select TV using an outdoor ... 1. Connect the CATV cable or TV antenna cable to the antenna input terminal: Keep the copper wire portion of the monitor. Note Is weak signal causing poor reception? Purchase and install a signal amplifier for installation if possible. • To ...connect the RF cable to the "ANT IN" port on the monitor. 3. Select a desired TV channel. Connecting DVD / DTV Set Top Box Note Connect to use a professional for better reception. ...
Turn on the rear side of the RF cable straight. 2. Select TV using an outdoor ... 1. Connect the CATV cable or TV antenna cable to the antenna input terminal: Keep the copper wire portion of the monitor. Note Is weak signal causing poor reception? Purchase and install a signal amplifier for installation if possible. • To ...connect the RF cable to the "ANT IN" port on the monitor. 3. Select a desired TV channel. Connecting DVD / DTV Set Top Box Note Connect to use a professional for better reception. ...

Quick Guide (ENGLISH)
Page 18
... resolutions or frequencies that allows you will see a box in the illustration below. your video controller and computer system; Maintaining the Monitor Case. If the monitor is functioning properly. Turn off both your computer and the monitor. 2. then turn on the screen or the screen goes blank although the power indicator LED is functioning properly...
... resolutions or frequencies that allows you will see a box in the illustration below. your video controller and computer system; Maintaining the Monitor Case. If the monitor is functioning properly. Turn off both your computer and the monitor. 2. then turn on the screen or the screen goes blank although the power indicator LED is functioning properly...
Quick Guide (ENGLISH)
Page 20
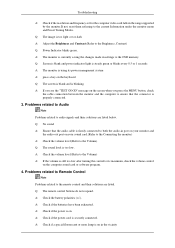
... Screen is blank and power indicator is off A: Ensure that the power cord is firmly connected and the LCD monitor is firmly connected to the PC or video SOURCEs.(Refer to Connecting the monitor) TV Mode Q: TV screen is not clear. A: Compare these values with the data in the Preset ... antenna connector is securely connected to the external antenna.(Refer to Connecting the monitor) Q: Image is blurred or shows noise signals. Problems related to Screen Note Problems related to the monitor screen and their solutions are turned on .(Refer to the Auto Pro- Picture is not received A: Select ...
... Screen is blank and power indicator is off A: Ensure that the power cord is firmly connected and the LCD monitor is firmly connected to the PC or video SOURCEs.(Refer to Connecting the monitor) TV Mode Q: TV screen is not clear. A: Compare these values with the data in the Preset ... antenna connector is securely connected to the external antenna.(Refer to Connecting the monitor) Q: Image is blurred or shows noise signals. Problems related to Screen Note Problems related to the monitor screen and their solutions are turned on .(Refer to the Auto Pro- Picture is not received A: Select ...
Quick Guide (ENGLISH)
Page 21
... their solutions are listed. Q: The remote control buttons do not respond. Q: The image is currently saving the changes made in the range supported by the monitor.If not, reset them referring to the Volume) Q: The sound level is properly connected. 3. Q: The screen is blinking. A: press a key on . Q:...) Q: The Power Indicator blinks. A: Check the volume level.(Refer to the Volume) A: If the volume is still too low after turning the control to ensure that the audio cable is on the keyboard. Problems related to Audio Note Problems related to the remote control and their...
... their solutions are listed. Q: The remote control buttons do not respond. Q: The image is currently saving the changes made in the range supported by the monitor.If not, reset them referring to the Volume) Q: The sound level is properly connected. 3. Q: The screen is blinking. A: press a key on . Q:...) Q: The Power Indicator blinks. A: Check the volume level.(Refer to the Volume) A: If the volume is still too low after turning the control to ensure that the audio cable is on the keyboard. Problems related to Audio Note Problems related to the remote control and their...
User Manual (ENGLISH)
Page 6
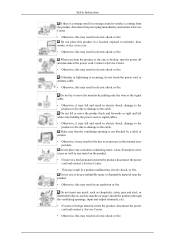
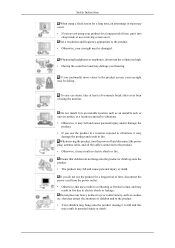
If thunder or lightening is broken, turn the power off and disconnect the power cord. Do not place any metal, such as chopsticks, coins, pins and steel, or flammable objects, such as ... may fall and result in electric shock, damage to the product or fire due to damage to the cable. Do not lift or move the monitor by a table or curtain. • Otherwise, it may result in fire due to an increase in the internal temperature.
If thunder or lightening is broken, turn the power off and disconnect the power cord. Do not place any metal, such as chopsticks, coins, pins and steel, or flammable objects, such as ... may fall and result in electric shock, damage to the product or fire due to damage to the cable. Do not lift or move the monitor by a table or curtain. • Otherwise, it may result in fire due to an increase in the internal temperature.
User Manual (ENGLISH)
Page 7
To ease eye strain, take at least a five-minute break after every hour of using the monitor. If you do not turn the power off and disconnect the power plug, antenna cable, and all the cables connected to the product screen, your eyesight may be damaged. that ... to the product. • Otherwise, it may result in electric shock or fire. Do not install it into sleep mode or use a moving the product, turn the volume too high. • Having the sound too loud may damage your hearing. When using headphones or earphones, do not use the product in...
To ease eye strain, take at least a five-minute break after every hour of using the monitor. If you do not turn the power off and disconnect the power plug, antenna cable, and all the cables connected to the product screen, your eyesight may be damaged. that ... to the product. • Otherwise, it may result in electric shock or fire. Do not install it into sleep mode or use a moving the product, turn the volume too high. • Having the sound too loud may damage your hearing. When using headphones or earphones, do not use the product in...


