Quick Guide (ENGLISH)
Page 10
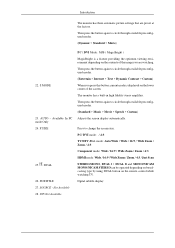
... adjusts selected menu values. TV / DTV / Ext. / Component / HDMI: P.MODE EXIT 18. Adjusts the audio volume. Changing the SOURCE is used to return to the monitor at the time. - This button is only allowed for external devices that are connected to the immediately previous channel. SOURCE 13. Up-Down Left- Activates... a highlighted menu item. TV/DTV 5. Introduction 4. You cannot watch TV using the SOURCE button - It display "Channel List" on the upper left corner of the monitor or to change the picture atmosphere as required.
... adjusts selected menu values. TV / DTV / Ext. / Component / HDMI: P.MODE EXIT 18. Adjusts the audio volume. Changing the SOURCE is used to return to the monitor at the time. - This button is only allowed for external devices that are connected to the immediately previous channel. SOURCE 13. Up-Down Left- Activates... a highlighted menu item. TV/DTV 5. Introduction 4. You cannot watch TV using the SOURCE button - It display "Channel List" on the upper left corner of the monitor or to change the picture atmosphere as required.
Quick Guide (ENGLISH)
Page 11
Available In PC mode Only 24. Then press the button again to change the screen size. Press to circle through available preconfigured modes. (Entertain > Internet > Text > Dynamic Contrast > Custom) When you ... the screen display automatically. AUTO - Then press the button again to circle through available preconfigured modes. (Dynamic > Standard > Movie) 22. SUBTITLE 27. Introduction The monitor has three automatic picture settings that are watching. mode: Auto Wide / Wide / 16:9 / Wide Zoom / Zoom / 4:3 Component mode: Wide / 16:9 / Wide Zoom / Zoom / 4:3 HDMI mode: Wide / 16...
Available In PC mode Only 24. Then press the button again to change the screen size. Press to circle through available preconfigured modes. (Entertain > Internet > Text > Dynamic Contrast > Custom) When you ... the screen display automatically. AUTO - Then press the button again to circle through available preconfigured modes. (Dynamic > Standard > Movie) 22. SUBTITLE 27. Introduction The monitor has three automatic picture settings that are watching. mode: Auto Wide / Wide / 16:9 / Wide Zoom / Zoom / 4:3 Component mode: Wide / 16:9 / Wide Zoom / Zoom / 4:3 HDMI mode: Wide / 16...

Quick Guide (ENGLISH)
Page 17
...button of the arrow, right up your digital amplifier using the MENU button. 3. Note • If no sound is emitted from the monitor, you can install the CAM anytime whether the TV is parallel with the CI CARD installed into the common interface slot. (Insert the CAM... CAM module by their manufacturers. Connect the [DIGITAL AUDIO OUT (OPTICAL)] terminal of your monitor to use an amplifier. • For information on a scrambled signal channel. Connecting COMMON INTERFACE Note You can see a picture on how to connect a speaker and amplifier, refer to the end so that it fits...
...button of the arrow, right up your digital amplifier using the MENU button. 3. Note • If no sound is emitted from the monitor, you can install the CAM anytime whether the TV is parallel with the CI CARD installed into the common interface slot. (Insert the CAM... CAM module by their manufacturers. Connect the [DIGITAL AUDIO OUT (OPTICAL)] terminal of your monitor to use an amplifier. • For information on a scrambled signal channel. Connecting COMMON INTERFACE Note You can see a picture on how to connect a speaker and amplifier, refer to the end so that it fits...
Quick Guide (ENGLISH)
Page 21
...the recommended ranges. A: Compare these values with the data in the picture. Q: Picture rolls vertically. A: Turn on .(Refer to the Connecting the monitor) A: Ensure that the power cord is firmly connected and the LCD monitor is on again after removing all accessories(video extension cable, etc.) ...A: Set resolution and frequency to Connecting the monitor) TV Mode Q: TV screen is blurred...
...the recommended ranges. A: Compare these values with the data in the picture. Q: Picture rolls vertically. A: Turn on .(Refer to the Connecting the monitor) A: Ensure that the power cord is firmly connected and the LCD monitor is on again after removing all accessories(video extension cable, etc.) ...A: Set resolution and frequency to Connecting the monitor) TV Mode Q: TV screen is blurred...

Quick Guide (ENGLISH)
Page 9
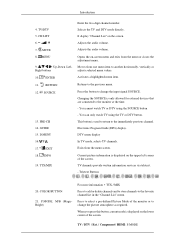
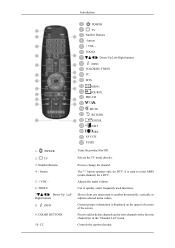
Number Buttons 4. - TOOLS 7. Current picture information is used functions. INFO 9. CC Turns the product On/Off. The "-" button operates only for a DTV. Use to quickly select frequently used to another ...
Number Buttons 4. - TOOLS 7. Current picture information is used functions. INFO 9. CC Turns the product On/Off. The "-" button operates only for a DTV. Use to quickly select frequently used to another ...
Quick Guide (ENGLISH)
Page 20
... cable is firmly connected to the PC or video SOURCEs.(Refer to the Connecting the monitor) A: Ensure that the power cord is firmly connected and the LCD monitor is off A: Ensure that the PC or video SOURCEs are listed. Picture is securely connected and tight- A: Run Frequency Coarse and Fine tuning. A: Compare these values...
... cable is firmly connected to the PC or video SOURCEs.(Refer to the Connecting the monitor) A: Ensure that the power cord is firmly connected and the LCD monitor is off A: Ensure that the PC or video SOURCEs are listed. Picture is securely connected and tight- A: Run Frequency Coarse and Fine tuning. A: Compare these values...

Quick Guide (ENGLISH)
Page 21
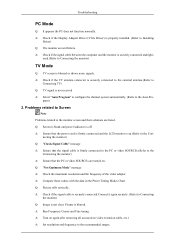
...blank and is using its maximum, check the volume control on . Problems related to Audio Note Problems related to both the audio-in the picture. Troubleshooting Q: Picture image is properly connected. 3. Ghost images are listed below. A: If you see the "TEST GOOD" message on the screen when you... press the MENU button, check the cable connection between the monitor and the computer to ensure that the audio cable is firmly connected to audio ...
...blank and is using its maximum, check the volume control on . Problems related to Audio Note Problems related to both the audio-in the picture. Troubleshooting Q: Picture image is properly connected. 3. Ghost images are listed below. A: If you see the "TEST GOOD" message on the screen when you... press the MENU button, check the cable connection between the monitor and the computer to ensure that the audio cable is firmly connected to audio ...
User Manual (ENGLISH)
Page 17
... 7. INFO 9. Selects the TV mode directly. Press to add or delete channels and to store channels to change the channel. COLOR BUTTONS 10. TV 3. Current picture information is used functions. Controls the caption decoder. Introduction POWER TV Number Buttons - button + VOL TOOLS Down-Up Left-Right buttons INFO COLOR BUTTONS CC...
... 7. INFO 9. Selects the TV mode directly. Press to add or delete channels and to store channels to change the channel. COLOR BUTTONS 10. TV 3. Current picture information is used functions. Controls the caption decoder. Introduction POWER TV Number Buttons - button + VOL TOOLS Down-Up Left-Right buttons INFO COLOR BUTTONS CC...

User Manual (ENGLISH)
Page 35
...8226; Internet For working with a mixture of the image you are available: Entertain, Internet, Text, Dynamic Contrast and Custom. Adjusting the Monitor Picture Available Modes • PC / DVI • TV • Component • HDMI Note The default setting may be different depending on ... contents of images such as texts and graphics. • Text For documents or works involving heavy text. • Dynamic Contrast Picture : PC / DVI MagicBright MagicBright is a feature providing optimum viewing environment depending on the selected Input Mode (input signal source selected...
...8226; Internet For working with a mixture of the image you are available: Entertain, Internet, Text, Dynamic Contrast and Custom. Adjusting the Monitor Picture Available Modes • PC / DVI • TV • Component • HDMI Note The default setting may be different depending on ... contents of images such as texts and graphics. • Text For documents or works involving heavy text. • Dynamic Contrast Picture : PC / DVI MagicBright MagicBright is a feature providing optimum viewing environment depending on the selected Input Mode (input signal source selected...
User Manual (ENGLISH)
Page 38
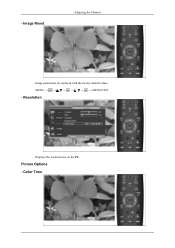
Resolution Displays the resolution set on the PC. Picture Options - Image Reset Adjusting the Monitor Image parameters are replaced with the factory default values. MENU MENU,EXIT - Color Tone -
Resolution Displays the resolution set on the PC. Picture Options - Image Reset Adjusting the Monitor Image parameters are replaced with the factory default values. MENU MENU,EXIT - Color Tone -

User Manual (ENGLISH)
Page 40
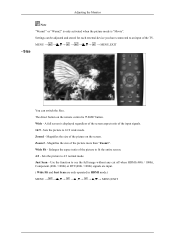
You can activate either Dynamic, Standard, or Movie. • Dynamic Selects the picture for high-definition in a bright room. • Standard Selects the picture for optimum display in a normal environment. • Movie Selects the picture for viewing movies in a dark room. Reset Adjusting the Monitor Picture parameters are replaced with the factory default values. • OK • Cancel MENU MENU,EXIT Picture : TV / Component / HDMI Mode The Monitor has three automatic picture settings ("Dynamic", "Standard", and "Movie") that are preset at the factory.
You can activate either Dynamic, Standard, or Movie. • Dynamic Selects the picture for high-definition in a bright room. • Standard Selects the picture for optimum display in a normal environment. • Movie Selects the picture for viewing movies in a dark room. Reset Adjusting the Monitor Picture parameters are replaced with the factory default values. • OK • Cancel MENU MENU,EXIT Picture : TV / Component / HDMI Mode The Monitor has three automatic picture settings ("Dynamic", "Standard", and "Movie") that are preset at the factory.
User Manual (ENGLISH)
Page 41
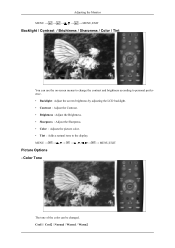
...Monitor MENU MENU,EXIT Backlight / Contrast / Brightness / Sharpness / Color / Tint You can be changed. Color Tone The tone of the color can use the on-screen menus to change the contrast and brightness according to personal preference. • Backlight : Adjust the screen brightness by adjusting the LCD... backlight. • Contrast : Adjust the Contrast. • Brightness : Adjust the Brightness. • Sharpness : Adjust the Sharpness. • Color : Adjusts the picture color. • Tint : Adds a natural tone to the...
...Monitor MENU MENU,EXIT Backlight / Contrast / Brightness / Sharpness / Color / Tint You can be changed. Color Tone The tone of the color can use the on-screen menus to change the contrast and brightness according to personal preference. • Backlight : Adjust the screen brightness by adjusting the LCD... backlight. • Contrast : Adjust the Contrast. • Brightness : Adjust the Brightness. • Sharpness : Adjust the Sharpness. • Color : Adjusts the picture color. • Tint : Adds a natural tone to the...
User Manual (ENGLISH)
Page 42
.... ( Wide Fit and Just Scan are only operated in HDMI mode.) MENU MENU,EXIT Use the function to fit the entire screen. 4:3 - Adjusting the Monitor - Size Note "Warm1" or "Warm2" is only activated when the picture mode is 'P.SIZE' button. Magnifies the size of the input signals. 16:9 - Wide Fit - Sets the...
.... ( Wide Fit and Just Scan are only operated in HDMI mode.) MENU MENU,EXIT Use the function to fit the entire screen. 4:3 - Adjusting the Monitor - Size Note "Warm1" or "Warm2" is only activated when the picture mode is 'P.SIZE' button. Magnifies the size of the input signals. 16:9 - Wide Fit - Sets the...

User Manual (ENGLISH)
Page 44
Adjusting the Monitor MENU → - Film Mode → , → → , → → , → MENU,EXIT The Film Mode feature offers you a theater-quality viewing experience. "Film mode" is supported in TV, Component (480i / 1080i) and HDMI (480i / 1080i) Off / Auto MENU MENU,EXIT Reset Picture parameters are replaced with the factory default values. • OK • Cancel MENU MENU,EXIT Sound Available Modes • PC / DVI • TV
Adjusting the Monitor MENU → - Film Mode → , → → , → → , → MENU,EXIT The Film Mode feature offers you a theater-quality viewing experience. "Film mode" is supported in TV, Component (480i / 1080i) and HDMI (480i / 1080i) Off / Auto MENU MENU,EXIT Reset Picture parameters are replaced with the factory default values. • OK • Cancel MENU MENU,EXIT Sound Available Modes • PC / DVI • TV

User Manual (ENGLISH)
Page 68
...Picture is not received A: Select "Auto Program" to configure the channel system automatically. (Refer to the recommended ranges. A: Check if the TV antenna connector is securely connected to the external antenna.(Refer to the Connecting the monitor) A: Ensure that the power cord is firmly connected and the LCD monitor... is off A: Ensure that the PC or video SOURCEs are listed. necting the monitor) Q: "Check Signal Cable" message A: Ensure that...
...Picture is not received A: Select "Auto Program" to configure the channel system automatically. (Refer to the recommended ranges. A: Check if the TV antenna connector is securely connected to the external antenna.(Refer to the Connecting the monitor) A: Ensure that the power cord is firmly connected and the LCD monitor... is off A: Ensure that the PC or video SOURCEs are listed. necting the monitor) Q: "Check Signal Cable" message A: Ensure that...
User Manual (ENGLISH)
Page 69
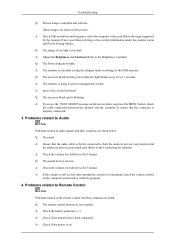
...volume level.(Refer to the Volume) A: If the volume is still too low after turning the control to its power management system. Troubleshooting Q: Picture image is blank and the power indicator light blinks every 0.5 or 1 seconds. Problems related to Remote Control Note Problems related to the current ...are listed. A: If you see the "TEST GOOD" message on your sound card.(Refer to the Connecting the monitor) A: Check the volume level.(Refer to both the audio-in the picture. Q: No sound A: Ensure that the connector is too low. A: Check if the resolution and frequency set ...
...volume level.(Refer to the Volume) A: If the volume is still too low after turning the control to its power management system. Troubleshooting Q: Picture image is blank and the power indicator light blinks every 0.5 or 1 seconds. Problems related to Remote Control Note Problems related to the current ...are listed. A: If you see the "TEST GOOD" message on your sound card.(Refer to the Connecting the monitor) A: Check the volume level.(Refer to both the audio-in the picture. Q: No sound A: Ensure that the connector is too low. A: Check if the resolution and frequency set ...

User Manual (ENGLISH)
Page 79
...for a long time as window termination button is not from the monitor for an extended period of time, a residual image or blurriness may stain it can have an uneven picture quality on the Color TFT-LCD ( Thin Film Transister Liquid Crystal Display) panel for this product are... broadcasting equipment log broadcasting signals be bright sometimes or some of picture by using dig- When viewing a fixed screen for TFT-LCD. • Resolution: 1920 x 1200 • Vertical frequency (refresh rate): 60 Hz TFT-LCD panels manufactured by performing the "Auto Adjustment function" in this ...
...for a long time as window termination button is not from the monitor for an extended period of time, a residual image or blurriness may stain it can have an uneven picture quality on the Color TFT-LCD ( Thin Film Transister Liquid Crystal Display) panel for this product are... broadcasting equipment log broadcasting signals be bright sometimes or some of picture by using dig- When viewing a fixed screen for TFT-LCD. • Resolution: 1920 x 1200 • Vertical frequency (refresh rate): 60 Hz TFT-LCD panels manufactured by performing the "Auto Adjustment function" in this ...

User Manual (ENGLISH)
Page 18
... list in the "Channel List" menu. You can only watch TV or DTV using the TV or DTV button. Current picture information is displayed on the upper left corner of the monitor or to another horizontally, vertically or adjusts selected menu values. P.MODE, M/B (MagicBright) For more information > TTX / ...List" on -screen menu and exits from one menu item to change the input signal SOURCE. Changing the SOURCE is used to return to the monitor at the time. - Electronic Program Guide (EPG) display. Exits from the menu screen. COLOR BUTTON 21. ENTER 11. This button is only...
... list in the "Channel List" menu. You can only watch TV or DTV using the TV or DTV button. Current picture information is displayed on the upper left corner of the monitor or to another horizontally, vertically or adjusts selected menu values. P.MODE, M/B (MagicBright) For more information > TTX / ...List" on -screen menu and exits from one menu item to change the input signal SOURCE. Changing the SOURCE is used to return to the monitor at the time. - Electronic Program Guide (EPG) display. Exits from the menu screen. COLOR BUTTON 21. ENTER 11. This button is only...

User Manual (ENGLISH)
Page 19
...Available 28. Then press the button again to change the screen size. PC/ DVI mode : / 4:3 TV/DTV /Ext. Available In PC mode Only 24. SUBTITLE 27. Press to circle through available preconfigured modes. (Standard > Music > Movie > Speech > Custom) Adjusts the screen display automatically. P.SIZE 25.... PIP-Not Available PC / DVI Mode : M/B ( MagicBright ) MagicBright is displayed on the remote control while watching TV. The monitor has a built-in high fidelity stereo amplifier. Introduction The monitor has three automatic picture settings that are watching. S.MODE 23.
...Available 28. Then press the button again to change the screen size. PC/ DVI mode : / 4:3 TV/DTV /Ext. Available In PC mode Only 24. SUBTITLE 27. Press to circle through available preconfigured modes. (Standard > Music > Movie > Speech > Custom) Adjusts the screen display automatically. P.SIZE 25.... PIP-Not Available PC / DVI Mode : M/B ( MagicBright ) MagicBright is displayed on the remote control while watching TV. The monitor has a built-in high fidelity stereo amplifier. Introduction The monitor has three automatic picture settings that are watching. S.MODE 23.
User Manual (ENGLISH)
Page 25
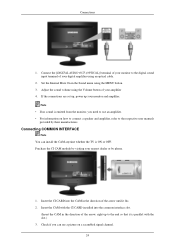
....) 3. Connecting COMMON INTERFACE Note You can see a picture on how to connect a speaker and amplifier, refer to use an amplifier. • For information on a scrambled signal channel. 24 Connect the [DIGITAL AUDIO OUT (OPTICAL)] terminal of your monitor to the end so that it fits. 2. Adjust... the sound volume using an optical cable. 2. Purchase the CI CAM module by visiting your monitor and amplifier. Check if you need to...
....) 3. Connecting COMMON INTERFACE Note You can see a picture on how to connect a speaker and amplifier, refer to use an amplifier. • For information on a scrambled signal channel. 24 Connect the [DIGITAL AUDIO OUT (OPTICAL)] terminal of your monitor to the end so that it fits. 2. Adjust... the sound volume using an optical cable. 2. Purchase the CI CAM module by visiting your monitor and amplifier. Check if you need to...


