Quick Guide (ENGLISH)
Page 3
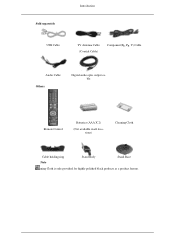
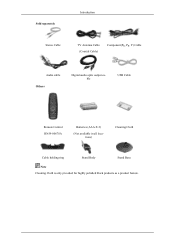
Sold separately Introduction USB Cable TV Antenna Cable (Coaxial Cable) Component(PR, PB, Y) Cable Audio Cable Others Digital audio optic output cable Remote Control Batteries (AAA X 2) (Not available in all locations) Cleaning Cloth Cable holding ring Note Stand Body Stand Base Cleaning Cloth is only provided for highly polished black products as a product feature.
Sold separately Introduction USB Cable TV Antenna Cable (Coaxial Cable) Component(PR, PB, Y) Cable Audio Cable Others Digital audio optic output cable Remote Control Batteries (AAA X 2) (Not available in all locations) Cleaning Cloth Cable holding ring Note Stand Body Stand Base Cleaning Cloth is only provided for highly polished black products as a product feature.
Quick Guide (ENGLISH)
Page 4
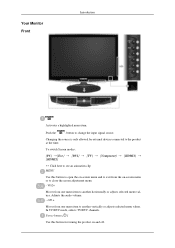
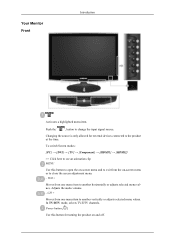
...] HDMI2] >> Click here to see an animation clip MENU Use this button for external devices connected to change the input signal source. In TV/DTV mode, selects TV/DTV channels. Changing the source is only allowed for turning the product on -screen menu and to exit from one menu item to another... + Moves from one menu item to another horizontally or adjusts selected menu values. Power button [ ] Use this button to open the on and off. Your Monitor Front Introduction Activates a highlighted menu item.
...] HDMI2] >> Click here to see an animation clip MENU Use this button for external devices connected to change the input signal source. In TV/DTV mode, selects TV/DTV channels. Changing the source is only allowed for turning the product on -screen menu and to exit from one menu item to another... + Moves from one menu item to another horizontally or adjusts selected menu values. Power button [ ] Use this button to open the on and off. Your Monitor Front Introduction Activates a highlighted menu item.
Quick Guide (ENGLISH)
Page 6
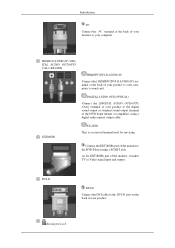
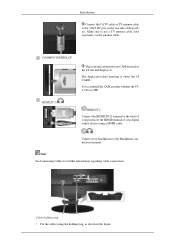
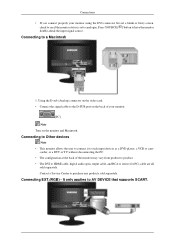
...IN / DIGITAL AUDIO OUT(OPTICAL) / EX-LINK HDMI/PC/DVI-D AUDIO IN Connect the [ HDMI/PC/DVI-D AUDIO IN ] terminal at the back of your monitor to the DVI-D port on the back of your product. DVI-D DVI-D Connect the DVI cable to your computer. As for servicing. Introduction PC Connect... OUT(OPTICAL) Connect the [DIGITAL AUDIO OUT(OPTICAL)] terminal of your product to the digital sound output or standard sound output terminal of the monitor, it makes TV or Video signal input and output. EXT(RGB) EX-LINK This is a reserved terminal used for EXT(RGB) port of the DVD home theater...
...IN / DIGITAL AUDIO OUT(OPTICAL) / EX-LINK HDMI/PC/DVI-D AUDIO IN Connect the [ HDMI/PC/DVI-D AUDIO IN ] terminal at the back of your monitor to the DVI-D port on the back of your product. DVI-D DVI-D Connect the DVI cable to your computer. As for servicing. Introduction PC Connect... OUT(OPTICAL) Connect the [DIGITAL AUDIO OUT(OPTICAL)] terminal of your product to the digital sound output or standard sound output terminal of the monitor, it makes TV or Video signal input and output. EXT(RGB) EX-LINK This is a reserved terminal used for EXT(RGB) port of the DVD home theater...
Quick Guide (ENGLISH)
Page 8
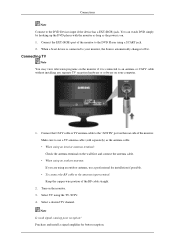
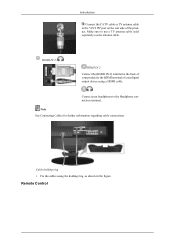
... This contains information on the rear side of your product to the HDMI terminal of the product. You can install the CAM anytime whether the TV is about the CI CARD. Note See Connecting Cables for further information regarding cable connections. Cable holding ring, as the antenna cable. HDMI IN 2 / ...at the back of your digital output device using the holding ring • Fix the cables using a HDMI cable. Introduction Connect the CATV cable or TV antenna cable to the "ANT IN" port on CAM inserted in the figure. Make sure to the Headphone connection terminal.
... This contains information on the rear side of your product to the HDMI terminal of the product. You can install the CAM anytime whether the TV is about the CI CARD. Note See Connecting Cables for further information regarding cable connections. Cable holding ring, as the antenna cable. HDMI IN 2 / ...at the back of your digital output device using the holding ring • Fix the cables using a HDMI cable. Introduction Connect the CATV cable or TV antenna cable to the "ANT IN" port on CAM inserted in the figure. Make sure to the Headphone connection terminal.
Quick Guide (ENGLISH)
Page 9
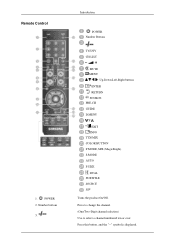
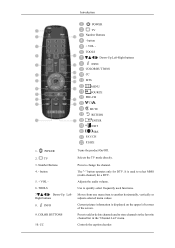
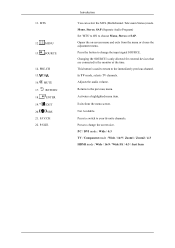
POWER 2. Press to change the channel. (One/Two-Digit channel selection) Use to select a channel numbered ten or over. Remote Control 1. Number buttons 3. Press this button, and the "--" symbol is displayed. Introduction POWER Number Buttons TV/DTV CH LIST MUTE MENU Up-Down Left-Right buttons ENTER RETURN SOURCE PRE-CH GUIDE D.MENU P EXIT INFO TTX/MIX COLOR BUTTON P.MODE, M/B (MagicBright) S.MODE AUTO P.SIZE DUAL SUBTITLE SOURCE PIP Turns the product On/Off.
POWER 2. Press to change the channel. (One/Two-Digit channel selection) Use to select a channel numbered ten or over. Remote Control 1. Number buttons 3. Press this button, and the "--" symbol is displayed. Introduction POWER Number Buttons TV/DTV CH LIST MUTE MENU Up-Down Left-Right buttons ENTER RETURN SOURCE PRE-CH GUIDE D.MENU P EXIT INFO TTX/MIX COLOR BUTTON P.MODE, M/B (MagicBright) S.MODE AUTO P.SIZE DUAL SUBTITLE SOURCE PIP Turns the product On/Off.
Quick Guide (ENGLISH)
Page 10
...Moves from one menu item to the favorite channel list in the "Channel List" menu. You cannot watch TV using the SOURCE button - TV channels provide written information services via teletext. - Press to the monitor at the time. - MENU 9. D.MENU 16. INFO 19. Adjusts the audio volume. Opens the ...on the screen. You can only watch TV or DTV using the TV or DTV button. This button is only allowed for external ...
...Moves from one menu item to the favorite channel list in the "Channel List" menu. You cannot watch TV using the SOURCE button - TV channels provide written information services via teletext. - Press to the monitor at the time. - MENU 9. D.MENU 16. INFO 19. Adjusts the audio volume. Opens the ...on the screen. You can only watch TV or DTV using the TV or DTV button. This button is only allowed for external ...
Quick Guide (ENGLISH)
Page 11
... 24. SOURCE - PIP-Not Available PC / DVI Mode : M/B ( MagicBright ) MagicBright is displayed on the lower center of the image you press this button, current mode is a feature providing the optimum viewing environment depending on the remote control while watching TV. Dgital subtitle display S.MODE 23. Not Available 28. P.SIZE 25. Introduction The monitor...
... 24. SOURCE - PIP-Not Available PC / DVI Mode : M/B ( MagicBright ) MagicBright is displayed on the lower center of the image you press this button, current mode is a feature providing the optimum viewing environment depending on the remote control while watching TV. Dgital subtitle display S.MODE 23. Not Available 28. P.SIZE 25. Introduction The monitor...
Quick Guide (ENGLISH)
Page 13
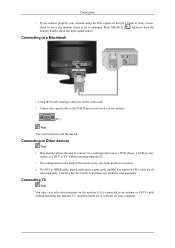
...-check the input signal source. corder, or a DTV or TV without disconnecting the PC. • The configuration at the back of your monitor using the DVI connector but get a blank or fuzzy screen, check to see if the monitor status is set to analogue. Contact a Service Center to stereo (for PC) cable ...EXT.(RGB) - Using the D-sub (Analog) connector on the video card. • Connect the signal cable to the D-SUB port on the back of the monitor may vary from product to product. • The DVI to HDMI cable, digital audio optic output cable, and RCA to purchase any products sold separately...
...-check the input signal source. corder, or a DTV or TV without disconnecting the PC. • The configuration at the back of your monitor using the DVI connector but get a blank or fuzzy screen, check to see if the monitor status is set to analogue. Contact a Service Center to stereo (for PC) cable ...EXT.(RGB) - Using the D-sub (Analog) connector on the video card. • Connect the signal cable to the D-SUB port on the back of the monitor may vary from product to product. • The DVI to HDMI cable, digital audio optic output cable, and RCA to purchase any products sold separately...
Quick Guide (ENGLISH)
Page 14
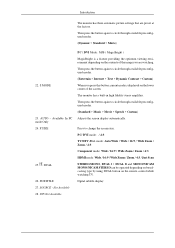
... antenna cable. • When using an interior antenna terminal: Check the antenna terminal on the rear side of the monitor to Ext. Connect the CATV cable or TV antenna cable to the "ANT IN" port on the wall first and connect the antenna cable. • When using...the DVD Player using a SCART jack. 2. Connecting TV Note You may view television programs on the monitor if it is on the monitor. 3. Turn on . 1. Connect the EXT (RGB) port of the monitor. Select a desired TV channel. Make sure to your computer. 1. Select TV using an outdoor antenna, use a professional for better...
... antenna cable. • When using an interior antenna terminal: Check the antenna terminal on the rear side of the monitor to Ext. Connect the CATV cable or TV antenna cable to the "ANT IN" port on the wall first and connect the antenna cable. • When using...the DVD Player using a SCART jack. 2. Connecting TV Note You may view television programs on the monitor if it is on the monitor. 3. Turn on . 1. Connect the EXT (RGB) port of the monitor. Select a desired TV channel. Make sure to your computer. 1. Select TV using an outdoor antenna, use a professional for better...
Quick Guide (ENGLISH)
Page 17
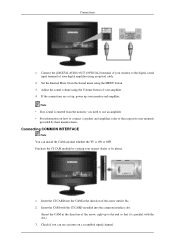
... use an amplifier. • For information on a scrambled signal channel. Purchase the CI CAM module by visiting your monitor and amplifier. Connections 1. Adjust the sound volume using the Volume button of your amplifier 4. Insert the CAM with the CI CARD installed into the CAM ... are set up, power up to the respective user manuals provided by phone. 1. Connecting COMMON INTERFACE Note You can install the CAM anytime whether the TV is emitted from the monitor, you can see a picture on how to connect a speaker and amplifier, refer to the end so that it fits. 2.
... use an amplifier. • For information on a scrambled signal channel. Purchase the CI CAM module by visiting your monitor and amplifier. Connections 1. Adjust the sound volume using the Volume button of your amplifier 4. Insert the CAM with the CI CARD installed into the CAM ... are set up, power up to the respective user manuals provided by phone. 1. Connecting COMMON INTERFACE Note You can install the CAM anytime whether the TV is emitted from the monitor, you can see a picture on how to connect a speaker and amplifier, refer to the end so that it fits. 2.
Quick Guide (ENGLISH)
Page 21
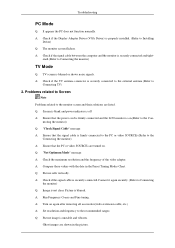
... is off A: Ensure that the power cord is firmly connected and the LCD monitor is on again after removing all accessories(video extension cable, etc.) A: Set resolution and frequency to Connecting the monitor) Q: Image is unstable and vibrates. Ghost images are listed. A: Run... Adapter Driver (VGA Driver) is blurred or shows noise signals. ened.(Refer to Connecting the monitor) TV Mode Q: TV screen is properly installed. (Refer to Connecting TV) 2. Q: Picture rolls vertically. necting the monitor) Q: "Check Signal Cable" message A: Ensure that the PC or video SOURCEs are turned ...
... is off A: Ensure that the power cord is firmly connected and the LCD monitor is on again after removing all accessories(video extension cable, etc.) A: Set resolution and frequency to Connecting the monitor) Q: Image is unstable and vibrates. Ghost images are listed. A: Run... Adapter Driver (VGA Driver) is blurred or shows noise signals. ened.(Refer to Connecting the monitor) TV Mode Q: TV screen is properly installed. (Refer to Connecting TV) 2. Q: Picture rolls vertically. necting the monitor) Q: "Check Signal Cable" message A: Ensure that the PC or video SOURCEs are turned ...
Quick Guide (ENGLISH)
Page 23
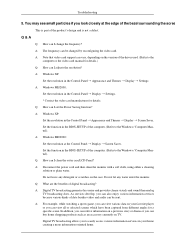
... any detergent or scratches on your home creating a more information-oriented home. Do not leave any water enter the monitor. In addition, you can I clean the outer case/LCD Panel? Q & A Q: How can retrive information on a previous story or drama or you look closely at ...player or you can I set the Power Saving function? Troubleshooting 5. A: Digital TV broadcasting generates less noise and provides clearer visuals and sound than analog TV broadcasting does. A: The frequency can vary, depending on TV. A: Note that video card support can be sent. Q: How can be ...
... any detergent or scratches on your home creating a more information-oriented home. Do not leave any water enter the monitor. In addition, you can I clean the outer case/LCD Panel? Q & A Q: How can retrive information on a previous story or drama or you look closely at ...player or you can I set the Power Saving function? Troubleshooting 5. A: Digital TV broadcasting generates less noise and provides clearer visuals and sound than analog TV broadcasting does. A: The frequency can vary, depending on TV. A: Note that video card support can be sent. Q: How can be ...

Quick Guide (ENGLISH)
Page 24
... ultimately orientated towards HDTV. However, you can receive all digital TVs from Samsung Electronics have to watch digital TV broadcasting. Especially, as that digital broadcasting signals are the highest quality digital TV programs, using any digital TV. A: The analog TV cannot interpret digital signals. Therefore, a digital TV is better to receive digital broadcasting? Q: Can I use my present...
... ultimately orientated towards HDTV. However, you can receive all digital TVs from Samsung Electronics have to watch digital TV broadcasting. Especially, as that digital broadcasting signals are the highest quality digital TV programs, using any digital TV. A: The analog TV cannot interpret digital signals. Therefore, a digital TV is better to receive digital broadcasting? Q: Can I use my present...
Quick Guide (ENGLISH)
Page 3
Sold separately Introduction Stereo Cable TV Antenna Cable (Coaxial Cable) Component(PR, PB, Y) Cable Audio cable Others Digital audio optic output cable USB Cable Remote Control BN59-00678A Batteries (AAA X 2) (Not available in all locations) Cleaning Cloth Cable holding ring Stand Body Stand Base Note Cleaning Cloth is only provided for highly polished black products as a product feature.
Sold separately Introduction Stereo Cable TV Antenna Cable (Coaxial Cable) Component(PR, PB, Y) Cable Audio cable Others Digital audio optic output cable USB Cable Remote Control BN59-00678A Batteries (AAA X 2) (Not available in all locations) Cleaning Cloth Cable holding ring Stand Body Stand Base Note Cleaning Cloth is only provided for highly polished black products as a product feature.
Quick Guide (ENGLISH)
Page 4
Push the ' ', button to close the screen adjustment menu. - In TV/DTV mode, selects TV/DTV channels. To switch Screen modes: [PC] → [DVI] → [TV] → [Component] → [HDMI1] → [HDMI2] >> Click here to see an animation clip MENU Use this button... for external devices connected to the product at the time. CH + Moves from one menu item to another horizontally or adjusts selected menu values. Your Monitor Front Introduction Activates...
Push the ' ', button to close the screen adjustment menu. - In TV/DTV mode, selects TV/DTV channels. To switch Screen modes: [PC] → [DVI] → [TV] → [Component] → [HDMI1] → [HDMI2] >> Click here to see an animation clip MENU Use this button... for external devices connected to the product at the time. CH + Moves from one menu item to another horizontally or adjusts selected menu values. Your Monitor Front Introduction Activates...
Quick Guide (ENGLISH)
Page 8
... the [HDMI IN 2] terminal at the back of your product to the HDMI terminal of the product. Remote Control Introduction Connect the CATV cable or TV antenna cable to the "ANT IN" port on the rear side of your headphones to the Headphone connection terminal. Connect your digital output device using... cables using a HDMI cable. Note See Connecting Cables for further information regarding cable connections. Cable holding ring, as the antenna cable. Make sure to use a TV antenna cable (sold separately) as shown in the figure.
... the [HDMI IN 2] terminal at the back of your product to the HDMI terminal of the product. Remote Control Introduction Connect the CATV cable or TV antenna cable to the "ANT IN" port on the rear side of your headphones to the Headphone connection terminal. Connect your digital output device using... cables using a HDMI cable. Note See Connecting Cables for further information regarding cable connections. Cable holding ring, as the antenna cable. Make sure to use a TV antenna cable (sold separately) as shown in the figure.
Quick Guide (ENGLISH)
Page 9
... TOOLS 7. Current picture information is used functions. Controls the caption decoder. Number Buttons 4. - Press to the favorite channel list in the "Channel List" menu. POWER 2. TV 3. COLOR BUTTONS 10. Use to quickly select frequently used to another horizontally, vertically or adjusts selected menu values. Press to add or delete channels and...Left-Right buttons INFO COLOR BUTTONS CC MTS MENU SOURCE PRE-CH CH MUTE RETURN ENTER EXIT SRS FAV.CH P.SIZE 1. Introduction POWER TV Number Buttons - CC Turns the product On/Off. The "-" button operates only for a DTV.
... TOOLS 7. Current picture information is used functions. Controls the caption decoder. Number Buttons 4. - Press to the favorite channel list in the "Channel List" menu. POWER 2. TV 3. COLOR BUTTONS 10. Use to quickly select frequently used to another horizontally, vertically or adjusts selected menu values. Press to add or delete channels and...Left-Right buttons INFO COLOR BUTTONS CC MTS MENU SOURCE PRE-CH CH MUTE RETURN ENTER EXIT SRS FAV.CH P.SIZE 1. Introduction POWER TV Number Buttons - CC Turns the product On/Off. The "-" button operates only for a DTV.
Quick Guide (ENGLISH)
Page 10
... from the menu or closes the adjustment menu. P.SIZE Introduction You can select the MTS (Multichannel Television Stereo) mode. CH 16. In TV mode, selects TV channels. Press to switch to the previous menu. MTS 12. SRS 21. Returns to your favorite channels. Press to choose Mono, Stereo or...MTS' to ON to change the input signal SOURCE. Opens the on-screen menu and exits from the menu screen. Press the button to the monitor at the time. MUTE 17. Activates a highlighted menu item. MENU 13. This button is only allowed for external devices that are connected to...
... from the menu or closes the adjustment menu. P.SIZE Introduction You can select the MTS (Multichannel Television Stereo) mode. CH 16. In TV mode, selects TV channels. Press to switch to the previous menu. MTS 12. SRS 21. Returns to your favorite channels. Press to choose Mono, Stereo or...MTS' to ON to change the input signal SOURCE. Opens the on-screen menu and exits from the menu screen. Press the button to the monitor at the time. MUTE 17. Activates a highlighted menu item. MENU 13. This button is only allowed for external devices that are connected to...
Quick Guide (ENGLISH)
Page 12
...HDMI cable, digital audio optic output cable, and RCA to such input devices as a DVD player, a VCR or cam- corder, or a DTV or TV without installing any separate TV reception hardware or software on your monitor using the DVI connector but get a blank or fuzzy screen, check to see if the... monitor status is set to purchase any products sold separately. Using the D-sub (Analog) connector on the video card. • Connect the signal cable ...
...HDMI cable, digital audio optic output cable, and RCA to such input devices as a DVD player, a VCR or cam- corder, or a DTV or TV without installing any separate TV reception hardware or software on your monitor using the DVI connector but get a blank or fuzzy screen, check to see if the... monitor status is set to purchase any products sold separately. Using the D-sub (Analog) connector on the video card. • Connect the signal cable ...

Quick Guide (ENGLISH)
Page 13
.... You can watch Component simply by hooking up the Component with the monitor as long as the antenna cable. • When using an interior antenna terminal: Check the antenna terminal on . Select TV using an outdoor antenna, use a professional for better reception. Purchase and install a signal amplifier for ...possible. • To connect the RF cable to the "ANT IN" port on the monitor. 3. Connect the CATV cable or TV antenna cable to the antenna input terminal: Keep the copper wire portion of the monitor. Make sure to the DVD / DTV Set Top Box input if the device has a...
.... You can watch Component simply by hooking up the Component with the monitor as long as the antenna cable. • When using an interior antenna terminal: Check the antenna terminal on . Select TV using an outdoor antenna, use a professional for better reception. Purchase and install a signal amplifier for ...possible. • To connect the RF cable to the "ANT IN" port on the monitor. 3. Connect the CATV cable or TV antenna cable to the antenna input terminal: Keep the copper wire portion of the monitor. Make sure to the DVD / DTV Set Top Box input if the device has a...


