User Manual (user Manual) (ver.1.1) (English)
Page 5
... CD-ROM. Shooting options 38 Learn about your camera's layout, icons, and basic functions for shooting. You will also learn how to connect your camera to your camera's settings. Playback/Editing 59 Learn how to record a video or voice memo. Appendixes 87 Refer to the "OpenSourceInfo.pdf" in shooting mode. Organization of this manual without prior permission. • For Open Source License information, refer to error messages, specifications, and maintenance...
... CD-ROM. Shooting options 38 Learn about your camera's layout, icons, and basic functions for shooting. You will also learn how to connect your camera to your camera's settings. Playback/Editing 59 Learn how to record a video or voice memo. Appendixes 87 Refer to the "OpenSourceInfo.pdf" in shooting mode. Organization of this manual without prior permission. • For Open Source License information, refer to error messages, specifications, and maintenance...

User Manual (user Manual) (ver.1.1) (English)
Page 6
... Auto Focus DIS Digital Image Stabilization DPOF Digital Print Order Format EV Exposure Value ISO International Organization for Standardization WB White Balance 5 For example: Select Shooting → White Balance represents select Shooting, and then select White Balance. * Annotation Abbreviations used in this manual Shooting mode Smart Auto Indication Program Scene Movie Smart Movie Shooting mode icons These icons indicate that a function is available in the corresponding modes. for all scenes. The mode may not support functions for example: [Shutter...
... Auto Focus DIS Digital Image Stabilization DPOF Digital Print Order Format EV Exposure Value ISO International Organization for Standardization WB White Balance 5 For example: Select Shooting → White Balance represents select Shooting, and then select White Balance. * Annotation Abbreviations used in this manual Shooting mode Smart Auto Indication Program Scene Movie Smart Movie Shooting mode icons These icons indicate that a function is available in the corresponding modes. for all scenes. The mode may not support functions for example: [Shutter...
User Manual (user Manual) (ver.1.1) (English)
Page 9
... • Deleting all files on the memory card 64 • Viewing files as a slide show 65 • Viewing files on a TV 73 • Connecting your camera to a computer 74 • Adjusting sound and volume 83 • Adjusting the brightness of the display 83 • Changing the display language 84 • Setting the date and time 84 • Formatting the memory card 84 • Troubleshooting 97...
... • Deleting all files on the memory card 64 • Viewing files as a slide show 65 • Viewing files on a TV 73 • Connecting your camera to a computer 74 • Adjusting sound and volume 83 • Adjusting the brightness of the display 83 • Changing the display language 84 • Setting the date and time 84 • Formatting the memory card 84 • Troubleshooting 97...
User Manual (user Manual) (ver.1.1) (English)
Page 10
... to a photo 37 Shooting options 38 Selecting a resolution and quality 39 Selecting a resolution 39 Selecting image quality 39 Using the timer 40 Shooting in the dark 41 Preventing red-eye 41 Using the flash 41 Adjusting the ISO speed 42 Changing the camera's focus 43 Using macro 43 Using auto focus 43 Using tracking auto focus 44 Adjusting the focus area 45 Using face detection 46 Detecting faces 46 Taking a self-portrait shot 47 Taking a smile shot 47 Detecting eye blinking 48 Using smart face...
... to a photo 37 Shooting options 38 Selecting a resolution and quality 39 Selecting a resolution 39 Selecting image quality 39 Using the timer 40 Shooting in the dark 41 Preventing red-eye 41 Using the flash 41 Adjusting the ISO speed 42 Changing the camera's focus 43 Using macro 43 Using auto focus 43 Using tracking auto focus 44 Adjusting the focus area 45 Using face detection 46 Detecting faces 46 Taking a self-portrait shot 47 Taking a smile shot 47 Detecting eye blinking 48 Using smart face...
User Manual (user Manual) (ver.1.1) (English)
Page 11
... 74 Transferring files using Intelli-studio 75 Transferring files by connecting the camera as a removable disk .. 77 Disconnecting the camera (for Windows XP 78 Transferring files to your Mac computer 79 Printing photos with a PictBridge photo printer .......... 80 Settings 81 Camera settings menu 82 Accessing the settings menu 82 Sound 83 Display 83 Settings 84 Appendixes 87 Error messages 88 Camera maintenance 89 Cleaning your camera 89 Using or storing the camera 90 About memory cards 91 About the battery 93 Before contacting a service center 97 Camera specifications 100...
... 74 Transferring files using Intelli-studio 75 Transferring files by connecting the camera as a removable disk .. 77 Disconnecting the camera (for Windows XP 78 Transferring files to your Mac computer 79 Printing photos with a PictBridge photo printer .......... 80 Settings 81 Camera settings menu 82 Accessing the settings menu 82 Sound 83 Display 83 Settings 84 Appendixes 87 Error messages 88 Camera maintenance 89 Cleaning your camera 89 Using or storing the camera 90 About memory cards 91 About the battery 93 Before contacting a service center 97 Camera specifications 100...
User Manual (user Manual) (ver.1.1) (English)
Page 12
Basic functions Learn about your camera 16 Performing the initial setup 17 Learning icons 18 Selecting options 19 Setting the display and sound 21 Changing the display type 21 Setting the sound 21 Taking photos 22 Zooming 23 Reducing camera shake (DIS 25 Tips for shooting. Unpacking 12 Camera layout 13 Inserting the battery and memory card 15 Charging the battery and turning your camera on ......... 16 Charging the battery 16 Turning on your camera's layout, icons, and basic functions for getting a clearer photo 26
Basic functions Learn about your camera 16 Performing the initial setup 17 Learning icons 18 Selecting options 19 Setting the display and sound 21 Changing the display type 21 Setting the sound 21 Taking photos 22 Zooming 23 Reducing camera shake (DIS 25 Tips for shooting. Unpacking 12 Camera layout 13 Inserting the battery and memory card 15 Charging the battery and turning your camera on ......... 16 Charging the battery 16 Turning on your camera's layout, icons, and basic functions for getting a clearer photo 26

User Manual (user Manual) (ver.1.1) (English)
Page 27
... the shutter button When is blocking the lens. The aperture remains open longer and it may be harder to hold the camera still. • Use a tripod or set the flash option to take the photo if the focus frame appears in . (p. 41) • Set ISO speed options. (p. 42) Basic functions 26 Focus frame • Press [Shutter] to Fill in green. • Change the composition and half- The camera adjusts the focus and exposure automatically...
... the shutter button When is blocking the lens. The aperture remains open longer and it may be harder to hold the camera still. • Use a tripod or set the flash option to take the photo if the focus frame appears in . (p. 41) • Set ISO speed options. (p. 42) Basic functions 26 Focus frame • Press [Shutter] to Fill in green. • Change the composition and half- The camera adjusts the focus and exposure automatically...
User Manual (user Manual) (ver.1.1) (English)
Page 31
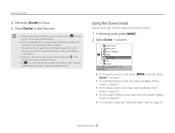
... on page 34. Extended functions 30 appears • Even if it changes settings often to take the photo. • If the camera does not recognize a proper scene mode, and the camera uses default settings. Magic Frame Beauty Shot Object Highlight Night Landscape Text Sunset This mode is appropriate for a specific scene. 1 In Shooting mode, press [ ]. 2 Select Scene → a scene. Shooting modes 4 Half-press [Shutter] to focus. 5 Press [Shutter] to select appropriate...
... on page 34. Extended functions 30 appears • Even if it changes settings often to take the photo. • If the camera does not recognize a proper scene mode, and the camera uses default settings. Magic Frame Beauty Shot Object Highlight Night Landscape Text Sunset This mode is appropriate for a specific scene. 1 In Shooting mode, press [ ]. 2 Select Scene → a scene. Shooting modes 4 Half-press [Shutter] to focus. 5 Press [Shutter] to select appropriate...
User Manual (user Manual) (ver.1.1) (English)
Page 36
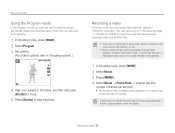
... display. Extended functions 35 Shooting modes Using the Program mode In the Program mode, you can record high-definition videos in the frame, and then half-press [Shutter] to focus. 5 Press [Shutter] to take the photo. To record high-resolution or high-speed videos, use memory cards with slow writing speeds will not support high resolution videos and high-speed videos. You can record up to 4 GB (approximately 11 minutes) at 1280x720 resolution and the camera saves recorded videos as MJPEG files...
... display. Extended functions 35 Shooting modes Using the Program mode In the Program mode, you can record high-definition videos in the frame, and then half-press [Shutter] to focus. 5 Press [Shutter] to take the photo. To record high-resolution or high-speed videos, use memory cards with slow writing speeds will not support high resolution videos and high-speed videos. You can record up to 4 GB (approximately 11 minutes) at 1280x720 resolution and the camera saves recorded videos as MJPEG files...

User Manual (user Manual) (ver.1.1) (English)
Page 39
... you can set in the dark 41 Preventing red-eye 41 Using the flash 41 Adjusting the ISO speed 42 Changing the camera's focus 43 Using macro 43 Using auto focus 43 Using tracking auto focus 44 Adjusting the focus area 45 Using face detection 46 Detecting faces 46 Taking a self-portrait shot 47 Taking a smile shot 47 Detecting eye blinking 48 Using smart face recognition 48 Registering faces as your favorites (My Star) ...... 49 Adjusting brightness and color 51 Adjusting the exposure manually (EV...
... you can set in the dark 41 Preventing red-eye 41 Using the flash 41 Adjusting the ISO speed 42 Changing the camera's focus 43 Using macro 43 Using auto focus 43 Using tracking auto focus 44 Adjusting the focus area 45 Using face detection 46 Detecting faces 46 Taking a self-portrait shot 47 Taking a smile shot 47 Detecting eye blinking 48 Using smart face recognition 48 Registering faces as your favorites (My Star) ...... 49 Adjusting brightness and color 51 Adjusting the exposure manually (EV...
User Manual (user Manual) (ver.1.1) (English)
Page 40
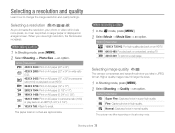
Selecting image quality The camera compresses and saves the photos you take in larger file sizes. 1 In Shooting mode, press [ ]. 2 Select Shooting → Quality → an option. When taking a photo 1 In Shooting mode, press [ ]. 2 Select Shooting → Photo Size → an option. Option Description 1280 X 720 HQ: For high-quality play back on an HDTV. 640 X 480: For play back on an HDTV. 3648 X 2736: Print on A3 paper (12" x 17...
Selecting image quality The camera compresses and saves the photos you take in larger file sizes. 1 In Shooting mode, press [ ]. 2 Select Shooting → Quality → an option. When taking a photo 1 In Shooting mode, press [ ]. 2 Select Shooting → Photo Size → an option. Option Description 1280 X 720 HQ: For high-quality play back on an HDTV. 640 X 480: For play back on an HDTV. 3648 X 2736: Print on A3 paper (12" x 17...

User Manual (user Manual) (ver.1.1) (English)
Page 43
... time. • Flash options are not available if you set Continuous, Motion Capture, AEB options or select Self-Portrait or Blink Detection. • Make sure that your subjects are within the recommended distance from the flash. (p. 100) • If light from blurring. • The camera will display the shake warning ( ) when you are shooting in low light. The higher ISO speed you select, the more image...
... time. • Flash options are not available if you set Continuous, Motion Capture, AEB options or select Self-Portrait or Blink Detection. • Make sure that your subjects are within the recommended distance from the flash. (p. 100) • If light from blurring. • The camera will display the shake warning ( ) when you are shooting in low light. The higher ISO speed you select, the more image...
User Manual (user Manual) (ver.1.1) (English)
Page 74
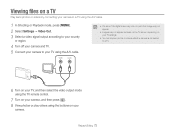
... screen depending on your TV using the A/V cable. Playback/Editing 73 Viewing files on a TV Play back photos or videos by connecting your camera to a TV using the A/V cable. 1 In Shooting or Playback mode, press [ ]. 2 Select Settings → Video Out. 3 Select a video signal output according to your country or region. 4 Turn off your camera and TV. 5 Connect your camera to a TV. 6 Turn on your TV, and then select the video output mode using the TV remote control. 7 Turn on your camera...
... screen depending on your TV using the A/V cable. Playback/Editing 73 Viewing files on a TV Play back photos or videos by connecting your camera to a TV using the A/V cable. 1 In Shooting or Playback mode, press [ ]. 2 Select Settings → Video Out. 3 Select a video signal output according to your country or region. 4 Turn off your camera and TV. 5 Connect your camera to a TV. 6 Turn on your TV, and then select the video output mode using the TV remote control. 7 Turn on your camera...
User Manual (user Manual) (ver.1.1) (English)
Page 77
Videos: MP4 (Video: H.264, Audio: AAC), WMV (WMV 7/8/9), AVI (MJPEG) -- Transfer files to a folder on the camera. You can update the firmware of Intelli-studio by selecting Web Support → Upgrade firmware for the connected devicev from the program toolbar. • If you to play back and edit files. To install the program, select Tool → Install Intelli-studio on PC. • You cannot edit files directly on your...
Videos: MP4 (Video: H.264, Audio: AAC), WMV (WMV 7/8/9), AVI (MJPEG) -- Transfer files to a folder on the camera. You can update the firmware of Intelli-studio by selecting Web Support → Upgrade firmware for the connected devicev from the program toolbar. • If you to play back and edit files. To install the program, select Tool → Install Intelli-studio on PC. • You cannot edit files directly on your...

User Manual (user Manual) (ver.1.1) (English)
Page 78
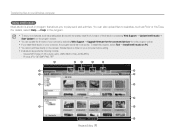
..., store files in My Folder, or register faces Transferring files by connecting the camera as a removable disk Connect the camera to your computer as a removable disk. 1 In Shooting or Playback mode, press [ ]. 2 Select Settings → PC Software → Off. 3 Turn off the camera. 4 Connect the camera to your computer with the indicator light (▲) into your files. Playback/Editing 77 If the cable is not responsible for any loss of the cable with the USB cable. You...
..., store files in My Folder, or register faces Transferring files by connecting the camera as a removable disk Connect the camera to your computer as a removable disk. 1 In Shooting or Playback mode, press [ ]. 2 Select Settings → PC Software → Off. 3 Turn off the camera. 4 Connect the camera to your computer with the indicator light (▲) into your files. Playback/Editing 77 If the cable is not responsible for any loss of the cable with the USB cable. You...
User Manual (user Manual) (ver.1.1) (English)
Page 86
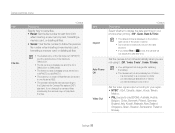
... folder number increases one folder is connected to a computer or printer -- Item Imprint Auto Power Off Video Out * Default Description Select whether to display the date and time on the bottomright corner of files that can be stored in mode, the camera will not automatically turn off when: -- Set the camera to turn off automatically when you are not using it is 9999. • The camera defines file names according to the Digital...
... folder number increases one folder is connected to a computer or printer -- Item Imprint Auto Power Off Video Out * Default Description Select whether to display the date and time on the bottomright corner of files that can be stored in mode, the camera will not automatically turn off when: -- Set the camera to turn off automatically when you are not using it is 9999. • The camera defines file names according to the Digital...

User Manual (user Manual) (ver.1.1) (English)
Page 98
... having problems with your pocket. • Using the flash or recording videos depletes the battery quickly. Situation Cannot turn off suddenly The camera is losing battery power quickly Suggested remedies • Make sure that the battery is inserted. • Make sure that the battery is inserted correctly. • Charge the battery. • Charge the battery. • Your camera may be set to the malfunction, such as the memory card and battery. Situation Suggested remedies Cannot take photos...
... having problems with your pocket. • Using the flash or recording videos depletes the battery quickly. Situation Cannot turn off suddenly The camera is losing battery power quickly Suggested remedies • Make sure that the battery is inserted. • Make sure that the battery is inserted correctly. • Charge the battery. • Charge the battery. • Your camera may be set to the malfunction, such as the memory card and battery. Situation Suggested remedies Cannot take photos...
User Manual (user Manual) (ver.1.1) (English)
Page 99
... is blurry Suggested remedies Set the date and time in the photo do not work The camera screen works poorly The memory card has an error Cannot play back the files on your computer. • Make sure that the focus option you set is suitable for close-up shots. (p. 43) • Make sure that the lens is switched on the flash. (p. 41) • Adjust the ISO speed. (p. 42) • Adjust the exposure value. (p. 51) The TV...
... is blurry Suggested remedies Set the date and time in the photo do not work The camera screen works poorly The memory card has an error Cannot play back the files on your computer. • Make sure that the focus option you set is suitable for close-up shots. (p. 43) • Make sure that the lens is switched on the flash. (p. 41) • Adjust the ISO speed. (p. 42) • Adjust the exposure value. (p. 51) The TV...
User Manual (user Manual) (ver.1.1) (English)
Page 110
... Playback mode 71 in Shooting mode 58 Saturation in Playback mode 71 in Shooting mode 58 Sharpness 58 AF Lamp 86 AF Sound 83 Aperture 34 Auto Contrast Balance (ACB) 51 Specifications 93 Beauty Shot mode 32 Blink detection 48 Burst Auto Exposure Bracket (AEB) 54 Continuous 54 Motion capture 54 C Camera shake 26 Capturing an image from a video 67 Cleaning Body 89 Display 89 Lens 89 B Battery Charging 94 Life 93 D Date/Time Set 84 Date Type 84 Deleting files 64 Digital Image...
... Playback mode 71 in Shooting mode 58 Saturation in Playback mode 71 in Shooting mode 58 Sharpness 58 AF Lamp 86 AF Sound 83 Aperture 34 Auto Contrast Balance (ACB) 51 Specifications 93 Beauty Shot mode 32 Blink detection 48 Burst Auto Exposure Bracket (AEB) 54 Continuous 54 Motion capture 54 C Camera shake 26 Capturing an image from a video 67 Cleaning Body 89 Display 89 Lens 89 B Battery Charging 94 Life 93 D Date/Time Set 84 Date Type 84 Deleting files 64 Digital Image...
User Manual (user Manual) (ver.1.1) (English)
Page 112
... 62 Smart Auto mode 29 Smart button 13 Smart Face Recognition 48 Smart Filter in Playback mode 69 in Shooting mode 55 Smile shot 47 Start image 68, 83 T Timer 40 Tracking focus 44 Transferring files for Mac 79 for Windows 74 V Video Playing 66 Recording 35 Video Out 85 Viewing files as thumbnails 63 by category 62 on TV 73 Slide show 65 Voice memo Playing 67 Recording 37 Volume 83 W White Balance 52 Z Zoom button 13 Zooming 23...
... 62 Smart Auto mode 29 Smart button 13 Smart Face Recognition 48 Smart Filter in Playback mode 69 in Shooting mode 55 Smile shot 47 Start image 68, 83 T Timer 40 Tracking focus 44 Transferring files for Mac 79 for Windows 74 V Video Playing 66 Recording 35 Video Out 85 Viewing files as thumbnails 63 by category 62 on TV 73 Slide show 65 Voice memo Playing 67 Recording 37 Volume 83 W White Balance 52 Z Zoom button 13 Zooming 23...


