User Manual Ver.1.0 (English)
Page 4
... a fire or electric shock. Do not use a damaged power supply cord, plug, or loose outlet when you connect cables or adapters and install batteries and memory cards. Doing so may cause a fire or electric shock. Misusing the battery may damage the screen or external or internal components. Failing to do so may...battery. When you use the AC charger, turn off the camera before you can cause batteries to explode, damage your camera, or cause injury. • Samsung is very hot when fired and may result in fire or electric shock. Do not drop or subject the camera to come in contact with...
... a fire or electric shock. Do not use a damaged power supply cord, plug, or loose outlet when you connect cables or adapters and install batteries and memory cards. Doing so may cause a fire or electric shock. Misusing the battery may damage the screen or external or internal components. Failing to do so may...battery. When you use the AC charger, turn off the camera before you can cause batteries to explode, damage your camera, or cause injury. • Samsung is very hot when fired and may result in fire or electric shock. Do not drop or subject the camera to come in contact with...
User Manual Ver.1.0 (English)
Page 5
... trademarks, intellectual property laws, or public decency ordinances. 4 To prevent unwanted interference, use a damaged charger, battery, or memory card. Use your electronic devices to have the camera repaired. Consult the manufacturers of data. Data transference and your files. This may result ... data transfers that may damage your responsibilities • Data transferred via WLAN could be damaged or erased. Never use only Samsung-approved devices or accessories. Do not use the camera if the screen is operating properly before use . Check that may...
... trademarks, intellectual property laws, or public decency ordinances. 4 To prevent unwanted interference, use a damaged charger, battery, or memory card. Use your electronic devices to have the camera repaired. Consult the manufacturers of data. Data transference and your files. This may result ... data transfers that may damage your responsibilities • Data transferred via WLAN could be damaged or erased. Never use only Samsung-approved devices or accessories. Do not use the camera if the screen is operating properly before use . Check that may...
User Manual Ver.1.0 (English)
Page 15
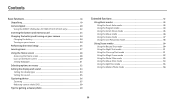
Contents Basic functions...18 Unpacking ...19 Camera layout ...20 Using the DIRECT LINK button (ST150F/ST151F/ST152F only 22 Inserting the battery and memory card 23 Charging the battery and turning on your camera 24 Charging the battery 24 Turning on your camera 24 Performing the initial setup 25 Learning ...
Contents Basic functions...18 Unpacking ...19 Camera layout ...20 Using the DIRECT LINK button (ST150F/ST151F/ST152F only 22 Inserting the battery and memory card 23 Charging the battery and turning on your camera 24 Charging the battery 24 Turning on your camera 24 Performing the initial setup 25 Learning ...
User Manual Ver.1.0 (English)
Page 18
... Display ...123 Connectivity ...124 General ...125 Appendixes...127 Error messages ...128 Camera maintenance 129 Cleaning your camera 129 Using or storing the camera 130 About memory cards 131 About the battery 134 Before contacting a service center 138 Camera specifications 141 Glossary ...145 Index ...150 17
... Display ...123 Connectivity ...124 General ...125 Appendixes...127 Error messages ...128 Camera maintenance 129 Cleaning your camera 129 Using or storing the camera 130 About memory cards 131 About the battery 134 Before contacting a service center 138 Camera specifications 141 Glossary ...145 Index ...150 17

User Manual Ver.1.0 (English)
Page 19
Unpacking 19 Camera layout 20 Using the DIRECT LINK button (ST150F/ST151F/ST152F only 22 Inserting the battery and memory card 23 Charging the battery and turning on your camera 24 Charging the battery 24 Turning on your camera's layout, icons, and basic functions for getting a ...
Unpacking 19 Camera layout 20 Using the DIRECT LINK button (ST150F/ST151F/ST152F only 22 Inserting the battery and memory card 23 Charging the battery and turning on your camera 24 Charging the battery 24 Turning on your camera's layout, icons, and basic functions for getting a ...
User Manual Ver.1.0 (English)
Page 20
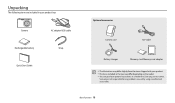
.../USB cable Strap Optional accessories Camera case A/V cable Battery charger Memory card/Memory card adapter • The illustrations may differ depending on the model. • You can purchase optional accessories at a retailer or a Samsung service center. Unpacking The following items are included in your product.... • The items included in the box may differ slightly from the items shipped with your product box. Samsung is not responsible for any problems ...
.../USB cable Strap Optional accessories Camera case A/V cable Battery charger Memory card/Memory card adapter • The illustrations may differ depending on the model. • You can purchase optional accessories at a retailer or a Samsung service center. Unpacking The following items are included in your product.... • The items included in the box may differ slightly from the items shipped with your product box. Samsung is not responsible for any problems ...
User Manual Ver.1.0 (English)
Page 21
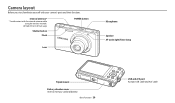
Internal antenna* * Avoid contact with your camera's parts and their functions. Camera layout Before you start, familiarize yourself with the internal antenna while using the wireless network. (ST150F/ST151F/ST152F only) Shutter button Flash POWER button Lens Microphone Speaker AF-assist light/Timer lamp Tripod mount Battery chamber cover Insert a memory card and battery Basic functions 20 USB and A/V port Accepts USB cable and A/V cable
Internal antenna* * Avoid contact with your camera's parts and their functions. Camera layout Before you start, familiarize yourself with the internal antenna while using the wireless network. (ST150F/ST151F/ST152F only) Shutter button Flash POWER button Lens Microphone Speaker AF-assist light/Timer lamp Tripod mount Battery chamber cover Insert a memory card and battery Basic functions 20 USB and A/V port Accepts USB cable and A/V cable
User Manual Ver.1.0 (English)
Page 24
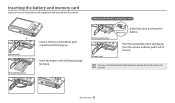
... the camera, and then pull it out of the slot. Basic functions 23 Inserting the battery and memory card Learn how to release the Battery lock battery. Memory card Rechargeable battery Insert a memory card with the Samsung logo facing up . Removing the battery and memory card Rechargeable battery Memory card Slide the lock up to insert the battery and an optional...
... the camera, and then pull it out of the slot. Basic functions 23 Inserting the battery and memory card Learn how to release the Battery lock battery. Memory card Rechargeable battery Insert a memory card with the Samsung logo facing up . Removing the battery and memory card Rechargeable battery Memory card Slide the lock up to insert the battery and an optional...

User Manual Ver.1.0 (English)
Page 28
... Stabilization (DIS) Focus Image adjustment (sharpness, contrast, and saturation) Timer Basic functions 27 3 Shooting information Icon Description Current date Current time Available number of photos Memory card inserted • : Fully charged • : Partially charged • : Empty (Recharge) • : Charging (Connected with the charger) Aperture value Shutter speed Available recording time Auto focus...
... Stabilization (DIS) Focus Image adjustment (sharpness, contrast, and saturation) Timer Basic functions 27 3 Shooting information Icon Description Current date Current time Available number of photos Memory card inserted • : Fully charged • : Partially charged • : Empty (Recharge) • : Charging (Connected with the charger) Aperture value Shutter speed Available recording time Auto focus...
User Manual Ver.1.0 (English)
Page 46
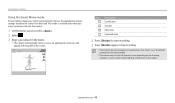
Extended functions 45 An appropriate scene icon will appear at the top left of the screen. This mode is available only when you insert a memory card into the camera. 1 On the Home screen, scroll to . 2 Select . 3 Align your camera automatically chooses the appropriate camera settings based on the shooting conditions, such ...
Extended functions 45 An appropriate scene icon will appear at the top left of the screen. This mode is available only when you insert a memory card into the camera. 1 On the Home screen, scroll to . 2 Select . 3 Align your camera automatically chooses the appropriate camera settings based on the shooting conditions, such ...
User Manual Ver.1.0 (English)
Page 47
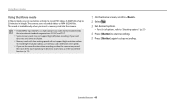
...H.264 (MPEG-4 part10/AVC) is a high-compression video format established by the international standards organizations ISO-IEC and ITU-T. • Some memory cards may record the noise of the zoom operating. To decrease zoom noise, use the zoom function when recording a video, the camera may not...the Movie mode In Movie mode, you can customize settings to record HD videos (1280X720) of up to stop recording. If your card does not, set a lower resolution. • Memory cards with faster write speeds. • If you use the Sound Alive function. (p. 75) 1 On the Home screen, scroll to...
...H.264 (MPEG-4 part10/AVC) is a high-compression video format established by the international standards organizations ISO-IEC and ITU-T. • Some memory cards may record the noise of the zoom operating. To decrease zoom noise, use the zoom function when recording a video, the camera may not...the Movie mode In Movie mode, you can customize settings to record HD videos (1280X720) of up to stop recording. If your card does not, set a lower resolution. • Memory cards with faster write speeds. • If you use the Sound Alive function. (p. 75) 1 On the Home screen, scroll to...
User Manual Ver.1.0 (English)
Page 55
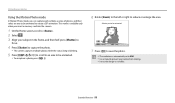
... the subject appear in the frame, and then half-press [Shutter] to focus. 5 Press [Shutter] to capture a photo. • Depending on the option you insert a memory card into the camera. 1 On the Home screen, scroll to . 2 Select . 3 Select an effect. Apply a black and white effect. Create a cold and monotone effect. 4 Press [Shutter...
... the subject appear in the frame, and then half-press [Shutter] to focus. 5 Press [Shutter] to capture a photo. • Depending on the option you insert a memory card into the camera. 1 On the Home screen, scroll to . 2 Select . 3 Select an effect. Apply a black and white effect. Create a cold and monotone effect. 4 Press [Shutter...
User Manual Ver.1.0 (English)
Page 57
...] to the left or right to reduce or enlarge the area. Using Scene modes Using the Motion Photo mode In Motion Photo mode, you insert a memory card into the camera. 1 On the Home screen, scroll to . 2 Select . 3 Align your camera from shaking. • It may take longer to save the photo. •...
...] to the left or right to reduce or enlarge the area. Using Scene modes Using the Motion Photo mode In Motion Photo mode, you insert a memory card into the camera. 1 On the Home screen, scroll to . 2 Select . 3 Align your camera from shaking. • It may take longer to save the photo. •...
User Manual Ver.1.0 (English)
Page 74
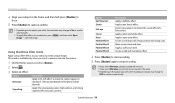
... options may take longer to save the photos depending on the capacity of 30 photos). In these cases, select one of your memory card. Icon Description Single: Capture a single photo. Continuous: • While you are pressing [Shutter], the camera continuously captures photos.... • The maximum number of photos depends on the memory card capacity and performance. Use a tripod for best results. Shooting options 73 Icon Description Motion Capture: While you are pressing [Shutter], the...
... options may take longer to save the photos depending on the capacity of 30 photos). In these cases, select one of your memory card. Icon Description Single: Capture a single photo. Continuous: • While you are pressing [Shutter], the camera continuously captures photos.... • The maximum number of photos depends on the memory card capacity and performance. Use a tripod for best results. Shooting options 73 Icon Description Motion Capture: While you are pressing [Shutter], the...
User Manual Ver.1.0 (English)
Page 80
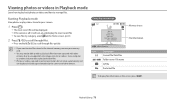
..., press [D]. Use a computer or another device to edit or play back photos or videos and how to manage files. Playback/Editing 79 Photo file information Memory in use File Information Album/Zoom In Icon Description Current file/Total files Folder name-File name GIF file Protected file To display file information..., due to edit or play back files that were captured with other devices. Starting Playback mode View photos or play videos stored in the internal memory, remove your memory card. • You may not be able to unsupported sizes (image size, etc) or codecs.
..., press [D]. Use a computer or another device to edit or play back photos or videos and how to manage files. Playback/Editing 79 Photo file information Memory in use File Information Album/Zoom In Icon Description Current file/Total files Folder name-File name GIF file Protected file To display file information..., due to edit or play back files that were captured with other devices. Starting Playback mode View photos or play videos stored in the internal memory, remove your memory card. • You may not be able to unsupported sizes (image size, etc) or codecs.

User Manual Ver.1.0 (English)
Page 84
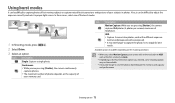
... to step 3. 2 Select Delete → Delete All. 3 When the pop-up message appears, select Yes. Copying files to a memory card Copy files from the internal memory to a memory card. 1 In Playback mode, press [m]. 2 Select Copy to Card. Viewing photos or videos in Playback mode Deleting multiple files You can select all files, and then delete them...
... to step 3. 2 Select Delete → Delete All. 3 When the pop-up message appears, select Yes. Copying files to a memory card Copy files from the internal memory to a memory card. 1 In Playback mode, press [m]. 2 Select Copy to Card. Viewing photos or videos in Playback mode Deleting multiple files You can select all files, and then delete them...

User Manual Ver.1.0 (English)
Page 95
... Windows OS computer Connect the camera to the computer. Transferring files to the computer Connect the camera to a computer to transfer files from the camera's memory card to your computer as a removable disk. 1 On the Home screen, scroll to . 2 Select . 3 Select Connectivity → i-Launcher → Off. 4 Turn off the camera. 5 Connect the...
... Windows OS computer Connect the camera to the computer. Transferring files to the computer Connect the camera to a computer to transfer files from the camera's memory card to your computer as a removable disk. 1 On the Home screen, scroll to . 2 Select . 3 Select Connectivity → i-Launcher → Off. 4 Turn off the camera. 5 Connect the...
User Manual Ver.1.0 (English)
Page 105
... any problem caused by entering such information. • Available network connections may differ by country. • The WLAN feature of your camera must insert a memory card to use the Wi-Fi features. • The quality of your contract. • If you cannot connect to a WLAN, try another AP from the... to connect to a network may not be determined by some modes. • Files that you enter personal information for any payment or credit card information on the AP List. To ensure compliance, use the WLAN feature only in English, the camera may not be able to locate the ...
... any problem caused by entering such information. • Available network connections may differ by country. • The WLAN feature of your camera must insert a memory card to use the Wi-Fi features. • The quality of your contract. • If you cannot connect to a WLAN, try another AP from the... to connect to a network may not be determined by some modes. • Files that you enter personal information for any payment or credit card information on the AP List. To ensure compliance, use the WLAN feature only in English, the camera may not be able to locate the ...

User Manual Ver.1.0 (English)
Page 126
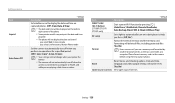
... Item File No. * Default Description Specify how to name files. • Reset: Set the file number to start from 0001 when you insert a new memory card, format a memory card, or delete all files. • Series*: Set the file number to resume from SAM_0001 to SAM_9999, each time a folder is full. • The ...be stored in one folder is SAM_0001. • The file number increases by one, from the previous file number when you insert a new memory card, format a memory card, or delete all files. • The default name of the first folder is 100PHOTO and the default name of your location.
... Item File No. * Default Description Specify how to name files. • Reset: Set the file number to start from 0001 when you insert a new memory card, format a memory card, or delete all files. • Series*: Set the file number to resume from SAM_0001 to SAM_9999, each time a folder is full. • The ...be stored in one folder is SAM_0001. • The file number increases by one, from the previous file number when you insert a new memory card, format a memory card, or delete all files. • The default name of the first folder is 100PHOTO and the default name of your location.
User Manual Ver.1.0 (English)
Page 127
... Your settings will not change when you replace the battery. • The camera will not automatically turn on the bottom right corner of camera, a memory card reader, or a computer. Settings 126 Item DIRECT LINK (Wi-Fi Button) (ST150F/ST151F/ ST152F only) AF Lamp Format Description * Default Start a...delete all files, including protected files. (Yes, No) Errors can occur if you are playing a slide show or videos. Please format memory cards in Scene mode -- Settings menu Item Imprint Auto Power Off * Default Description Set whether or not to display the date and time on...
... Your settings will not change when you replace the battery. • The camera will not automatically turn on the bottom right corner of camera, a memory card reader, or a computer. Settings 126 Item DIRECT LINK (Wi-Fi Button) (ST150F/ST151F/ ST152F only) AF Lamp Format Description * Default Start a...delete all files, including protected files. (Yes, No) Errors can occur if you are playing a slide show or videos. Please format memory cards in Scene mode -- Settings menu Item Imprint Auto Power Off * Default Description Set whether or not to display the date and time on...


