

Open Source Guide (ENGLISH)
Page 2
... start of each source file to most effectively convey the exclusion of warranty; To apply these terms (or, alternatively, under these terms, attach the following notices to the public, we recommend making it free software that everyone can do so by permitting redistribution under the terms of the greatest possible use to the library...
... start of each source file to most effectively convey the exclusion of warranty; To apply these terms (or, alternatively, under these terms, attach the following notices to the public, we recommend making it free software that everyone can do so by permitting redistribution under the terms of the greatest possible use to the library...
Quick Guide (easy Manual) (ver.1.0) (English)
Page 4
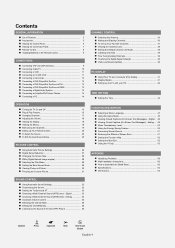
... the Input Source Name 25 PICTURE CONTROL Using Automatic Picture Settings 26 Digital Noise Reduction 27 Changing the Screen Size 28 DNIe (Digital Natural Image engine 29 Selecting the Film Mode 29 Setting the Blue Screen Mode 29 Viewing Picture-in 51 Reducing the Effects of Screen Burn 51 Setting the Function Help 52 Setting the Blue Eye 52 Using the V-Chip 53 APPENDIX Identifying Problems 59 Wall Installation Instructions 60 How to the Sound of the Sub (PIP) Picture 35 CHANNEL CONTROL Selecting the Antenna...
... the Input Source Name 25 PICTURE CONTROL Using Automatic Picture Settings 26 Digital Noise Reduction 27 Changing the Screen Size 28 DNIe (Digital Natural Image engine 29 Selecting the Film Mode 29 Setting the Blue Screen Mode 29 Viewing Picture-in 51 Reducing the Effects of Screen Burn 51 Setting the Function Help 52 Setting the Blue Eye 52 Using the V-Chip 53 APPENDIX Identifying Problems 59 Wall Installation Instructions 60 How to the Sound of the Sub (PIP) Picture 35 CHANNEL CONTROL Selecting the Antenna...

Quick Guide (easy Manual) (ver.1.0) (English)
Page 5
.... V-Chip function. Remote Control The supplied remote can be used to turn the TV on and off. Excellent Picture Quality - DNIe technology provides life-like clear images. Remote Control (BN59-00511A) / AAA Batteries (4301-000103) Power Cord (3903-000144) Owner's Instructions (BN68-00991D) / Quick Setup Guide (BN68-00766P) The following items are available at most DVD players, Set-top boxes, Cable Boxes and VCRs. Accessories Please make sure the following parts are sold...
.... V-Chip function. Remote Control The supplied remote can be used to turn the TV on and off. Excellent Picture Quality - DNIe technology provides life-like clear images. Remote Control (BN59-00511A) / AAA Batteries (4301-000103) Power Cord (3903-000144) Owner's Instructions (BN68-00991D) / Quick Setup Guide (BN68-00766P) The following items are available at most DVD players, Set-top boxes, Cable Boxes and VCRs. Accessories Please make sure the following parts are sold...
Quick Guide (easy Manual) (ver.1.0) (English)
Page 7
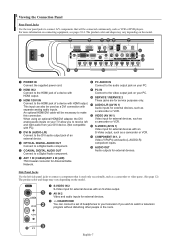
... Audio outputs for Antenna/Cable Network. Connect to the HDMI jack of headphones to watch a television program without disturbing other people in the room. this connection. VIDEO (AV IN 1) When using an optional HDMI/DVI adapter, the DVI Video input for external devices. ˇ HEADPHONE You can also be used only occasionally, such as a camcorder or video game. (See page 12) The product color and shape may vary depending on the model. Œ POWER...
... Audio outputs for Antenna/Cable Network. Connect to the HDMI jack of headphones to watch a television program without disturbing other people in the room. this connection. VIDEO (AV IN 1) When using an optional HDMI/DVI adapter, the DVI Video input for external devices. ˇ HEADPHONE You can also be used only occasionally, such as a camcorder or video game. (See page 12) The product color and shape may vary depending on the model. Œ POWER...

Quick Guide (easy Manual) (ver.1.0) (English)
Page 12
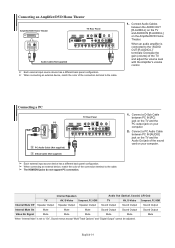
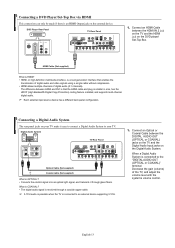
... connecting an external device, match the color of the connection terminal to the cable. DVD Player / Set-Top Box TV Rear Panel 2 Audio Cable (Not supplied) 1 DVI to HDMI Cable (Not supplied) ➢ Each external input source device has a different back panel configuration. ➢ When connecting an external device, match the color of the connection terminal to HDMI Cable or DVI-HDMI Adapter between the AV IN 2 [R-AUDIO-L] jacks on the TV and the AUDIO OUT jacks on the DVD player/ Set-Top Box. 2. Connect Audio Cables between the HDMI 1/DVI IN...
... connecting an external device, match the color of the connection terminal to the cable. DVD Player / Set-Top Box TV Rear Panel 2 Audio Cable (Not supplied) 1 DVI to HDMI Cable (Not supplied) ➢ Each external input source device has a different back panel configuration. ➢ When connecting an external device, match the color of the connection terminal to HDMI Cable or DVI-HDMI Adapter between the AV IN 2 [R-AUDIO-L] jacks on the TV and the AUDIO OUT jacks on the DVD player/ Set-Top Box. 2. Connect Audio Cables between the HDMI 1/DVI IN...

Quick Guide (easy Manual) (ver.1.0) (English)
Page 13
... transmission of digital audio and video signals using a single cable without compression. • HDMI allows multiple channels of the TV, and adjust the volume level with the system's volume control. When a Digital Audio System is smaller in size, has the HDCP (High Bandwidth Digital Copy Protection) coding feature installed, and supports multi-channel digital audio. ➢ Each external input source device has a different back panel configuration. English-13 DVD Player Rear Panel TV Rear Panel 1. Connect an Optical or Coaxial Cable between the HDMI IN 2 jack...
... transmission of digital audio and video signals using a single cable without compression. • HDMI allows multiple channels of the TV, and adjust the volume level with the system's volume control. When a Digital Audio System is smaller in size, has the HDCP (High Bandwidth Digital Copy Protection) coding feature installed, and supports multi-channel digital audio. ➢ Each external input source device has a different back panel configuration. English-13 DVD Player Rear Panel TV Rear Panel 1. Connect an Optical or Coaxial Cable between the HDMI IN 2 jack...
Quick Guide (easy Manual) (ver.1.0) (English)
Page 14
... Speaker Output Speaker Output Speaker Output Sound Output Sound Output Sound Output Internal Mute On Mute Mute Mute Sound Output Sound Output Sound Output Video No Signal Mute Mute Mute Mute Mute Mute When "Internal Mute" is connected to the "AUDIO OUT [R-AUDIO-L]" terminals: Decrease the gain (volume) of the sound card on your computer. Connect a D-Sub Cable between PC IN [AUDIO] jack on the Amplifier/DVD Home Theater. English-14 Connecting a PC PC TV Rear Panel 2 PC Audio Cable (Not supplied) 1 D-Sub Cable (Not supplied) ➢ Each external input source...
... Speaker Output Speaker Output Speaker Output Sound Output Sound Output Sound Output Internal Mute On Mute Mute Mute Sound Output Sound Output Sound Output Video No Signal Mute Mute Mute Mute Mute Mute When "Internal Mute" is connected to the "AUDIO OUT [R-AUDIO-L]" terminals: Decrease the gain (volume) of the sound card on your computer. Connect a D-Sub Cable between PC IN [AUDIO] jack on the Amplifier/DVD Home Theater. English-14 Connecting a PC PC TV Rear Panel 2 PC Audio Cable (Not supplied) 1 D-Sub Cable (Not supplied) ➢ Each external input source...
Quick Guide (easy Manual) (ver.1.0) (English)
Page 41
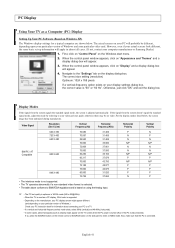
... Windows.) Check your PC instruction book for a typical computer are shown below , the screen image has been optimized during manufacture. For the display modes listed below . If so, press the SOURCE button on the remote control or SOURCE button on the side panel to the "Settings" tab on "Display" and a display dialog-box will probably be no video. First, click on "Control Panel" on using the Analog Input. ➢ • The PC...
... Windows.) Check your PC instruction book for a typical computer are shown below , the screen image has been optimized during manufacture. For the display modes listed below . If so, press the SOURCE button on the remote control or SOURCE button on the side panel to the "Settings" tab on "Display" and a display dialog-box will probably be no video. First, click on "Control Panel" on using the Analog Input. ➢ • The PC...

Quick Guide (easy Manual) (ver.1.0) (English)
Page 59
... again. No picture or sound. The TV operates erratically. Check the antenna connections. The image is too low at maximum volume. Screen is analog: The digital program displayed on the keyboard. Power, Signal Cable. Clean the upper edge of these troubleshooting tips apply, call your nearest Samsung service center. Please check the digital signal strength and input antenna. The HD caption that the "+" and "-" ends of possible problems and solutions. Picture rolls vertically. Move...
... again. No picture or sound. The TV operates erratically. Check the antenna connections. The image is too low at maximum volume. Screen is analog: The digital program displayed on the keyboard. Power, Signal Cable. Clean the upper edge of these troubleshooting tips apply, call your nearest Samsung service center. Please check the digital signal strength and input antenna. The HD caption that the "+" and "-" ends of possible problems and solutions. Picture rolls vertically. Move...
Quick Guide (easy Manual) (ver.1.0) (English)
Page 60
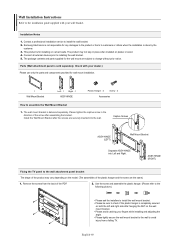
... the back of the PDP. 2. Remove the screws from a falling TV. The package contents and parts supplied for wall mount installation. 1 Wall Mount Bracket Left : 1 Right : 1 ASSY-HINGE Plastic Hanger : 4 Screw : 4 Accessories How to install the wall bracket. 2. Contact a professional installation service to assemble the Wall Mount Bracket 1. Check with your dealer.) Please use only the parts and components provided for the wall mount are subject to the installation guide supplied with your wall bracket. This product is completely...
... the back of the PDP. 2. Remove the screws from a falling TV. The package contents and parts supplied for wall mount installation. 1 Wall Mount Bracket Left : 1 Right : 1 ASSY-HINGE Plastic Hanger : 4 Screw : 4 Accessories How to install the wall bracket. 2. Contact a professional installation service to assemble the Wall Mount Bracket 1. Check with your dealer.) Please use only the parts and components provided for the wall mount are subject to the installation guide supplied with your wall bracket. This product is completely...
Quick Guide (easy Manual) (ver.1.0) (English)
Page 61
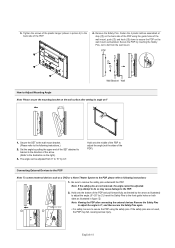
... the back side of the wall mount, push (!) and hook (@) down to fall , causing serious injury. PDP Wall Bracket Wall How to Adjust Mounting Angle Note: Please secure the mounting bracket on the wall surface after connecting the external devices Remove the Safety Pins to adjust the angle to the PDP. 2. Set the angle by pulling the upper end of the SET attached to bracket in the direction of the...
... the back side of the wall mount, push (!) and hook (@) down to fall , causing serious injury. PDP Wall Bracket Wall How to Adjust Mounting Angle Note: Please secure the mounting bracket on the wall surface after connecting the external devices Remove the Safety Pins to adjust the angle to the PDP. 2. Set the angle by pulling the upper end of the SET attached to bracket in the direction of the...
User Manual (user Manual) (ver.1.0) (English)
Page 4
... Connecting a DVD Player/Set-Top Box via HDMI 13 Connecting a Digital Audio System 13 Connecting an Amplifier/DVD Home Theater 14 Connecting a PC 14 OPERATION Turning the TV On and Off 15 Plug & Play Feature 15 Changing Channels 17 Adjusting the Volume 18 Viewing the Display 18 Viewing the Menus 18 Memorizing the Channels 19 Setting Up Your Remote Control 20 To Select the Source 25 To Edit the Input Source Name 25 PICTURE CONTROL Using Automatic Picture Settings 26 Digital Noise Reduction 27 Changing the Screen Size...
... Connecting a DVD Player/Set-Top Box via HDMI 13 Connecting a Digital Audio System 13 Connecting an Amplifier/DVD Home Theater 14 Connecting a PC 14 OPERATION Turning the TV On and Off 15 Plug & Play Feature 15 Changing Channels 17 Adjusting the Volume 18 Viewing the Display 18 Viewing the Menus 18 Memorizing the Channels 19 Setting Up Your Remote Control 20 To Select the Source 25 To Edit the Input Source Name 25 PICTURE CONTROL Using Automatic Picture Settings 26 Digital Noise Reduction 27 Changing the Screen Size...

User Manual (user Manual) (ver.1.0) (English)
Page 7
... 1, 2 Video (Y/PB/PR) and audio (L-AUDIO-R) ˆ OPTICAL DIGITAL AUDIO OUT component inputs. Connect to the HDMI jack of headphones to your DVI device. (Not compatible with PC) Ò S-VIDEO (AV IN 1) Video input for external devices, such as a camcorder or VCR. Viewing the Connection Panel Rear Panel Jacks Use the rear panel jacks to connect A/V components that is used as VCR or DVD players. This input can connect a set of a device with HDMI output. and right audio from your television if you to receive...
... 1, 2 Video (Y/PB/PR) and audio (L-AUDIO-R) ˆ OPTICAL DIGITAL AUDIO OUT component inputs. Connect to the HDMI jack of headphones to your DVI device. (Not compatible with PC) Ò S-VIDEO (AV IN 1) Video input for external devices, such as a camcorder or VCR. Viewing the Connection Panel Rear Panel Jacks Use the rear panel jacks to connect A/V components that is used as VCR or DVD players. This input can connect a set of a device with HDMI output. and right audio from your television if you to receive...

User Manual (user Manual) (ver.1.0) (English)
Page 12
... is a DVI Output jack on the external device. They allow you to view the camcorder tapes without using a VCR Camcorder 1 S-Video Cable (Not supplied) or 1 Video Cable (Not supplied) 2 Audio Cable (Not supplied) TV Side Panel ➢ Each external input source device has a different back panel configuration. ➢ When connecting an external device, match the color of the connection terminal to match the component video and audio connections. DVD Player / Set-Top Box TV Rear Panel 2 Audio Cable (Not supplied) 1 Component Cable (Not supplied) ➢ Component video separates...
... is a DVI Output jack on the external device. They allow you to view the camcorder tapes without using a VCR Camcorder 1 S-Video Cable (Not supplied) or 1 Video Cable (Not supplied) 2 Audio Cable (Not supplied) TV Side Panel ➢ Each external input source device has a different back panel configuration. ➢ When connecting an external device, match the color of the connection terminal to match the component video and audio connections. DVD Player / Set-Top Box TV Rear Panel 2 Audio Cable (Not supplied) 1 Component Cable (Not supplied) ➢ Component video separates...
User Manual (user Manual) (ver.1.0) (English)
Page 13
... electric signal into an optical light signal, and transmits it easy to connect a Digital Audio System to your TV. English-13 Connecting a Digital Audio System The rear panel jacks on the DVD player/ Set-Top Box. Digital Audio System TV Rear Panel Optical Cable (Not supplied) or Coaxial cable (Not supplied) What is a next-generation interface that the HDMI cable and plug is smaller in size, has the HDCP (High Bandwidth Digital Copy Protection) coding feature installed, and supports multi-channel digital audio. ➢ Each external input source device...
... electric signal into an optical light signal, and transmits it easy to connect a Digital Audio System to your TV. English-13 Connecting a Digital Audio System The rear panel jacks on the DVD player/ Set-Top Box. Digital Audio System TV Rear Panel Optical Cable (Not supplied) or Coaxial cable (Not supplied) What is a next-generation interface that the HDMI cable and plug is smaller in size, has the HDCP (High Bandwidth Digital Copy Protection) coding feature installed, and supports multi-channel digital audio. ➢ Each external input source device...

User Manual (user Manual) (ver.1.0) (English)
Page 41
... on "Appearance and Themes" and a display dialog-box will appear. 4. When the control panel window appears, click on "Display" and a display dialog-box will appear. 3. Display Modes If the signal from the system doesn't equal the standard signal mode, adjust the mode by referring to your videocard user guide; If so, press the SOURCE button on the remote control or SOURCE button on the Windows start menu. 2. Video Signal Resolution (Dot X Line) Vertical Frequency (Hz) Horizontal Frequency (KHz...
... on "Appearance and Themes" and a display dialog-box will appear. 4. When the control panel window appears, click on "Display" and a display dialog-box will appear. 3. Display Modes If the signal from the system doesn't equal the standard signal mode, adjust the mode by referring to your videocard user guide; If so, press the SOURCE button on the remote control or SOURCE button on the Windows start menu. 2. Video Signal Resolution (Dot X Line) Vertical Frequency (Hz) Horizontal Frequency (KHz...
User Manual (user Manual) (ver.1.0) (English)
Page 44
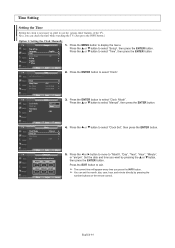
... Move Adjust Return number buttons on the remote control. English-44 Press the ... Move Enter TV Time Return 2. Month Day Year or "am /pm ➢ The current time will appear every time you press the INFO button. -- -- -- ➢ You can check the time while watching the TV. (Just press the INFO button.) Option 1: Setting the Clock Manually TV Plug & Play Language Time Game Mode V-Chip Caption † More Setup √...
... Move Adjust Return number buttons on the remote control. English-44 Press the ... Move Enter TV Time Return 2. Month Day Year or "am /pm ➢ The current time will appear every time you press the INFO button. -- -- -- ➢ You can check the time while watching the TV. (Just press the INFO button.) Option 1: Setting the Clock Manually TV Plug & Play Language Time Game Mode V-Chip Caption † More Setup √...

User Manual (user Manual) (ver.1.0) (English)
Page 59
... battery terminals. Press the TV button to digital. Make sure the remote has batteries. Please check the digital signal strength and input antenna. The image is plugged in the "TV" mode. Adjust the Fine tuning. The image is using its power management system. Adjust the Size settings. Power, Signal Cable. Move the computer's mouse or press any key on the remote control means the selected channel is analog: The digital program displayed on . The TV is...
... battery terminals. Press the TV button to digital. Make sure the remote has batteries. Please check the digital signal strength and input antenna. The image is plugged in the "TV" mode. Adjust the Fine tuning. The image is using its power management system. Adjust the Size settings. Power, Signal Cable. Move the computer's mouse or press any key on the remote control means the selected channel is analog: The digital program displayed on . The TV is...

User Manual (user Manual) (ver.1.0) (English)
Page 60
... the Wall Mount Bracket 1. Check with your wall bracket. Captive Screws ASSY-HINGE (LEFT) Wall Mount Bracket Separate ASSY-HINGE into the wall. Wall Installation Instructions Refer to the installation guide supplied with your dealer.) Please use only the parts and components provided for the wall mount are subject to change without prior notice. Install the Wall Mount Bracket after the screws are the same) 1. Remove the screws from a falling TV. English-60 Connect all external devices prior to install the wall bracket...
... the Wall Mount Bracket 1. Check with your wall bracket. Captive Screws ASSY-HINGE (LEFT) Wall Mount Bracket Separate ASSY-HINGE into the wall. Wall Installation Instructions Refer to the installation guide supplied with your dealer.) Please use only the parts and components provided for the wall mount are subject to change without prior notice. Install the Wall Mount Bracket after the screws are the same) 1. Remove the screws from a falling TV. English-60 Connect all external devices prior to install the wall bracket...

User Manual (user Manual) (ver.1.0) (English)
Page 61
... wall surface after connecting the external devices Remove the Safety Pins to adjust the angle to 0°, and then secure the Safety Pins again. • For safety, be sure to Adjust Mounting Angle Note: Please secure the mounting bracket on the right.) 3. English-61 3. PDP Wall Bracket Wall How to secure the PDP using the guide holes of the PDP. 4. Hold onto the middle of the PDP to adjust...
... wall surface after connecting the external devices Remove the Safety Pins to adjust the angle to 0°, and then secure the Safety Pins again. • For safety, be sure to Adjust Mounting Angle Note: Please secure the mounting bracket on the right.) 3. English-61 3. PDP Wall Bracket Wall How to secure the PDP using the guide holes of the PDP. 4. Hold onto the middle of the PDP to adjust...


