
User Manual
Page 2
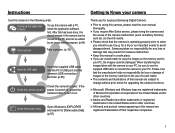
..., Memory card etc.) to the A/S centre. å Please check that may result from camera malfunction. å Keep this camera with the camera to your PC. for buying a Samsung Digital Camera. å Prior to use it on. Samsung takes no responsibility for upgrading the camera functions. Ä Microsoft, Windows and Windows logo are registered trademarks of Microsoft Corporation incorporated...
..., Memory card etc.) to the A/S centre. å Please check that may result from camera malfunction. å Keep this camera with the camera to your PC. for buying a Samsung Digital Camera. å Prior to use it on. Samsung takes no responsibility for upgrading the camera functions. Ä Microsoft, Windows and Windows logo are registered trademarks of Microsoft Corporation incorporated...
User Manual
Page 3
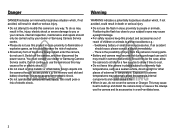
... the power source. Do not continue to use the camera as a sealed vehicle, direct sunlight or other places of extremes in temperature. Positioning the flash too close to your dealer or Samsung Camera Service centre. å Please do not use this product... in close proximity to extremely high temperatures, such as this camera in a well-ventilated area. 2 Swallowing battery or small camera accessories. Warning WARNING indicates a potentially hazardous situation...
... the power source. Do not continue to use the camera as a sealed vehicle, direct sunlight or other places of extremes in temperature. Positioning the flash too close to your dealer or Samsung Camera Service centre. å Please do not use this product... in close proximity to extremely high temperatures, such as this camera in a well-ventilated area. 2 Swallowing battery or small camera accessories. Warning WARNING indicates a potentially hazardous situation...
User Manual
Page 4
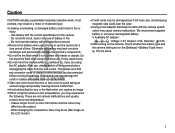
...be an after image on the [Settings] > [Battery Type] menu (p. 52) are using the AC adapter. Do not touch the flash after using this camera in fire or injury. - Failure to do so may damage the cords or cables and cause a fire or electric shock. å Take care... make sure that doesn't match with the polarities reversed. å Remove the battery when not planning to avoid taking an unclear image and possibly causing camera malfunction. å Avoid obstructing the lens or the flash when you capture an image. å When using it is in contact with the correct...
...be an after image on the [Settings] > [Battery Type] menu (p. 52) are using the AC adapter. Do not touch the flash after using this camera in fire or injury. - Failure to do so may damage the cords or cables and cause a fire or electric shock. å Take care... make sure that doesn't match with the polarities reversed. å Remove the battery when not planning to avoid taking an unclear image and possibly causing camera malfunction. å Avoid obstructing the lens or the flash when you capture an image. å When using it is in contact with the correct...
User Manual
Page 5
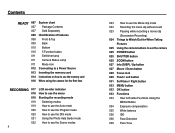
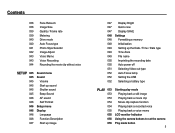
...Contents 007 Sold Separately 008 Identification of features 008 Front & Top 009 Back 010 Bottom 010 5 Function button 011 Self-timer lamp 011 Camera Status Lamp 011 Mode icon 012 Connecting to a Power Source 013 Inserting the memory card 014 Instructions on how to use the memory card 016... clip without sound 023 Pausing while recording a movie clip (Successive Recording) 024 Things to Watch Out for When Taking Pictures 025 Using the camera buttons to set the camera 025 POWER button 025 SHUTTER button 025 ZOOM button 027 Info (DISP) / Up button 027 Macro / Down button 029 Focus lock 029 ...
...Contents 007 Sold Separately 008 Identification of features 008 Front & Top 009 Back 010 Bottom 010 5 Function button 011 Self-timer lamp 011 Camera Status Lamp 011 Mode icon 012 Connecting to a Power Source 013 Inserting the memory card 014 Instructions on how to use the memory card 016... clip without sound 023 Pausing while recording a movie clip (Successive Recording) 024 Things to Watch Out for When Taking Pictures 025 Using the camera buttons to set the camera 025 POWER button 025 SHUTTER button 025 ZOOM button 027 Info (DISP) / Up button 027 Macro / Down button 029 Focus lock 029 ...
User Manual
Page 6
... Playing back a still image Playing back a movie clip Movie clip capture function Playing back a recorded voice Playing back a voice memo LCD monitor Indicator Using the camera buttons to set the camera Play mode button 5
... Playing back a still image Playing back a movie clip Movie clip capture function Playing back a recorded voice Playing back a voice memo LCD monitor Indicator Using the camera buttons to set the camera Play mode button 5
User Manual
Page 8
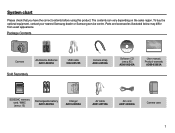
To buy the optional equipment, contact your nearest Samsung dealer or Samsung service centre. Package Contents Camera AA Alkaline Batteries AD81-00867A USB cable 3802-001205 Sold Separately Camera strap AD63-02596A Software CD (see p.83) AD46-00245A User manual, Product warranty AD68-03903A SD/SDHC memory card... / MMC (see p.15) Rechargeable battery AD81-00879A Charger AD81-00898A AV cable AD81-00750A AC cord AD81-00696A Camera case 7 System chart Please check that you have the correct contents before using this product. Parts and accessories illustrated below may...
To buy the optional equipment, contact your nearest Samsung dealer or Samsung service centre. Package Contents Camera AA Alkaline Batteries AD81-00867A USB cable 3802-001205 Sold Separately Camera strap AD63-02596A Software CD (see p.83) AD46-00245A User manual, Product warranty AD68-03903A SD/SDHC memory card... / MMC (see p.15) Rechargeable battery AD81-00879A Charger AD81-00898A AV cable AD81-00750A AC cord AD81-00696A Camera case 7 System chart Please check that you have the correct contents before using this product. Parts and accessories illustrated below may...
User Manual
Page 12
... turns off) When the USB cable is inserted into a printer The lamp is off after about the camera mode setting. Camera Status Lamp Status Description Power on The lamp turns on and off when the camera is ready to take a picture After taking a picture The lamp blinks while saving the image data and... battery is charging The lamp blinks When the USB cable is off When the AF activates The lamp turns on (The camera focus on the subject) The lamp blinks (The camera doesn't focus on the subject) Mode icon Refer to a PC (LCD monitor turns off When the printer is printing The lamp...
... turns off) When the USB cable is inserted into a printer The lamp is off after about the camera mode setting. Camera Status Lamp Status Description Power on The lamp turns on and off when the camera is ready to take a picture After taking a picture The lamp blinks while saving the image data and... battery is charging The lamp blinks When the USB cable is off When the AF activates The lamp turns on (The camera focus on the subject) The lamp blinks (The camera doesn't focus on the subject) Mode icon Refer to a PC (LCD monitor turns off When the printer is printing The lamp...
User Manual
Page 13
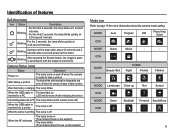
...SNB-2512 Type Ni-MH Capacity 2500mAh Voltage 1.2V x 2 Charging time Approximately 300 Minutes (Use for a digital camera (Within a year from the date of the camera, the camera body may experience reduced battery life. å Batteries will usually recover at normal temperatures. å During extended... the photographic conditions å Do not use manganese batteries as manganese batteries cannot deliver sufficient power. å For this camera, it recommended that a high-capacity battery (alkaline, nickel-hydride) is easy to a Power Source We recommend batteries for SBC-N2...
...SNB-2512 Type Ni-MH Capacity 2500mAh Voltage 1.2V x 2 Charging time Approximately 300 Minutes (Use for a digital camera (Within a year from the date of the camera, the camera body may experience reduced battery life. å Batteries will usually recover at normal temperatures. å During extended... the photographic conditions å Do not use manganese batteries as manganese batteries cannot deliver sufficient power. å For this camera, it recommended that a high-capacity battery (alkaline, nickel-hydride) is easy to a Power Source We recommend batteries for SBC-N2...
User Manual
Page 14
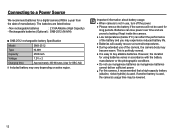
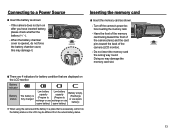
...battery capacity capacity (Prepare to (Prepare to a Power Source Ê Insert the battery as shown. - If the camera does not turn on the LCD monitor. Turn off the camera's power before inserting the memory card. - Do not insert the memory card the wrong way round. Connecting to recharge... or use recharge or use spare battery) spare battery) Battery empty. (Recharge or use spare battery) Ä When using the camera and the battery in a place that are 4 indicators for battery condition that is excessively cold or hot, the battery status on the LCD may...
...battery capacity capacity (Prepare to (Prepare to a Power Source Ê Insert the battery as shown. - If the camera does not turn on the LCD monitor. Turn off the camera's power before inserting the memory card. - Do not insert the memory card the wrong way round. Connecting to recharge... or use recharge or use spare battery) spare battery) Battery empty. (Recharge or use spare battery) Ä When using the camera and the battery in a place that are 4 indicators for battery condition that is excessively cold or hot, the battery status on the LCD may...
User Manual
Page 15
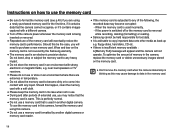
... not use a memory card formatted by the Samsung warranty. å The memory card is an electronic precision device. When the memory card is used in the camera, replace the memory card or delete unnecessary images stored on the memory card is not covered by another digital camera. To optimise the amount of extended use...with a soft cloth. å Please keep the memory card in its case when not in use. å During and after periods of memory in another digital camera or memory card reader. å If the memory card is subjected to any liquid. If the power is switched off the...
... not use a memory card formatted by the Samsung warranty. å The memory card is an electronic precision device. When the memory card is used in the camera, replace the memory card or delete unnecessary images stored on the memory card is not covered by another digital camera. To optimise the amount of extended use...with a soft cloth. å Please keep the memory card in its case when not in use. å During and after periods of memory in another digital camera or memory card reader. å If the memory card is subjected to any liquid. If the power is switched off the...
User Manual
Page 16
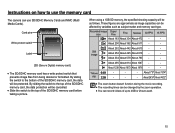
Card pins Write protect switch Label [SD (Secure Digital) memory card] å The SD/SDHC memory card has a write protect switch that prevents image files from being deleted or formatted. These figures ..., the data will be cancelled. å Slide the switch to 4GB or 2hours each. 15 By sliding the switch to use the memory card The camera can be as subject matter and memory card type. Instructions on how to the top of the SD/SDHC memory card, the data protection will...
Card pins Write protect switch Label [SD (Secure Digital) memory card] å The SD/SDHC memory card has a write protect switch that prevents image files from being deleted or formatted. These figures ..., the data will be cancelled. å Slide the switch to 4GB or 2hours each. 15 By sliding the switch to use the memory card The camera can be as subject matter and memory card type. Instructions on how to the top of the SD/SDHC memory card, the data protection will...
User Manual
Page 17
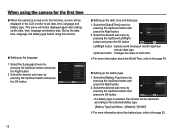
When using this camera. Ê Setting up the language 1. This menu will be optimized according to the selected battery type. [Battery Type] sub Menu : [Alkaline] / [Ni-MH] Ä For ... time, a menu will be displayed again after setting up the date, time, language and battery type before using the camera for the first time Ê When the camera is selected, the camera will not be displayed in the LCD monitor to the page 52. 16 Set up the date, time, language and...
When using this camera. Ê Setting up the language 1. This menu will be optimized according to the selected battery type. [Battery Type] sub Menu : [Alkaline] / [Ni-MH] Ä For ... time, a menu will be displayed again after setting up the date, time, language and battery type before using the camera for the first time Ê When the camera is selected, the camera will not be displayed in the LCD monitor to the page 52. 16 Set up the date, time, language and...
User Manual
Page 18
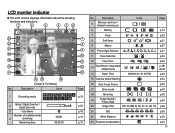
Description Icons 1 Recording mode 2 Optical / Digital Zoom bar / Digital Zoom rate 3 Voice Memo Number of available shots 4 remaining Remaining time 00001 00:00:00 Page p.19 p.25 p.43 p.15 p.15 No. p.13 p.29 p.31 p.... 7 Flash 8 Self-timer 9 Macro 10 Photo Style Selector 11 Face Detection 12 Face Tone 13 Face Retouch / Image Adjust / Without Sound 14 Date / Time 15 Camera shake Warning 16 Auto Focus Frame 17 Drive mode 18 Metering 19 Image Quality / Frame Rate 20 Image Size 21 ISO 22 White Balance 23...
Description Icons 1 Recording mode 2 Optical / Digital Zoom bar / Digital Zoom rate 3 Voice Memo Number of available shots 4 remaining Remaining time 00001 00:00:00 Page p.19 p.25 p.43 p.15 p.15 No. p.13 p.29 p.31 p.... 7 Flash 8 Self-timer 9 Macro 10 Photo Style Selector 11 Face Detection 12 Face Tone 13 Face Retouch / Image Adjust / Without Sound 14 Date / Time 15 Camera shake Warning 16 Auto Focus Frame 17 Drive mode 18 Metering 19 Image Quality / Frame Rate 20 Image Size 21 ISO 22 White Balance 23...
User Manual
Page 19
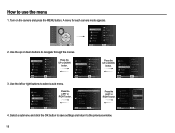
...Volume Start Sound Shutter Sound Beep AF Sound Self-Portrait Back Off :Medium Low:Off Med:1ium High:1 :On :On Set 18 Turn on the camera and press the MENU button. Volume Start Sound Shutter Sound Beep AF Sound Self-Portrait Exit :Medium :Off :1 :1 :On :On Back Press the... LEFT or RIGHT button. 4. A menu for each camera mode appears. 2. Use the up or down buttons to use the menu 1. Change 3. Change Mode Functions Sound Display Settings Exit Volume Start Sound Shutter Sound...
...Volume Start Sound Shutter Sound Beep AF Sound Self-Portrait Back Off :Medium Low:Off Med:1ium High:1 :On :On Set 18 Turn on the camera and press the MENU button. Volume Start Sound Shutter Sound Beep AF Sound Self-Portrait Exit :Medium :Off :1 :1 :On :On Back Press the... LEFT or RIGHT button. 4. A menu for each camera mode appears. 2. Use the up or down buttons to use the menu 1. Change 3. Change Mode Functions Sound Display Settings Exit Volume Start Sound Shutter Sound...
User Manual
Page 20
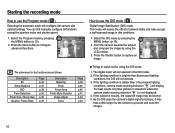
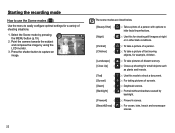
... Guide Scene Movie Change How to use the MENU button 1. Select the Auto mode by using the MENU button located on the back of the camera. Ê How to use the Auto mode ( ) Select this mode for quick and easy picture taking note of the polarity (+ / -). 2. Press the MENU button ... the recording mode Selecting modes You can select the desired working mode using the LCD monitor. 7. Press the Up / Down button to turn on the camera. 5. Press the power button to select Mode Functions Sound the [Mode] menu and press the Right button. Press the shutter button to capture an image...
... Guide Scene Movie Change How to use the MENU button 1. Select the Auto mode by using the MENU button located on the back of the camera. Ê How to use the Auto mode ( ) Select this mode for quick and easy picture taking note of the polarity (+ / -). 2. Press the MENU button ... the recording mode Selecting modes You can select the desired working mode using the LCD monitor. 7. Press the Up / Down button to turn on the camera. 5. Press the power button to select Mode Functions Sound the [Mode] menu and press the Right button. Press the shutter button to capture an image...
User Manual
Page 21
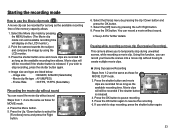
... shutter speed. 1. Press the Menu button to capture an image. Press the Shutter button to configure advanced functions. The digital zoom will not operate in situations where the camera shake warning indicator ( Ã ) is darker than fluorescent lighting conditions, the DIS will not activate. 3. Select the DIS mode by...
... shutter speed. 1. Press the Menu button to capture an image. Press the Shutter button to configure advanced functions. The digital zoom will not operate in situations where the camera shake warning indicator ( Ã ) is darker than fluorescent lighting conditions, the DIS will not activate. 3. Select the DIS mode by...
User Manual
Page 22
... used when adjusting the picture colour Photo Help Guide Photo Help Guide Features to use when the image is out of focus Features to reduce camera shake Features to use in low light conditions Features to use when adjusting brightness Features to use when adjusting colours Change Photo Help Guide Photo...
... used when adjusting the picture colour Photo Help Guide Photo Help Guide Features to use when the image is out of focus Features to reduce camera shake Features to use in low light conditions Features to use when adjusting brightness Features to use when adjusting colours Change Photo Help Guide Photo...
User Manual
Page 23
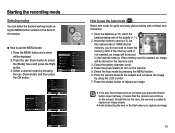
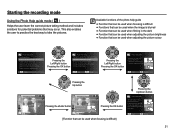
... monitor. 3. Starting the recording mode How to use the Scene modes ( ) Use the menu to shoot a document. ) : For taking pictures of shooting situations. 1. Point the camera towards the subject and compose the image by pressing the MENU button (p.19). 2.
... monitor. 3. Starting the recording mode How to use the Scene modes ( ) Use the menu to shoot a document. ) : For taking pictures of shooting situations. 1. Point the camera towards the subject and compose the image by pressing the MENU button (p.19). 2.
User Manual
Page 24
... the [Off] menu by pressing the Up / Down button and press the OK button. 7. Pausing while recording a movie clip (Successive Recording) This camera allows you wish to pause recording. 5. Press the shutter button once and movie clips are listed below. - Movie clips will display on the LCD monitor... while recording a movie clip. Press the OK button again to select the [Functions] menu and press the Right button. 6. Point the camera towards the subject and compose the image by pressing the MENU button. (The Movie clip mode icon and available recording time will still be ...
... the [Off] menu by pressing the Up / Down button and press the OK button. 7. Pausing while recording a movie clip (Successive Recording) This camera allows you wish to pause recording. 5. Press the shutter button once and movie clips are listed below. - Movie clips will display on the LCD monitor... while recording a movie clip. Press the OK button again to select the [Functions] menu and press the Right button. 6. Point the camera towards the subject and compose the image by pressing the MENU button. (The Movie clip mode icon and available recording time will still be ...
User Manual
Page 25
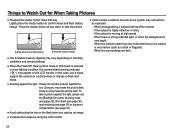
...the sun. When photographing a subject that has little contrast. - Doing so may make the picture dark. In this case, use a tripod, support the camera on a solid surface or change to take pictures against the light, please use the [Backlight] in scene shooting mode (see page 22), fill...-in a low lighting condition, the camera shake warning indicator ( Ã ) may not perform as a stick or flagpole). - When the subject matter has only horizontal lines or the...
...the sun. When photographing a subject that has little contrast. - Doing so may make the picture dark. In this case, use a tripod, support the camera on a solid surface or change to take pictures against the light, please use the [Backlight] in scene shooting mode (see page 22), fill...-in a low lighting condition, the camera shake warning indicator ( Ã ) may not perform as a stick or flagpole). - When the subject matter has only horizontal lines or the...


