
User Manual (user Manual) (ver.f6) (English)
Page 1
PORTABLE Quad-BAND MOBILE PHONE User Manual Please read this manual before operating your phone, and keep it for future reference.
PORTABLE Quad-BAND MOBILE PHONE User Manual Please read this manual before operating your phone, and keep it for future reference.

User Manual (user Manual) (ver.f6) (English)
Page 2
... the rights secured by or which is otherwise the property of Samsung or its respective suppliers relating to the SAMSUNG Phone, including but is a registered trademark of the Intellectual Property shall remain with SAMSUNG and its related entities. For 24 hour information and assistance, ...limited to, accessories, parts, or software relating there to (the "Phone System"), is transferred to ) modify, prepare derivative works of authorship. Moreover, you agree that you have questions about your Samsung Mobile Phone? Do you will not (and will not attempt to you. Intellectual...
... the rights secured by or which is otherwise the property of Samsung or its respective suppliers relating to the SAMSUNG Phone, including but is a registered trademark of the Intellectual Property shall remain with SAMSUNG and its related entities. For 24 hour information and assistance, ...limited to, accessories, parts, or software relating there to (the "Phone System"), is transferred to ) modify, prepare derivative works of authorship. Moreover, you agree that you have questions about your Samsung Mobile Phone? Do you will not (and will not attempt to you. Intellectual...
User Manual (user Manual) (ver.f6) (English)
Page 4
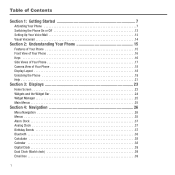
... Started 7 Activating Your Phone 7 Switching the Phone On or Off 13 Setting Up Your Voice Mail 13 Visual Voicemail 14 Section 2: Understanding Your Phone 15 Features of Your Phone 15 Front View of Your Phone 16 Keys 16 Side Views of Your Phone 17 Camera View of Your Phone 18 Display Layout 18 ...Unlocking the Phone 19 Help 21 Section 3: Displays 23 Home Screen 23 ...
... Started 7 Activating Your Phone 7 Switching the Phone On or Off 13 Setting Up Your Voice Mail 13 Visual Voicemail 14 Section 2: Understanding Your Phone 15 Features of Your Phone 15 Front View of Your Phone 16 Keys 16 Side Views of Your Phone 17 Camera View of Your Phone 18 Display Layout 18 ...Unlocking the Phone 19 Help 21 Section 3: Displays 23 Home Screen 23 ...
User Manual (user Manual) (ver.f6) (English)
Page 6
... Using ABC Mode 70 Using Numeric 70 Using Symbols 70 Section 7: Understanding Your Contacts List 72 Using Mobile Address Book 72 Storing a Number in the Phone's Memory 72 Storing a Number on the SIM Card 73 Finding a Contact Entry 74 Adding a New Caller Group 75 Dialing a Number from the SIM Card 76...
... Using ABC Mode 70 Using Numeric 70 Using Symbols 70 Section 7: Understanding Your Contacts List 72 Using Mobile Address Book 72 Storing a Number in the Phone's Memory 72 Storing a Number on the SIM Card 73 Finding a Contact Entry 74 Adding a New Caller Group 75 Dialing a Number from the SIM Card 76...
User Manual (user Manual) (ver.f6) (English)
Page 7
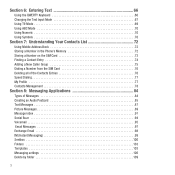
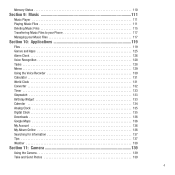
Memory Status 110 Section 9: Music 111 Music Player 111 Playing Music Files 111 Deleting Music Files 115 Transferring Music Files to your Phone 117 Managing your Music Files 117 Section 10: Applications 119 Files 119 Games and Apps 125 Alarm Clock 126 Voice Recognition 128 Tasks 128 Memo ...
Memory Status 110 Section 9: Music 111 Music Player 111 Playing Music Files 111 Deleting Music Files 115 Transferring Music Files to your Phone 117 Managing your Music Files 117 Section 10: Applications 119 Files 119 Games and Apps 125 Alarm Clock 126 Voice Recognition 128 Tasks 128 Memo ...
User Manual (user Manual) (ver.f6) (English)
Page 8
... 158 Bluetooth Settings 158 Section 14: Changing Your Settings 161 Widget Manager 161 Sound Profiles 162 Display Settings 171 Command Bar 172 Time & Date 173 Phone Settings 174 Security 175 Airplane mode 177 PC connections 177 Smart Unlock 178 Motion Settings 178 Call Settings 178 Application Settings 179 Enabling Data Roaming...
... 158 Bluetooth Settings 158 Section 14: Changing Your Settings 161 Widget Manager 161 Sound Profiles 162 Display Settings 171 Command Bar 172 Time & Date 173 Phone Settings 174 Security 175 Airplane mode 177 PC connections 177 Smart Unlock 178 Motion Settings 178 Call Settings 178 Application Settings 179 Enabling Data Roaming...
User Manual (user Manual) (ver.f6) (English)
Page 9
... Information 183 Please Note the Following Information When Using Your Handset 184 Samsung Mobile Products and Recycling 185 UL Certified Travel Adapter 185 Consumer Information on Wireless Phones 185 Road Safety 191 Responsible Listening 192 Operating Environment 194 Using Your Phone Near Other Electronic Devices 195 FCC Hearing-Aid Compatibility (HAC) Regulations for...
... Information 183 Please Note the Following Information When Using Your Handset 184 Samsung Mobile Products and Recycling 185 UL Certified Travel Adapter 185 Consumer Information on Wireless Phones 185 Road Safety 191 Responsible Listening 192 Operating Environment 194 Using Your Phone Near Other Electronic Devices 195 FCC Hearing-Aid Compatibility (HAC) Regulations for...
User Manual (user Manual) (ver.f6) (English)
Page 10
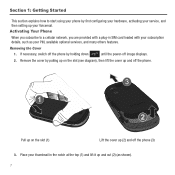
... up your subscription details, such as shown). 7 Removing the Cover 1. Pull up on the slot (see diagram), then lift the cover up and off the phone. Remove the cover by pulling up on the slot (1) Lift the cover up (2) and off image displays. 2. Place your thumbnail in SIM card loaded with..., and many others features. Section 1: Getting Started This section explains how to a cellular network, you are provided with your Voicemail. If necessary, switch off the phone by holding down until the power-off the...
... up your subscription details, such as shown). 7 Removing the Cover 1. Pull up on the slot (see diagram), then lift the cover up and off the phone. Remove the cover by pulling up on the slot (1) Lift the cover up (2) and off image displays. 2. Place your thumbnail in SIM card loaded with..., and many others features. Section 1: Getting Started This section explains how to a cellular network, you are provided with your Voicemail. If necessary, switch off the phone by holding down until the power-off the...

User Manual (user Manual) (ver.f6) (English)
Page 11
Keep all SIM cards out of reach of the card is positioned as shown. Getting Started 8 Make sure that the card's gold contacts face into the phone and that the upper-left angled corner of small children. ᮣ Carefully slide the SIM card into the SIM card socket until the card locks into place. Installing the SIM Card Important!: The plug-in SIM card and its contacts information can be easily damaged by scratching or bending, so be careful when handling, inserting, or removing the card. Removing the Battery ᮣ Lift up (1) and remove (2) the battery.
Keep all SIM cards out of reach of the card is positioned as shown. Getting Started 8 Make sure that the card's gold contacts face into the phone and that the upper-left angled corner of small children. ᮣ Carefully slide the SIM card into the SIM card socket until the card locks into place. Installing the SIM Card Important!: The plug-in SIM card and its contacts information can be easily damaged by scratching or bending, so be careful when handling, inserting, or removing the card. Removing the Battery ᮣ Lift up (1) and remove (2) the battery.

User Manual (user Manual) (ver.f6) (English)
Page 12
Replacing the Battery 1. Lightly press down on the phone. 9 Check that the tabs on the end align with the slots at the bottom of the phone. Note: If the card is properly installed before turning on the battery until it snaps into place. 3. Be sure to line up the gold contacts. 2. Re-orient the card back into the compartment so that the battery is not inserted correctly, the phone does not detect the SIM card. Slide the battery into the slot.
Replacing the Battery 1. Lightly press down on the phone. 9 Check that the tabs on the end align with the slots at the bottom of the phone. Note: If the card is properly installed before turning on the battery until it snaps into place. 3. Be sure to line up the gold contacts. 2. Re-orient the card back into the compartment so that the battery is not inserted correctly, the phone does not detect the SIM card. Slide the battery into the slot.
User Manual (user Manual) (ver.f6) (English)
Page 13
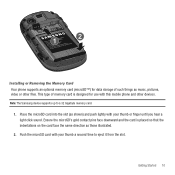
...you hear a light click sound. Getting Started 10 Note: The Samsung device supports up to eject it from the slot. Place the microSD card into the slot (as those illustrated. 2. Installing or Removing the Memory Card Your phone supports an optional memory card (microSD™) for use with ...this mobile phone and other files. Ensure the microSD's gold contact pins face downward and the card is designed for data...
...you hear a light click sound. Getting Started 10 Note: The Samsung device supports up to eject it from the slot. Place the microSD card into the slot (as those illustrated. 2. Installing or Removing the Memory Card Your phone supports an optional memory card (microSD™) for use with ...this mobile phone and other files. Ensure the microSD's gold contact pins face downward and the card is designed for data...

User Manual (user Manual) (ver.f6) (English)
Page 15
...further details. Note: You must fully charge the battery before using your local Samsung dealer for the first time. If attempted, damage to connecting the wall charger. Charging a Battery Your phone is included with your phone. A wall charger, which is used for connecting the charger. Use only... Getting Started 12 With the battery installed, temporarily remove the plastic cover on the left side of the phone (as indicated) and plug in approximately 4 hours. 1. You can use the phone while the battery is installed prior to the accessory port will occur therefore voiding the...
...further details. Note: You must fully charge the battery before using your local Samsung dealer for the first time. If attempted, damage to connecting the wall charger. Charging a Battery Your phone is included with your phone. A wall charger, which is used for connecting the charger. Use only... Getting Started 12 With the battery installed, temporarily remove the plastic cover on the left side of the phone (as indicated) and plug in approximately 4 hours. 1. You can use the phone while the battery is installed prior to the accessory port will occur therefore voiding the...
User Manual (user Manual) (ver.f6) (English)
Page 16
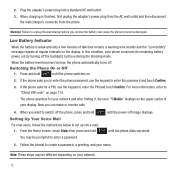
...create a password, a greeting, and your name. until the power-off . Warning!: Failure to unplug the wall charger before you can cause the phone to set up voice mail: 1. Low Battery Indicator When the battery is finished, first unplug the adapter's power plug from the AC wall outlet... For more information, refer to "Check PIN code" on the upper center of talk time remain; When the battery level becomes too low, the phone automatically turns off image displays. Press and hold 1 You may be prompted to enter this condition, your network. 13 a warning tone sounds and ...
...create a password, a greeting, and your name. until the power-off . Warning!: Failure to unplug the wall charger before you can cause the phone to set up voice mail: 1. Low Battery Indicator When the battery is finished, first unplug the adapter's power plug from the AC wall outlet... For more information, refer to "Check PIN code" on the upper center of talk time remain; When the battery level becomes too low, the phone automatically turns off image displays. Press and hold 1 You may be prompted to enter this condition, your network. 13 a warning tone sounds and ...
User Manual (user Manual) (ver.f6) (English)
Page 17
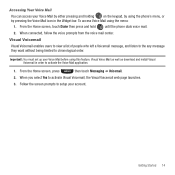
From the Home screen, touch Dialer then press and hold until the phone dials voice mail. 2. Visual Voicemail Visual Voicemail enables users to view a list of people who left a Voicemail message, and listen to the any message they ... Visual Voicemail web page launches. 3. Follow the screen prompts to setup your Voice Mail by either pressing and holding on the keypad, by using the phone's menu, or by pressing the Voice Mail icon in order to activate the Voice Mail application. 1. Accessing Your Voice Mail You can access your account...
From the Home screen, touch Dialer then press and hold until the phone dials voice mail. 2. Visual Voicemail Visual Voicemail enables users to view a list of people who left a Voicemail message, and listen to the any message they ... Visual Voicemail web page launches. 3. Follow the screen prompts to setup your Voice Mail by either pressing and holding on the keypad, by using the phone's menu, or by pressing the Voice Mail icon in order to activate the Voice Mail application. 1. Accessing Your Voice Mail You can access your account...
User Manual (user Manual) (ver.f6) (English)
Page 18
Features of Your Phone Your phone is in your phone. Section 2: Understanding Your Phone This section outlines some key features of your phone. • Full touch screen phone with full QWERTY keyboard slide-out • Multiple messaging options (Exchange Email, Audio PostcardSM, Text, Picture, Video and Instant ...features included in use and offers many significant features. It also displays the screen and the icons that display when the phone is lightweight, easy-to 32GB • Assisted GPS • Smart unlock screen • Etiquette mode feature • Command Bar shortcuts ...
Features of Your Phone Your phone is in your phone. Section 2: Understanding Your Phone This section outlines some key features of your phone. • Full touch screen phone with full QWERTY keyboard slide-out • Multiple messaging options (Exchange Email, Audio PostcardSM, Text, Picture, Video and Instant ...features included in use and offers many significant features. It also displays the screen and the icons that display when the phone is lightweight, easy-to 32GB • Assisted GPS • Smart unlock screen • Etiquette mode feature • Command Bar shortcuts ...
User Manual (user Manual) (ver.f6) (English)
Page 19
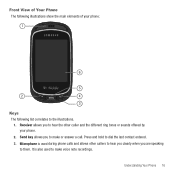
Understanding Your Phone 16 It is used to them. Press and hold to make voice note recordings. Receiver allows you to hear the other callers to hear you clearly when you to dial the last contact entered. 3. Microphone is also used during phone calls and allows other caller and the different ring tones or sounds offered by your phone: 1 6 5 2 4 3 Keys The following illustrations show the main elements of your phone. 2. Send key allows you are speaking to make or answer a call. Front View of Your Phone The following list correlates to the illustrations. 1.
Understanding Your Phone 16 It is used to them. Press and hold to make voice note recordings. Receiver allows you to hear the other callers to hear you clearly when you to dial the last contact entered. 3. Microphone is also used during phone calls and allows other caller and the different ring tones or sounds offered by your phone: 1 6 5 2 4 3 Keys The following illustrations show the main elements of your phone. 2. Send key allows you are speaking to make or answer a call. Front View of Your Phone The following list correlates to the illustrations. 1.
User Manual (user Manual) (ver.f6) (English)
Page 20
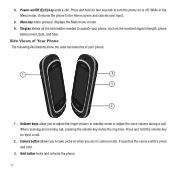
...the Home screen and cancels your input. 5. Side Views of Your Phone The following illustrations show the external elements of your phone, such as the received signal strength, phone battery level, date, and time. Camera button allows you to operate your phone. 1 4 3 2 1. Menu key when pressed, displays the Main... menu screen. 6. Display shows all the information needed to take pictures when you to reject a call . Hold button locks and unlocks the phone. 17 4. Press and hold . 3. It launches the camera with a press and hold the volume key to adjust the ringer volume in ...
...the Home screen and cancels your input. 5. Side Views of Your Phone The following illustrations show the external elements of your phone, such as the received signal strength, phone battery level, date, and time. Camera button allows you to operate your phone. 1 4 3 2 1. Menu key when pressed, displays the Main... menu screen. 6. Display shows all the information needed to take pictures when you to reject a call . Hold button locks and unlocks the phone. 17 4. Press and hold . 3. It launches the camera with a press and hold the volume key to adjust the ringer volume in ...
User Manual (user Manual) (ver.f6) (English)
Page 21
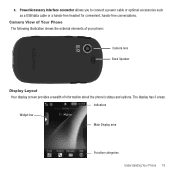
Camera View of Your Phone The following illustration shows the external elements of your phone: Camera lens Back Speaker Display Layout Your display screen provides a wealth of information about the phone's status and options. 4. The display has 3 areas: Indicators Widget bar Main Display area Function categories Understanding Your Phone 18 Power/Accessory Interface connector allows you to connect a power cable or optional accessories such as a USB/data cable or a hands-free headset for convenient, hands-free conversations.
Camera View of Your Phone The following illustration shows the external elements of your phone: Camera lens Back Speaker Display Layout Your display screen provides a wealth of information about the phone's status and options. 4. The display has 3 areas: Indicators Widget bar Main Display area Function categories Understanding Your Phone 18 Power/Accessory Interface connector allows you to connect a power cable or optional accessories such as a USB/data cable or a hands-free headset for convenient, hands-free conversations.
User Manual (user Manual) (ver.f6) (English)
Page 22
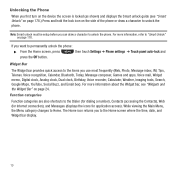
... device the screen is locked (as shown) and displays the Smart unlock guide (see "Widgets and the Widget Bar" on the side of the phone or draw a character to "Smart Unlock" on page 178. If you want to the Home screen where the time, date, and Widget bar display.... 19 Function categories Function categories are also shortcuts to Home. For more information, refer to unlock the phone. While viewing the Main Menu, the Menu category changes to the Dialer (for dialing a number), Contacts (accessing the Contacts), Web (for Internet connection),...
... device the screen is locked (as shown) and displays the Smart unlock guide (see "Widgets and the Widget Bar" on the side of the phone or draw a character to "Smart Unlock" on page 178. If you want to the Home screen where the time, date, and Widget bar display.... 19 Function categories Function categories are also shortcuts to Home. For more information, refer to unlock the phone. While viewing the Main Menu, the Menu category changes to the Dialer (for dialing a number), Contacts (accessing the Contacts), Web (for Internet connection),...
User Manual (user Manual) (ver.f6) (English)
Page 23
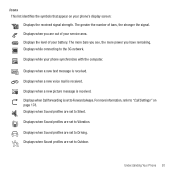
... Settings" on your service area. Displays while your battery. Displays when Sound profiles are set to Silent. Displays the level of your phone synchronizes with the computer. Displays when a new text message is received. Displays when a new picture message is received. For more power... you are set to Vibration. Understanding Your Phone 20 Displays when you have remaining. Displays when Call forwarding is received. The more bars you see, the more information, refer to the...
... Settings" on your service area. Displays while your battery. Displays when Sound profiles are set to Silent. Displays the level of your phone synchronizes with the computer. Displays when a new text message is received. Displays when a new picture message is received. For more power... you are set to Vibration. Understanding Your Phone 20 Displays when you have remaining. Displays when Call forwarding is received. The more bars you see, the more information, refer to the...


