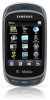
User Manual (user Manual) (ver.f6) (English)
Page 1
PORTABLE Quad-BAND MOBILE PHONE User Manual Please read this manual before operating your phone, and keep it for future reference.
User Manual (user Manual) (ver.f6) (English)
Page 2
and its respective suppliers relating to the SAMSUNG Phone, including but is transferred to , inventions (patentable or unpatentable), patents, trade secrets, copyrights, software, computer programs, and related documentation and other works of Samsung Electronics America, Inc. Moreover, you agree that ...75074 Toll Free Tel: 1.888.987.HELP (4357) Internet Address: http://www.samsungusa.com ©2010 Samsung Telecommunications America, LLC is proprietary to (the "Phone System"), is a registered trademark of authorship. For 24 hour information and assistance, we offer a new FAQ...
User Manual (user Manual) (ver.f6) (English)
Page 4
... Started 7 Activating Your Phone 7 Switching the Phone On or Off 13 Setting Up Your Voice Mail 13 Visual Voicemail 14 Section 2: Understanding Your Phone 15 Features of Your Phone 15 Front View of Your Phone 16 Keys 16 Side Views of Your Phone 17 Camera View of Your Phone 18 Display Layout 18 ...Unlocking the Phone 19 Help 21 Section 3: Displays 23 Home Screen 23 ...
User Manual (user Manual) (ver.f6) (English)
Page 6
... Using ABC Mode 70 Using Numeric 70 Using Symbols 70 Section 7: Understanding Your Contacts List 72 Using Mobile Address Book 72 Storing a Number in the Phone's Memory 72 Storing a Number on the SIM Card 73 Finding a Contact Entry 74 Adding a New Caller Group 75 Dialing a Number from the SIM Card 76...
User Manual (user Manual) (ver.f6) (English)
Page 7
Memory Status 110 Section 9: Music 111 Music Player 111 Playing Music Files 111 Deleting Music Files 115 Transferring Music Files to your Phone 117 Managing your Music Files 117 Section 10: Applications 119 Files 119 Games and Apps 125 Alarm Clock 126 Voice Recognition 128 Tasks 128 Memo ...
User Manual (user Manual) (ver.f6) (English)
Page 8
... 158 Bluetooth Settings 158 Section 14: Changing Your Settings 161 Widget Manager 161 Sound Profiles 162 Display Settings 171 Command Bar 172 Time & Date 173 Phone Settings 174 Security 175 Airplane mode 177 PC connections 177 Smart Unlock 178 Motion Settings 178 Call Settings 178 Application Settings 179 Enabling Data Roaming...
User Manual (user Manual) (ver.f6) (English)
Page 9
... Information 183 Please Note the Following Information When Using Your Handset 184 Samsung Mobile Products and Recycling 185 UL Certified Travel Adapter 185 Consumer Information on Wireless Phones 185 Road Safety 191 Responsible Listening 192 Operating Environment 194 Using Your Phone Near Other Electronic Devices 195 FCC Hearing-Aid Compatibility (HAC) Regulations for...
User Manual (user Manual) (ver.f6) (English)
Page 10
...section explains how to a cellular network, you are provided with a plug-in the notch at the top (1) and lift it up (2) and off the phone (3) 3. Remove the cover by first configuring your hardware, activating your service, and then setting up your subscription details, such as shown). 7 Removing the Cover... 1. If necessary, switch off the phone by holding down until the power-off the phone. Pull up on the slot (1) Lift the cover up and out (2) (as your phone by pulling up on the slot (see diagram), then lift the cover up and...
User Manual (user Manual) (ver.f6) (English)
Page 11
Installing the SIM Card Important!: The plug-in SIM card and its contacts information can be easily damaged by scratching or bending, so be careful when handling, inserting, or removing the card. Getting Started 8 Keep all SIM cards out of reach of the card is positioned as shown. Make sure that the upper-left angled corner of small children. ᮣ Carefully slide the SIM card into the SIM card socket until the card locks into the phone and that the card's gold contacts face into place. Removing the Battery ᮣ Lift up (1) and remove (2) the battery.
User Manual (user Manual) (ver.f6) (English)
Page 12
Replacing the Battery 1. Check that the tabs on the phone. 9 Be sure to line up the gold contacts. 2. Re-orient the card back into place. 3. Slide the battery into the compartment so that the battery is not inserted correctly, the phone does not detect the SIM card. Note: If the card is properly installed before turning on the end align with the slots at the bottom of the phone. Lightly press down on the battery until it snaps into the slot.
User Manual (user Manual) (ver.f6) (English)
Page 13
Note: The Samsung device supports up to eject it from the slot. Installing or Removing the Memory Card Your phone supports an optional memory card (microSD™) for use with this mobile phone and other files. Place the microSD card into the slot (as shown) and push lightly with your thumb or finger until...
User Manual (user Manual) (ver.f6) (English)
Page 15
...You can use the phone while the battery is... incorrect method for further details. Charging a Battery Your phone is installed prior to the accessory port will occur therefore voiding the phone's warranty. If attempted, damage to connecting the wall.... With the battery installed, temporarily remove the plastic cover on the left side of the phone (as indicated) and plug in approximately 4 hours. 1. A discharged battery recharges fully in...by a rechargeable Lithium ion battery. Ask your phone. A wall charger, which is used for the first time. Note: You must fully charge the...
User Manual (user Manual) (ver.f6) (English)
Page 16
...and hold 1 You may be prompted to unplug the wall charger before you can cause the phone to set up voice mail: 1. In this password and touch Confirm. 3. until the phone dials voicemail. 2. The phone searches for a PIN, use the keypad to enter the PIN and touch Confirm. Now ..."Low battery" message repeats at regular intervals on the upper center of talk time remain; When the battery level becomes too low, the phone automatically turns off image displays. Low Battery Indicator When the battery is finished, first unplug the adapter's power plug from the AC wall outlet...
User Manual (user Manual) (ver.f6) (English)
Page 17
.... Important!: You must set up your Voice Mail before using the menu: 1. From the Home screen, touch Dialer then press and hold until the phone dials voice mail. 2. When you select Yes to activate Visual Voicemail, the Visual Voicemail web page launches. 3. Accessing Your Voice Mail You can access... your Voice Mail by either pressing and holding on the keypad, by using the phone's menu, or by pressing the Voice Mail icon in order to activate the Voice Mail application. 1. Visual Voice Mail as well as download and...
User Manual (user Manual) (ver.f6) (English)
Page 18
...; Assisted GPS • Smart unlock screen • Etiquette mode feature • Command Bar shortcuts feature 15 Section 2: Understanding Your Phone This section outlines some key features of your phone. • Full touch screen phone with full QWERTY keyboard slide-out • Multiple messaging options (Exchange Email, Audio PostcardSM, Text, Picture, Video and Instant...
User Manual (user Manual) (ver.f6) (English)
Page 19
Receiver allows you to hear the other callers to hear you clearly when you to make voice note recordings. Send key allows you are speaking to the illustrations. 1. Microphone is also used during phone calls and allows other caller and the different ring tones or sounds offered by your phone: 1 6 5 2 4 3 Keys The following illustrations show the main elements of Your Phone The following list correlates to them. Front View of your phone. 2. It is used to dial the last contact entered. 3. Press and hold to make or answer a call. Understanding Your Phone 16
User Manual (user Manual) (ver.f6) (English)
Page 20
Menu key when pressed, displays the Main menu screen. 6. Display shows all the information needed to operate your phone. 1 4 3 2 1. When receiving an incoming call . Press and hold . 3. Volume keys allow you are in standby mode or adjust the voice volume during a call ... when you to reject a call . Side Views of Your Phone The following illustrations show the external elements of your phone, such as the received signal strength, phone battery level, date, and time. Hold button locks and unlocks the phone. 17 Press and hold the volume key to adjust the ringer...
User Manual (user Manual) (ver.f6) (English)
Page 21
Power/Accessory Interface connector allows you to connect a power cable or optional accessories such as a USB/data cable or a hands-free headset for convenient, hands-free conversations. The display has 3 areas: Indicators Widget bar Main Display area Function categories Understanding Your Phone 18 4. Camera View of Your Phone The following illustration shows the external elements of your phone: Camera lens Back Speaker Display Layout Your display screen provides a wealth of information about the phone's status and options.
User Manual (user Manual) (ver.f6) (English)
Page 22
...screen where the time, date, and Widget bar display. 19 For more information, refer to permanently unlock the phone: ᮣ From the Home screen, press then touch Settings ➔ Phone settings ➔ Touch panel auto-lock and press the Off button. The Home icon returns you first turn...screen is locked (as shown) and displays the Smart unlock guide (see "Widgets and the Widget Bar" on the side of the phone or draw a character to unlock the phone. If you use most frequently (Web, Photo, Message inbox, IM, Tips, Telenav, Voice recognition, Calendar, Bluetooth, Today, Message ...
User Manual (user Manual) (ver.f6) (English)
Page 23
... are set to Forward always. Displays when Sound profiles are out of your phone's display screen: Displays the received signal strength. The greater the number of your phone synchronizes with the computer. Displays when you have remaining. Understanding Your Phone 20 Displays when a new picture message is received. Displays when Sound profiles are...