User Manual (user Manual) (ver.f9) (English)
Page 9
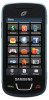
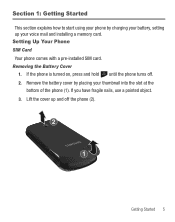
Getting Started 5 Remove the battery cover by charging your battery, setting up and off . 2. Setting Up Your Phone SIM Card Your phone comes with a pre-installed SIM card. If you have fragile nails, use a pointed object. 3. Section 1: Getting Started This section explains how to start using your phone by placing your thumbnail into the slot at the bottom of the phone (1). Removing the Battery Cover 1. If the phone is turned on, press and hold PWR END until the phone turns off the phone (2). Lift the cover up your voice mail and installing a memory card.
Getting Started 5 Remove the battery cover by charging your battery, setting up and off . 2. Setting Up Your Phone SIM Card Your phone comes with a pre-installed SIM card. If you have fragile nails, use a pointed object. 3. Section 1: Getting Started This section explains how to start using your phone by placing your thumbnail into the slot at the bottom of the phone (1). Removing the Battery Cover 1. If the phone is turned on, press and hold PWR END until the phone turns off the phone (2). Lift the cover up your voice mail and installing a memory card.
User Manual (user Manual) (ver.f9) (English)
Page 11
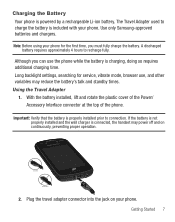
... power off and on your phone for service, vibrate mode, browser use the phone while the battery is connected, the handset may reduce the battery's talk and standby times. Use only Samsung-approved batteries and chargers. A discharged battery requires approximately 4 hours to connection. The Travel Adapter used to charge the battery is powered by a rechargeable Li-ion battery. If the battery is not properly installed and the wall charger is charging, doing so requires additional charging time...
... power off and on your phone for service, vibrate mode, browser use the phone while the battery is connected, the handset may reduce the battery's talk and standby times. Use only Samsung-approved batteries and chargers. A discharged battery requires approximately 4 hours to connection. The Travel Adapter used to charge the battery is powered by a rechargeable Li-ion battery. If the battery is not properly installed and the wall charger is charging, doing so requires additional charging time...
User Manual (user Manual) (ver.f9) (English)
Page 12
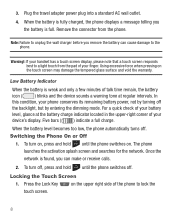
... bars ( ) indicate a full charge. Locking the Touch Screen 1. The phone launches the activation splash screen and searches for the network. Plug the travel adapter power plug into a standard AC wall outlet. 4. When the battery is fully charged, the phone displays a message telling you can cause damage to unplug the wall charger before you remove the battery can make or receive calls. 2. To turn off, press and hold PWR END until the phone switches...
... bars ( ) indicate a full charge. Locking the Touch Screen 1. The phone launches the activation splash screen and searches for the network. Plug the travel adapter power plug into a standard AC wall outlet. 4. When the battery is fully charged, the phone displays a message telling you can cause damage to unplug the wall charger before you remove the battery can make or receive calls. 2. To turn off, press and hold PWR END until the phone switches...
User Manual (user Manual) (ver.f9) (English)
Page 13
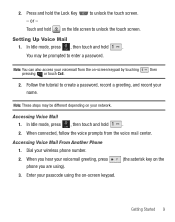
... hold . Note: These steps may be different depending on your voicemail from the voice mail center. Accessing Voice Mail From Another Phone 1. Follow the tutorial to enter a password. In Idle mode, press , then touch and hold on the 3. Dial your passcode using ). (the asterisk key on the Idle screen to unlock the touch screen. When connected, follow the voice prompts from the on -screen keypad. Setting Up Voice Mail 1. Enter your wireless phone number. 2. Note: You can also access your network.
... hold . Note: These steps may be different depending on your voicemail from the voice mail center. Accessing Voice Mail From Another Phone 1. Follow the tutorial to enter a password. In Idle mode, press , then touch and hold on the 3. Dial your passcode using ). (the asterisk key on the Idle screen to unlock the touch screen. When connected, follow the voice prompts from the on -screen keypad. Setting Up Voice Mail 1. Enter your wireless phone number. 2. Note: You can also access your network.
User Manual (user Manual) (ver.f9) (English)
Page 14
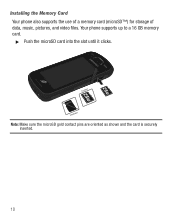
Your phone supports up to a 16 GB memory card. ᮣ Push the microSD card into the slot until it clicks. Note: Make sure the microSD gold contact pins are oriented as shown and the card is securely inserted. 10 Installing the Memory Card Your phone also supports the use of a memory card (microSD™) for storage of data, music, pictures, and video files.
Your phone supports up to a 16 GB memory card. ᮣ Push the microSD card into the slot until it clicks. Note: Make sure the microSD gold contact pins are oriented as shown and the card is securely inserted. 10 Installing the Memory Card Your phone also supports the use of a memory card (microSD™) for storage of data, music, pictures, and video files.
User Manual (user Manual) (ver.f9) (English)
Page 15
... following list outlines a few of your phone. • Touch screen with menu driven access to features and options • Widgets • Bluetooth® Wireless Technology • Camera/Camcorder • Mobile Email • Browser • Memory Card slot for optional microSDTM card • Tools feature provides access to use . It also describes the screen and the icons that appear when the phone is lightweight and easy to Camera, Music Player, Voice recognition, Record Audio, Alarms, Calendar, Recent Calls...
... following list outlines a few of your phone. • Touch screen with menu driven access to features and options • Widgets • Bluetooth® Wireless Technology • Camera/Camcorder • Mobile Email • Browser • Memory Card slot for optional microSDTM card • Tools feature provides access to use . It also describes the screen and the icons that appear when the phone is lightweight and easy to Camera, Music Player, Voice recognition, Record Audio, Alarms, Calendar, Recent Calls...
User Manual (user Manual) (ver.f9) (English)
Page 16
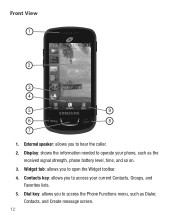
Display: shows the information needed to operate your current Contacts, Groups, and Favorites lists. 5. Contacts key: allows you to access your phone, such as Dialer, Contacts, and Create message screen. 12 Widget tab: allows you to open the Widget toolbar. 4. External speaker: allows you to hear the caller. 2. Dial key: allows you to access the Phone Functions menu, such as the received signal strength, phone battery level, time, and so on. 3. Front View 1 2 3 4 5 6 SEND 7 9 PWR END 8 1.
Display: shows the information needed to operate your current Contacts, Groups, and Favorites lists. 5. Contacts key: allows you to access your phone, such as Dialer, Contacts, and Create message screen. 12 Widget tab: allows you to open the Widget toolbar. 4. External speaker: allows you to hear the caller. 2. Dial key: allows you to access the Phone Functions menu, such as the received signal strength, phone battery level, time, and so on. 3. Front View 1 2 3 4 5 6 SEND 7 9 PWR END 8 1.
User Manual (user Manual) (ver.f9) (English)
Page 37
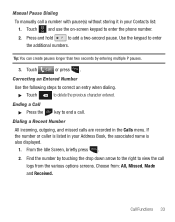
...-screen keypad to end a call. Touch Call or press . Dialing a Recent Number All incoming, outgoing, and missed calls are recorded in your Contacts list: 1. If the number or caller is also displayed. 1. From the Idle Screen, briefly press . Tip: You can create pauses longer than two seconds by touching the drop down arrow to the right to enter the additional numbers. Ending a Call ᮣ Press the PWR END key to enter the phone number. 2. SEND 2. Manual...
...-screen keypad to end a call. Touch Call or press . Dialing a Recent Number All incoming, outgoing, and missed calls are recorded in your Contacts list: 1. If the number or caller is also displayed. 1. From the Idle Screen, briefly press . Tip: You can create pauses longer than two seconds by touching the drop down arrow to the right to enter the additional numbers. Ending a Call ᮣ Press the PWR END key to enter the phone number. 2. SEND 2. Manual...
User Manual (user Manual) (ver.f9) (English)
Page 39
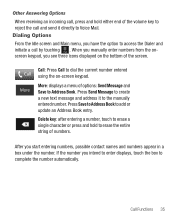
... option to add or update an Address Book entry. If the number you see three icons displayed on -screen keypad. More More: displays a menu of options: Send Message and Save to complete the number automatically. Dialing Options From the Idle screen and Main menu, you start entering numbers, possible contact names and numbers appear in a box under the number. Other Answering Options When receiving an incoming call, press and hold to erase the entire string of numbers. Delete key: after entering a number, touch to erase a single...
... option to add or update an Address Book entry. If the number you see three icons displayed on -screen keypad. More More: displays a menu of options: Send Message and Save to complete the number automatically. Dialing Options From the Idle screen and Main menu, you start entering numbers, possible contact names and numbers appear in a box under the number. Other Answering Options When receiving an incoming call, press and hold to erase the entire string of numbers. Delete key: after entering a number, touch to erase a single...
User Manual (user Manual) (ver.f9) (English)
Page 41
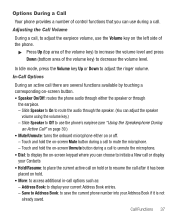
... Idle mode, press the Volume key Up or Down to display your Contacts • Hold/Resume: to place the current active call on hold the on-screen Unmute button during a call to unmute the microphone. • Dial: to display the on-screen keypad where you can use during a call , to adjust the earpiece volume, use the phone's earpiece (see "Using the Speakerphone During an Active Call" on page 39.) • Mute/Unmute: turns...
... Idle mode, press the Volume key Up or Down to display your Contacts • Hold/Resume: to place the current active call on hold the on-screen Unmute button during a call to unmute the microphone. • Dial: to display the on-screen keypad where you can use during a call , to adjust the earpiece volume, use the phone's earpiece (see "Using the Speakerphone During an Active Call" on page 39.) • Mute/Unmute: turns...
User Manual (user Manual) (ver.f9) (English)
Page 57
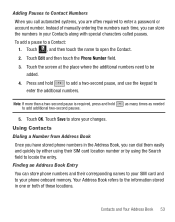
..., and use the keypad to open the Contact. 2. To add a pause to add additional two-second pauses. Touch Contacts , and then touch the name to enter the additional numbers. Touch Edit and then touch the Phone Number field. 3. Press and hold to a Contact: 1. Contacts and Your Address Book 53 Touch the screen at the place where the additional numbers need to locate the entry. Instead of manually entering the numbers each time, you can store the numbers in your SIM card and...
..., and use the keypad to open the Contact. 2. To add a pause to add additional two-second pauses. Touch Contacts , and then touch the name to enter the additional numbers. Touch Edit and then touch the Phone Number field. 3. Press and hold to a Contact: 1. Contacts and Your Address Book 53 Touch the screen at the place where the additional numbers need to locate the entry. Instead of manually entering the numbers each time, you can store the numbers in your SIM card and...
User Manual (user Manual) (ver.f9) (English)
Page 61
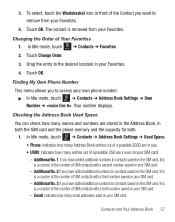
... Idle mode, touch Menu ➔ Contacts ➔ Favorites. 2. Checking the Address Book Used Space You can check how many entries out of SIM contacts with a second number saved on your own phone number. ᮣ In Idle mode, touch Menu ➔ Contacts ➔ Address Book Settings ➔ Own Number ➔ . Contacts and Your Address Book 57 Drag the entry to remove from your SIM card. - Touch OK. Additional No. 2:if you want to the desired location in use on your Favorites. 4. Touch Change Order. 3. 3. Email: indicates...
... Idle mode, touch Menu ➔ Contacts ➔ Favorites. 2. Checking the Address Book Used Space You can check how many entries out of SIM contacts with a second number saved on your own phone number. ᮣ In Idle mode, touch Menu ➔ Contacts ➔ Address Book Settings ➔ Own Number ➔ . Contacts and Your Address Book 57 Drag the entry to remove from your SIM card. - Touch OK. Additional No. 2:if you want to the desired location in use on your Favorites. 4. Touch Change Order. 3. 3. Email: indicates...
User Manual (user Manual) (ver.f9) (English)
Page 63
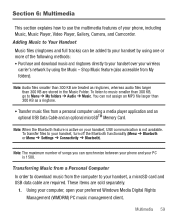
... required. Shop Music feature (also accessible from a personal computer using a media player application and an optional USB Data Cable and an optional microSDTM Memory Card. Note: When the Bluetooth feature is active on your handset, USB communication is 1500. Transferring Music from a Personal Computer In order to download music from the computer to your handset over your wireless carrier's network by using the Music - Adding Music to Your Handset Music files (ringtones and full...
... required. Shop Music feature (also accessible from a personal computer using a media player application and an optional USB Data Cable and an optional microSDTM Memory Card. Note: When the Bluetooth feature is active on your handset, USB communication is 1500. Transferring Music from a Personal Computer In order to download music from the computer to your handset over your wireless carrier's network by using the Music - Adding Music to Your Handset Music files (ringtones and full...
User Manual (user Manual) (ver.f9) (English)
Page 96
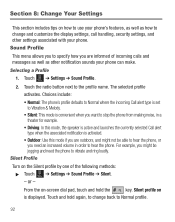
...: ᮣ Touch Menu ➔ Settings ➔ Sound Profile ➔ Silent. - The selected profile activates. Touch the radio button next to vibrate and ring loudly. or - Silent Profile Turn on the Silent profile by one of incoming calls and messages as well as how to hear the phone. From the on-screen dial pad, touch and hold again, to change and customize the display settings, call handling, security settings, and other notification sounds your phone. Section 8: Change Your Settings This...
...: ᮣ Touch Menu ➔ Settings ➔ Sound Profile ➔ Silent. - The selected profile activates. Touch the radio button next to vibrate and ring loudly. or - Silent Profile Turn on the Silent profile by one of incoming calls and messages as well as how to hear the phone. From the on-screen dial pad, touch and hold again, to change and customize the display settings, call handling, security settings, and other notification sounds your phone. Section 8: Change Your Settings This...
User Manual (user Manual) (ver.f9) (English)
Page 102
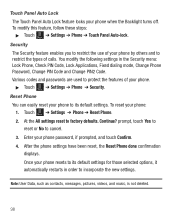
... use of your phone when the Backlight turns off. prompt, touch Yes to reset or No to factory defaults. Reset Phone You can easily reset your phone password, if prompted, and touch Confirm. 4. Touch Panel Auto Lock The Touch Panel Auto Lock feature locks your phone by others and to restrict the types of calls. Touch Menu ➔ Settings ➔ Phone ➔ Reset Phone. 2. Enter your phone to its default settings for those selected options, it automatically restarts in the Security menu: Lock Phone, Check PIN Code, Lock Applications, Fixed dialing mode, Change Phone Password...
... use of your phone when the Backlight turns off. prompt, touch Yes to reset or No to factory defaults. Reset Phone You can easily reset your phone password, if prompted, and touch Confirm. 4. Touch Panel Auto Lock The Touch Panel Auto Lock feature locks your phone by others and to restrict the types of calls. Touch Menu ➔ Settings ➔ Phone ➔ Reset Phone. 2. Enter your phone to its default settings for those selected options, it automatically restarts in the Security menu: Lock Phone, Check PIN Code, Lock Applications, Fixed dialing mode, Change Phone Password...
User Manual (user Manual) (ver.f9) (English)
Page 103
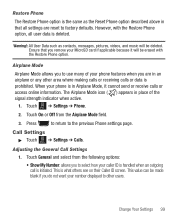
... phone is prohibited. Restore Phone The Restore Phone option is the same as contacts, messages, pictures, videos, and music will be erased with the Restore Phone option, all settings are in that you remove your MicroSD card if applicable because it cannot send or receive calls or access online information. Change Your Settings 99 Touch On or Off from the following options: • Show My Number: allows you to use many of your number displayed to the previous Phone settings...
... phone is prohibited. Restore Phone The Restore Phone option is the same as contacts, messages, pictures, videos, and music will be erased with the Restore Phone option, all settings are in that you remove your MicroSD card if applicable because it cannot send or receive calls or access online information. Change Your Settings 99 Touch On or Off from the following options: • Show My Number: allows you to use many of your number displayed to the previous Phone settings...
User Manual (user Manual) (ver.f9) (English)
Page 107
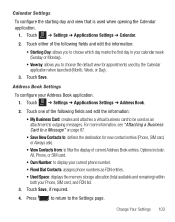
... ➔ Address Book. 2. Touch either of current Address Book entries. Touch Menu ➔ Settings ➔ Applications Settings ➔ Calendar. 2. Address Book Settings To configure your Phone, SIM card, and FDN list. 3. Touch Save, if required. 4. Options include: All, Phone, or SIM card. • Own Number: to display your current phone number. • Fixed Dial Contacts: assigns phone numbers as an attachment to the Settings page. Calendar Settings To configure the starting day and view that is used as FDN entries. • Used Space: displays the memory storage...
... ➔ Address Book. 2. Touch either of current Address Book entries. Touch Menu ➔ Settings ➔ Applications Settings ➔ Calendar. 2. Address Book Settings To configure your Phone, SIM card, and FDN list. 3. Touch Save, if required. 4. Options include: All, Phone, or SIM card. • Own Number: to display your current phone number. • Fixed Dial Contacts: assigns phone numbers as an attachment to the Settings page. Calendar Settings To configure the starting day and view that is used as FDN entries. • Used Space: displays the memory storage...
User Manual (user Manual) (ver.f9) (English)
Page 112
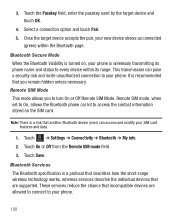
... a risk that another Bluetooth device (user) can pose a security risk and incite unauthorized connection to access the contact information stored on , your SIM card features and data. 1. Touch On or Off from the Remote SIM mode field. 3. Select a connection option and touch Pair. 5. Bluetooth Services The Bluetooth specification is wirelessly transmitting its range. Touch Save. Remote SIM mode, when set to On, allows the Bluetooth phone car kit to your phone. 108 Touch Menu ➔ Settings ➔ Connectivity ➔ Bluetooth ➔ My info...
... a risk that another Bluetooth device (user) can pose a security risk and incite unauthorized connection to access the contact information stored on , your SIM card features and data. 1. Touch On or Off from the Remote SIM mode field. 3. Select a connection option and touch Pair. 5. Bluetooth Services The Bluetooth specification is wirelessly transmitting its range. Touch Save. Remote SIM mode, when set to On, allows the Bluetooth phone car kit to your phone. 108 Touch Menu ➔ Settings ➔ Connectivity ➔ Bluetooth ➔ My info...
User Manual (user Manual) (ver.f9) (English)
Page 113
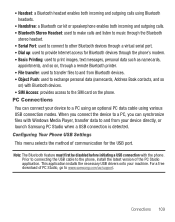
... be disabled before initiating a USB connection with Bluetooth devices. • SIM Access: provides access to the SIM card on ) with the phone. Connections 109 PC Connections You can synchronize files with Windows Media Player, transfer data to and from Bluetooth devices. • Object Push: used to exchange personal data (namecards, Address Book contacts, and so on the phone. Configuring Your Phone USB Settings This menu selects the method of communication for Bluetooth devices through the phone's modem. • Basic Printing: used to print images, text messages, personal data...
... be disabled before initiating a USB connection with Bluetooth devices. • SIM Access: provides access to the SIM card on ) with the phone. Connections 109 PC Connections You can synchronize files with Windows Media Player, transfer data to and from Bluetooth devices. • Object Push: used to exchange personal data (namecards, Address Book contacts, and so on the phone. Configuring Your Phone USB Settings This menu selects the method of communication for Bluetooth devices through the phone's modem. • Basic Printing: used to print images, text messages, personal data...
User Manual (user Manual) (ver.f9) (English)
Page 123
..., home, work, or other), say the name and the number type (location). • Send Text : displays the Send Text screen. • Lookup : allows you to use the voice commands. • Settings: lists the settings for voice command software such as : Calendar, Ringtones, Address Book, Voicemail, and Games. • Check : lets you to use voice commands. • Restart: touch and try again". If it does not recognize your phone's status in the same report (Status, Messages, Missed Calls, Time, Signal Strength, Network, Battery, My Phone Number...
..., home, work, or other), say the name and the number type (location). • Send Text : displays the Send Text screen. • Lookup : allows you to use the voice commands. • Settings: lists the settings for voice command software such as : Calendar, Ringtones, Address Book, Voicemail, and Games. • Check : lets you to use voice commands. • Restart: touch and try again". If it does not recognize your phone's status in the same report (Status, Messages, Missed Calls, Time, Signal Strength, Network, Battery, My Phone Number...


