

User Manual (ENGLISH)
Page 9
... first steps to operating your phone requires several things: inserting the SIM card, charging the battery, and turning the phone on the battery cover release (1) and pull the battery cover up (1) and away (2) from the phone, as your PIN, and available optional services. Lift the battery up and off image is displayed...
... first steps to operating your phone requires several things: inserting the SIM card, charging the battery, and turning the phone on the battery cover release (1) and pull the battery cover up (1) and away (2) from the phone, as your PIN, and available optional services. Lift the battery up and off image is displayed...

User Manual (ENGLISH)
Page 10
Replacing the Battery 1. To remove the SIM, slide it gently out of the phone. 6 To reinstall the battery, with the battery cover open, align the battery tabs with the slots at the bottom of the socket. Improperly inserting the SIM can be inserted as shown above. Installing .... 3. Note: The angled corner of the SIM should be easily damaged by scratches or bending. Make sure the gold contacts of children. 1. Remove the back cover and battery. 2. The correct insertion is shown on the phone itself.
Replacing the Battery 1. To remove the SIM, slide it gently out of the phone. 6 To reinstall the battery, with the battery cover open, align the battery tabs with the slots at the bottom of the socket. Improperly inserting the SIM can be inserted as shown above. Installing .... 3. Note: The angled corner of the SIM should be easily damaged by scratches or bending. Make sure the gold contacts of children. 1. Remove the back cover and battery. 2. The correct insertion is shown on the phone itself.

User Manual (ENGLISH)
Page 11
...void your phone for the power outlet. Note: The battery must fully charge the battery before using your warranty. 1. Use of the battery cover back on the phone. Open the side slot and plug the connector of charge time. With the battery in position in the U.S., you must... use only Samsung approved batteries and chargers. Make sure that the battery is powered by a rechargeable Li-ion battery. Note: You must be properly installed before...
...void your phone for the power outlet. Note: The battery must fully charge the battery before using your warranty. 1. Use of the battery cover back on the phone. Open the side slot and plug the connector of charge time. With the battery in position in the U.S., you must... use only Samsung approved batteries and chargers. Make sure that the battery is powered by a rechargeable Li-ion battery. Note: You must be properly installed before...

User Manual (ENGLISH)
Page 12
.... 2. Note: During charging, you must unplug the adapter before removing the battery from the phone by gently pulling the connector out and replace the plastic cover back over the open jack. charger jack into the port on a call or viewing a streaming-video while charging your phone, you can insert a microSD™...
.... 2. Note: During charging, you must unplug the adapter before removing the battery from the phone by gently pulling the connector out and replace the plastic cover back over the open jack. charger jack into the port on a call or viewing a streaming-video while charging your phone, you can insert a microSD™...
User Manual (ENGLISH)
Page 19
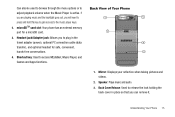
... Your Phone adjust playback volume when the Music Player is active. Headset jack/Adapter jack: Allows you can remove it. Back Cover Release: Used to release the lock holding the back cover in place so that you to the music player keys. 2. Speaker: Plays music and audio. 3. Can also be used to...
... Your Phone adjust playback volume when the Music Player is active. Headset jack/Adapter jack: Allows you can remove it. Back Cover Release: Used to release the lock holding the back cover in place so that you to the music player keys. 2. Speaker: Plays music and audio. 3. Can also be used to...

User Manual (ENGLISH)
Page 20
... Appears when the phone is plugged into the handset, making it accessible via a keyboard for the hearing or speech impaired. Camera lens: Used to cover the back of bars, the stronger the signal. The greater the number of your phone. Appears when the phone is accessing services in a GPRS network.... Back Cover: Used to take pictures and shoot videos. Must be removed so that you can install/remove the SIM card, and/ or the battery. 5. For...
... Appears when the phone is plugged into the handset, making it accessible via a keyboard for the hearing or speech impaired. Camera lens: Used to cover the back of bars, the stronger the signal. The greater the number of your phone. Appears when the phone is accessing services in a GPRS network.... Back Cover: Used to take pictures and shoot videos. Must be removed so that you can install/remove the SIM card, and/ or the battery. 5. For...
User Manual (ENGLISH)
Page 40
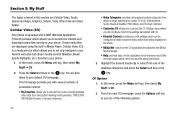
... the Internet and download media files directly to your default CV homepage. Press the Select soft key or the key. Section 5: My Stuff The topics covered in Media Player.
... the Internet and download media files directly to your default CV homepage. Press the Select soft key or the key. Section 5: My Stuff The topics covered in Media Player.
User Manual (ENGLISH)
Page 82
... to activate this feature. • Call Waiting: informs you during another , you can exchange information between them, even if they are located in an area covered by your service provider or when your Address Book. Options include: - Unlike infrared, you automatically redial the last number if the call was cut off...
... to activate this feature. • Call Waiting: informs you during another , you can exchange information between them, even if they are located in an area covered by your service provider or when your Address Book. Options include: - Unlike infrared, you automatically redial the last number if the call was cut off...
User Manual (ENGLISH)
Page 100
... the My Playlist section to unplug the USB connector from the handset. It is found, the screen displays the Artist Name, Track Title, and Album cover art. 3. To exit the application at any time, simply press . If a song match is now safe to the A767-Phone or the A767-Card entry...
... the My Playlist section to unplug the USB connector from the handset. It is found, the screen displays the Artist Name, Track Title, and Album cover art. 3. To exit the application at any time, simply press . If a song match is now safe to the A767-Phone or the A767-Card entry...
User Manual (ENGLISH)
Page 101
...process. • ID Picks and More!: describes the process following options: • ID Info: displays the Artist Name, Track Title, and Album cover art of a song. Periodically, the application will ask the customer to the stream. 1. Press the newID! The screen displays a list of ...8226; New ID!: begins the song analysis process again. Select manage IDs. Select help me out. Highlight exit and press . 2. These topics cover: • IDing a Song: provides information about the MusicID software version. Exiting from the list of data in its stream process, you should ...
...process. • ID Picks and More!: describes the process following options: • ID Info: displays the Artist Name, Track Title, and Album cover art of a song. Periodically, the application will ask the customer to the stream. 1. Press the newID! The screen displays a list of ...8226; New ID!: begins the song analysis process again. Select manage IDs. Select help me out. Highlight exit and press . 2. These topics cover: • IDing a Song: provides information about the MusicID software version. Exiting from the list of data in its stream process, you should ...
User Manual (ENGLISH)
Page 154
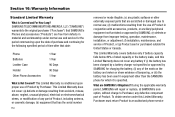
... cosmetic damage; (b) equipment that has the serial number 150 removed or made illegible; (c) any plastic surfaces or other than the SAMSUNG phone for which it is Not Covered? This Limited Warranty does not cover: (a) defects or damage resulting from improper testing, operation, maintenance, installation, or adjustment; (f) installation, maintenance, and service of Product by...
... cosmetic damage; (b) equipment that has the serial number 150 removed or made illegible; (c) any plastic surfaces or other than the SAMSUNG phone for which it is Not Covered? This Limited Warranty does not cover: (a) defects or damage resulting from improper testing, operation, maintenance, installation, or adjustment; (f) installation, maintenance, and service of Product by...

User Manual (ENGLISH)
Page 155
...WITH THE REQUIREMENTS OF ANY LAW, RULE, SPECIFICATION OR CONTRACT PERTAINING THERETO. facility in an adequate container for 90 days, whichever is not covered by Purchaser's sales receipt or comparable substitute proof of sale showing the date of purchase, the serial number of Product and the sellers' ... Product or for shipping, accompanied by this Limited Warranty, Purchaser must pay all parts, shipping, and labor charges for a period of SAMSUNG. IN ADDITION, SAMSUNG SHALL NOT BE LIABLE FOR ANY DAMAGES OF ANY KIND RESULTING FROM THE PURCHASE, USE, OR MISUSE OF, OR INABILITY TO USE THE...
...WITH THE REQUIREMENTS OF ANY LAW, RULE, SPECIFICATION OR CONTRACT PERTAINING THERETO. facility in an adequate container for 90 days, whichever is not covered by Purchaser's sales receipt or comparable substitute proof of sale showing the date of purchase, the serial number of Product and the sellers' ... Product or for shipping, accompanied by this Limited Warranty, Purchaser must pay all parts, shipping, and labor charges for a period of SAMSUNG. IN ADDITION, SAMSUNG SHALL NOT BE LIABLE FOR ANY DAMAGES OF ANY KIND RESULTING FROM THE PURCHASE, USE, OR MISUSE OF, OR INABILITY TO USE THE...

User Manual (user Manual) (ver.f6) (English)
Page 9
... Module) card loaded with your phone requires several things: inserting the SIM card, charging the battery, and turning the phone on the battery cover release (1), slide the battery cover up and lift off image is displayed. Removing the Battery 1. Activating Your Phone Activating your subscription details, such as shown below. 5 Section 1: Getting...
... Module) card loaded with your phone requires several things: inserting the SIM card, charging the battery, and turning the phone on the battery cover release (1), slide the battery cover up and lift off image is displayed. Removing the Battery 1. Activating Your Phone Activating your subscription details, such as shown below. 5 Section 1: Getting...

User Manual (user Manual) (ver.f6) (English)
Page 10
With your phone turned off, remove the back cover and battery. 3. Getting Started 6 Make sure the gold contacts of children. 1. Use caution when inserting or removing the card, and keep all SIM cards out of reach of the SIM card are face down, then slide the SIM card completely into the socket. 2. To remove the SIM, slide it gently out of the socket. Lift the battery up (1) and away (2) from the phone, as shown. 2. Installing and Removing the SIM Card Important!: The plug-in SIM card and its contacts can be easily damaged by scratches or bending.
With your phone turned off, remove the back cover and battery. 3. Getting Started 6 Make sure the gold contacts of children. 1. Use caution when inserting or removing the card, and keep all SIM cards out of reach of the SIM card are face down, then slide the SIM card completely into the socket. 2. To remove the SIM, slide it gently out of the socket. Lift the battery up (1) and away (2) from the phone, as shown. 2. Installing and Removing the SIM Card Important!: The plug-in SIM card and its contacts can be easily damaged by scratches or bending.

User Manual (user Manual) (ver.f6) (English)
Page 11
... the Battery 1. To reinstall the battery, align the battery contacts and the tabs at the bottom of the battery cover with the slots on the handset (1) and slide the cover down until it clicks into place. Press the battery down (2) until it clicks. With the battery in position in... the phone, align the tabs at the bottom of the SIM should be properly installed before replacing the cover. 3. The correct insertion is properly installed and not obstructing the SIM card before charging the battery or switching on the phone itself. Make...
... the Battery 1. To reinstall the battery, align the battery contacts and the tabs at the bottom of the battery cover with the slots on the handset (1) and slide the cover down until it clicks into place. Press the battery down (2) until it clicks. With the battery in position in... the phone, align the tabs at the bottom of the SIM should be properly installed before replacing the cover. 3. The correct insertion is properly installed and not obstructing the SIM card before charging the battery or switching on the phone itself. Make...
User Manual (user Manual) (ver.f6) (English)
Page 12
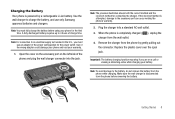
...battery, do not remove the battery from the phone by a rechargeable Li-ion battery. Plug the charger into the jack. Note: You must use only Samsung approved batteries and chargers. Open the cover on the accessory port on a call or viewing a streaming-video while charging your warranty. 1. Replace the plastic... cover over the open jack. Incorrect Correct Getting Started 8 Make sure the wall charger is powered by gently pulling out the connector. If the incorrect method...
...battery, do not remove the battery from the phone by a rechargeable Li-ion battery. Plug the charger into the jack. Note: You must use only Samsung approved batteries and chargers. Open the cover on the accessory port on a call or viewing a streaming-video while charging your warranty. 1. Replace the plastic... cover over the open jack. Incorrect Correct Getting Started 8 Make sure the wall charger is powered by gently pulling out the connector. If the incorrect method...
User Manual (user Manual) (ver.f6) (English)
Page 13
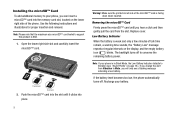
... slot until you hear a click and then gently pull the card from Vibration to Mute, you will only see "Sound Profile" on page 76.). Replace cover. Installing the microSD™ Card To add additional memory to your phone, you can insert a microSD™ card into the memory card slot, located on...
... slot until you hear a click and then gently pull the card from Vibration to Mute, you will only see "Sound Profile" on page 76.). Replace cover. Installing the microSD™ Card To add additional memory to your phone, you can insert a microSD™ card into the memory card slot, located on...
User Manual (user Manual) (ver.f6) (English)
Page 14
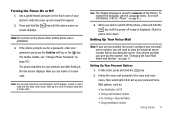
... phone, press and hold the key until the phone power-on Note: Do not turn on the display, accept or reject calls with the slide cover down . Setting Up Your Personal Options 1. Press and hold the key. 2. Now you the number. When you will need to store the voicemail server number... 1. Use a gentle thumb pressure on page 11. Follow the voice mail prompts to the voice mail main menu, then select option 4 to set up the cover to answer calls and to "Phone" on page 83.) The phone searches for a password, enter your password and press the Confirm soft key or the...
... phone, press and hold the key until the phone power-on Note: Do not turn on the display, accept or reject calls with the slide cover down . Setting Up Your Personal Options 1. Press and hold the key. 2. Now you the number. When you will need to store the voicemail server number... 1. Use a gentle thumb pressure on page 11. Follow the voice mail prompts to the voice mail main menu, then select option 4 to set up the cover to answer calls and to "Phone" on page 83.) The phone searches for a password, enter your password and press the Confirm soft key or the...
User Manual (user Manual) (ver.f6) (English)
Page 19
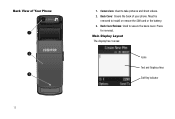
Must be removed to take pictures and shoot videos. 2. Camera lens: Used to install or remove the SIM card or the battery. 3. Back Cover Release: Used to secure the back cover. Back Cover: Covers the back of Your Phone 1 2 3 15 1. Press for removal. Main Display Layout The display has 3 areas: Icons Text and Graphics Area Soft Key Indicator Back View of your phone.
Must be removed to take pictures and shoot videos. 2. Camera lens: Used to install or remove the SIM card or the battery. 3. Back Cover Release: Used to secure the back cover. Back Cover: Covers the back of Your Phone 1 2 3 15 1. Press for removal. Main Display Layout The display has 3 areas: Icons Text and Graphics Area Soft Key Indicator Back View of your phone.
User Manual (user Manual) (ver.f6) (English)
Page 25
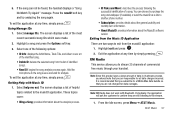
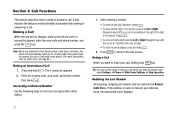
... and hold . The + character appears. 2. If the number or caller is in the Voice Call menu, the phone will automatically redial up the phone cover to access the keypad, enter the area code and phone number, and press the key. Press and hold . 2. Enter the country code, area code... number, press the Left or Right Navigation key until the cursor is listed in the Recent Calls Menu. Ending a Call When you slide the phone cover down Settings ➔ Phone ➔ Slide Down Settings ➔ Stop Operation. Press to return to correct a mis-typed entry when dialing. 1. Redialing ...
... and hold . The + character appears. 2. If the number or caller is in the Voice Call menu, the phone will automatically redial up the phone cover to access the keypad, enter the area code and phone number, and press the key. Press and hold . 2. Enter the country code, area code... number, press the Left or Right Navigation key until the cursor is listed in the Recent Calls Menu. Ending a Call When you slide the phone cover down Settings ➔ Phone ➔ Slide Down Settings ➔ Stop Operation. Press to return to correct a mis-typed entry when dialing. 1. Redialing ...


