SGH-A107 Sim - Samsung
SGH-A107 Sim

Related Manual Pages


Related Videos

How to Unlock AT&T SAMSUNG SGH-A107 cellphone
Duration: 3:17
Total Views: 80,096
Duration: 3:17
Total Views: 80,096
UNLOCK SGH-A107 - How to Unlock Samsung A107 GoPhone At&t by Unlock code
Duration: 3:11
Total Views: 16,087
Duration: 3:11
Total Views: 16,087
Similar Questions

Why My New Sim Crash
I have a prepaid AT&T it's new I just got it a week ago. And I just acidentaly broke the phone a...
I have a prepaid AT&T it's new I just got it a week ago. And I just acidentaly broke the phone a...
(Posted by florante 10 years ago)

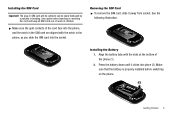
Where Insert Sim
Where i insert a sim card in m620-sph upstage phone please tell me
Where i insert a sim card in m620-sph upstage phone please tell me
(Posted by hasnatdastgir111 11 years ago)

My Smasung Model Sgh-a107 Showing Wrong Sim Card
Please I need unlocking code for the phone, it showing Wrong SIM Card Samsung at & tModel SGH-A107A...
Please I need unlocking code for the phone, it showing Wrong SIM Card Samsung at & tModel SGH-A107A...
(Posted by murphylee 11 years ago)
