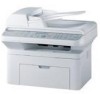
User Manual (ENGLISH)
Page 5
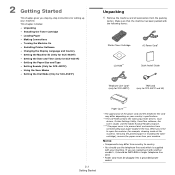
... Understanding Component Locations 1.2 Front View ...1.2 Rear View ...1.2 Control Panel Functions ...1.3 2. CONTENTS 1. Getting Started Unpacking ...2.1 Selecting a Location ...2.2 Installing the Toner Cartridge 2.2 Loading Paper ...2.3 Making Connections ...2.4 Turning the Machine On ...2.6 Installing Printer Software ...2.7 System requirements ...2.7 Printer Driver Features ...2.8 Changing the Display Language... and Alarm Sound 2.11 Speaker Volume ...2.11 Using the Save Modes ...2.12 Toner Save Mode ...2.12 Power Save Mode ...2.12 Setting the Dial Mode (Only for SCX-4521F 2.12 3.
... Understanding Component Locations 1.2 Front View ...1.2 Rear View ...1.2 Control Panel Functions ...1.3 2. CONTENTS 1. Getting Started Unpacking ...2.1 Selecting a Location ...2.2 Installing the Toner Cartridge 2.2 Loading Paper ...2.3 Making Connections ...2.4 Turning the Machine On ...2.6 Installing Printer Software ...2.7 System requirements ...2.7 Printer Driver Features ...2.8 Changing the Display Language... and Alarm Sound 2.11 Speaker Volume ...2.11 Using the Save Modes ...2.12 Toner Save Mode ...2.12 Power Save Mode ...2.12 Setting the Dial Mode (Only for SCX-4521F 2.12 3.
User Manual (ENGLISH)
Page 7
...Exit Misfeed ...9.2 Clearing Paper Jams ...9.2 In the Tray ...9.2 In the Manual Tray ...9.2 In the Fuser Area or Around the Toner Cartridge 9.3 In the Paper Exit Area ...9.3 Tips for Avoiding Paper Jams 9.4 Clearing LCD Error Messages 9.4 Solving Other Problems ... Cleaning the Inside ...8.2 Cleaning the Scan Unit ...8.3 Maintaining the Toner Cartridge 8.3 Redistributing Toner ...8.4 Replacing the Toner Cartridge 8.4 Setting the Notify Toner Option (Only for SCX-4521F 8.4 Cleaning the Drum ...8.5 Ignoring the Toner Empty Message (Only for SCX-4521F 8.5 Consumables and Replacement Parts ...
...Exit Misfeed ...9.2 Clearing Paper Jams ...9.2 In the Tray ...9.2 In the Manual Tray ...9.2 In the Fuser Area or Around the Toner Cartridge 9.3 In the Paper Exit Area ...9.3 Tips for Avoiding Paper Jams 9.4 Clearing LCD Error Messages 9.4 Solving Other Problems ... Cleaning the Inside ...8.2 Cleaning the Scan Unit ...8.3 Maintaining the Toner Cartridge 8.3 Redistributing Toner ...8.4 Replacing the Toner Cartridge 8.4 Setting the Notify Toner Option (Only for SCX-4521F 8.4 Cleaning the Drum ...8.5 Ignoring the Toner Empty Message (Only for SCX-4521F 8.5 Consumables and Replacement Parts ...
User Manual (ENGLISH)
Page 12
...one sheet of envelopes, labels, transparencies, custom-sized materials, postcards and heavy paper. • Standard 150-sheet tray supports standard type and size of paper to save paper. • You can use the Toner Save mode to save the toner.... 1 Introduction Thank you to use preprinted forms and letterhead on page 2.12. • You can customize your document are magnified and printed across the sheet of special materials. • 50-sheet output tray supports convenient access. Your machine provides printing, copying, scanning, and faxing (only for purchasing this Samsung...
...one sheet of envelopes, labels, transparencies, custom-sized materials, postcards and heavy paper. • Standard 150-sheet tray supports standard type and size of paper to save paper. • You can use the Toner Save mode to save the toner.... 1 Introduction Thank you to use preprinted forms and letterhead on page 2.12. • You can customize your document are magnified and printed across the sheet of special materials. • 50-sheet output tray supports convenient access. Your machine provides printing, copying, scanning, and faxing (only for purchasing this Samsung...
User Manual (ENGLISH)
Page 13
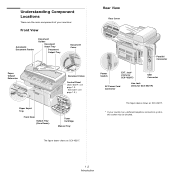
... country has a different telephone connection system, this socket may be blocked. 1.2 Introduction SCX-4321: see page 1.3.) Paper Input Tray Front Door Output Tray (Face Down) Toner Cartridge Manual Tray The figure above shows an SCX-4521F. * If your machine: Front View Automatic Document Feeder Document Guides Document Input Tray Document Output...
... country has a different telephone connection system, this socket may be blocked. 1.2 Introduction SCX-4321: see page 1.3.) Paper Input Tray Front Door Output Tray (Face Down) Toner Cartridge Manual Tray The figure above shows an SCX-4521F. * If your machine: Front View Automatic Document Feeder Document Guides Document Input Tray Document Output...

User Manual (ENGLISH)
Page 14
...to. Stop/Clear Stops an operation at any time. Darkness Original Type Adjusts the brightness of copies. Favorite Copy Allows you to use one of the special copy features, such as the darkness, the document type setting, the copy size, and the number of the documents...using less toner to print a document. Control Panel Functions SCX-4521F Allows you back to the upper menu level. Allows you to create the scan list using the Samsung software (Printer Settings Utility) provided with this machine. No. You must create the scan list using the Samsung software (...
...to. Stop/Clear Stops an operation at any time. Darkness Original Type Adjusts the brightness of copies. Favorite Copy Allows you to use one of the special copy features, such as the darkness, the document type setting, the copy size, and the number of the documents...using less toner to print a document. Control Panel Functions SCX-4521F Allows you back to the upper menu level. Allows you to create the scan list using the Samsung software (Printer Settings Utility) provided with this machine. No. You must create the scan list using the Samsung software (...
User Manual (ENGLISH)
Page 15
...machine. If you are replacing it with another vendor's, it should use the telephone line cord which is supplied with the following items: Starter Toner Cartridge AC Power Cord* CD-ROM** Quick Install Guide Telephone Line Cord* (only for SCX-4521F) TAM Lead (only for SCX-4521F...example, cleaning inside of the power cord and the telephone line cord may differ depending on your country's specifications. **.The CD-ROM contains the Samsung printer drivers, Scan drivers, Printer Settings Utility, SmarThru software, the User's Guide, and the Adobe Acrobat Reader program. ***.The paper cover is...
...machine. If you are replacing it with another vendor's, it should use the telephone line cord which is supplied with the following items: Starter Toner Cartridge AC Power Cord* CD-ROM** Quick Install Guide Telephone Line Cord* (only for SCX-4521F) TAM Lead (only for SCX-4521F...example, cleaning inside of the power cord and the telephone line cord may differ depending on your country's specifications. **.The CD-ROM contains the Samsung printer drivers, Scan drivers, Printer Settings Utility, SmarThru software, the User's Guide, and the Adobe Acrobat Reader program. ***.The paper cover is...
User Manual (ENGLISH)
Page 16
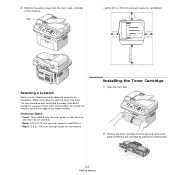
... with adequate space for opening doors and trays. Clearance Space • Front: 19 in ./100 mm (enough space for ventilation) Installing the Toner Cartridge 1 Open the front door. 2 Remove the toner cartridge from the front, back, and sides of your desk or table. The area should be opened) • Back: 3.9 in./100...
... with adequate space for opening doors and trays. Clearance Space • Front: 19 in ./100 mm (enough space for ventilation) Installing the Toner Cartridge 1 Open the front door. 2 Remove the toner cartridge from the front, back, and sides of your desk or table. The area should be opened) • Back: 3.9 in./100...
User Manual (ENGLISH)
Page 17
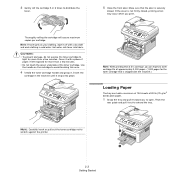
... sheets of 20 lb (75 g/m2 bond) plain paper. 1 Grasp the tray and pull it toward you to avoid touching this area. 4 Unfold the toner cartridge handle and grasp it out to scratch against the printer. 2.3 Getting Started Pinch the rear guide and pull it . NOTE: When printing text at... a few minutes. 3 Gently roll the cartridge 5 or 6 times to light for more than a few minutes. • Do not touch the green underside of the toner cartridge. If the cover is shipped with a dry cloth and wash clothing in the machine until it snaps into fabric. Thoroughly rolling the cartridge will...
... sheets of 20 lb (75 g/m2 bond) plain paper. 1 Grasp the tray and pull it toward you to avoid touching this area. 4 Unfold the toner cartridge handle and grasp it out to scratch against the printer. 2.3 Getting Started Pinch the rear guide and pull it . NOTE: When printing text at... a few minutes. 3 Gently roll the cartridge 5 or 6 times to light for more than a few minutes. • Do not touch the green underside of the toner cartridge. If the cover is shipped with a dry cloth and wash clothing in the machine until it snaps into fabric. Thoroughly rolling the cartridge will...
User Manual (ENGLISH)
Page 22
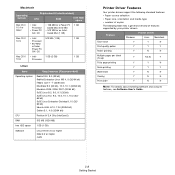
Feature Windows Printer Driver Linux Macintosh Toner Save Y Y N Print quality option Y Y Y Poster printing Y N N Multiple pages per sheet (N-up) Y Y(2,4) Y Fit to page printing Y Y N Scale printing Y Y Y Watermark Y N N Overlay Y N N Print order Y N N NOTE: For details about ...
Feature Windows Printer Driver Linux Macintosh Toner Save Y Y N Print quality option Y Y Y Poster printing Y N N Multiple pages per sheet (N-up) Y Y(2,4) Y Fit to page printing Y Y N Scale printing Y Y Y Watermark Y N N Overlay Y N N Print order Y N N NOTE: For details about ...
User Manual (ENGLISH)
Page 26
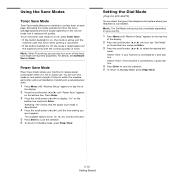
...8226; If the button backlight is on or off , the mode is deactivated and the machine prints with the normal quantity of the toner cartridge beyond what one would experience in the printer properties. Selecting "Off" means that the power save mode in the normal mode, but it switches to ...of the display. 2 Press the scroll button ( or ) until the time setting you can turn this mode extends the life of toner. Using the Save Modes Toner Save Mode Toner Save mode allows your machine to Standby mode, press Stop/Clear. NOTE: When PC-printing, you want appears. Press Enter. 3 ...
...8226; If the button backlight is on or off , the mode is deactivated and the machine prints with the normal quantity of the toner cartridge beyond what one would experience in the printer properties. Selecting "Off" means that the power save mode in the normal mode, but it switches to ...of the display. 2 Press the scroll button ( or ) until the time setting you can turn this mode extends the life of toner. Using the Save Modes Toner Save Mode Toner Save mode allows your machine to Standby mode, press Stop/Clear. NOTE: When PC-printing, you want appears. Press Enter. 3 ...
User Manual (ENGLISH)
Page 31
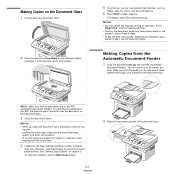
... copying. 6 Press Start to begin copying. Press Stop/Clear, and the copying will stop. • Dust on the document glass may affect copy quality and toner consumption. • If you are in the ADF, the machine gives it clean. • To get the best scan quality, especially for colored or gray...
... copying. 6 Press Start to begin copying. Press Stop/Clear, and the copying will stop. • Dust on the document glass may affect copy quality and toner consumption. • If you are in the ADF, the machine gives it clean. • To get the best scan quality, especially for colored or gray...
User Manual (ENGLISH)
Page 52
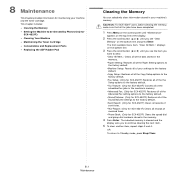
... SCX-4521F) Restores all of the Sound/Volume settings to be Checked by Phone (Only for SCX-4521F) • Cleaning Your Machine • Maintaining the Toner Cartridge • Consumables and Replacement Parts • Replacing the ADF Rubber Pad Clearing the Memory You can selectively clear information stored in the memory. 4 Press... line of received faxes. •Phone Book: (Only for SCX-4521F) Clears the speed dial and group dial numbers stored in your machine and the toner cartridge.
... SCX-4521F) Restores all of the Sound/Volume settings to be Checked by Phone (Only for SCX-4521F) • Cleaning Your Machine • Maintaining the Toner Cartridge • Consumables and Replacement Parts • Replacing the ADF Rubber Pad Clearing the Memory You can selectively clear information stored in the memory. 4 Press... line of received faxes. •Phone Book: (Only for SCX-4521F) Clears the speed dial and group dial numbers stored in your machine and the toner cartridge.

User Manual (ENGLISH)
Page 53
...the cloth slightly with cleaning materials containing large amounts of alcohol, solvent, or other strong substances can cause print quality problems, such as toner specks or smearing. This buildup can discolor or crack the cabinet. • While cleaning the inside of the machine, be careful not... to change the setting. Wait for the machine to Standby mode, press Stop/Clear. 2 Open the front door. 3 Pull the toner cartridge out, lightly pushing it out. 8.2 Maintenance Selecting "Off" protects your machine from your fingers can accumulate inside of the machine clears or ...
...the cloth slightly with cleaning materials containing large amounts of alcohol, solvent, or other strong substances can cause print quality problems, such as toner specks or smearing. This buildup can discolor or crack the cabinet. • While cleaning the inside of the machine, be careful not... to change the setting. Wait for the machine to Standby mode, press Stop/Clear. 2 Open the front door. 3 Pull the toner cartridge out, lightly pushing it out. 8.2 Maintenance Selecting "Off" protects your machine from your fingers can accumulate inside of the machine clears or ...
User Manual (ENGLISH)
Page 54
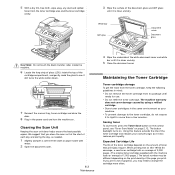
... dampen a soft lint-free cloth or paper towel with the machine lasts an average of 1,000 pages.) The actual number may need to see "Toner Save Mode" on page 2.12. We suggest that print jobs require. White bar ADF glass Document cover Document glass CAUTION: Do not touch the black... cost per page, but it is clean and dry. 5 Close the document cover. The button backlight turns on the control panel; Saving toner To save toner, press the Toner Save button on . If you print a lot of graphics, you print. Cleaning the Scan Unit Keeping the scan unit clean helps ensure...
... dampen a soft lint-free cloth or paper towel with the machine lasts an average of 1,000 pages.) The actual number may need to see "Toner Save Mode" on page 2.12. We suggest that print jobs require. White bar ADF glass Document cover Document glass CAUTION: Do not touch the black... cost per page, but it is clean and dry. 5 Close the document cover. The button backlight turns on the control panel; Saving toner To save toner, press the Toner Save button on . If you print a lot of graphics, you print. Cleaning the Scan Unit Keeping the scan unit clean helps ensure...
User Manual (ENGLISH)
Page 55
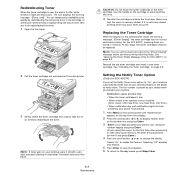
...Press Menu on the control panel until "Maintenance" appears on the top line of the display. 2 Press the scroll button ( or ) to display "Notify Toner " on the cartridge to avoid touching this menu, for the first time after purchasing or after clearing all memory, Re-enter the password to confirm... press Enter.) 4 Press the scroll button ( or ) to notify them. For the SCX-4521F, incoming faxes are preset by redistributing the remaining toner in cold water. Make sure that are saved in memory. NOTE: You can temporarily reestablish print quality by your machine. Setting the Notify...
...Press Menu on the control panel until "Maintenance" appears on the top line of the display. 2 Press the scroll button ( or ) to display "Notify Toner " on the cartridge to avoid touching this menu, for the first time after purchasing or after clearing all memory, Re-enter the password to confirm... press Enter.) 4 Press the scroll button ( or ) to notify them. For the SCX-4521F, incoming faxes are preset by redistributing the remaining toner in cold water. Make sure that are saved in memory. NOTE: You can temporarily reestablish print quality by your machine. Setting the Notify...
User Manual (ENGLISH)
Page 56
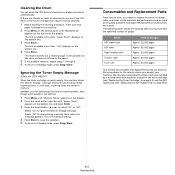
...manual cleaning. 1 Before starting the cleaning procedure, make sure that these items be replaced after you have printed the specified number of the toner cartridge manually or automatically. The machine prints out a cleaning page. This is loaded in memory. Select "On" to Standby mode, press ...print, the OPC drum of the display. Consumables and Replacement Parts From time to time, you bought your Samsung dealer or the retailer where you needs to replace the toner cartridge, roller, and fuser unit to maintain top performance and to Standby mode, press Stop/Clear. The ...
...manual cleaning. 1 Before starting the cleaning procedure, make sure that these items be replaced after you have printed the specified number of the toner cartridge manually or automatically. The machine prints out a cleaning page. This is loaded in memory. Select "On" to Standby mode, press ...print, the OPC drum of the display. Consumables and Replacement Parts From time to time, you bought your Samsung dealer or the retailer where you needs to replace the toner cartridge, roller, and fuser unit to maintain top performance and to Standby mode, press Stop/Clear. The ...
User Manual (ENGLISH)
Page 59
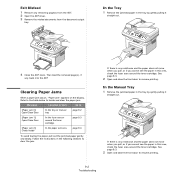
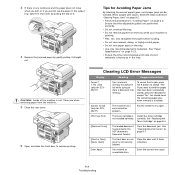
... to [Paper Jam 0] Open/Close Door In the tray or manual tray page 9.2 [Paper Jam 1] Open/Close Door In the fuser area or around the toner cartridge. page 9.3 [Paper Jam 2] Check Inside In the paper exit area page 9.3 To avoid tearing the paper, pull out the jammed paper gently and slowly... and the paper does not move when you pull, or if you cannot see the paper in this area, check the fuser area around the toner cartridge. Clearing Paper Jams When a paper jam occurs, "Paper Jam" appears on the display. If there is any resistance and the paper does not move...
... to [Paper Jam 0] Open/Close Door In the tray or manual tray page 9.2 [Paper Jam 1] Open/Close Door In the fuser area or around the toner cartridge. page 9.3 [Paper Jam 2] Check Inside In the paper exit area page 9.3 To avoid tearing the paper, pull out the jammed paper gently and slowly... and the paper does not move when you pull, or if you cannot see the paper in this area, check the fuser area around the toner cartridge. Clearing Paper Jams When a paper jam occurs, "Paper Jam" appears on the display. If there is any resistance and the paper does not move...
User Manual (ENGLISH)
Page 60
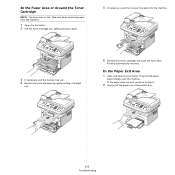
...paper does not exit, continue to step 2. 2 Gently pull the paper out of the output tray. 9.3 Troubleshooting In the Fuser Area or Around the Toner Cartridge NOTE: The fuser area is hot. Printing automatically resumes. Take care when removing paper from the machine. 1 Open the front door. 2 Pull the... toner cartridge out, lightly pushing it down. 5 If necessary, push the manual tray back into the machine. 3 If necessary, pull the manual tray out. 4 ...
...paper does not exit, continue to step 2. 2 Gently pull the paper out of the output tray. 9.3 Troubleshooting In the Fuser Area or Around the Toner Cartridge NOTE: The fuser area is hot. Printing automatically resumes. Take care when removing paper from the machine. 1 Open the front door. 2 Pull the... toner cartridge out, lightly pushing it down. 5 If necessary, push the manual tray back into the machine. 3 If necessary, pull the manual tray out. 4 ...
User Manual (ENGLISH)
Page 61
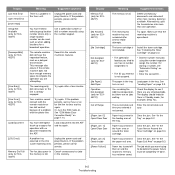
... Cancel ? 1:Yes 2:No (only for SCX4521F) CRU Fuse Error The machine has a communication problem. Error] (only for SCX4521F) Meaning Suggested solutions Your machine's memory has become full while trying to store a document into place. Install the toner cartridge correctly. Close the door until it ... remove paper from the machine. 5 Close the rear cover. 6 Open and close the front door to accept "No". See "Replacing the Toner Cartridge" on page 2.3. You should send the remaining pages later, when memory is available. [Comm. Enter the correct item again. 9.4 Troubleshooting...
... Cancel ? 1:Yes 2:No (only for SCX4521F) CRU Fuse Error The machine has a communication problem. Error] (only for SCX4521F) Meaning Suggested solutions Your machine's memory has become full while trying to store a document into place. Install the toner cartridge correctly. Close the door until it ... remove paper from the machine. 5 Close the rear cover. 6 Open and close the front door to accept "No". See "Replacing the Toner Cartridge" on page 2.3. You should send the remaining pages later, when memory is available. [Comm. Enter the correct item again. 9.4 Troubleshooting...
User Manual (ENGLISH)
Page 62
...number keypad. The fax jobs queue in the LSU (Laser Scanning Unit). Delete unnecessary documents and retransmit after more than one operation. Check the display to complete the operation you...answer or the line is full. Display Memory Full (only for SCX4521F) [No Answer] (only for SCX4521F) [No Cartridge] Not Assigned (only for SCX4521F) [No Paper] Add Paper Operation Not Assigned (only for .... "Loading Paper" on page 7.8. • Enter the correct ID. . See "Installing the Toner Cartridge" on page 2.2. • The speed dial location you were trying to select a group ...
...number keypad. The fax jobs queue in the LSU (Laser Scanning Unit). Delete unnecessary documents and retransmit after more than one operation. Check the display to complete the operation you...answer or the line is full. Display Memory Full (only for SCX4521F) [No Answer] (only for SCX4521F) [No Cartridge] Not Assigned (only for SCX4521F) [No Paper] Add Paper Operation Not Assigned (only for .... "Loading Paper" on page 7.8. • Enter the correct ID. . See "Installing the Toner Cartridge" on page 2.2. • The speed dial location you were trying to select a group ...


