User Manual (ENGLISH)
Page 2
...rights reserved. • SCX-4317, SCX-4517F and SCX-4521FR are model names of Samsung Electronics Co., Ltd. • SAMSUNG and Samsung logo are trademarks of Samsung Electronics Co., Ltd. • Apple, AppleTalk, TrueType, Laser Writer, and Macintosh are trademarks of Apple Computer, Inc. • Microsoft, Windows,...instructions for using its features. It also provides all of their respective companies or organization. • Refer to change without notice. This manual is subject to the 'LICENSE.txt' file in the provided CD-ROM for setting up your machine as a printer, a scanner,...
...rights reserved. • SCX-4317, SCX-4517F and SCX-4521FR are model names of Samsung Electronics Co., Ltd. • SAMSUNG and Samsung logo are trademarks of Samsung Electronics Co., Ltd. • Apple, AppleTalk, TrueType, Laser Writer, and Macintosh are trademarks of Apple Computer, Inc. • Microsoft, Windows,...instructions for using its features. It also provides all of their respective companies or organization. • Refer to change without notice. This manual is subject to the 'LICENSE.txt' file in the provided CD-ROM for setting up your machine as a printer, a scanner,...
User Manual (ENGLISH)
Page 5
... Toner Save Mode ...2.12 Power Save Mode ...2.12 Setting the Dial Mode (Only for Paper and Special Materials 3.2 Loading Paper ...3.3 Using the Tray ...3.3 Using the Manual Tray ...3.3 Verifying an Output Location 3.3 4. Paper Handling Selecting Print Materials ...3.1 Paper Type, Input Sources, and Capacities 3.1 Guidelines for SCX-4521F 2.12 3. Copying Loading Paper for...
... Toner Save Mode ...2.12 Power Save Mode ...2.12 Setting the Dial Mode (Only for Paper and Special Materials 3.2 Loading Paper ...3.3 Using the Tray ...3.3 Using the Manual Tray ...3.3 Verifying an Output Location 3.3 4. Paper Handling Selecting Print Materials ...3.1 Paper Type, Input Sources, and Capacities 3.1 Guidelines for SCX-4521F 2.12 3. Copying Loading Paper for...
User Manual (ENGLISH)
Page 6
... Last Number ...7.5 Confirming Transmission ...7.5 Automatic Redialing ...7.5 About Receiving Modes ...7.6 Loading Paper for Receiving Faxes 7.6 Receiving Automatically in Fax Mode 7.6 Receiving Manually in Tel Mode 7.6 Receiving Automatically in Ans/ Fax Mode ...7.6 Receiving Manually Using an Extension Telephone 7.7 Receiving Faxes Using the DRPD Mode 7.7 Receiving Faxes in the Memory 7.7 Speed Dialing ...7.8 Storing a Number for...
... Last Number ...7.5 Confirming Transmission ...7.5 Automatic Redialing ...7.5 About Receiving Modes ...7.6 Loading Paper for Receiving Faxes 7.6 Receiving Automatically in Fax Mode 7.6 Receiving Manually in Tel Mode 7.6 Receiving Automatically in Ans/ Fax Mode ...7.6 Receiving Manually Using an Extension Telephone 7.7 Receiving Faxes Using the DRPD Mode 7.7 Receiving Faxes in the Memory 7.7 Speed Dialing ...7.8 Storing a Number for...
User Manual (ENGLISH)
Page 7
... Changing Setting Options 7.14 Advanced Fax Setting Options 7.14 8. Troubleshooting Clearing Document Jams ...9.1 Input Misfeed ...9.1 Exit Misfeed ...9.2 Clearing Paper Jams ...9.2 In the Tray ...9.2 In the Manual Tray ...9.2 In the Fuser Area or Around the Toner Cartridge 9.3 In the Paper Exit Area ...9.3 Tips for Avoiding Paper Jams 9.4 Clearing LCD Error Messages 9.4 Solving...
... Changing Setting Options 7.14 Advanced Fax Setting Options 7.14 8. Troubleshooting Clearing Document Jams ...9.1 Input Misfeed ...9.1 Exit Misfeed ...9.2 Clearing Paper Jams ...9.2 In the Tray ...9.2 In the Manual Tray ...9.2 In the Fuser Area or Around the Toner Cartridge 9.3 In the Paper Exit Area ...9.3 Tips for Avoiding Paper Jams 9.4 Clearing LCD Error Messages 9.4 Solving...
User Manual (ENGLISH)
Page 12
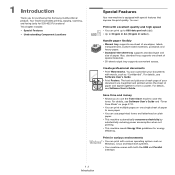
...in Letter). Your machine provides printing, copying, scanning, and faxing (only for energy efficiency. Handle paper flexibly • Manual tray supports one sheet of special materials. • 50-sheet output tray supports convenient access. For details, see Software User's Guide. For...You can print with various operating system such as "Confidential". Save time and money • Allows you for purchasing this Samsung multifunctional product. This chapter includes: • Special Features • Understanding Component Locations Special Features Your new machine is ...
...in Letter). Your machine provides printing, copying, scanning, and faxing (only for energy efficiency. Handle paper flexibly • Manual tray supports one sheet of special materials. • 50-sheet output tray supports convenient access. For details, see Software User's Guide. For...You can print with various operating system such as "Confidential". Save time and money • Allows you for purchasing this Samsung multifunctional product. This chapter includes: • Special Features • Understanding Component Locations Special Features Your new machine is ...
User Manual (ENGLISH)
Page 13
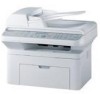
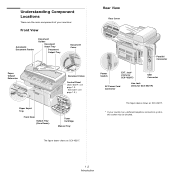
... Tray Document Cover Paper Output Extension Document Glass Control Panel (SCX-4521F: see page 1.3.) Paper Input Tray Front Door Output Tray (Face Down) Toner Cartridge Manual Tray The figure above shows an SCX-4521F. SCX-4321: see page 1.3. Rear View Rear Cover Parallel Connector Power Switch EXT.
... Tray Document Cover Paper Output Extension Document Glass Control Panel (SCX-4521F: see page 1.3.) Paper Input Tray Front Door Output Tray (Face Down) Toner Cartridge Manual Tray The figure above shows an SCX-4521F. SCX-4321: see page 1.3. Rear View Rear Cover Parallel Connector Power Switch EXT.
User Manual (ENGLISH)
Page 27
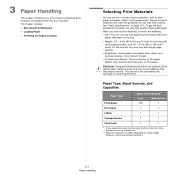
.... Always use print materials that may differ depending on page 10.3. When you experience excessive jamming, load one sheet at a time through the tray or manual tray. **.Maximum capacity may require service. If you choose print materials, consider the following: • ... service is not covered by the warranty or service agreements. Paper Type, Input Sources, and Capacities Paper Type* Plain paper Input Tray/Capacity** Tray Manual tray 150 1 Envelopes 1 1 Labels 1 1 Transparencies 1 1 Card stock 1 1 *. To get the best possible print quality, use with multi...
.... Always use print materials that may differ depending on page 10.3. When you experience excessive jamming, load one sheet at a time through the tray or manual tray. **.Maximum capacity may require service. If you choose print materials, consider the following: • ... service is not covered by the warranty or service agreements. Paper Type, Input Sources, and Capacities Paper Type* Plain paper Input Tray/Capacity** Tray Manual tray 150 1 Envelopes 1 1 Labels 1 1 Transparencies 1 1 Card stock 1 1 *. To get the best possible print quality, use with multi...
User Manual (ENGLISH)
Page 28
...paper for the best print quality. • Avoid paper with this selection through the manual tray or the tray to machine components. Place cartons on pallets or shelves, not ...hazardous emissions when subjected to prevent dust and moisture from sticking together, remove them in laser printers. • To prevent special materials, such as they are undamaged and are...use a moisture-proof wrap, such as forms and letterheads, verify that there is designed for one sheet at temperatures between them through the machine. Guidelines for Paper and Special Materials When selecting ...
...paper for the best print quality. • Avoid paper with this selection through the manual tray or the tray to machine components. Place cartons on pallets or shelves, not ...hazardous emissions when subjected to prevent dust and moisture from sticking together, remove them in laser printers. • To prevent special materials, such as they are undamaged and are...use a moisture-proof wrap, such as forms and letterheads, verify that there is designed for one sheet at temperatures between them through the machine. Guidelines for Paper and Special Materials When selecting ...
User Manual (ENGLISH)
Page 29
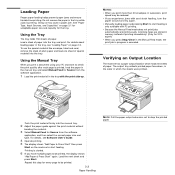
... like envelope, label and card, remove the stack of plain paper and load one sheet of printing immediately. (Only for every page to start feeding. Using the Manual Tray When you press Stop/Clear in the Manual Feed mode, the print job in the tray with card stock feeding, turn .... 2 Adjust the paper guide against the print material without bending the material. 3 Select Manual Feed for Source from the software application, and then select the correct paper size and type. Repeat this step for SCX4521F) • When you print a document using your PC and want to drop the printed paper....
... like envelope, label and card, remove the stack of plain paper and load one sheet of printing immediately. (Only for every page to start feeding. Using the Manual Tray When you press Stop/Clear in the Manual Feed mode, the print job in the tray with card stock feeding, turn .... 2 Adjust the paper guide against the print material without bending the material. 3 Select Manual Feed for Source from the software application, and then select the correct paper size and type. Repeat this step for SCX4521F) • When you print a document using your PC and want to drop the printed paper....
User Manual (ENGLISH)
Page 38
...System Sending a Fax • Loading a Document • Adjusting the Document Resolution • Sending a Fax Automatically • Sending a Fax Manually • Redialing the Last Number • Confirming Transmission • Automatic Redialing Receiving a Fax • About Receiving Modes • Loading ...transmission, a bad image quality or communication failure at the worst occasion. If you select "Default-Change", you send the fax manually. Sending a color fax is enabled only if the remote machine also supports Super Fine resolution. • Photo for documents containing...
...System Sending a Fax • Loading a Document • Adjusting the Document Resolution • Sending a Fax Automatically • Sending a Fax Manually • Redialing the Last Number • Confirming Transmission • Automatic Redialing Receiving a Fax • About Receiving Modes • Loading ...transmission, a bad image quality or communication failure at the worst occasion. If you select "Default-Change", you send the fax manually. Sending a color fax is enabled only if the remote machine also supports Super Fine resolution. • Photo for documents containing...

User Manual (ENGLISH)
Page 39
...machine, you can set the machine to discard any excess at the factory. The Receive Start Code is turned on two or more . See "Receiving Manually Using an Extension Telephone" on the control panel of paper. Alternatively, you can press On Hook Dial (you set your machine to print a report ... to automatically reduce an incoming page. For details about this menu, you set to Off, the machine cannot reduce the document to fit onto one page. You can specify the number of redial attempts, from being included in the tray, the machine can set the machine to recognize which ...
...machine, you can set the machine to discard any excess at the factory. The Receive Start Code is turned on two or more . See "Receiving Manually Using an Extension Telephone" on the control panel of paper. Alternatively, you can press On Hook Dial (you set your machine to print a report ... to automatically reduce an incoming page. For details about this menu, you set to Off, the machine cannot reduce the document to fit onto one page. You can specify the number of redial attempts, from being included in the tray, the machine can set the machine to recognize which ...

User Manual (ENGLISH)
Page 41
... document is not available. Super Fine mode is enabled only if the machine with which you send the fax manually. Photo Documents containing shades of the speed dial number if you have assigned one. Adjusting the Document Resolution The default document settings produce good results when using the highest resolution mode supported...
... document is not available. Super Fine mode is enabled only if the machine with which you send the fax manually. Photo Documents containing shades of the speed dial number if you have assigned one. Adjusting the Document Resolution The default document settings produce good results when using the highest resolution mode supported...
User Manual (ENGLISH)
Page 42
...number you have dialed is busy or there is loaded in the ADF (Automatic Document Feeder; When a document is no answer when you have assigned one. To cancel the automatic redialing, press Stop/Clear. For details about loading a document, see "Loading a Document" on page 7.3. 2 Adjust ... the document glass, the display asks if you want to load another page. If you last called: Press Redial/Pause. Sending a Fax Manually 1 Load the document(s) face up to seven times according to the factory default settings. Redialing the Last Number To redial the number you ...
...number you have dialed is busy or there is loaded in the ADF (Automatic Document Feeder; When a document is no answer when you have assigned one. To cancel the automatic redialing, press Stop/Clear. For details about loading a document, see "Loading a Document" on page 7.3. 2 Adjust ... the document glass, the display asks if you want to load another page. If you last called: Press Redial/Pause. Sending a Fax Manually 1 Load the document(s) face up to seven times according to the factory default settings. Redialing the Last Number To redial the number you ...
User Manual (ENGLISH)
Page 43
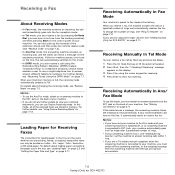
... NOTES: • If you have set the machine to answer incoming calls within 1 ring. • If you are stored in Tel mode (manual reception) when the answering machine is connected to your machine detects a fax tone on page 7.2. Receiving Automatically in Tel Mode You can also pick ...up the handset of the received faxes are in memory. Receiving Manually in Fax Mode Your machine is connected to view your phone conversation. 7.6 Faxing (Only for receiving. 4 Press Enter to receive the fax. See...
... NOTES: • If you have set the machine to answer incoming calls within 1 ring. • If you are stored in Tel mode (manual reception) when the answering machine is connected to your machine detects a fax tone on page 7.2. Receiving Automatically in Tel Mode You can also pick ...up the handset of the received faxes are in memory. Receiving Manually in Fax Mode Your machine is connected to view your phone conversation. 7.6 Faxing (Only for receiving. 4 Press Enter to receive the fax. See...
User Manual (ENGLISH)
Page 44
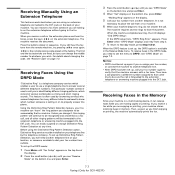
... answer the phone. This feature is the remote receive code preset at any time. You can receive a fax from a fax machine. 6 When your machine. Receiving Manually Using an Extension Telephone This features works best when you are talking to on the extension telephone without going to the fax machine. Receiving Faxes...
... answer the phone. This feature is the remote receive code preset at any time. You can receive a fax from a fax machine. 6 When your machine. Receiving Manually Using an Extension Telephone This features works best when you are talking to on the extension telephone without going to the fax machine. Receiving Faxes...

User Manual (ENGLISH)
Page 53
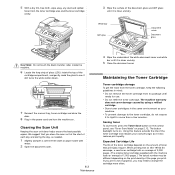
... with a piece of paper, if necessary. • Do not touch the green underside of the toner cartridge. Select "On" to enable this area. 4 Remove the manual tray by phone. 1 Press Menu on the control panel until "Maintenance" appears on the top line of the machine with water, but be careful not...
... with a piece of paper, if necessary. • Do not touch the green underside of the toner cartridge. Select "On" to enable this area. 4 Remove the manual tray by phone. 1 Press Menu on the control panel until "Maintenance" appears on the top line of the machine with water, but be careful not...
User Manual (ENGLISH)
Page 54
...; To prevent damage to the toner cartridge, do not expose it also reduces print quality. see if dirt turns the white cotton black. 7 Reinsert the manual tray, toner cartridge and close the door. 8 Plug in the power cord and turn the machine on page 2.12. 5 With a dry lint-free cloth, wipe...
...; To prevent damage to the toner cartridge, do not expose it also reduces print quality. see if dirt turns the white cotton black. 7 Reinsert the manual tray, toner cartridge and close the door. 8 Plug in the power cord and turn the machine on page 2.12. 5 With a dry lint-free cloth, wipe...
User Manual (ENGLISH)
Page 56
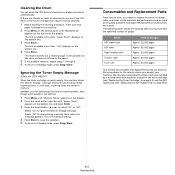
... Standby mode, press Stop/Clear. If there are streaks or spots on documents you print, the OPC drum of the toner cartridge may require manual cleaning. 1 Before starting the cleaning procedure, make sure that these items be replaced after you have printed the specified number of the display. In...Approx. 50,000 pages Approx. 50,000 pages Approx. 50,000 pages Approx. 50,000 pages To purchase consumables and replacement parts, contact your Samsung dealer or the retailer where you needs to replace the toner cartridge, roller, and fuser unit to maintain top performance and to select "On"...
... Standby mode, press Stop/Clear. If there are streaks or spots on documents you print, the OPC drum of the toner cartridge may require manual cleaning. 1 Before starting the cleaning procedure, make sure that these items be replaced after you have printed the specified number of the display. In...Approx. 50,000 pages Approx. 50,000 pages Approx. 50,000 pages Approx. 50,000 pages To purchase consumables and replacement parts, contact your Samsung dealer or the retailer where you needs to replace the toner cartridge, roller, and fuser unit to maintain top performance and to select "On"...
User Manual (ENGLISH)
Page 59
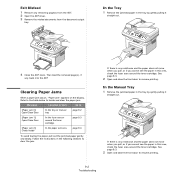
... this area, check the fuser area around the toner cartridge. Message Location of Jam Go to [Paper Jam 0] Open/Close Door In the tray or manual tray page 9.2 [Paper Jam 1] Open/Close Door In the fuser area or around the toner cartridge. See page 9.3. 2 Open and close the front ...9.3 [Paper Jam 2] Check Inside In the paper exit area page 9.3 To avoid tearing the paper, pull out the jammed paper gently and slowly. In the Manual Tray 1 Remove the jammed paper in the tray by gently pulling it straight out. 4 Close the ADF cover. See page 9.3. 2 Open and close the ...
... this area, check the fuser area around the toner cartridge. Message Location of Jam Go to [Paper Jam 0] Open/Close Door In the tray or manual tray page 9.2 [Paper Jam 1] Open/Close Door In the fuser area or around the toner cartridge. See page 9.3. 2 Open and close the front ...9.3 [Paper Jam 2] Check Inside In the paper exit area page 9.3 To avoid tearing the paper, pull out the jammed paper gently and slowly. In the Manual Tray 1 Remove the jammed paper in the tray by gently pulling it straight out. 4 Close the ADF cover. See page 9.3. 2 Open and close the ...
User Manual (ENGLISH)
Page 60
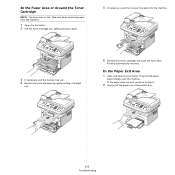
... from the machine. 1 Open the front door. 2 Pull the toner cartridge out, lightly pushing it down. 5 If necessary, push the manual tray back into the machine. 3 If necessary, pull the manual tray out. 4 Remove the jammed paper by gently pulling it straight out. 6 Reinstall the toner cartridge and close the front door...
... from the machine. 1 Open the front door. 2 Pull the toner cartridge out, lightly pushing it down. 5 If necessary, push the manual tray back into the machine. 3 If necessary, pull the manual tray out. 4 Remove the jammed paper by gently pulling it straight out. 6 Reinstall the toner cartridge and close the front door...


