
User Manual (ENGLISH)
Page 5
... Type 1.17 Changing the Display Language 1.17 Using Save Modes 1.18 Toner Save Mode 1.18 Power Save 1.18 CCD Power Save Mode 1.19 Time Out 1.19 Setting the Localization 1.20 Chapter 2: INSTALLING SOFTWARE About Samsung Software 2.2 System Requirements 2.3 Installing Samsung Software 2.4 Installing Samsung SmarThru 2.7 Repairing Software 2.9 Removing Software 2.10 Uninstalling the MFP Driver 2.10...
... Type 1.17 Changing the Display Language 1.17 Using Save Modes 1.18 Toner Save Mode 1.18 Power Save 1.18 CCD Power Save Mode 1.19 Time Out 1.19 Setting the Localization 1.20 Chapter 2: INSTALLING SOFTWARE About Samsung Software 2.2 System Requirements 2.3 Installing Samsung Software 2.4 Installing Samsung SmarThru 2.7 Repairing Software 2.9 Removing Software 2.10 Uninstalling the MFP Driver 2.10...
User Manual (ENGLISH)
Page 7
Printing Multiple Pages on One Sheet of the Paper 5.14 Printing a Reduced or Enlarged Document 5.15 Fitting Your Document to a ...Locally Shared Printer 5.28 In Windows 9x/Me 5.28 In Windows NT 4.0/2000/XP 5.29 Chapter 6: SCANNING Scanning Basics 6.2 Scanning Using Samsung SmarThru 6.2 Scanning Process with TWAIN-enabled Software ...... 6.5 Scanning Using the WIA Driver 6.6 Scanning Using Network Scan 6.7 About Network Scan 6.7 ... MAINTENANCE Cleaning Your Machine 7.2 Cleaning the Outside 7.2 Cleaning the Scan Unit 7.2 Expected Cartridge Life 7.3 Replacing the Toner Cartridge 7.3 vi
Printing Multiple Pages on One Sheet of the Paper 5.14 Printing a Reduced or Enlarged Document 5.15 Fitting Your Document to a ...Locally Shared Printer 5.28 In Windows 9x/Me 5.28 In Windows NT 4.0/2000/XP 5.29 Chapter 6: SCANNING Scanning Basics 6.2 Scanning Using Samsung SmarThru 6.2 Scanning Process with TWAIN-enabled Software ...... 6.5 Scanning Using the WIA Driver 6.6 Scanning Using Network Scan 6.7 About Network Scan 6.7 ... MAINTENANCE Cleaning Your Machine 7.2 Cleaning the Outside 7.2 Cleaning the Scan Unit 7.2 Expected Cartridge Life 7.3 Replacing the Toner Cartridge 7.3 vi
User Manual (ENGLISH)
Page 8
... warning message 7.6 Replacing the Drum Cartridge 7.7 Checking the Serial Number 7.9 Adjusting Shading 7.9 Setting to Notify Toner Low 7.10 Consumables and Replacement Parts 7.11 System Administration Tools 7.12 Password Protect 7.12 Department Code 7.13 Auxiliary Access 7.14 Change Passcode... Problems 8.20 Copier Problem Solution Chart 8.20 Printing Problem Solution Chart 8.22 Scanning Problems 8.25 Fax Problem Solution Chart (only for SCX-6320F 8.26 Common Linux Problems 8.28 Troubleshooting PostScript Errors (Option) ........ 8.31 Common Macintosh Problems (Option 8.32 vii
... warning message 7.6 Replacing the Drum Cartridge 7.7 Checking the Serial Number 7.9 Adjusting Shading 7.9 Setting to Notify Toner Low 7.10 Consumables and Replacement Parts 7.11 System Administration Tools 7.12 Password Protect 7.12 Department Code 7.13 Auxiliary Access 7.14 Change Passcode... Problems 8.20 Copier Problem Solution Chart 8.20 Printing Problem Solution Chart 8.22 Scanning Problems 8.25 Fax Problem Solution Chart (only for SCX-6320F 8.26 Common Linux Problems 8.28 Troubleshooting PostScript Errors (Option) ........ 8.31 Common Macintosh Problems (Option 8.32 vii
User Manual (ENGLISH)
Page 22
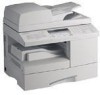
This machine provides printing, copying, scanning, faxing(SCX-6320F only), and e-mailing(SCX6320F only) functions! This chapter includes: • Unpacking • Component Location • Control Panel Functions • Making Connections • Installing the Drum and Toner Cartridges • Turning the Machine On • Loading Paper • Setting the Paper Size and Type •... the Localization This chapter provides step-by-step instructions on setting up the machine, and installing the software. 1 GETTING STARTED Thank you for purchasing Samsung multifunctional product.
This machine provides printing, copying, scanning, faxing(SCX-6320F only), and e-mailing(SCX6320F only) functions! This chapter includes: • Unpacking • Component Location • Control Panel Functions • Making Connections • Installing the Drum and Toner Cartridges • Turning the Machine On • Loading Paper • Setting the Paper Size and Type •... the Localization This chapter provides step-by-step instructions on setting up the machine, and installing the software. 1 GETTING STARTED Thank you for purchasing Samsung multifunctional product.
User Manual (ENGLISH)
Page 24
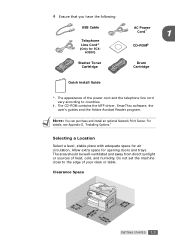
... Options." The CD-ROM contains the MFP driver, SmarThru software, the user's guides and the Adobe Acrobat Reader program. Allow extra space for SCX6320F) Starter Toner Cartridge AC Power Cord* 1 CD-ROM† Drum Cartridge Quick install Guide *. 4 Ensure that you have the following: USB Cable Telephone Line Cord* (Only for...
... Options." The CD-ROM contains the MFP driver, SmarThru software, the user's guides and the Adobe Acrobat Reader program. Allow extra space for SCX6320F) Starter Toner Cartridge AC Power Cord* 1 CD-ROM† Drum Cartridge Quick install Guide *. 4 Ensure that you have the following: USB Cable Telephone Line Cord* (Only for...
User Manual (ENGLISH)
Page 28
... dialling and edit the stored numbers. Used to select a paper supply source between Tray and Bypass in the dial directory. Turns on toner by using a one, two or three-digit speed dial or group number for the selected menu item. Sends you to print a Phonebook list. 6 F... Used to adjusts the resolution of the copying process. 3 Allows you to store frequently-dialed fax numbers using less toner to activate. 2 Shows the current ...
... dialling and edit the stored numbers. Used to select a paper supply source between Tray and Bypass in the dial directory. Turns on toner by using a one, two or three-digit speed dial or group number for the selected menu item. Sends you to print a Phonebook list. 6 F... Used to adjusts the resolution of the copying process. 3 Allows you to store frequently-dialed fax numbers using less toner to activate. 2 Shows the current ...
User Manual (ENGLISH)
Page 32
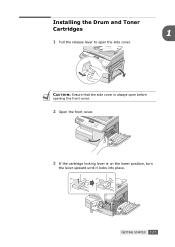
GETTING STARTED 1.11 CAUTION: Ensure that the side cover is on the lower position, turn the lever upward until it locks into place. Installing the Drum and Toner Cartridges 1 1 Pull the release lever to open before opening the front cover. 2 Open the front cover. 3 If the cartridge locking lever is always open the side cover.
GETTING STARTED 1.11 CAUTION: Ensure that the side cover is on the lower position, turn the lever upward until it locks into place. Installing the Drum and Toner Cartridges 1 1 Pull the release lever to open before opening the front cover. 2 Open the front cover. 3 If the cartridge locking lever is always open the side cover.
User Manual (ENGLISH)
Page 33
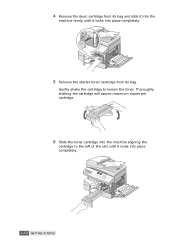
Gently shake the cartridge to the left of the slot until it locks into place completely. 1.12 GETTING STARTED 4 Remove the drum cartridge from its bag and slide it into the machine firmly until it locks into place completely. 5 Remove the starter toner cartridge from its bag. Thoroughly shaking the cartridge will assure maximum copies per cartridge. 6 Slide the toner cartridge into the machine aligning the cartridge to loosen the toner.
Gently shake the cartridge to the left of the slot until it locks into place completely. 1.12 GETTING STARTED 4 Remove the drum cartridge from its bag and slide it into the machine firmly until it locks into place completely. 5 Remove the starter toner cartridge from its bag. Thoroughly shaking the cartridge will assure maximum copies per cartridge. 6 Slide the toner cartridge into the machine aligning the cartridge to loosen the toner.
User Manual (ENGLISH)
Page 34
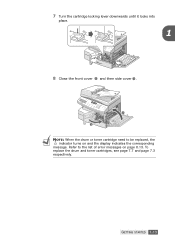
Refer to be replaced, the indicator turns on page 8.13. GETTING STARTED 1.13 7 Turn the cartridge locking lever downwards until it locks into place. 1 8 Close the front cover 1 and then side cover 2 . 2 1 NOTE: When the drum or toner cartridge need to the list of error messages on and the display indicates the corresponding message. To replace the drum and toner cartridges, see page 7.7 and page 7.3 respectively.
Refer to be replaced, the indicator turns on page 8.13. GETTING STARTED 1.13 7 Turn the cartridge locking lever downwards until it locks into place. 1 8 Close the front cover 1 and then side cover 2 . 2 1 NOTE: When the drum or toner cartridge need to the list of error messages on and the display indicates the corresponding message. To replace the drum and toner cartridges, see page 7.7 and page 7.3 respectively.
User Manual (ENGLISH)
Page 39
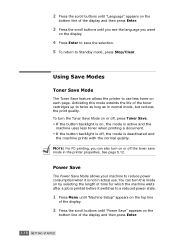
... the top line of the display. 2 Press the scroll buttons until you see the language you can turn this mode extends the life of the toner cartridges up to Standby mode, press Stop/Clear. Power Save The Power Save Mode allows your machine to reduce power consumption when it switches to... use . To turn the Toner Save Mode on or off, press Toner Save. • If the button backlight is on, the mode is active and the machine uses less...
... the top line of the display. 2 Press the scroll buttons until you see the language you can turn this mode extends the life of the toner cartridges up to Standby mode, press Stop/Clear. Power Save The Power Save Mode allows your machine to reduce power consumption when it switches to... use . To turn the Toner Save Mode on or off, press Toner Save. • If the button backlight is on, the mode is active and the machine uses less...
User Manual (ENGLISH)
Page 68
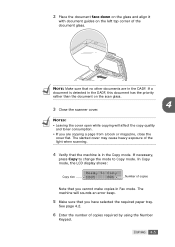
... copies Note that no other documents are copying a page from a book or magazine, close the cover flat. The machine will affect the copy quality and toner consumption. • If you are in Fax mode. If necessary, press Copy to change the mode to Copy mode. COPYING 4.5 The slanted cover may cause...
... copies Note that no other documents are copying a page from a book or magazine, close the cover flat. The machine will affect the copy quality and toner consumption. • If you are in Fax mode. If necessary, press Copy to change the mode to Copy mode. COPYING 4.5 The slanted cover may cause...
User Manual (ENGLISH)
Page 95
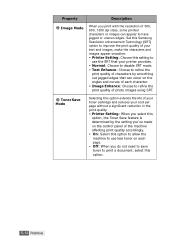
Set this Samsung Resolution enhancement Technology (SRT) option to improve the print quality of your text and images, make the characters and images appear smoother. • Printer Setting: Choose this setting to use less toner on the control panel of your toner cartridge and reduces your cost per ...the setting you've made on each character. • Image Enhance: Choose to refine the print quality of photo images using SRT. 3 Toner Save Mode Selecting this option extends the life of the machine affecting print quality accordingly. • On: Select this option. 5.12 PRINTING ...
Set this Samsung Resolution enhancement Technology (SRT) option to improve the print quality of your text and images, make the characters and images appear smoother. • Printer Setting: Choose this setting to use less toner on the control panel of your toner cartridge and reduces your cost per ...the setting you've made on each character. • Image Enhance: Choose to refine the print quality of photo images using SRT. 3 Toner Save Mode Selecting this option extends the life of the machine affecting print quality accordingly. • On: Select this option. 5.12 PRINTING ...
User Manual (ENGLISH)
Page 124
This chapter includes: • Cleaning Your Machine • Expected Cartridge Life • Replacing the Toner Cartridge • Setting to ignore the toner Empty warning message • Replacing the Drum Cartridge • Checking the Serial Number • Adjusting Shading • Setting to Notify Toner Low • Consumables and Replacement Parts • System Administration Tools • Setting E-mail Notification 7 MAINTENANCE This chapter provides information for maintaining the cartridge and your machine.
This chapter includes: • Cleaning Your Machine • Expected Cartridge Life • Replacing the Toner Cartridge • Setting to ignore the toner Empty warning message • Replacing the Drum Cartridge • Checking the Serial Number • Adjusting Shading • Setting to Notify Toner Low • Consumables and Replacement Parts • System Administration Tools • Setting E-mail Notification 7 MAINTENANCE This chapter provides information for maintaining the cartridge and your machine.

User Manual (ENGLISH)
Page 125
... helps ensure the best possible copies. CAUTIONS: • Cleaning the cabinet of the machine, be careful not to touch the transfer roller, located underneath the toner cartridge. We suggest that you clean the scan unit at the start of the document glass and DADF glass and white sheet until it is...
... helps ensure the best possible copies. CAUTIONS: • Cleaning the cabinet of the machine, be careful not to touch the transfer roller, located underneath the toner cartridge. We suggest that you clean the scan unit at the start of the document glass and DADF glass and white sheet until it is...
User Manual (ENGLISH)
Page 126
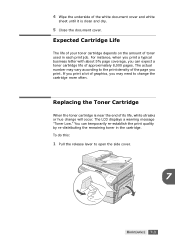
...: 1 Pull the release lever to the print density of the page you can temporarily re-establish the print quality by re-distributing the remaining toner in each print job. The actual number may need to change will occur. If you print a lot of graphics, you may vary according ...to open the side cover. 7 MAINTENANCE 7.3 You can expect a toner cartridge life of toner used in the cartridge. Replacing the Toner Cartridge When the toner cartridge is clean and dry. 5 Close the document cover. Expected Cartridge Life The life of your...
...: 1 Pull the release lever to the print density of the page you can temporarily re-establish the print quality by re-distributing the remaining toner in each print job. The actual number may need to change will occur. If you print a lot of graphics, you may vary according ...to open the side cover. 7 MAINTENANCE 7.3 You can expect a toner cartridge life of toner used in the cartridge. Replacing the Toner Cartridge When the toner cartridge is clean and dry. 5 Close the document cover. Expected Cartridge Life The life of your...
User Manual (ENGLISH)
Page 127
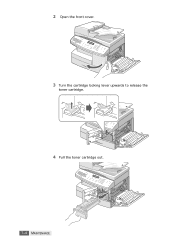
2 Open the front cover. 3 Turn the cartridge locking lever upwards to release the toner cartridge. 4 Pull the toner cartridge out. 7.4 MAINTENANCE
2 Open the front cover. 3 Turn the cartridge locking lever upwards to release the toner cartridge. 4 Pull the toner cartridge out. 7.4 MAINTENANCE
User Manual (ENGLISH)
Page 128
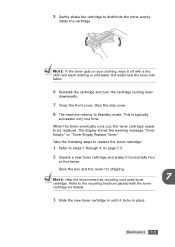
...Hot water sets the toner into fabric. 6 Reinstall the cartridge and turn the cartridge locking lever downwards. 7 Close the front cover, then the side cover. 8 The machine returns to steps 1 through 4 on your used toner 7 cartridge. This is typically successful only one time. Take the following... steps to replace the toner cartridge: 1 Refer to Standby mode. Save the box and the cover for details. 3 Slide the...
...Hot water sets the toner into fabric. 6 Reinstall the cartridge and turn the cartridge locking lever downwards. 7 Close the front cover, then the side cover. 8 The machine returns to steps 1 through 4 on your used toner 7 cartridge. This is typically successful only one time. Take the following... steps to replace the toner cartridge: 1 Refer to Standby mode. Save the box and the cover for details. 3 Slide the...
User Manual (ENGLISH)
Page 129
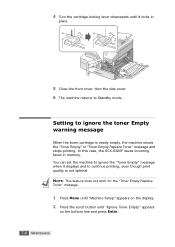
... Setup" appears on the bottom line and press Enter. 7.6 MAINTENANCE You can set the machine to ignore the "Toner Empty" message when it locks in memory. In this case, the SCX-6320F saves incoming faxes in place. 5 Close the front cover, then the side cover. 6 The machine returns to ...Standby mode. 4 Turn the cartridge locking lever downwards until "Ignore Toner Empty" appears on the display. 2 Press the scroll button ...
... Setup" appears on the bottom line and press Enter. 7.6 MAINTENANCE You can set the machine to ignore the "Toner Empty" message when it locks in memory. In this case, the SCX-6320F saves incoming faxes in place. 5 Close the front cover, then the side cover. 6 The machine returns to ...Standby mode. 4 Turn the cartridge locking lever downwards until "Ignore Toner Empty" appears on the display. 2 Press the scroll button ...
User Manual (ENGLISH)
Page 130
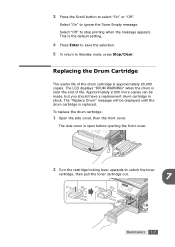
3 Press the Scroll button to unlock the toner cartridge, then pull the toner cartridge out. 7 MAINTENANCE 7.7 Approximately 2,000 more copies can be displayed until the drum cartridge is open before opening the front cover. 2 Turn the cartridge locking ... the drum is near the end of the drum cartridge is the default setting. 4 Press Enter to save the selection. 5 To return to ignore the Toner Empty message. This is approximately 20,000 copies. Select "On" to Standby mode, press Stop/Clear. Select "Off" to stop printing when the message appears...
3 Press the Scroll button to unlock the toner cartridge, then pull the toner cartridge out. 7 MAINTENANCE 7.7 Approximately 2,000 more copies can be displayed until the drum cartridge is open before opening the front cover. 2 Turn the cartridge locking ... the drum is near the end of the drum cartridge is the default setting. 4 Press Enter to save the selection. 5 To return to ignore the Toner Empty message. This is approximately 20,000 copies. Select "On" to Standby mode, press Stop/Clear. Select "Off" to stop printing when the message appears...
User Manual (ENGLISH)
Page 131
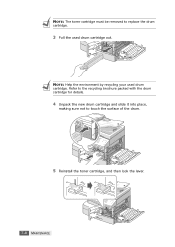
Refer to the recycling brochure packed with the drum cartridge for details. 4 Unpack the new drum cartridge and slide it into place, making sure not to replace the drum cartridge. 3 Pull the used drum cartridge. NOTE: Help the environment by recycling your used drum cartridge out. NOTE: The toner cartridge must be removed to touch the surface of the drum. 5 Reinstall the toner cartridge, and then lock the lever. 7.8 MAINTENANCE
Refer to the recycling brochure packed with the drum cartridge for details. 4 Unpack the new drum cartridge and slide it into place, making sure not to replace the drum cartridge. 3 Pull the used drum cartridge. NOTE: Help the environment by recycling your used drum cartridge out. NOTE: The toner cartridge must be removed to touch the surface of the drum. 5 Reinstall the toner cartridge, and then lock the lever. 7.8 MAINTENANCE


