User Manual (ENGLISH)
Page 34
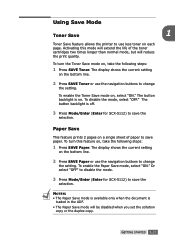
To disable the mode, select "OFF." NOTES: • The Paper Save mode is available only when the document is on. Activating this feature on a single sheet of the toner cartridges two times longer than normal mode, but will reduce the print quality. The button backlight is off.... 3 Press Mode/Enter (Enter for SCX-5112) to save the selection. Paper Save This feature prints 2 pages on , take the following steps: 1 Press SAVE Paper. GETTING STARTED 1.21 The display shows the current setting...
To disable the mode, select "OFF." NOTES: • The Paper Save mode is available only when the document is on. Activating this feature on a single sheet of the toner cartridges two times longer than normal mode, but will reduce the print quality. The button backlight is off.... 3 Press Mode/Enter (Enter for SCX-5112) to save the selection. Paper Save This feature prints 2 pages on , take the following steps: 1 Press SAVE Paper. GETTING STARTED 1.21 The display shows the current setting...

User Manual (ENGLISH)
Page 64
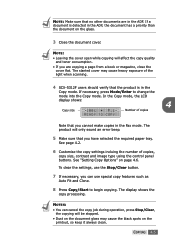
...the mode into the ADF and adjust the document guides to the document size. See "Setting Copy Options" on the ADF. 4 Document guides 2 SCX-5312F users should verify that all staples and paper clips have selected the required paper tray. COPYING 4.3 If necessary, press Mode/Enter to 30 documents ...(20lb, 75 g/m2) in one job. Ensure documents are in the Fax mode. To clear the settings, use special copy features such as collation and duplex copy. The product will only sound an error beep. 3 Make sure ...
...the mode into the ADF and adjust the document guides to the document size. See "Setting Copy Options" on the ADF. 4 Document guides 2 SCX-5312F users should verify that all staples and paper clips have selected the required paper tray. COPYING 4.3 If necessary, press Mode/Enter to 30 documents ...(20lb, 75 g/m2) in one job. Ensure documents are in the Fax mode. To clear the settings, use special copy features such as collation and duplex copy. The product will only sound an error beep. 3 Make sure ...
User Manual (ENGLISH)
Page 66
...7 If necessary, you cannot make copies in the ADF. If necessary, press Mode/Enter to begin copying. NOTES: • You can use special copy features such as Auto Fit and Clone. 8 Press Copy/Start to change the mode into the Copy mode. See page 4.2. 6 Customise the copy settings incluing the..., press Stop/Clear, the copying will be stopped. • Dust on the document glass may cause heavy exposure of the light when scanning. 4 SCX-5312F users should verify that the product is detected in the Copy mode. The product will affect the copy quality and toner consumption. • If you...
...7 If necessary, you cannot make copies in the ADF. If necessary, press Mode/Enter to begin copying. NOTES: • You can use special copy features such as Auto Fit and Clone. 8 Press Copy/Start to change the mode into the Copy mode. See page 4.2. 6 Customise the copy settings incluing the..., press Stop/Clear, the copying will be stopped. • Dust on the document glass may cause heavy exposure of the light when scanning. 4 SCX-5312F users should verify that the product is detected in the Copy mode. The product will affect the copy quality and toner consumption. • If you...
User Manual (ENGLISH)
Page 69
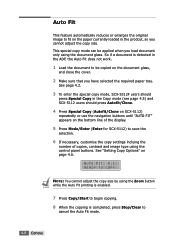
... Copy/Start to begin copying. 8 When the copying is detected in the Copy mode (see page 4.5) and SCX-5112 users should press Special Copy in the ADF, the Auto Fit does not work. 1 Load the document ...the control panel buttons. See page 4.2. 3 To enter the special copy mode, SCX-5312F users should press Autofit/Clone. 4 Press Special Copy (Autofit/Clone on SCX-5112) repeatedly or use the navigation buttons until "AUTO FIT" appears on the ... so you have selected the required paper tray. Auto Fit This feature automatically reduces or enlarges the original image to fit on page 4.6.
... Copy/Start to begin copying. 8 When the copying is detected in the Copy mode (see page 4.5) and SCX-5112 users should press Special Copy in the ADF, the Auto Fit does not work. 1 Load the document ...the control panel buttons. See page 4.2. 3 To enter the special copy mode, SCX-5312F users should press Autofit/Clone. 4 Press Special Copy (Autofit/Clone on SCX-5112) repeatedly or use the navigation buttons until "AUTO FIT" appears on the ... so you have selected the required paper tray. Auto Fit This feature automatically reduces or enlarges the original image to fit on page 4.6.

User Manual (ENGLISH)
Page 70
So if a document is completed, press Stop/Clear to cancel the Clone mode. Clone The Clone feature prints multiple image copies from original document on page 4.6. See "Setting Copy Options" on a single page. The number of images is automatically determined by ...cannot adjust the copy size. See page 4.2. 3 To enter the special copy mode, SCX-5312F users should press Special Copy in the Copy mode (see page 4.5) and SCX-5112 users should press Autofit/Clone. 4 4 Press Special Copy (Autofit/Clone on SCX-5112) repeatedly or use the navigation buttons until "CLONE" appears on the bottom...
So if a document is completed, press Stop/Clear to cancel the Clone mode. Clone The Clone feature prints multiple image copies from original document on page 4.6. See "Setting Copy Options" on a single page. The number of images is automatically determined by ...cannot adjust the copy size. See page 4.2. 3 To enter the special copy mode, SCX-5312F users should press Special Copy in the Copy mode (see page 4.5) and SCX-5112 users should press Autofit/Clone. 4 4 Press Special Copy (Autofit/Clone on SCX-5112) repeatedly or use the navigation buttons until "CLONE" appears on the bottom...
User Manual (ENGLISH)
Page 72
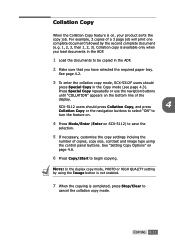
...COLLATION" appears on , your product sorts the copy job. Collation Copy When the Collation Copy feature is on the bottom line of the display. See page 4.2. 3 To enter the collation copy mode, SCX-5312F users should press Collation Copy, and press 4 Collation Copy or the navigation buttons to select...see page 4.3). SCX-5112 users should press Special Copy in the ADF. 2 Make sure that you load documents in the ADF. 1 Load the documents to save the selection. 5 If necessary, customise the copy settings incluing the number of a 3 page job will print one complete document followed ...
...COLLATION" appears on , your product sorts the copy job. Collation Copy When the Collation Copy feature is on the bottom line of the display. See page 4.2. 3 To enter the collation copy mode, SCX-5312F users should press Collation Copy, and press 4 Collation Copy or the navigation buttons to select...see page 4.3). SCX-5112 users should press Special Copy in the ADF. 2 Make sure that you load documents in the ADF. 1 Load the documents to save the selection. 5 If necessary, customise the copy settings incluing the number of a 3 page job will print one complete document followed ...
User Manual (ENGLISH)
Page 96
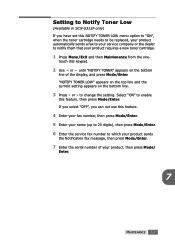
Setting to Notify Toner Low (Available in SCX-5312F only) If you can not use this feature, then press Mode/Enter. If you select "OFF", you have set this... to be replaced, your product automatically sends a fax to your service company or the dealer to enable this feature. 4 Enter your fax number, then press Mode/Enter. 5 Enter your product requires a new toner cartridge. 1 Press... Menu/Exit and then Maintenance from the one- Select "ON" to notify them that your name (up to 20 digits), then press Mode/Enter. 6 Enter...
Setting to Notify Toner Low (Available in SCX-5312F only) If you can not use this feature, then press Mode/Enter. If you select "OFF", you have set this... to be replaced, your product automatically sends a fax to your service company or the dealer to enable this feature. 4 Enter your fax number, then press Mode/Enter. 5 Enter your product requires a new toner cartridge. 1 Press... Menu/Exit and then Maintenance from the one- Select "ON" to notify them that your name (up to 20 digits), then press Mode/Enter. 6 Enter...

User Manual (ENGLISH)
Page 61
... further details, click the Help button at the bottom of your desktop computer. 3 From Programs, select Samsung SCX-5x12 Series, then SCX-5x12 Series Remote Control Panel. For information on the desktop window of each tab screen. ADDITIONAL FEATURES 6.7 Settings, Advanced, Phonebook, Information, and Firmware Update. When you can set up fax system data...
... further details, click the Help button at the bottom of your desktop computer. 3 From Programs, select Samsung SCX-5x12 Series, then SCX-5x12 Series Remote Control Panel. For information on the desktop window of each tab screen. ADDITIONAL FEATURES 6.7 Settings, Advanced, Phonebook, Information, and Firmware Update. When you can set up fax system data...


