User Manual (ENGLISH)
Page 2
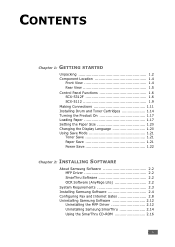
...GETTING STARTED Unpacking 1.2 Component Location 1.4 Front View 1.4 Rear View 1.5 Control Panel Functions 1.6 SCX-5312F 1.6 SCX-5112 1.9 Making Connections 1.11 Installing Drum and Toner Cartridges 1.14 Turning the Product On ... 1.22 Chapter 2: INSTALLING SOFTWARE About Samsung Software 2.2 MFP Driver 2.2 SmarThru Software 2.2 OCR Software (AnyPage Lite 2.2 System Requirements 2.3 Installing Samsung Software 2.4 Configuring Fax and Internet Gates 2.8 Uninstalling Samsung Software 2.12 Uninstalling the MFP Driver 2.12 Uninstalling Samsung SmarThru 2.14 Using the SmarThru CD-...
...GETTING STARTED Unpacking 1.2 Component Location 1.4 Front View 1.4 Rear View 1.5 Control Panel Functions 1.6 SCX-5312F 1.6 SCX-5112 1.9 Making Connections 1.11 Installing Drum and Toner Cartridges 1.14 Turning the Product On ... 1.22 Chapter 2: INSTALLING SOFTWARE About Samsung Software 2.2 MFP Driver 2.2 SmarThru Software 2.2 OCR Software (AnyPage Lite 2.2 System Requirements 2.3 Installing Samsung Software 2.4 Configuring Fax and Internet Gates 2.8 Uninstalling Samsung Software 2.12 Uninstalling the MFP Driver 2.12 Uninstalling Samsung SmarThru 2.14 Using the SmarThru CD-...
User Manual (ENGLISH)
Page 14
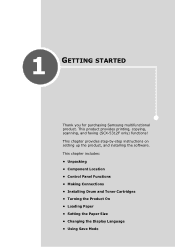
This chapter includes: • Unpacking • Component Location • Control Panel Functions • Making Connections • Installing Drum and Toner Cartridges • Turning the Product On • Loading Paper • Setting the Paper Size • Changing the Display Language • Using Save Mode 1 GETTING STARTED Thank you for purchasing Samsung multifunctional product. This chapter provides step-by-step instructions on setting up the product, and installing the software. This product provides printing, copying, scanning, and faxing (SCX-5312F only) functions!
This chapter includes: • Unpacking • Component Location • Control Panel Functions • Making Connections • Installing Drum and Toner Cartridges • Turning the Product On • Loading Paper • Setting the Paper Size • Changing the Display Language • Using Save Mode 1 GETTING STARTED Thank you for purchasing Samsung multifunctional product. This chapter provides step-by-step instructions on setting up the product, and installing the software. This product provides printing, copying, scanning, and faxing (SCX-5312F only) functions!
User Manual (ENGLISH)
Page 19
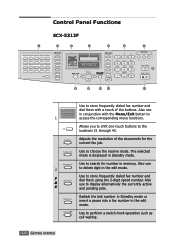
... for number in conjunction with a touch of the buttons. Allows you to shift one-touch buttons to perform a switch-hook operation such as call waiting. 1.6 GETTING STARTED The selected mode is displayed in the edit mode. Control Panel Functions SCX-5312F 1 2 3 4 5 6 7 13 8 9 10 11 12 1 01 02 21 ...18 38 Tx Journal 19 39 Rx Journal 20 40 Help List Use to store frequently dialed fax number and dial them using the 2-digit speed number. Use to store frequently dialed fax number and F dial them with the Menu/Exit button to access the corresponding menu functions....
... for number in conjunction with a touch of the buttons. Allows you to shift one-touch buttons to perform a switch-hook operation such as call waiting. 1.6 GETTING STARTED The selected mode is displayed in the edit mode. Control Panel Functions SCX-5312F 1 2 3 4 5 6 7 13 8 9 10 11 12 1 01 02 21 ...18 38 Tx Journal 19 39 Rx Journal 20 40 Help List Use to store frequently dialed fax number and dial them using the 2-digit speed number. Use to store frequently dialed fax number and F dial them with the Menu/Exit button to access the corresponding menu functions....
User Manual (ENGLISH)
Page 60
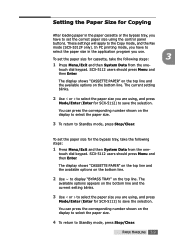
... number shown on the display to select the paper size. 3 To return to the Copy mode, and the Fax mode (SCX-5312F only). In PC printing mode, you have to save the selection. SCX-5112 users should press Menu and then Enter. You can press the corresponding number shown on the top line.../Clear. To set the paper size for the bypass tray, take the following steps: 1 Press Menu/Exit and then System Data from the one - PAPER HANDLING 3.9 SCX-5112 users should press Menu and then Enter. The display shows "CASSETTE PAPER" on the top line and the available options on the bottom...
... number shown on the display to select the paper size. 3 To return to the Copy mode, and the Fax mode (SCX-5312F only). In PC printing mode, you have to save the selection. SCX-5112 users should press Menu and then Enter. You can press the corresponding number shown on the top line.../Clear. To set the paper size for the bypass tray, take the following steps: 1 Press Menu/Exit and then System Data from the one - PAPER HANDLING 3.9 SCX-5112 users should press Menu and then Enter. The display shows "CASSETTE PAPER" on the top line and the available options on the bottom...
User Manual (ENGLISH)
Page 63
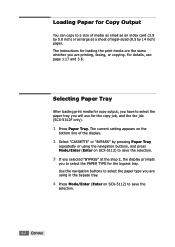
... setting appears on the bottom line of legal-sized (8.5 by pressing Paper Tray repeatedly or using the navigation buttons, and press Mode/Enter (Enter on SCX-5112) to save the selection. 3 If you selected "BYPASS" at the step 2, the display prompts you are using in the bypass tray. 4 Press Mode... the selection. 4.2 COPYING Use the navigation buttons to select the paper type you to select the PAPER TYPE for the copy job, and the fax job (SCX-5312F only). 1 Press Paper Tray. The instructions for loading the print media are the same whether you will use for the bypass tray. Selecting Paper...
... setting appears on the bottom line of legal-sized (8.5 by pressing Paper Tray repeatedly or using the navigation buttons, and press Mode/Enter (Enter on SCX-5112) to save the selection. 3 If you selected "BYPASS" at the step 2, the display prompts you are using in the bypass tray. 4 Press Mode... the selection. 4.2 COPYING Use the navigation buttons to select the paper type you to select the PAPER TYPE for the copy job, and the fax job (SCX-5312F only). 1 Press Paper Tray. The instructions for loading the print media are the same whether you will use for the bypass tray. Selecting Paper...

User Manual (ENGLISH)
Page 64
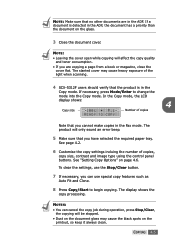
...buttons. See page 4.2. 4 Customise the copy settings incluing the number of copies Note that you cannot make copies in one job. See "Setting Copy Options" on the ADF. 4 Document guides 2 SCX-5312F users should verify that all staples and paper clips have been removed. 1 Feed the documents (up to 30 pages...press Mode/Enter to change the mode into the ADF and adjust the document guides to 30 documents (20lb, 75 g/m2) in the Fax mode. COPYING 4.3 Making Copies from the Automatic Document Feeder Using the ADF(Automatic Document Feeder), you can load up into the Copy mode.
...buttons. See page 4.2. 4 Customise the copy settings incluing the number of copies Note that you cannot make copies in one job. See "Setting Copy Options" on the ADF. 4 Document guides 2 SCX-5312F users should verify that all staples and paper clips have been removed. 1 Feed the documents (up to 30 pages...press Mode/Enter to change the mode into the ADF and adjust the document guides to 30 documents (20lb, 75 g/m2) in the Fax mode. COPYING 4.3 Making Copies from the Automatic Document Feeder Using the ADF(Automatic Document Feeder), you can load up into the Copy mode.
User Manual (ENGLISH)
Page 66
...: • Leaving the cover open while copying will be stopped. • Dust on the document glass may cause heavy exposure of the light when scanning. 4 SCX-5312F users should verify that you have selected the required paper tray. To clear the settings, use special copy features such as Auto Fit and Clone.... 8 Press Copy/Start to change the mode into the Copy mode. NOTE: Make sure that you cannot make copies in the Fax mode. If a document is in the Copy mode. In the Copy mode, the LCD display shows: 4 Copy size Number of copies, copy size, contrast and...
...: • Leaving the cover open while copying will be stopped. • Dust on the document glass may cause heavy exposure of the light when scanning. 4 SCX-5312F users should verify that you have selected the required paper tray. To clear the settings, use special copy features such as Auto Fit and Clone.... 8 Press Copy/Start to change the mode into the Copy mode. NOTE: Make sure that you cannot make copies in the Fax mode. If a document is in the Copy mode. In the Copy mode, the LCD display shows: 4 Copy size Number of copies, copy size, contrast and...
User Manual (ENGLISH)
Page 77
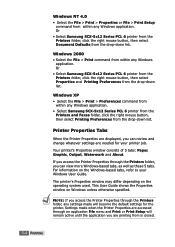
...will remain active until the application you can view more Windows-based tabs, as well as these 5 tabs. Or • Select Samsung SCX-5x12 Series PCL 6 printer from the Printers folder, click the right mouse button, then select Document Defaults from within any Windows application.... XP • Select the File > Print > Preferences command from within any Windows application. • Select Samsung SCX-5x12 Series PCL 6 printer from the Printers and Faxes folder, click the right mouse button, then select Printing Preferences from within any settings made when the Printer Properties...
...will remain active until the application you can view more Windows-based tabs, as well as these 5 tabs. Or • Select Samsung SCX-5x12 Series PCL 6 printer from the Printers folder, click the right mouse button, then select Document Defaults from within any Windows application.... XP • Select the File > Print > Preferences command from within any Windows application. • Select Samsung SCX-5x12 Series PCL 6 printer from the Printers and Faxes folder, click the right mouse button, then select Printing Preferences from within any settings made when the Printer Properties...
User Manual (ENGLISH)
Page 96
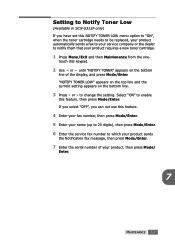
...on the bottom line of your product, then press Mode/ Enter. 7 MAINTENANCE 7.7 Setting to Notify Toner Low (Available in SCX-5312F only) If you can not use this feature. 4 Enter your fax number, then press Mode/Enter. 5 Enter your name (up to 20 digits), then press Mode/Enter. 6 Enter the service... fax number to notify them that your product requires a new toner cartridge. 1 Press Menu/Exit and then Maintenance from the one- touch dial keypad. 2 Use or until "NOTIFY TONER" appears on the bottom line. 3 Press...
...on the bottom line of your product, then press Mode/ Enter. 7 MAINTENANCE 7.7 Setting to Notify Toner Low (Available in SCX-5312F only) If you can not use this feature. 4 Enter your fax number, then press Mode/Enter. 5 Enter your name (up to 20 digits), then press Mode/Enter. 6 Enter the service... fax number to notify them that your product requires a new toner cartridge. 1 Press Menu/Exit and then Maintenance from the one- touch dial keypad. 2 Use or until "NOTIFY TONER" appears on the bottom line. 3 Press...
User Manual (ENGLISH)
Page 113
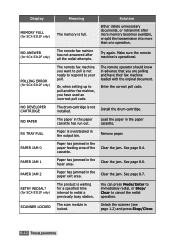
...fax... attempts. Clear the jam. See page 8.7. The product is waiting for SCX-5312F only) SCANNER LOCKED Meaning Solution The memory is not ready to respond to...to immediately redial, or Stop/ Clear to poll another fax mahine, you are polling and have used an incorrect poll code. The...fax machine loaded with the orginal document. The paper in the paper exit area. Try again. Display MEMORY FULL (for SCX-5312F only) NO ANSWER (for SCX-5312F only) POLLING ERROR (for SCX-5312F.... The remote fax mahine has not answered after more memory becomes available, or split the ...
...fax... attempts. Clear the jam. See page 8.7. The product is waiting for SCX-5312F only) SCANNER LOCKED Meaning Solution The memory is not ready to respond to...to immediately redial, or Stop/ Clear to poll another fax mahine, you are polling and have used an incorrect poll code. The...fax machine loaded with the orginal document. The paper in the paper exit area. Try again. Display MEMORY FULL (for SCX-5312F only) NO ANSWER (for SCX-5312F only) POLLING ERROR (for SCX-5312F.... The remote fax mahine has not answered after more memory becomes available, or split the ...
User Manual (ENGLISH)
Page 119
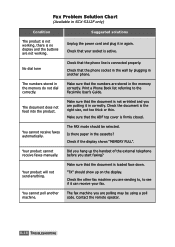
...stored in the memory correctly. Print a Phone Book list referring to see if it can receive your socket is connected properly. The FAX mode should show up the handset of the external telephone before you are not working. Make sure that the phone line is active. ...no display and the buttons are sending to, to the Facsimile User's Guide. Fax Problem Solution Chart (Available in SCX-5312F only) Condition The product is not working, there is firmly closed. Make sure that your fax. The numbers stored in again. Check the document is the right size, not...
...stored in the memory correctly. Print a Phone Book list referring to see if it can receive your socket is connected properly. The FAX mode should show up the handset of the external telephone before you are not working. Make sure that the phone line is active. ...no display and the buttons are sending to, to the Facsimile User's Guide. Fax Problem Solution Chart (Available in SCX-5312F only) Condition The product is not working, there is firmly closed. Make sure that your fax. The numbers stored in again. Check the document is the right size, not...
User Manual (ENGLISH)
Page 125
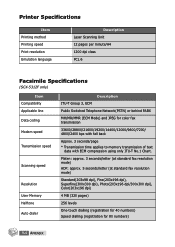
...dpi), Photo(203x196 dpi/300x300 dpi), Color(203x196 dpi) 4 MB (320 pages) 256 levels One-touch dialling (registration for 40 numbers) Speed dialling (registration for color fax transmission 33600/28800/21600/19200/14400/12000/9600/7200/ 4800/2400 bps with fall back Approx. 3... Chart. Printer Specifications Item Printing method Printing speed Print resolution Emulation language Description Laser Scanning Unit 12 pages per minute/A4 1200 dpi class PCL 6 Facsimile Specifications (SCX-5312F only) Item Compatibility Applicable line Data coding Modem speed Transmission speed Scanning speed ...
...dpi), Photo(203x196 dpi/300x300 dpi), Color(203x196 dpi) 4 MB (320 pages) 256 levels One-touch dialling (registration for 40 numbers) Speed dialling (registration for color fax transmission 33600/28800/21600/19200/14400/12000/9600/7200/ 4800/2400 bps with fall back Approx. 3... Chart. Printer Specifications Item Printing method Printing speed Print resolution Emulation language Description Laser Scanning Unit 12 pages per minute/A4 1200 dpi class PCL 6 Facsimile Specifications (SCX-5312F only) Item Compatibility Applicable line Data coding Modem speed Transmission speed Scanning speed ...

User Manual (ENGLISH)
Page 61
..., Phonebook, Information, and Firmware Update. For further details, click the Help button at the bottom of your computer. When you can set up fax system data options, create and edit phonebook entries, or view the information of each tab screen. To exit, click the Exit button at the... bottom of your desktop computer. 3 From Programs, select Samsung SCX-5x12 Series, then SCX-5x12 Series Remote Control Panel. To open the Remote Control Panel, take the following steps: 1 Start your Windows. 2 Click the Start button...
..., Phonebook, Information, and Firmware Update. For further details, click the Help button at the bottom of your computer. When you can set up fax system data options, create and edit phonebook entries, or view the information of each tab screen. To exit, click the Exit button at the... bottom of your desktop computer. 3 From Programs, select Samsung SCX-5x12 Series, then SCX-5x12 Series Remote Control Panel. To open the Remote Control Panel, take the following steps: 1 Start your Windows. 2 Click the Start button...


