User Manual (ENGLISH)
Page 5
Chapter 6: SCANNING Scanning using the Samsung SmarThru 6.2 Scanning Process with TWAIN-enabled Software ...... 6.4 Chapter 7: MAINTENANCE Cleaning the Scan Unit 7.2 Expected Cartridge Life 7.3 Replacing the Toner Cartridge 7.3 Setting to Notify Toner Low 7.7 Cleaning the Drum 7.8 Replacing the Drum Cartridge 7.8 Consumables and Replacement Parts 7.11 Chapter 8: TROUBLESHOOTING Document Jams 8.2 Input Misfeed 8.2 Exit Misfeed 8.3 Roller Misfeed...
Chapter 6: SCANNING Scanning using the Samsung SmarThru 6.2 Scanning Process with TWAIN-enabled Software ...... 6.4 Chapter 7: MAINTENANCE Cleaning the Scan Unit 7.2 Expected Cartridge Life 7.3 Replacing the Toner Cartridge 7.3 Setting to Notify Toner Low 7.7 Cleaning the Drum 7.8 Replacing the Drum Cartridge 7.8 Consumables and Replacement Parts 7.11 Chapter 8: TROUBLESHOOTING Document Jams 8.2 Input Misfeed 8.2 Exit Misfeed 8.3 Roller Misfeed...
User Manual (ENGLISH)
Page 104
This chapter includes: • Document Jams • Paper Jams • LCD Error Messages • Solving Problems 8 TROUBLESHOOTING This chapter gives helpful information for what to do if you encounter an error.
This chapter includes: • Document Jams • Paper Jams • LCD Error Messages • Solving Problems 8 TROUBLESHOOTING This chapter gives helpful information for what to do if you encounter an error.

User Manual (ENGLISH)
Page 105
NOTE: To prevent document jams, use the document scanner glass for clearing the three types of the ADF. 3 Close the ADF top cover. Document Jams If a document jams while it is feeding through the ADF, "DOCUMENT JAM" appears on the display. Input Misfeed 1 Open the ADF top cover. 2 Pull the document gently to the right and out of document misfeeds are given below. Then place the documents back into the ADF. Details for thick, thin or mixed documents. 8.2 TROUBLESHOOTING
NOTE: To prevent document jams, use the document scanner glass for clearing the three types of the ADF. 3 Close the ADF top cover. Document Jams If a document jams while it is feeding through the ADF, "DOCUMENT JAM" appears on the display. Input Misfeed 1 Open the ADF top cover. 2 Pull the document gently to the right and out of document misfeeds are given below. Then place the documents back into the ADF. Details for thick, thin or mixed documents. 8.2 TROUBLESHOOTING

User Manual (ENGLISH)
Page 106
Then place the documents back into the ADF. TROUBLESHOOTING 8.3 Then place the documents back into the ADF. Exit Misfeed 1 Open the document cover and turn the release knob to remove the misfed documents from the ADF or the feed area by carefully pulling it rightwards using both hands. 8 3 Close the document cover. Roller Misfeed 1 Open the document cover. 2 Turn the release knob so that you can easily seize the misfed document, and remove the document from the exit area. 2 Close the document cover.
Then place the documents back into the ADF. TROUBLESHOOTING 8.3 Then place the documents back into the ADF. Exit Misfeed 1 Open the document cover and turn the release knob to remove the misfed documents from the ADF or the feed area by carefully pulling it rightwards using both hands. 8 3 Close the document cover. Roller Misfeed 1 Open the document cover. 2 Turn the release knob so that you can easily seize the misfed document, and remove the document from the exit area. 2 Close the document cover.

User Manual (ENGLISH)
Page 107
Paper Jams If paper jams occur, "PAPER JAM" appears on the display. 8.4 TROUBLESHOOTING After you remove the jammed paper here, open . Paper Feed Area If the paper jammed in the feed area, "PAPER JAM0" appears in the display. 1 ...
Paper Jams If paper jams occur, "PAPER JAM" appears on the display. 8.4 TROUBLESHOOTING After you remove the jammed paper here, open . Paper Feed Area If the paper jammed in the feed area, "PAPER JAM0" appears in the display. 1 ...
User Manual (ENGLISH)
Page 108
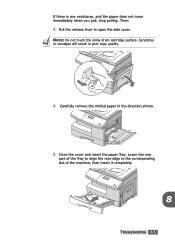
If there is any resistance, and the paper does not move immediately when you pull, stop pulling. Scratches or smudges will result in poor copy quality. 4 Carefully remove the misfed paper in the direction shown. 5 Close the cover and insert the paper Tray. Lower the rear part of the Tray to align the rear edge to open the side cover. NOTE: Do not touch the shiny drum cartridge surface. Then: 3 Pull the release lever to the corresponding slot of the machine, then insert it completely. 8 TROUBLESHOOTING 8.5
If there is any resistance, and the paper does not move immediately when you pull, stop pulling. Scratches or smudges will result in poor copy quality. 4 Carefully remove the misfed paper in the direction shown. 5 Close the cover and insert the paper Tray. Lower the rear part of the Tray to align the rear edge to open the side cover. NOTE: Do not touch the shiny drum cartridge surface. Then: 3 Pull the release lever to the corresponding slot of the machine, then insert it completely. 8 TROUBLESHOOTING 8.5
User Manual (ENGLISH)
Page 109
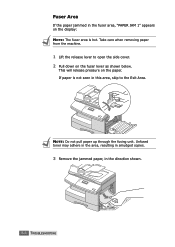
This will release pressure on the fuser lever as shown below. If paper is not seen in the fuser area, "PAPER JAM 1" appears on the display: NOTE: The fuser area is hot. Take care when removing paper from the machine. 1 Lift the release lever to the Exit Area. Fuser Area If the paper jammed in this area, skip to open the side cover. 2 Pull down on the paper. NOTE: Do not pull paper up through the fusing unit. Unfused toner may adhere in the area, resulting in smudged copies. 3 Remove the jammed paper, in the direction shown. 8.6 TROUBLESHOOTING
This will release pressure on the fuser lever as shown below. If paper is not seen in the fuser area, "PAPER JAM 1" appears on the display: NOTE: The fuser area is hot. Take care when removing paper from the machine. 1 Lift the release lever to the Exit Area. Fuser Area If the paper jammed in this area, skip to open the side cover. 2 Pull down on the paper. NOTE: Do not pull paper up through the fusing unit. Unfused toner may adhere in the area, resulting in smudged copies. 3 Remove the jammed paper, in the direction shown. 8.6 TROUBLESHOOTING
User Manual (ENGLISH)
Page 110
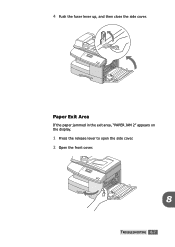
Paper Exit Area If the paper jammed in the exit area, "PAPER JAM 2" appears on the display. 1 Press the release lever to open the side cover. 2 Open the front cover. 8 TROUBLESHOOTING 8.7 4 Push the fuser lever up, and then close the side cover.
Paper Exit Area If the paper jammed in the exit area, "PAPER JAM 2" appears on the display. 1 Press the release lever to open the side cover. 2 Open the front cover. 8 TROUBLESHOOTING 8.7 4 Push the fuser lever up, and then close the side cover.
User Manual (ENGLISH)
Page 111
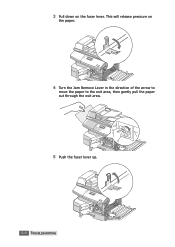
3 Pull down on the paper. 4 Turn the Jam Remove Lever in the direction of the arrow to move the paper to the exit area, then gently pull the paper out through the exit area. 5 Push the fuser lever up. 8.8 TROUBLESHOOTING This will release pressure on the fuser lever.
3 Pull down on the paper. 4 Turn the Jam Remove Lever in the direction of the arrow to move the paper to the exit area, then gently pull the paper out through the exit area. 5 Push the fuser lever up. 8.8 TROUBLESHOOTING This will release pressure on the fuser lever.
User Manual (ENGLISH)
Page 112
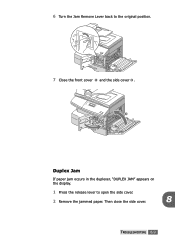
Then close the side cover. 8 TROUBLESHOOTING 8.9 6 Turn the Jam Remove Lever back to the original position. 7 Close the front cover 1 and the side cover 2 . 2 1 Duplex Jam If paper jam occurs in the duplexer, "DUPLEX JAM" appears on the display. 1 Press the release lever to open the side cover. 2 Remove the jammed paper.
Then close the side cover. 8 TROUBLESHOOTING 8.9 6 Turn the Jam Remove Lever back to the original position. 7 Close the front cover 1 and the side cover 2 . 2 1 Duplex Jam If paper jam occurs in the duplexer, "DUPLEX JAM" appears on the display. 1 Press the release lever to open the side cover. 2 Remove the jammed paper.
User Manual (ENGLISH)
Page 113
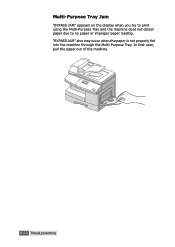
Multi-Purpose Tray Jam "BYPASS JAM" appears on the display when you try to print using the Multi-Purpose Tray and the machine does not detect paper due to no paper or improper paper loading. In that case, pull the paper out of the machine. 8.10 TROUBLESHOOTING "BYPASS JAM" also may occur when the paper is not properly fed into the machine through the Multi-Purpose Tray.
Multi-Purpose Tray Jam "BYPASS JAM" appears on the display when you try to print using the Multi-Purpose Tray and the machine does not detect paper due to no paper or improper paper loading. In that case, pull the paper out of the machine. 8.10 TROUBLESHOOTING "BYPASS JAM" also may occur when the paper is not properly fed into the machine through the Multi-Purpose Tray.
User Manual (ENGLISH)
Page 114
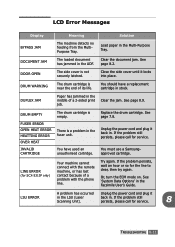
...ADF. There is not securely latched. LINE ERROR (for service. If the problem still persists, please call for SCX-5315F only) Your machine cannot connect with the remote machine, or has lost contact because of its life. LCD ... ERROR A problem has occurred Unplug the power cord and plug it locks into place. back in the LSU (Laser Scanning Unit). You should have used an unauthorised cartridge. DRUM EMPTY FUSER ERROR OPEN HEAT ERROR HEATTING ERROR OVER ... a problem in . If the problem persists, wait an hour or so for service. 8 TROUBLESHOOTING 8.11 Clear the jam.
...ADF. There is not securely latched. LINE ERROR (for service. If the problem still persists, please call for SCX-5315F only) Your machine cannot connect with the remote machine, or has lost contact because of its life. LCD ... ERROR A problem has occurred Unplug the power cord and plug it locks into place. back in the LSU (Laser Scanning Unit). You should have used an unauthorised cartridge. DRUM EMPTY FUSER ERROR OPEN HEAT ERROR HEATTING ERROR OVER ... a problem in . If the problem persists, wait an hour or so for service. 8 TROUBLESHOOTING 8.11 Clear the jam.
User Manual (ENGLISH)
Page 115
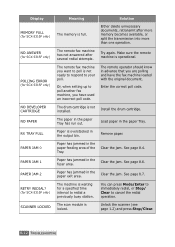
...8.6. Clear the jam. Unlock the scanner (see page 1.2) and press Stop/Clear. 8.12 TROUBLESHOOTING The remote fax machine has not answered after more memory becomes available, or split the transmission into more than one operation. The paper in the paper Tray. Clear the jam. The scan module is operational.... paper in the paper Tray has run out. Paper has jammed in the fuser area. Display MEMORY FULL (for SCX-5315F only) NO ANSWER (for SCX-5315F only) POLLING ERROR (for SCX-5315F only) NO DEVELOPER CARTRIDGE NO PAPER RX TRAY FULL PAPER JAM 0 PAPER JAM 1 PAPER JAM 2 RETRY REDIAL...
...8.6. Clear the jam. Unlock the scanner (see page 1.2) and press Stop/Clear. 8.12 TROUBLESHOOTING The remote fax machine has not answered after more memory becomes available, or split the transmission into more than one operation. The paper in the paper Tray. Clear the jam. The scan module is operational.... paper in the paper Tray has run out. Paper has jammed in the fuser area. Display MEMORY FULL (for SCX-5315F only) NO ANSWER (for SCX-5315F only) POLLING ERROR (for SCX-5315F only) NO DEVELOPER CARTRIDGE NO PAPER RX TRAY FULL PAPER JAM 0 PAPER JAM 1 PAPER JAM 2 RETRY REDIAL...

User Manual (ENGLISH)
Page 116
... lower than 10 oC , copy your document 1 hour after you can temporarily re-establish printing operations. If the detects are too light or too dark. TROUBLESHOOTING 8.13
... lower than 10 oC , copy your document 1 hour after you can temporarily re-establish printing operations. If the detects are too light or too dark. TROUBLESHOOTING 8.13
User Manual (ENGLISH)
Page 117
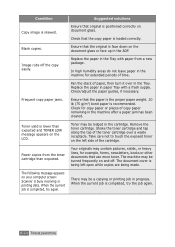
... easily. Replace the paper in the Tray with a fresh supply. Frequent copy paper jams. Ensure that the original is completed, try the job again. 8.14 TROUBLESHOOTING Toner may be lodged in the Tray. The document cover is loaded correctly. Condition Suggested solutions Copy image is completed, try again. Ensure that the...
... easily. Replace the paper in the Tray with a fresh supply. Frequent copy paper jams. Ensure that the original is completed, try the job again. 8.14 TROUBLESHOOTING Toner may be lodged in the Tray. The document cover is loaded correctly. Condition Suggested solutions Copy image is completed, try again. Ensure that the...
User Manual (ENGLISH)
Page 118
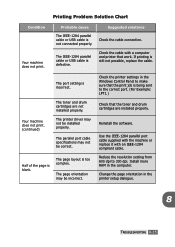
... computer. The port setting is too complex. The parallel port cable specifications may not be installed properly. Install more RAM in the printer setup dialogue. 8 TROUBLESHOOTING 8.15 Your machine does not print. (continued) The toner and drum cartridges are installed properly. Printing Problem Solution Chart Condition Your machine does not print...
... computer. The port setting is too complex. The parallel port cable specifications may not be installed properly. Install more RAM in the printer setup dialogue. 8 TROUBLESHOOTING 8.15 Your machine does not print. (continued) The toner and drum cartridges are installed properly. Printing Problem Solution Chart Condition Your machine does not print...

User Manual (ENGLISH)
Page 119
...mode to save the selection. 5. The computer parallel port may experience poor USB communication. Computer may be set to 300 dpi. 8.16 TROUBLESHOOTING To do so, take the following steps: 1. Press Menu/Exit then System Setup from 600 dpi to "FAST" some PC users may...Select the desired setting from the available choices. Condition When printing using Windows 95, the spool setting may not have enough memory (RAM). SCX-5115 users should press Menu then Enter. 2. The current setting appears on the Details tab. Click Properties and then spool settings on the ...
...mode to save the selection. 5. The computer parallel port may experience poor USB communication. Computer may be set to 300 dpi. 8.16 TROUBLESHOOTING To do so, take the following steps: 1. Press Menu/Exit then System Setup from 600 dpi to "FAST" some PC users may...Select the desired setting from the available choices. Condition When printing using Windows 95, the spool setting may not have enough memory (RAM). SCX-5115 users should press Menu then Enter. 2. The current setting appears on the Details tab. Click Properties and then spool settings on the ...

User Manual (ENGLISH)
Page 120
.... Character voids The paper may be too damp. Do not open packets of paper until necessary so that meets the specifications required by the machine. TROUBLESHOOTING 8.17 Background scatter The paper may be too damp. Printing over areas that meets the specifications required by your printing layout to evenly distribute the...
.... Character voids The paper may be too damp. Do not open packets of paper until necessary so that meets the specifications required by the machine. TROUBLESHOOTING 8.17 Background scatter The paper may be too damp. Printing over areas that meets the specifications required by your printing layout to evenly distribute the...
User Manual (ENGLISH)
Page 121
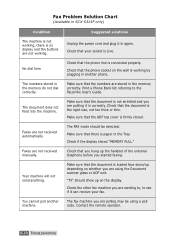
.... Check that the document is loaded face down/up depending on the wall is paper in the memory correctly. The numbers stored in SCX-5315F only) Condition The machine is not working, there is Live. The document does not feed into the machine. The fax machine ...another phone. No dial tone Check that there is working . Make sure that the document is connected properly. Contact the remote operator. 8.18 TROUBLESHOOTING Check that the numbers are sending to, to the Facsimile User's Guide. Check that the document is firmly closed. Make sure that the ...
.... Check that the document is loaded face down/up depending on the wall is paper in the memory correctly. The numbers stored in SCX-5315F only) Condition The machine is not working, there is Live. The document does not feed into the machine. The fax machine ...another phone. No dial tone Check that there is working . Make sure that the document is connected properly. Contact the remote operator. 8.18 TROUBLESHOOTING Check that the numbers are sending to, to the Facsimile User's Guide. Check that the document is firmly closed. Make sure that the ...

User Manual (ENGLISH)
Page 122
... the display shows a "MEMORY FULL" message, delete any documents you received a poor-quality copy. Clean the document glass, referring to choose the proper paper size. 8 TROUBLESHOOTING 8.19 See page 7.2. Refer to the Facsimile User's Guide to page 7.2. Condition Suggested solutions The incoming fax has blank spaces or you no longer need...
... the display shows a "MEMORY FULL" message, delete any documents you received a poor-quality copy. Clean the document glass, referring to choose the proper paper size. 8 TROUBLESHOOTING 8.19 See page 7.2. Refer to the Facsimile User's Guide to page 7.2. Condition Suggested solutions The incoming fax has blank spaces or you no longer need...
