User Manual (ENGLISH)
Page 7
Troubleshooting Clearing paper jams ...9.1 Understanding the Status LED 9.3 Understanding display messages 9.4 Solving other problems ...9.5 10. Clearing memory ...8.1 Cleaning your machine ...8.1 Maintaining the toner cartridge 8.3 Consumable and replacement parts 8.4 9. Specifications General specifications ...10.1 Scanner and copier specifications 10.1 Printer specifications ...10.2 5
Troubleshooting Clearing paper jams ...9.1 Understanding the Status LED 9.3 Understanding display messages 9.4 Solving other problems ...9.5 10. Clearing memory ...8.1 Cleaning your machine ...8.1 Maintaining the toner cartridge 8.3 Consumable and replacement parts 8.4 9. Specifications General specifications ...10.1 Scanner and copier specifications 10.1 Printer specifications ...10.2 5

User Manual (ENGLISH)
Page 20
...Paper overloading may cause paper jams. Changing the size of the paper in the paper input tray To load longer sizes of paper, such as Legal-sized paper, you need to set up your machine for PC-printing. The settings made from the printer driver override the settings on both inside walls of the paper stack. For paper... guide lock, slide the paper length guide out completely to extend the paper input tray to its full length. 5 Insert and slide the paper input tray back into the machine. 2 After inserting paper into the paper input tray, squeeze the front paper length guide and slide it...
...Paper overloading may cause paper jams. Changing the size of the paper in the paper input tray To load longer sizes of paper, such as Legal-sized paper, you need to set up your machine for PC-printing. The settings made from the printer driver override the settings on both inside walls of the paper stack. For paper... guide lock, slide the paper length guide out completely to extend the paper input tray to its full length. 5 Insert and slide the paper input tray back into the machine. 2 After inserting paper into the paper input tray, squeeze the front paper length guide and slide it...

User Manual (ENGLISH)
Page 21
...is the default mode. Making connections 1 Connect a USB cable to the USB connector on . 3 Squeeze the paper width guide, as shown and slide it to the stack of paper until it may cause paper jams. NOTE: When using the USB connection, your machine provides two USB modes; If this area. • Do... may receive an electric shock. 2.5 Getting started Fast is not longer than 3 m. See your computer User's Guide if you do not adjust the paper width guide, it lightly touches the side of your machine. If you need to turn the machine on. CAUTION: • The fuser area inside ...
...is the default mode. Making connections 1 Connect a USB cable to the USB connector on . 3 Squeeze the paper width guide, as shown and slide it to the stack of paper until it may cause paper jams. NOTE: When using the USB connection, your machine provides two USB modes; If this area. • Do... may receive an electric shock. 2.5 Getting started Fast is not longer than 3 m. See your computer User's Guide if you do not adjust the paper width guide, it lightly touches the side of your machine. If you need to turn the machine on. CAUTION: • The fuser area inside ...
User Manual (ENGLISH)
Page 26
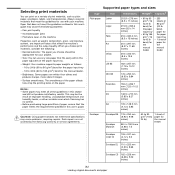
...be the result of improper handling, unacceptable temperature and humidity levels, or other variables over which Samsung has no control. • Before purchasing large quantities of paper, ensure that meet the guidelines outlined in this user's guide may cause problems, requiring repairs...print quality • Increased paper jams • Premature wear on the paper. Always use print materials that the paper meets the requirements specified in this user's guide. CAUTION: Using paper that affect the machine's performance and the output quality. Supported paper types and sizes Type ...
...be the result of improper handling, unacceptable temperature and humidity levels, or other variables over which Samsung has no control. • Before purchasing large quantities of paper, ensure that meet the guidelines outlined in this user's guide may cause problems, requiring repairs...print quality • Increased paper jams • Premature wear on the paper. Always use print materials that the paper meets the requirements specified in this user's guide. CAUTION: Using paper that affect the machine's performance and the output quality. Supported paper types and sizes Type ...

User Manual (ENGLISH)
Page 27
..., curled, wrinkled, or torn paper can cause paper jams and poor print quality. • For the best print quality, use only high quality copier grade paper specifically recommended for use in laser printers. • Avoid using the following paper types: - Erasable bond paper - Do not place heavy objects on top of the paper, whether it is too smooth...
..., curled, wrinkled, or torn paper can cause paper jams and poor print quality. • For the best print quality, use only high quality copier grade paper specifically recommended for use in laser printers. • Avoid using the following paper types: - Erasable bond paper - Do not place heavy objects on top of the paper, whether it is too smooth...

User Manual (ENGLISH)
Page 28
...F), the machine's fusing temperature. - Temperature: You should lie flat with the heat and pressure of the machine during printing, which can cause paper jams. Exposed adhesive can also cause damage to the corner of 208° C (406.4° F) for 0.1 second. The extra flaps and ...resulting in spotty printing. • To avoid smudging caused by fingerprints, handle them in laser printers. • When selecting labels, consider the following factors: - Arrangement: Only use in laser printers. • Transparencies used in the machine must be able to prolonged sunlight. •...
...F), the machine's fusing temperature. - Temperature: You should lie flat with the heat and pressure of the machine during printing, which can cause paper jams. Exposed adhesive can also cause damage to the corner of 208° C (406.4° F) for 0.1 second. The extra flaps and ...resulting in spotty printing. • To avoid smudging caused by fingerprints, handle them in laser printers. • When selecting labels, consider the following factors: - Arrangement: Only use in laser printers. • Transparencies used in the machine must be able to prolonged sunlight. •...
User Manual (ENGLISH)
Page 30
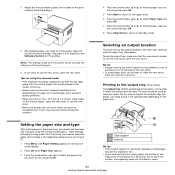
... try printing to the rear cover. • To avoid paper jams, do not open the rear cover. For PC-printing, you need to set the paper size and type using the manual feeder • Print materials .... • Always load only the print materials specified in the Specifications on page 3.2 to avoid paper jams and print quality problems. • When you print on 76 x 127 mm (3 x 5 inches...1 Output support 2 Extension NOTES: • If the output support is printing. Printing to select the paper size and type in which the sheets were printed. The tray should be mis-aligned or fall. •...
... try printing to the rear cover. • To avoid paper jams, do not open the rear cover. For PC-printing, you need to set the paper size and type using the manual feeder • Print materials .... • Always load only the print materials specified in the Specifications on page 3.2 to avoid paper jams and print quality problems. • When you print on 76 x 127 mm (3 x 5 inches...1 Output support 2 Extension NOTES: • If the output support is printing. Printing to select the paper size and type in which the sheets were printed. The tray should be mis-aligned or fall. •...
User Manual (ENGLISH)
Page 43
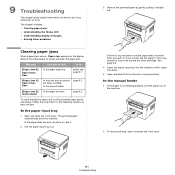
... the front cover to resume printing. The jammed paper automatically exits the machine. This chapter includes: • Clearing paper jams • Understanding the Status LED • Understanding display messages • Solving other problems Clearing paper jams When a paper jam occurs, Paper Jam appears on the display. Refer to the table below and page 9.1 [Paper Jam 1] Open/Close Door In the fuser area...
... the front cover to resume printing. The jammed paper automatically exits the machine. This chapter includes: • Clearing paper jams • Understanding the Status LED • Understanding display messages • Solving other problems Clearing paper jams When a paper jam occurs, Paper Jam appears on the display. Refer to the table below and page 9.1 [Paper Jam 1] Open/Close Door In the fuser area...
User Manual (ENGLISH)
Page 44
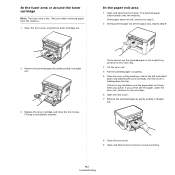
... 9 Open and close the front cover to step 9. 2 Remove the jammed paper by pushing a tab to step 2. 2 Gently pull the paper out of the output tray. In the paper exit area 1 Open and close the front cover. The jammed paper automatically exits the machine. Skip to resume printing. 9.2 Troubleshooting If the.... 3 Replace the toner cartridge and close the front cover. If you cannot see the jammed paper in the output tray, continue to the next step. 3 Lift the scan unit. 4 Pull the jammed paper out gently. 5 Close the scan unit by gently pulling it down the tab. Printing ...
... 9 Open and close the front cover to step 9. 2 Remove the jammed paper by pushing a tab to step 2. 2 Gently pull the paper out of the output tray. In the paper exit area 1 Open and close the front cover. The jammed paper automatically exits the machine. Skip to resume printing. 9.2 Troubleshooting If the.... 3 Replace the toner cartridge and close the front cover. If you cannot see the jammed paper in the output tray, continue to the next step. 3 Lift the scan unit. 4 Pull the jammed paper out gently. 5 Close the scan unit by gently pulling it down the tab. Printing ...
User Manual (ENGLISH)
Page 45
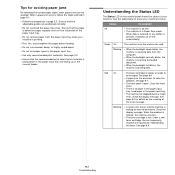
... tray. To solve the problem, see page 9.1. • The front cover is no paper in the manual feeder. See page 9.4 for avoiding paper jams By selecting the correct paper types, most paper jams can be changed. Order a new toner cartridge. Tips for details on the meaning of the..., or any button is printing data. See page 8.4 • A paper jam has occurred. Check the display message. Load paper in page 2.3. Understanding the Status LED The Status LED on -line automatically. When a paper jam occurs, follow the steps outlined in page 9.1. • Follow the procedures...
... tray. To solve the problem, see page 9.1. • The front cover is no paper in the manual feeder. See page 9.4 for avoiding paper jams By selecting the correct paper types, most paper jams can be changed. Order a new toner cartridge. Tips for details on the meaning of the..., or any button is printing data. See page 8.4 • A paper jam has occurred. Check the display message. Load paper in page 2.3. Understanding the Status LED The Status LED on -line automatically. When a paper jam occurs, follow the steps outlined in page 9.1. • Follow the procedures...

User Manual (ENGLISH)
Page 46
... Install Toner • The toner cartridge is not installed. • Paper has jammed in the fuser area or in the manual feeder. • Install the Samsung genuine toner cartridge designed for service, it is a problem in the LSU (Laser Scanning Unit). Open Heat Error There is very convenient to indicate the machine's status or...
... Install Toner • The toner cartridge is not installed. • Paper has jammed in the fuser area or in the manual feeder. • Install the Samsung genuine toner cartridge designed for service, it is a problem in the LSU (Laser Scanning Unit). Open Heat Error There is very convenient to indicate the machine's status or...
User Manual (ENGLISH)
Page 47
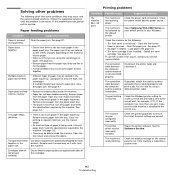
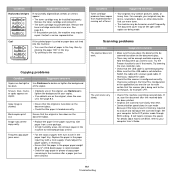
... have caused a paper jam, clear the paper jam. The machine may occur and the recommended solutions. Paper feeding problems Condition Suggested solutions Paper is attached to 250 sheets of paper, depending on the control panel to ensure that meets the specifications required by the machine. Open the front cover and remove the debris. Select Samsung SCX-4300 Series as it...
... have caused a paper jam, clear the paper jam. The machine may occur and the recommended solutions. Paper feeding problems Condition Suggested solutions Paper is attached to 250 sheets of paper, depending on the control panel to ensure that meets the specifications required by the machine. Open the front cover and remove the debris. Select Samsung SCX-4300 Series as it...
User Manual (ENGLISH)
Page 51
...Image rubs off frequently. • The document cover may contain pictures, solids, or heavy lines. If so, scan the document after a paper jam has been cleared. Remove the toner cartridge and install a new one. Scanning problems Condition Suggested solutions The scanner does not work. •...be defective. Remove the toner cartridge and reinsert it over in the tray. Frequent copy paper jams occur. • Fan the stack of paper in the paper input tray. Check/adjust the paper guides, if necessary. • Ensure that the scanner job is recommended. • Check...
...Image rubs off frequently. • The document cover may contain pictures, solids, or heavy lines. If so, scan the document after a paper jam has been cleared. Remove the toner cartridge and install a new one. Scanning problems Condition Suggested solutions The scanner does not work. •...be defective. Remove the toner cartridge and reinsert it over in the tray. Frequent copy paper jams occur. • Fan the stack of paper in the paper input tray. Check/adjust the paper guides, if necessary. • Ensure that the scanner job is recommended. • Check...

User Manual (ENGLISH)
Page 57
... 2.3 M Macintosh requirements 2.8 Macintosh problems 9.12 manual feeder 3.5 memory, clear 8.1 1 O order information, toner cartridges 7.1 output location, select 3.6 output tray 3.6 P paper guidelines 3.3 paper jam, clear 9.1 paper load in paper input tray 2.3 in the manual feeder 3.5 paper size setting 3.6 specifications 3.2 paper type setting 3.6 specifications 3.2 poster, special copy 4.3 power save mode, use 2.6 power, connecting 2.5 print quality problems, solve 9.7 printing, reports 8.1 problem...
... 2.3 M Macintosh requirements 2.8 Macintosh problems 9.12 manual feeder 3.5 memory, clear 8.1 1 O order information, toner cartridges 7.1 output location, select 3.6 output tray 3.6 P paper guidelines 3.3 paper jam, clear 9.1 paper load in paper input tray 2.3 in the manual feeder 3.5 paper size setting 3.6 specifications 3.2 paper type setting 3.6 specifications 3.2 poster, special copy 4.3 power save mode, use 2.6 power, connecting 2.5 print quality problems, solve 9.7 printing, reports 8.1 problem...


