User Manual (ENGLISH)
Page 6
... ...6.1 7. Getting started Setting up your machine Finding more information ...2.1 Selecting a location ...2.2 Installing the toner cartridge 2.2 Loading paper ...2.3 Making connections ...2.5 Turning the machine on ...2.5 Setting up the machine system Overview of ... Supplied printer software ...2.7 Printer driver features ...2.7 System requirements ...2.8 3. Maintenance Printing reports ...8.1 4 Ordering toner cartridge Toner cartridges ...7.1 How to purchase ...7.1 8. Introduction Special features ...1.1 Understanding component locations 1.2 2. CONTENTS 1. Loading original ...
... ...6.1 7. Getting started Setting up your machine Finding more information ...2.1 Selecting a location ...2.2 Installing the toner cartridge 2.2 Loading paper ...2.3 Making connections ...2.5 Turning the machine on ...2.5 Setting up the machine system Overview of ... Supplied printer software ...2.7 Printer driver features ...2.7 System requirements ...2.8 3. Maintenance Printing reports ...8.1 4 Ordering toner cartridge Toner cartridges ...7.1 How to purchase ...7.1 8. Introduction Special features ...1.1 Understanding component locations 1.2 2. CONTENTS 1. Loading original ...
User Manual (ENGLISH)
Page 7
Troubleshooting Clearing paper jams ...9.1 Understanding the Status LED 9.3 Understanding display messages 9.4 Solving other problems ...9.5 10. Specifications General specifications ...10.1 Scanner and copier specifications 10.1 Printer specifications ...10.2 5 Clearing memory ...8.1 Cleaning your machine ...8.1 Maintaining the toner cartridge 8.3 Consumable and replacement parts 8.4 9.
Troubleshooting Clearing paper jams ...9.1 Understanding the Status LED 9.3 Understanding display messages 9.4 Solving other problems ...9.5 10. Specifications General specifications ...10.1 Scanner and copier specifications 10.1 Printer specifications ...10.2 5 Clearing memory ...8.1 Cleaning your machine ...8.1 Maintaining the toner cartridge 8.3 Consumable and replacement parts 8.4 9.
User Manual (ENGLISH)
Page 15
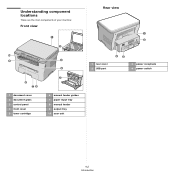
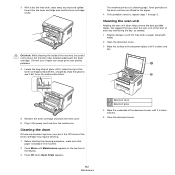
Understanding component locations These are the main components of your machine: Front view Rear view 1 rear cover 2 USB port 3 power receptacle 4 power switch 1 document cover 2 document glass 3 control panel 4 front cover 5 toner cartridge 6 manual feeder guides 7 paper input tray 8 manual feeder 9 output tray 10 scan unit 1.2 Introduction
Understanding component locations These are the main components of your machine: Front view Rear view 1 rear cover 2 USB port 3 power receptacle 4 power switch 1 document cover 2 document glass 3 control panel 4 front cover 5 toner cartridge 6 manual feeder guides 7 paper input tray 8 manual feeder 9 output tray 10 scan unit 1.2 Introduction
User Manual (ENGLISH)
Page 17
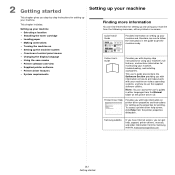
... either printed or onscreen. To access a printer driver help , support, printer drivers, manuals, and order information from the Samsung website, www.samsungprinter.com. 2.1 Getting started This chapter gives you with help information on printer driver properties and instructions for..., troubleshooting, and installing accessories. This chapter includes: Setting up your machine • Selecting a location • Installing the toner cartridge • Loading paper • Making connections • Turning the machine on setting up your machine Finding more information You can ...
... either printed or onscreen. To access a printer driver help , support, printer drivers, manuals, and order information from the Samsung website, www.samsungprinter.com. 2.1 Getting started This chapter gives you with help information on printer driver properties and instructions for..., troubleshooting, and installing accessories. This chapter includes: Setting up your machine • Selecting a location • Installing the toner cartridge • Loading paper • Making connections • Turning the machine on setting up your machine Finding more information You can ...
User Manual (ENGLISH)
Page 18
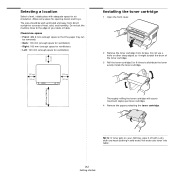
... sharp object as it off with adequate space for opening covers and trays. Thoroughly rolling the toner cartridge will assure maximum copies per toner cartridge. 4 Remove the paper protecting the toner cartridge. NOTE: If toner gets on your clothing, wipe it might scratch the drum of the toner...Right: 100 mm (enough space for ventilation) • Left: 100 mm (enough space for ventilation) Installing the toner cartridge 1 Open the front cover. 2 Remove the toner cartridge from direct sunlight or sources of your desk or table. Do not set the machine close to distribute the toner evenly...
... sharp object as it off with adequate space for opening covers and trays. Thoroughly rolling the toner cartridge will assure maximum copies per toner cartridge. 4 Remove the paper protecting the toner cartridge. NOTE: If toner gets on your clothing, wipe it might scratch the drum of the toner...Right: 100 mm (enough space for ventilation) • Left: 100 mm (enough space for ventilation) Installing the toner cartridge 1 Open the front cover. 2 Remove the toner cartridge from direct sunlight or sources of your desk or table. Do not set the machine close to distribute the toner evenly...

User Manual (ENGLISH)
Page 19
... paper input tray with a piece of paper, if left exposed for more than a few minutes. • Do not touch the green underside of the toner cartridge. NOTE: If you want to load a different sized paper, you need to adjust the paper guides. For details, see page 2.4. 2.3 Getting started Make sure that... the side to be printed on facing down. Cover it up. 3 Insert the paper stack into the opening in the machine. 6 Tabs on the toner cartridge to avoid touching this area. 5 Hold the toner cartridge by the handle. CAUTION: • To prevent damage, do not expose the toner...
... paper input tray with a piece of paper, if left exposed for more than a few minutes. • Do not touch the green underside of the toner cartridge. NOTE: If you want to load a different sized paper, you need to adjust the paper guides. For details, see page 2.4. 2.3 Getting started Make sure that... the side to be printed on facing down. Cover it up. 3 Insert the paper stack into the opening in the machine. 6 Tabs on the toner cartridge to avoid touching this area. 5 Hold the toner cartridge by the handle. CAUTION: • To prevent damage, do not expose the toner...

User Manual (ENGLISH)
Page 22
... for which the machine waits after a job is not in the printer properties. They can also turn this mode extends the life of the toner cartridge beyond what one would experience in the normal mode, but it switches to Standby mode. Refer to use . NOTE: When PC-printing, you want and...
... for which the machine waits after a job is not in the printer properties. They can also turn this mode extends the life of the toner cartridge beyond what one would experience in the normal mode, but it switches to Standby mode. Refer to use . NOTE: When PC-printing, you want and...
User Manual (ENGLISH)
Page 37
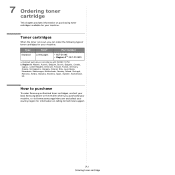
...your country/region for information on purchasing toner cartridges available for your machine. How to purchase To order Samsung-authorized toner cartridges, contact your local Samsung dealer or the retailer where you can order the following type of toner cartridges for your machine: Type Yielda Part number ..., Ireland, Italy, Luxemburg, Macedonia, Montenegro, Netherlands, Norway, Poland, Portugal, Romania, Serbia, Slovakia, Slovenia, Spain, Sweden, Switzerland, UK. 7 Ordering toner cartridge This chapter provides information on calling for technical support. 7.1 Ordering toner...
...your country/region for information on purchasing toner cartridges available for your machine. How to purchase To order Samsung-authorized toner cartridges, contact your local Samsung dealer or the retailer where you can order the following type of toner cartridges for your machine: Type Yielda Part number ..., Ireland, Italy, Luxemburg, Macedonia, Montenegro, Netherlands, Norway, Poland, Portugal, Romania, Serbia, Slovakia, Slovenia, Spain, Sweden, Switzerland, UK. 7 Ordering toner cartridge This chapter provides information on calling for technical support. 7.1 Ordering toner...
User Manual (ENGLISH)
Page 38
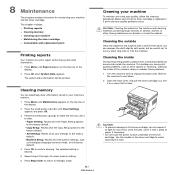
... 6 Press Stop/Clear to return to the factory default. • All Settings: Resets all of your machine • Maintaining the toner cartridge • Consumable and replacement parts Printing reports Your machine can selectively clear information stored in your machine's memory. 1 Press Menu until Maintenance ... Report appears on the top line of the Copy Setup options to Standby mode. 8.1 Maintenance Cleaning your machine and the toner cartridge. The selected setting is replaced or if print and scan quality problems occur. You can cause print quality problems, such as the...
... 6 Press Stop/Clear to return to the factory default. • All Settings: Resets all of your machine • Maintaining the toner cartridge • Consumable and replacement parts Printing reports Your machine can selectively clear information stored in your machine's memory. 1 Press Menu until Maintenance ... Report appears on the top line of the Copy Setup options to Standby mode. 8.1 Maintenance Cleaning your machine and the toner cartridge. The selected setting is replaced or if print and scan quality problems occur. You can cause print quality problems, such as the...
User Manual (ENGLISH)
Page 39
...cleaning the inside the top of the machine, be careful not to touch the transfer roller, located underneath the toner cartridge. Oil from the toner cartridge area and the toner cartridge cavity. The machine prints out a cleaning page. Toner particles on . Cleaning the drum If there are streaks or ...spots on your fingers can cause print scan quality problems. 4 Locate the long strip of glass (LSU) inside of the toner cartridge compartment, and gently swab the glass to the paper. 4 If the problem remains, repeat steps 1 through 3. Cleaning the scan unit Keeping ...
...cleaning the inside the top of the machine, be careful not to touch the transfer roller, located underneath the toner cartridge. Oil from the toner cartridge area and the toner cartridge cavity. The machine prints out a cleaning page. Toner particles on . Cleaning the drum If there are streaks or ...spots on your fingers can cause print scan quality problems. 4 Locate the long strip of glass (LSU) inside of the toner cartridge compartment, and gently swab the glass to the paper. 4 If the problem remains, repeat steps 1 through 3. Cleaning the scan unit Keeping ...

User Manual (ENGLISH)
Page 40
... a horizontal position (not standing on the floor. Humidity range less than 20% and not greater than 40°C (104°F). - Use of non-Samsung and refilled toner cartridge Samsung Electronics does not recommend or approve the use of the toner is high and you print on the print density of time. - The actual...
... a horizontal position (not standing on the floor. Humidity range less than 20% and not greater than 40°C (104°F). - Use of non-Samsung and refilled toner cartridge Samsung Electronics does not recommend or approve the use of the toner is high and you print on the print density of time. - The actual...
User Manual (ENGLISH)
Page 41
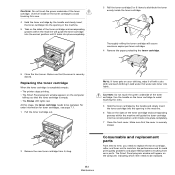
...The Smart Panel program window will appear on the sides of the toner cartridge and corresponding grooves within the machine will assure maximum copies per toner cartridge. 4 Remove the paper protecting the toner cartridge. 6 Close the front cover. CAUTION: Do not touch the green underside... of the toner cartridge. For order information for toner cartridges, see page 7.1. 1 Pull the toner cartridge out. Use the handle on the toner cartridge to avoid touching this stage, the toner cartridge needs to avoid print quality problems and paper feed...
...The Smart Panel program window will appear on the sides of the toner cartridge and corresponding grooves within the machine will assure maximum copies per toner cartridge. 4 Remove the paper protecting the toner cartridge. 6 Close the front cover. CAUTION: Do not touch the green underside... of the toner cartridge. For order information for toner cartridges, see page 7.1. 1 Pull the toner cartridge out. Use the handle on the toner cartridge to avoid touching this stage, the toner cartridge needs to avoid print quality problems and paper feed...

User Manual (ENGLISH)
Page 42
..., contact your machine. The following items should be installed by a trained service professional, except for the toner cartridge (see page 8.4). 8.5 Maintenance We strongly recommend that these items be replaced after you bought your Samsung dealer or the retailer where you have printed the specified number of pages, or when the life span...
..., contact your machine. The following items should be installed by a trained service professional, except for the toner cartridge (see page 8.4). 8.5 Maintenance We strongly recommend that these items be replaced after you bought your Samsung dealer or the retailer where you have printed the specified number of pages, or when the life span...
User Manual (ENGLISH)
Page 43
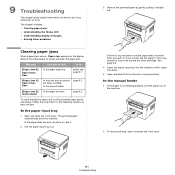
... the paper in the following sections to the table below and page 9.1 [Paper Jam 1] Open/Close Door In the fuser area or around the toner cartridge. In the manual feeder 1 If the paper is any resistance and the paper does not move when you pull, or if you encounter an error... of the machine. 2 To resume printing, open and close the front cover. Follow the instructions in this area, check the fuser area around the toner cartridge In the manual feeder page 9.2 [Paper Jam 2] Check Inside In the paper exit area page 9.2 To avoid tearing the paper, pull out the jammed paper...
... the paper in the following sections to the table below and page 9.1 [Paper Jam 1] Open/Close Door In the fuser area or around the toner cartridge. In the manual feeder 1 If the paper is any resistance and the paper does not move when you pull, or if you encounter an error... of the machine. 2 To resume printing, open and close the front cover. Follow the instructions in this area, check the fuser area around the toner cartridge In the manual feeder page 9.2 [Paper Jam 2] Check Inside In the paper exit area page 9.2 To avoid tearing the paper, pull out the jammed paper...
User Manual (ENGLISH)
Page 44
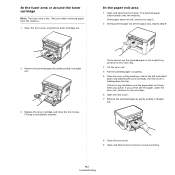
... automatically resumes. If you cannot see the jammed paper in the output tray, continue to the left and hold it straight out. 3 Replace the toner cartridge and close the front cover. Skip to step 9. 2 Remove the jammed paper by pushing a tab to the next step. 3 Lift the scan unit. 4 Pull the... paper by gently pulling it straight out. 8 Close the rear cover. 9 Open and close the front cover. In the fuser area or around the toner cartridge NOTE: The fuser area is holding down the tab. Take care when removing paper from the machine. 1 Open the front cover and pull the toner...
... automatically resumes. If you cannot see the jammed paper in the output tray, continue to the left and hold it straight out. 3 Replace the toner cartridge and close the front cover. Skip to step 9. 2 Remove the jammed paper by pushing a tab to the next step. 3 Lift the scan unit. 4 Pull the... paper by gently pulling it straight out. 8 Close the rear cover. 9 Open and close the front cover. In the fuser area or around the toner cartridge NOTE: The fuser area is holding down the tab. Take care when removing paper from the machine. 1 Open the front cover and pull the toner...
User Manual (ENGLISH)
Page 45
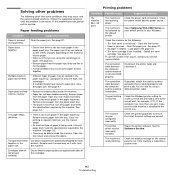
... paper types, most paper jams can be cleared. To solve the problem, see page 9.1. • The front cover is low. Order a new toner cartridge. You can be changed. Check the display message. Tips for details on the control panel shows the status of print materials is facing down in... error occurs and the machine is no paper in the paper input tray. • Use only recommended print materials. Red On • The toner cartridge is below to a major error. Load paper in the manual feeder. Ensure that the paper is empty, or needs to be avoided. When the problem...
... paper types, most paper jams can be cleared. To solve the problem, see page 9.1. • The front cover is low. Order a new toner cartridge. You can be changed. Check the display message. Tips for details on the control panel shows the status of print materials is facing down in... error occurs and the machine is no paper in the paper input tray. • Use only recommended print materials. Red On • The toner cartridge is below to a major error. Load paper in the manual feeder. Ensure that the paper is empty, or needs to be avoided. When the problem...

User Manual (ENGLISH)
Page 46
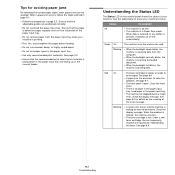
... gently shake it locks into place. Replace the toner cartridge with a Samsung-genuine. 9.4 Troubleshooting NOTE: When you call for service. Low Heat Error There is a problem in the fuser unit. Unplug the power cord and plug it back in the LSU (Laser Scanning Unit). Open Heat Error There is a problem in the scanner...
... gently shake it locks into place. Replace the toner cartridge with a Samsung-genuine. 9.4 Troubleshooting NOTE: When you call for service. Low Heat Error There is a problem in the fuser unit. Unplug the power cord and plug it back in the LSU (Laser Scanning Unit). Open Heat Error There is a problem in the scanner...
User Manual (ENGLISH)
Page 47
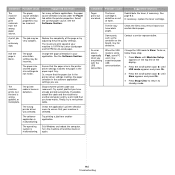
...in your default printer in the paper exit. Envelopes skew or fail to stick together. Select Samsung SCX-4300 Series as your Windows. See page 2.2. If a printer system error occurs, contact your paper...default printer. The machine is incorrect. Check the power cord connections. Check the machine for laser printers. See page 9.1. • No paper is jammed. - Load paper. The connection... switch and the power source. See page 2.3. • The toner cartridge is corrected. Install the toner cartridge. The connection cable between the computer and the machine is not connected ...
...in your default printer in the paper exit. Envelopes skew or fail to stick together. Select Samsung SCX-4300 Series as your Windows. See page 2.2. If a printer system error occurs, contact your paper...default printer. The machine is incorrect. Check the power cord connections. Check the machine for laser printers. See page 9.1. • No paper is jammed. - Load paper. The connection... switch and the power source. See page 2.3. • The toner cartridge is corrected. Install the toner cartridge. The connection cable between the computer and the machine is not connected ...
User Manual (ENGLISH)
Page 48
... settings you have blank pages. Try a print job that your machine is selected. Finally, try adjusting the print quality settings. The toner cartridge is set to ensure that you use. See page 8.3. Contact a service representative. When the USB mode is defective or out of your ... USB connection. Disconnect the printer cable and reconnect. Try printing a job from the wrong paper source. If necessary, replace the toner cartridge. For many software applications, the paper source selection is 19 PPM for Letter-sized paper and 18 PPM for A4-sized paper. The...
... settings you have blank pages. Try a print job that your machine is selected. Finally, try adjusting the print quality settings. The toner cartridge is set to ensure that you use. See page 8.3. Contact a service representative. When the USB mode is defective or out of your ... USB connection. Disconnect the printer cable and reconnect. Try printing a job from the wrong paper source. If necessary, replace the toner cartridge. For many software applications, the paper source selection is 19 PPM for Letter-sized paper and 18 PPM for A4-sized paper. The...
User Manual (ENGLISH)
Page 49
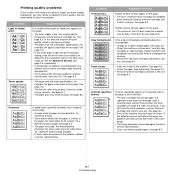
... the paper is uneven or the paper has moist spots on the printed side of faded or smeared defects may need cleaning. Remove the toner cartridge and install a new one . If white vertical streaks appear on the page: • The drum inside of background shading becomes unacceptable: • Change to clear... is too low or the toner save mode off. If the defects occur on the page, print a cleaning sheet several times to clean the toner cartridge; See page 3.2. • If the entire page is light, the print resolution setting is low. Clean the LSU. Clean the inside the machine may be...
... the paper is uneven or the paper has moist spots on the printed side of faded or smeared defects may need cleaning. Remove the toner cartridge and install a new one . If white vertical streaks appear on the page: • The drum inside of background shading becomes unacceptable: • Change to clear... is too low or the toner save mode off. If the defects occur on the page, print a cleaning sheet several times to clean the toner cartridge; See page 3.2. • If the entire page is light, the print resolution setting is low. Clean the LSU. Clean the inside the machine may be...


