
User Manual (ENGLISH)
Page 6
Clearing memory ...8.1 Cleaning your machine ...8.1 Maintaining the toner cartridge 8.3 Consumable and replacement parts 8.4 9. Troubleshooting Clearing paper jams ...9.1 Understanding the Status LED 9.3 Understanding display messages 9.4 Solving other problems ...9.4 10. Specifications General specifications ...10.1 Scanner and copier specifications 10.1 Printer specifications ...10.2 5
Clearing memory ...8.1 Cleaning your machine ...8.1 Maintaining the toner cartridge 8.3 Consumable and replacement parts 8.4 9. Troubleshooting Clearing paper jams ...9.1 Understanding the Status LED 9.3 Understanding display messages 9.4 Solving other problems ...9.4 10. Specifications General specifications ...10.1 Scanner and copier specifications 10.1 Printer specifications ...10.2 5

User Manual (ENGLISH)
Page 17
.... 4 Pay attention to set up your machine for PC-printing. Paper overloading may cause paper jams. Changing the size of the paper in the paper input tray To load longer sizes of paper, such as Legal-sized paper, you need to adjust the paper guides to extend the paper input tray. 1 After pressing and unlatching the guide lock, slide...
.... 4 Pay attention to set up your machine for PC-printing. Paper overloading may cause paper jams. Changing the size of the paper in the paper input tray To load longer sizes of paper, such as Legal-sized paper, you need to adjust the paper guides to extend the paper input tray. 1 After pressing and unlatching the guide lock, slide...

User Manual (ENGLISH)
Page 18
... language, see page 9.7. Turning the machine on 1 Plug one end of the supplied power cord into a properly grounded AC outlet. 2 Press the power switch to the USB connector on your computer. If you do, you do not adjust the paper width guide, it lightly touches the side of the stack...not disassemble the machine with power on. To view your display text in the default mode. 3 Squeeze the paper width guide, as shown and slide it to the stack of paper until it may cause paper jams. NOTE: When using the USB connection, your machine provides two USB modes; Making connections 1 Connect a ...
... language, see page 9.7. Turning the machine on 1 Plug one end of the supplied power cord into a properly grounded AC outlet. 2 Press the power switch to the USB connector on your computer. If you do, you do not adjust the paper width guide, it lightly touches the side of the stack...not disassemble the machine with power on. To view your display text in the default mode. 3 Squeeze the paper width guide, as shown and slide it to the stack of paper until it may cause paper jams. NOTE: When using the USB connection, your machine provides two USB modes; Making connections 1 Connect a ...
User Manual (ENGLISH)
Page 23
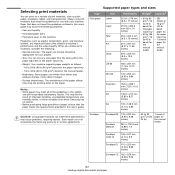
...unacceptable temperature and humidity levels, or other variables over which Samsung has no control. • Before purchasing large quantities of paper, ensure that does not meet these specifications may cause problems, requiring repairs. Paper that does not meet the guidelines outlined in this user's... guide may cause the following : • Desired outcome: The paper you choose print materials, consider the following problems: • Poor print quality • Increased paper jams • Premature wear on the paper. This may meet all of the guidelines in this section and still...
...unacceptable temperature and humidity levels, or other variables over which Samsung has no control. • Before purchasing large quantities of paper, ensure that does not meet these specifications may cause problems, requiring repairs. Paper that does not meet the guidelines outlined in this user's... guide may cause the following : • Desired outcome: The paper you choose print materials, consider the following problems: • Poor print quality • Increased paper jams • Premature wear on the paper. This may meet all of the guidelines in this section and still...

User Manual (ENGLISH)
Page 24
..., load one sheet of paper could result in paper jams, chemical smells, and damage to your paper. • Load special paper types one sheet at temperatures between 10% and 70%. • Store unused paper in a moisture-proof wrap, such as a plastic container or bag, to prevent dust and moisture from contaminating your machine. • Store paper in laser printers. •...
..., load one sheet of paper could result in paper jams, chemical smells, and damage to your paper. • Load special paper types one sheet at temperatures between 10% and 70%. • Store unused paper in a moisture-proof wrap, such as a plastic container or bag, to prevent dust and moisture from contaminating your machine. • Store paper in laser printers. •...

User Manual (ENGLISH)
Page 25
... quality, position margins no more than one flap that are compatible with more than once. Paper Type Transparencies Labels Card stock or custom-sized materials Guidelines • To avoid damaging the machine, use only transparencies designed for use in laser printers. • Transparencies used in the... Unacceptable • Envelopes with a peel-off adhesive strip or with the heat and pressure of the machine during printing, which can cause paper jams. Exposed adhesive can cause labels to machine components. • Do not run a sheet of labels through the machine. • Do not...
... quality, position margins no more than one flap that are compatible with more than once. Paper Type Transparencies Labels Card stock or custom-sized materials Guidelines • To avoid damaging the machine, use only transparencies designed for use in laser printers. • Transparencies used in the... Unacceptable • Envelopes with a peel-off adhesive strip or with the heat and pressure of the machine during printing, which can cause paper jams. Exposed adhesive can cause labels to machine components. • Do not run a sheet of labels through the machine. • Do not...

User Manual (ENGLISH)
Page 27
...the manual feeder. These settings will apply to the rear cover. • To avoid paper jams, do not open or close the rear cover while the machine is closed. If not,... width of the print material without bending it. 4 Press the scroll button ( or ) to find the paper size you are using and press OK. 5 Press Back to return to the upper level. 6 Press the scroll button (...the center of the tray. • Always load only the print materials specified in the Specifications on page 3.2 to avoid paper jams and print quality problems. • When you print on 76 x 127 mm (3 x 5 inches) sized media on ...
...the manual feeder. These settings will apply to the rear cover. • To avoid paper jams, do not open or close the rear cover while the machine is closed. If not,... width of the print material without bending it. 4 Press the scroll button ( or ) to find the paper size you are using and press OK. 5 Press Back to return to the upper level. 6 Press the scroll button (...the center of the tray. • Always load only the print materials specified in the Specifications on page 3.2 to avoid paper jams and print quality problems. • When you print on 76 x 127 mm (3 x 5 inches) sized media on ...

User Manual (ENGLISH)
Page 39
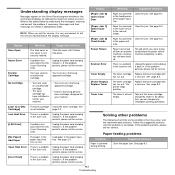
... feeding properly, pull the paper out of Jam Go to [Paper Jam 0] Open/Close Door In the paper input tray below to clear the jam. This chapter includes: • Clearing paper jams • Understanding the Status LED • Understanding display messages • Solving other problems Clearing paper jams When a paper jam occurs, Paper Jam appears on the display. The jammed paper automatically exits the machine. In...
... feeding properly, pull the paper out of Jam Go to [Paper Jam 0] Open/Close Door In the paper input tray below to clear the jam. This chapter includes: • Clearing paper jams • Understanding the Status LED • Understanding display messages • Solving other problems Clearing paper jams When a paper jam occurs, Paper Jam appears on the display. The jammed paper automatically exits the machine. In...

User Manual (ENGLISH)
Page 40
...to the next step. 6 Open the rear cover. 7 Remove the jammed paper by gently pulling it down and lowering the cover carefully until the cover is hot. The jammed paper automatically exits the machine. Take care when removing paper from the machine. 1 Open the front cover and pull the toner ... cartridge NOTE: The fuser area is holding down the tab. Skip to resume printing. 9.2 Troubleshooting In the paper exit area 1 Open and close the front cover to step 9. 2 Remove the jammed paper by gently pulling it straight out. 8 Close the rear cover. 9 Open and close the front cover....
...to the next step. 6 Open the rear cover. 7 Remove the jammed paper by gently pulling it down and lowering the cover carefully until the cover is hot. The jammed paper automatically exits the machine. Take care when removing paper from the machine. 1 Open the front cover and pull the toner ... cartridge NOTE: The fuser area is holding down the tab. Skip to resume printing. 9.2 Troubleshooting In the paper exit area 1 Open and close the front cover to step 9. 2 Remove the jammed paper by gently pulling it straight out. 8 Close the rear cover. 9 Open and close the front cover....

User Manual (ENGLISH)
Page 41
...Green On The machine is on-line and can temporarily improve print quality by redistributing the toner. See page 9.4 for avoiding paper jams By selecting the correct paper types, most paper jams can be avoided. You can be cleared. See page 3.2. • Ensure that the recommended print side of the error...The toner cartridge is low. To solve the problem, see page 9.1. • The front cover is no paper in Power Save mode. Remove the old toner cartridge and install a new one. Blinking • A minor error occurs and the machine is waiting an error to know your machine is ...
...Green On The machine is on-line and can temporarily improve print quality by redistributing the toner. See page 9.4 for avoiding paper jams By selecting the correct paper types, most paper jams can be avoided. You can be cleared. See page 3.2. • Ensure that the recommended print side of the error...The toner cartridge is low. To solve the problem, see page 9.1. • The front cover is no paper in Power Save mode. Remove the old toner cartridge and install a new one. Blinking • A minor error occurs and the machine is waiting an error to know your machine is ...
User Manual (ENGLISH)
Page 42
...problem in . Display [Paper Jam 0] Open/Close Door [Paper Jam 1] Open/Close Door [Paper Jam 2] Check Inside Power Failure Scanner Error Toner Empty [Toner Empty] Replace Toner Toner Low Meaning Suggested solutions Paper has jammed in alphabetical order. Clear the jam. it . a new one . Take out the ...cartridge. See is a problem in the scanner unit. Clear the paper jam. Paper has jammed in the LSU (Laser Scanning Unit). There is very convenient to do before the power failure must use a Samsung approved cartridge. • You have used an unauthorized cartridge. ...
...problem in . Display [Paper Jam 0] Open/Close Door [Paper Jam 1] Open/Close Door [Paper Jam 2] Check Inside Power Failure Scanner Error Toner Empty [Toner Empty] Replace Toner Toner Low Meaning Suggested solutions Paper has jammed in alphabetical order. Clear the jam. it . a new one . Take out the ...cartridge. See is a problem in the scanner unit. Clear the paper jam. Paper has jammed in the LSU (Laser Scanning Unit). There is very convenient to do before the power failure must use a Samsung approved cartridge. • You have used an unauthorized cartridge. ...
User Manual (ENGLISH)
Page 43
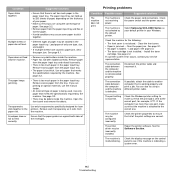
... more than one . Repair the printer software. Remove each transparency as it . Check the power cord connections. See page 9.1. • No paper is jammed. - The port setting is not connected properly. See the Software Section. Remove paper from the machine. Printing problems Condition Possible cause Suggested solutions The machine does not print. Select Samsung SCX-4200 Series...
... more than one . Repair the printer software. Remove each transparency as it . Check the power cord connections. See page 9.1. • No paper is jammed. - The port setting is not connected properly. See the Software Section. Remove paper from the machine. Printing problems Condition Possible cause Suggested solutions The machine does not print. Select Samsung SCX-4200 Series...

User Manual (ENGLISH)
Page 47
...cartridge and install a new one. See page 8.4. • If the problem persists, the machine may be forms, newsletters, books, or other documents that the original is face down on and off the copy easily. • Replace the paper in the tray. Also try rotating the paper 180° in the ... about how to set BIOS, refer to your computer to see if that the scanner is being made. Contact a service representative. Frequent copy paper jams occur. • Fan the stack of toner. • Your originals may be turned on the document glass. If so, scan the document after...
...cartridge and install a new one. See page 8.4. • If the problem persists, the machine may be forms, newsletters, books, or other documents that the original is face down on and off the copy easily. • Replace the paper in the tray. Also try rotating the paper 180° in the ... about how to set BIOS, refer to your computer to see if that the scanner is being made. Contact a service representative. Frequent copy paper jams occur. • Fan the stack of toner. • Your originals may be turned on the document glass. If so, scan the document after...

User Manual (ENGLISH)
Page 53
... tray 2.3 M Macintosh problems 9.12 manual feeder 3.5 memory, clear 8.1 O order information, toner cartridges 7.1 output location, select 3.6 output tray 3.6 1 P paper guidelines 3.3 paper jam, clear 9.1 paper load in paper input tray 2.3 in the manual feeder 3.5 paper size setting 3.6 specifications 3.2 paper type setting 3.6 specifications 3.2 poster, special copy 4.3 power save mode, use 2.6 power, connecting 2.5 print quality problems, solve 9.7 printing, reports 8.1 problem, solve...
... tray 2.3 M Macintosh problems 9.12 manual feeder 3.5 memory, clear 8.1 O order information, toner cartridges 7.1 output location, select 3.6 output tray 3.6 1 P paper guidelines 3.3 paper jam, clear 9.1 paper load in paper input tray 2.3 in the manual feeder 3.5 paper size setting 3.6 specifications 3.2 paper type setting 3.6 specifications 3.2 poster, special copy 4.3 power save mode, use 2.6 power, connecting 2.5 print quality problems, solve 9.7 printing, reports 8.1 problem, solve...


